

Tessa’s Recipe Rundown
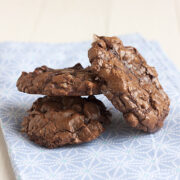
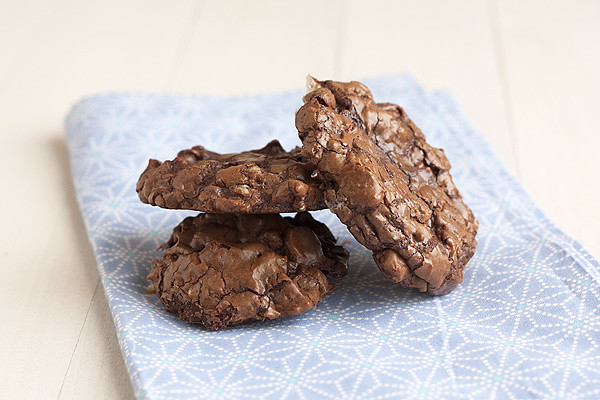
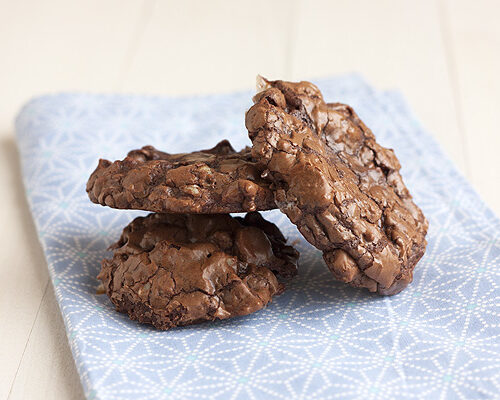
Taste: Sweet, nutty, ultra-chocolatey. Texture: The cookies are rich and fudgy while the nuts are crunchy and the marshmallows are chewy. Ease: Pretty easy. Appearance: The tops of these cookies are crackled and shiny while the inside is full of nuts, marshmallows, and chocolate chips. Pros: Wonderfully tasty cookie recipe, people will ask for the recipe! Cons: None. Would I make this again? Yes.This post may contain affiliate links. Read our disclosure policy.
Rocky Road Cookies are sweet, nutty, and ultra chocolatey. This recipe will impress!
Who didn’t love rocky road ice cream growing up? I’m not usually a big fan of nuts (I usually prefer my sweets sans nuts) but with the rich chocolate and chewy marshmallow, nuts are the perfect compliment. It’s probably been years since I’ve had a rocky road confection, something I hadn’t realized until I stumbled across Ezra Pound Cake’s post for these bad boys. This lack of rocky road in my life needed to be remedied, and what better way to do it than in cookie form? These cookies are magical, way better than I expected them to be. My family loved them. Yours probably will, too.
Rocky Road Cookies
Ingredients
- 2 cups pecans or walnuts, or a combination of both
- 6 tablespoons unsalted butter
- 8 ounces bittersweet or semisweet chocolate chips
- 3 ounces unsweetened chocolate, chopped
- 1/3 cup all-purpose flour
- 1/4 teaspoon baking powder
- 1/4 teaspoon salt
- 3 large eggs
- 1 cup sugar
- 1 tablespoon vanilla extract
- 1 1/2 cups milk chocolate chips
- 1 cup mini marshmallows
Instructions
- Preheat oven to 350 degrees. Line baking sheets with parchment paper and spray the parchment with cooking spray.
- Place the nuts on a baking sheet and toast for 7 minutes. Let cool completely. Chop nuts into pieces the same size as your milk chocolate chips.
- Place the butter, bittersweet chocolate, and unsweetened chocolate in a microwave-safe bowl. Microwave for 30 seconds, stir, and repeat until chocolate is melted and mixture is smooth.
- Sift the flour, baking powder, and salt into a small bowl.
- Using a mixer, beat the eggs and sugar on medium speed for about 3 minutes. Add vanilla and melted chocolate mixture, continue beating for another 2 minutes. Scrape down the sides of the bowl as necessary. Add flour mixture, mix until just incorporated. Fold in the toasted and chopped nuts, milk chocolate chips, and marshmallows. Chill dough in fridge for thirty minutes, or until firm enough to hold its shape.
- Using a 1 3/4-inch diameter scoop drop spoonfuls of dough onto prepared baking sheets. With the bottom of a measuring cup sprayed with cooking spray, gently flatten the dough mounds.
- Bake for 10-12 minutes, or until the tops crack and look shiny. Cool for 10 minutes before removing them from the baking sheets. Store in an airtight container at room temperature for up to 3 days.


Can this dough be frozen? Any changes to baking directions for the frozen dough?
Hi Erin! Sure 🙂 Follow the instructions listed in our How to Freeze Cookie Dough (& bake from frozen) article. Enjoy your cookies!
Are these chewy in the middle?
Is the 1/3 cup all purpose flour amount correct?
The recipe directions calls for 1/3 c. of flour. Is this amount correct?
Yes, it is 🙂
Hi Tessa! I made these last week. They were supposed to go to work with my boyfriend but they were so good we ate all of them, so I had to make another batch. They are so decadent! A real treat for any chocolate lover.
I don't know if you found this to be the case, but the marshmallows in mine oozed out the sides a little but and created a cooked sugary crust around the edges of some of them. Didn't hurt the taste at all, but made them a little sticky to handle.
I'll be posting about them this week and I'll make sure to link back to you. Thanks for sharing!
Gary
Gary,
Mine did that, too. On the first dozen, I used the measuring cup with Pam to flatten them out a little and they oozed out, too. But, the rest of the time, I just used my fingers and tried flattening them out. It worked much better! They held their shape well and didn't ooze too bad.
I converted mine to Gluten Free (my brother and I both have Celiac Disease) and just used the Better Batter Gluten Free flour and they turned out wonderful!! I'm going to try to freeze mine until we go on vacation, so that's my next concern. 🙂 Otherwise, these are AWESOME!!!
Thanks for this awesome recipe!