


Tessa’s Recipe Rundown
Taste: A little spicy, fresh, and not at all like cauliflower. Texture: The cauliflower crust is thin and crisp at the edges but softer in the middle, like most pizza crusts. You wouldn’t know it was cauliflower unless someone told you. Ease: Easier than yeast and flour pizza dough! Also, if you use some meat from a rotisserie chicken this recipe is even faster. Appearance: Looks just like normal pizza! Pros: Easy enough for a weeknight meal and much healthier. Cons: Cauliflower pizza crust doesn’t hold up for leftovers like a regular pizza. Also, cauliflower doesn’t smell great when it’s cooking. Would I make this again? Absolutely!!This post may contain affiliate links. Read our disclosure policy.

I’ve seen this cauliflower pizza crust idea floating around the internet for a while now. It seems bizarre. Although they sound the same, cauliflower and flour have nothing in common. How could one replace the other??
Turns out, my suspicions were completely wrong. I am totally sold on cauliflower pizza crust! Especially if you pair it with flavorful toppings, like Thai Chicken. Then it’s almost too good to be true. I think my next sneaky healthy recipe adventure will have to do with using tofu to replace cheese. Sounds adventurous to me!
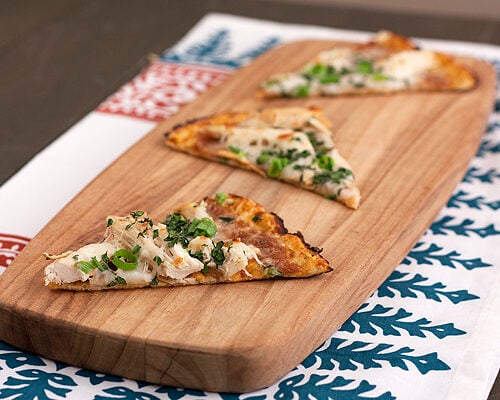
Cauliflower Crust Thai Chicken Pizza
I am totally sold on cauliflower pizza crust! Especially if you pair it with flavorful toppings, like Thai Chicken. Then it’s almost too good to be true.
Ingredients
For the crust:
- 2 cups firmly packed shredded cauliflower from about half a large head (*see note)
- 1 large egg
- 1/4 cup finely shredded mozzarella
- 1 clove garlic, minced
- 1 tablespoon (or more) Sriracha
- 1/4 teaspoon salt
- 2 teaspoons olive oil
For the topping:
- 1 (7-ounce) jar peanut sauce (*see note)
- 2 tablespoons peanut butter
- 1 cup cooked shredded chicken (from about 1 large breast)
- 1/2 cup finely shredded mozzarella
- 4 green onions, green parts chopped
- 2 tablespoons chopped fresh cilantro
Instructions
For the crust:
- Preheat oven to 450°F. Spray a large baking sheet or pizza pan with nonstick cooking spray. Place shredded cauliflower in a large microwave-safe bowl. Microwave for 8 minutes. Let cool.
- Add egg, mozzarella, garlic, sriarcha, and salt to the cauliflower, stirring to combine. Pat the mixture into a 12-inch round on prepared pan. Brush with olive oil.
- Bake for 12 to 15 minutes, or until golden. Remove crust from oven and adjust oven setting to broil.
For the toppings:
- In a measuring cup or small bowl stir the peanut sauce with the peanut butter until combined. Spread sauce over pizza crust. Arrange chicken over crust. Sprinkle with cheese, green onions, and cilantro.
- Broil for 3 to 4 minutes, watching carefully, until cheese is melted and begins to brown. Cut into slices and serve immediately.
Show us!If you make this recipe, be sure to snap a picture and share it on Instagram with #handletheheat so we can all see!
Recipe Notes
*Note: Use the large holes on a box grater to shred the cauliflower into crumbles. Peanut sauce can be found in the Asian section of your grocery store.
Crust recipe adapted from Your Lighter Side via Recipe Girl
Topping recipe adapted from All Recipes
Topping recipe adapted from All Recipes


That is one tasty looking pizza! I will have to try the cauliflower crust!
Hey there, I was wondering if I can just shred pre-steamed cauliflower instead of warming some raw cauliflower up? It's just that i already have mine steamd, and i need to use it up quickly before it goes bad haha
It's a great idea, isn't it?? I can't believe it turns out so good. Even my 11 yr old will eat it and enjoys it too!
love the idea of thai flavors with the cauliflower crust. another reason i need a food processor!
Oooh – I've been wanting to try this crust! This looks so good!!
Fascinating…. I think I have to try this!
Can't wait to try this – I am trying to lose wait and add more veggies – cool idea!
I have been wanting to try cauliflower crust! Seems so light, crispy and airy! The flavors you got on this pizza are amazing, I love a good Thai inspired pizza! Beautiful, Tessa!
This looks amazing! I can't wait to make it. Thanks for this healthy recipe.
Charred and roasted cauliflower tastes fantastic, so it sounds good in a pizza crust.
Thai chicken pizza is one of our favorites, but I have never tried the cauliflower crust. I am officially intrigued and HAVE to try this on our next pizza night.
I love the idea of a cauliflower crust and I've been wanting to try it!