Dutch Crunch Bread Rolls - Handle the Heat
Filed Under: Bread | Savory

Dutch Crunch Bread Rolls

By Tessa Arias
  |  
May 22nd, 2015
4 from 3 votes
4 from 3 votes

Dutch Crunch Bread Rolls are the absolute CRUNCHIEST bread I've ever made! They are perfect for sandwiches and are surprisingly simple to make from scratch.

Yield: 6 rolls

Prep Time: 15 minutes

Cook: 25 minutes

Tessa's Recipe Rundown...

Taste: An ever so slightly sweet blank slate for any type of sandwich or even a smear of something deliciously spreadable. 
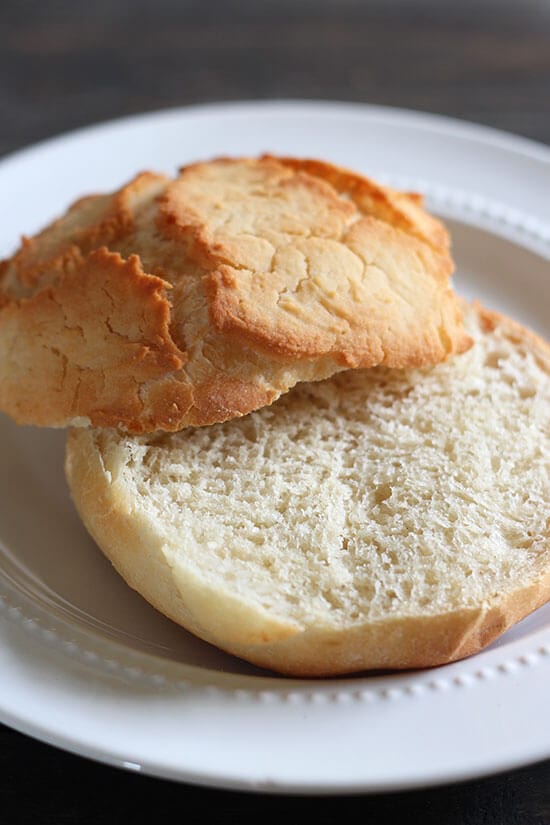
Texture: Obviously this is the best part. Unbelievably crunchy yet light, so you don't feel like you're going to scrape your gums just taking a bite. Perfection! Ease: Super simple, if not a little strange. The only inconvenient bit is that you'll need rice flour. I've included some extra pictures and tips above, as long as you follow the recipe as written these should turn out beautifully. Appearance: Intriguingly mouthwatering. I love how you can just see the crunch. Pros: Just like the bread at Ike's and in San Francisco, made right at home! Cons: None! Would I make this again? 1000% yes.

The CRUNCHIEST bread I have ever made!! This recipe is amazing!
Dutch Crunch Bread is popular in the Bay area and I first had it recently at the sandwich chain Ike’s and fell completely in LOVE. It is, of course, unbelievably crunchy but in a way that’s light and crackling so as not to scrape your gums or make it difficult to actually eat. It is also called Tiger bread, or tigerbrood or tigerbol in Netherlands and giraffe bread in the U.K. This is due to the spots and strips the are created by covering normal bread dough with a unique topping of yeast, oil, and gluten-free rice flour.

The CRUNCHIEST bread I have ever made!! This recipe is amazing!
This topping is what creates that crunchy exterior, so it’s super important to follow the ingredients and directions as they are written. The rice flour’s starchy and fine consistency paired with its complete lack of gluten is what causes the topping to develop into a crackled crunchy layer. Rice flour can be found at most American grocery stores in the baking aisle, often near the other gluten-free flours and products. I do not know of anything that can be substituted for the rice flour that provides the same effect, so if you want to make this recipe you may need to make a grocery store run!

Dutch Crunch Bread Topping
The texture of the topping is quite unique, so I made sure to include some photos so you know what it should look like. The mixture is kind of like a thick batter that inflates as you let it rest.

Dutch Crunch Bread Topping
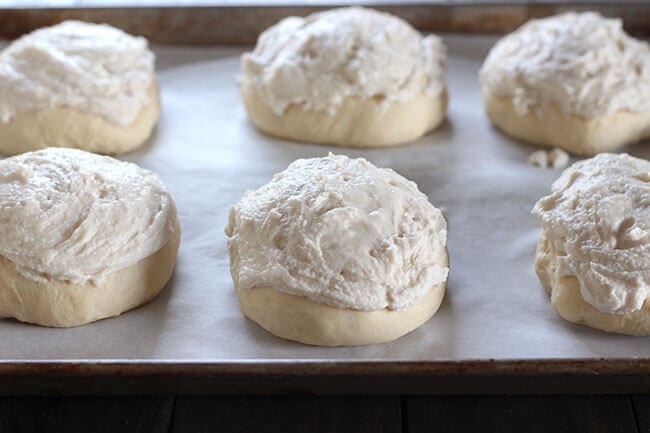
Then you simply spread it generously over the risen bread dough and watch it do its crazy thing in the oven!

4 from 3 votes

How to make
Dutch Crunch Bread Rolls

Yield: 6 rolls
Prep Time: 15 minutes
Cook Time: 25 minutes
Inactive Time 1 hour 35 minutes
Total Time: 2 hours 15 minutes
Dutch Crunch Bread Rolls are the absolute CRUNCHIEST bread I've ever made! They are perfect for sandwiches and are surprisingly simple to make from scratch.

Ingredients

For the rolls::

  • 1 package (2 1/4 teaspoons) instant yeast
  • 1/4 cup lukewarm water
  • 1 cup lukewarm milk
  • 1 tablespoon granulated sugar
  • 2 teaspoons vegetable oil
  • 3 cups (13.5 ounces) all-purpose flour
  • 1 1/2 teaspoons fine salt

For the topping::

  • 1 package (2 1/4 teaspoons) instant yeast
  • 3/4 cup lukewarm water
  • 1 tablespoon granulated sugar
  • 1 tablespoon vegetable oil
  • 1/4 teaspoon fine salt
  • 1 cup (5 ounces) rice flour*

Directions

For the rolls:

  1. In the bowl of an electric mixer combine yeast, water, milk, sugar, and oil. Gradually add in the flour and stir until moistened. Add in the salt. Fit the mixer with the dough hook attachment and mix on medium speed until the dough comes together in a smooth elastic ball, about 5 minutes. If the dough is unbearably sticky, add in more flour 1 tablespoon at a time. The dough can also be kneaded by hand.
  2. Transfer the dough to a lightly greased bowl and cover. Let rise in a warm place until doubled in size, about 1 hour.
  3. Turn the dough out onto a floured work surface and divide into six equal portions. Shape each portion into a tight ball and place on a parchment lined baking sheet. Cover and let rise while you prepare the topping.
  4. Make ahead: At this point the dough can be made ahead of time by covering tightly and refrigerating for up to 24 hours. Remove and let come to room temperature. If two fingers pressed into the dough leave indentations it’s ready.

For the topping:

  1. In a large bowl combine all the ingredients and let rest, covered, for 15 minutes, or until frothy.
  2. Make ahead: Store the topping in a covered but ventilated container in the fridge for up to a week. Let come to room temperature before using.
  3. Spread a generous layer of the topping all over the rolls, maintaining a thick coating. You should use almost all of the topping. Let rise uncovered for another 20 minutes.
  4. Meanwhile, preheat the oven to 400°F.
  5. Bake the rolls for 25 minutes, or until golden brown.

Recipe Notes

*Rice flour is a must for the topping in this recipe. It can be found in most grocery stores with other gluten-free flours and products.
You can also substitute active dry yeast for the instant yeast at a 1:1 ratio in this recipe. It must be proofed by combining it with the warm liquid ingredients in the dough for 5 minutes before proceeding.
Course : Side Dish
Cuisine : American


Tessa Arias
Author: Tessa Arias

I share trusted baking recipes your friends will LOVE alongside insights into the science of sweets. I'm a professionally trained chef, cookbook author, and cookie queen. I love to write about all things sweet, carb-y, and homemade. I live in Phoenix, Arizona (hence the blog name!)

Tessa Arias

About Tessa...

I share trusted baking recipes your friends will LOVE alongside insights into the science of sweets. I'm a professionally trained chef, cookbook author, and cookie queen. I love to write about all things sweet, carb-y, and homemade. I live in Phoenix, Arizona (hence the blog name!)

Find Tessa on  

Leave a Comment & Rating

Add a Review or Question

*Please select a rating to complete your comment.

Recipe Rating


  1. #
    Cindi — February 3, 2023 at 10:27 am

    Can I use sweet rice flour vs rice flour?

  2. #
    Jerry — May 29, 2021 at 7:36 pm

    While the initial dough was nice and springy, the dough flattened with the topping during the last 20 minute rest. Any clue on how to prevent it spreading out. All 6 rolls became one large roll.

    • #
      Tessa — June 1, 2021 at 3:28 pm

      Hmmm…it sounds like maybe you accidentally pushed too hard on the dough when adding the topping, which can deflate the dough, so I’d be careful when adding the topping next time. I’d recommend spreading out your dough balls a bit more as well to keep them from connecting. Hope that helps!

  3. #
    Kathy — August 15, 2020 at 11:16 pm

    I made this today! It was definitely interesting as I had never had this type of bread before. It reminded me a lot of Asian breads I’ve had before that have a crunchy top (except those are sweet, so every time I bit into these Dutch crunch breads I expected sweetness lol). I followed the recipe pretty closely, but I guess my rice flour (from an Asian grocery story) was different from yours because I did not get a thick topping mixture like pictured; it was pretty liquidy instead. I ended up putting in ¼-½ cup more rice flour. Otherwise, this recipe was really good! Even without the topping I think this is a solid bread recipe that results in super soft and springy rolls. I made shrimp burgers to pair with this and loved it a lot. The crunch from the topping enhanced the burgers a lot. I wrapped the leftovers in plastic wrap and I will have to see if they remain crunchy tomorrow

  4. #
    madonna — May 29, 2020 at 12:52 am

    can sweet rice flour be used for the topping in place of the rice flour?

  5. #
    Marianne — February 3, 2019 at 12:22 pm

    Can I use normal dry yeast instead of instant?

  6. #
    DONNA FLEURY — December 23, 2018 at 12:16 pm

    i can’t find the second asterisk. Am I just missing it?

  7. #
    Barb — September 4, 2018 at 11:49 am

    Can I double the recipe and make loaves of bread?

  8. #
    effie — June 2, 2018 at 11:35 am

    Hi, have you ever tried adding anything on top of the crunch? Like corse salt or “anything bagel” seasoning? Just wondering if this works… Thanks

  9. #
    Abigail — May 4, 2018 at 4:30 am

    These were lovely. One of the nicest tasty breads I’ve made considering the fact that the recipe calls for oil and not butter. I used 3/4 homemade rice flour and still had a little over a tablespoon left ( I was cautious next time I’m covering entire bread with it). Thanks for sharing Tessa, and yes will be baking them again.

  10. #
    Chris K — March 1, 2018 at 12:18 pm

    My topping was also too runny. Are the measurements right? I used organic brown rice flour.

  11. #
    Sheila Manica — December 17, 2017 at 11:53 pm

    Will a double recipe of tiger bread make 2 LOAVES of bread, and should I use AP flour or Bread flour ?? Please help, this will be for Christmas !!!! Thank You So Much and have a beautiful Holiday Season !!!!!

  12. #
    Diana — October 22, 2017 at 6:32 am

    Can I use brown rice flour instead?

  13. #
    Kathy Gonzalez — July 28, 2017 at 4:34 am

    Norma: Rica, deliciosa y fácil.
    Tessa: Wonderful bread. Thanks for the recipe.

  14. #
    Debbie — June 29, 2017 at 8:05 am

    Interesting recipe! I’m waiting for them to finish rising and looking forward to trying them. However, the topping turned out much runnier than your pictures indicate and I even added a bit more rice flour. I’m curious to see how they bake up; next time I might add even more flour.

  15. #
    Elisia — May 18, 2017 at 9:53 pm

    Hi, tijgerbrood is not normally made this way. But it looks intriguing to make it like you described it. Gonna try it out and check out the difference.

  16. #
    Kathy — May 10, 2017 at 7:40 am

    I plan on making these tonight for hamburgers. I was wondering if it would be OK to sprinkle some cheddar cheese on top before baking them…. or would doing that ruin the crackle top process?
    And thank you for posting such an interesting recipe to try!

  17. #
    Tracy W — May 1, 2017 at 10:41 pm

    I haven’t had dutch crunch in 12 years and it’s my favorite. Not a popular bread and I don’t know why!!! Trying!!!!

  18. #
    Lyn — April 14, 2017 at 1:05 pm

    These are fantastic!! I used 2 cups of my sourdough starter-reduced amount of milk and yeast and the dough is beautiful. I’ll be making these often 🙂

    • #
      Tessa — April 14, 2017 at 2:17 pm

      Yum!!

  19. #
    Brian — February 19, 2017 at 8:59 am

    Hello Tessa,

    I baked a batch of these wonderful and yummy rolls last weekend. While following the recipe everything came together perfectly. I baked the rolls on the center rack, I didn’t get them to brown in the suggested amount of time. Do I need to raise the rack up, so the rolls brown and crackle? I grew up in the SF Bay Area devouring my fair share of Dutch crunch and Sourdough. Dutch crunch is my most favorite bread for sandwiches and snacking on. I can’t get it where I live now, no one here has ever heard of it. Thank you Tessa for your time and your recipe.

    • #
      Tessa — February 23, 2017 at 8:47 pm

      Hi Brian, do you have an oven thermometer? I’d check and see if your oven was running at the correct temperature. Our last oven was always off by about 20°F, and our brand new oven says it’s preheated when it’s too cool so now I wait an extra 10 minutes. That might have been the problem!

  20. #
    Norma — November 9, 2016 at 4:31 am

    Se ve muy rico el pan, lástima q no hay traducción.

  21. #
    Linda — May 3, 2016 at 8:05 am

    Could you make 12 smaller rolls out of the batter rather than the 6 stated. They look like they would make yummy dinner rolls. Thanks.

    • #
      Tessa — May 4, 2016 at 10:16 am

      Of course! Just reduce the baking time and keep a careful eye on them 🙂

  22. #
    june — March 27, 2016 at 2:41 pm

    IT looks interesting got to try this out soon.

  23. #
    Didi — March 23, 2016 at 1:09 pm

    I love your commentary on the bread. More than the intriguing recipe, I find that your words literally compel me to make this bread. I’m exited to give it a try – thanks!

    • #
      Tessa — March 23, 2016 at 3:54 pm

      Thanks Didi!! Hope you love it 🙂

  24. #
    Marija — February 1, 2016 at 2:28 pm

    Hi. Made the bread today. It was very good. The top is crunchy but not overly so. The main part of the bun was nice and soft. Only thing I did was increase the flour for the bun part. You stated 3 cups but only 13 ounces. I read somewhere that a cup of flour should be 5 ounces. The 15 ounces of flour was just perfect. The dough was just a bit sticky after the extra flour but was perfect when I rolled them in the individual rolls after an hour & a half of proofing. Topping was interesting looking at first but when it got baked it looked awesome. I baked mine 5 extra minutes (my oven temp is different). Thanks for the great recipe.

    • #
      Tessa — February 2, 2016 at 6:18 pm

      Glad you made it work! Just as a tidbit, many brands of flour say 1 cup = 4.5 ounces, but it can vary by brand and cookbook. And if you live somewhere humid, more flour will be necessary. Enjoy!

  25. #
    Bernadette — January 20, 2016 at 3:25 am

    Hi! My topping was runny, but I followed the measurements. What did I do wrong? Thanks!

  26. #
    Linda — January 11, 2016 at 3:36 pm

    My topping was runny. What did I do wrong?

  27. #
    Diane — January 3, 2016 at 5:39 pm

    Just made tonight – the whole family loved it! Thanks for the recipe – no changes made and it was wonderful.

  28. #
    liz n — January 2, 2016 at 2:03 pm

    Just baked a batch of these rolls. I did have to add about five more teaspoons of flour while kneading, what with the dough being very, very sticky. They are wonderful!! We’re going to use the ones we haven’t already devoured for burgers tonight. This recipe is definitely going to become a staple around here!

  29. #
    Fiona — January 1, 2016 at 5:53 pm

    I’ve never heard anyone or any shop call it giraffe bread and I’m from the UK. We call it tiger bread.

    • #
      Charlotte Harrold — August 14, 2020 at 2:09 pm

      Fiona – UK – apparently a young lady (child) told Sainsbury’ that it was silly to call it Tiger bread, ‘cos it didn’t have stripes. It was more like a giraffe. I remember reading about it some years ago. So Sainsbury’s changed their name for it.

  30. #
    Outi — December 28, 2015 at 3:57 pm

    Actually, a high-gluten flour like “better for bread” would be better than ap flour for this (and any yeast-based dough) bread. Kneading the flour develops the gluten and gives it very a nice texture.

  31. #
    Carol — December 17, 2015 at 3:57 pm

    Can I substitute an all purpose glute free flour like Bob’s Red Mill 1/1 or Cup for Cupas the main ingredient flour in the bread? Of course,using the rice flour on top.Thanks

  32. #
    Simone — June 18, 2015 at 5:46 am

    Tiny comment: it is ‘tijgerbrood’ , instead of tigerbrood. Tiger is english, tijger is the Dutch word. Never knew they made the pattern this way!

  33. #
    Denisse | Le Petit Eats — June 3, 2015 at 11:40 am

    Dutch crunch is my absolute favorite type of bread- maybe because I grew up in the Bay Area! But I never knew how it was made, amazing!

  34. #
    Farha – faskitchen — May 26, 2015 at 4:26 am

    This looks fabulous… My three year old daughter is asking for the pull out bread.. Now what do I do??

  35. #
    Teresa — May 24, 2015 at 1:58 pm

    Sorry Dutch Crunch Rolls.
    I had said double crunch rolls.

  36. #
    Teresa — May 24, 2015 at 1:57 pm

    HI,
    Would it be ok if I made the Double Crunch Rolls
    with all purpose flour?
    Thanks.
    Hugs, Teresa

  37. #
    Teresa — May 24, 2015 at 1:55 pm

    HI,
    Would it be ok if I made the double crunch rolls with
    all purpose flour?
    Thanks.
    Teresa

  38. #
    Gaby — May 23, 2015 at 10:19 am

    This is a really interesting recipe, I will have to give it a try!

  39. #
    Linda — May 23, 2015 at 7:14 am

    Thanks. These look soooo good & I can’t wait to start bread making.

  40. #
    June @ How to Philosophize with Cake — May 23, 2015 at 3:32 am

    Those look terrific! I’d never heard of dutch crunch before but it sounds delicious 🙂

  41. #
    Linda — May 22, 2015 at 8:21 am

    Hi Tessa. I’m new to bread making & I was wondering if you need to use a specific type of milk (ie: whole, skim, etc.)? Thanks!

    • #
      Tessa — May 22, 2015 at 1:21 pm

      I usually use whole milk for baking because it offers the best taste, but you could get away with pretty much any type of milk here!

  42. #
    Taylor @ Food Faith Fitness — May 22, 2015 at 4:55 am

    The crunch is EVERYTHING to me, so clearly I am ALL over this bread. That texture would make one AMAZING sandwich! Pinning!

Join the Handle the Heat Community

Cookie Customization Chart
Do you want a more delicious life?
Instead of digging through cookbooks and magazines and searching the internet for amazing recipes, subscribe to Handle the Heat to receive new recipe posts delivered straight to your email inbox. You’ll get all the latest recipes, videos, kitchen tips and tricks AND my *free* Cookie Customization Guide (because I am the Cookie Queen)!
As Seen On....
NPR People Time Glamour Readers Digest The Huffington Post BuzzFeed