


Tessa’s Recipe Rundown
Taste: Rich, ever so slightly sweet, and perfect with dinner or as French toast in the morning.
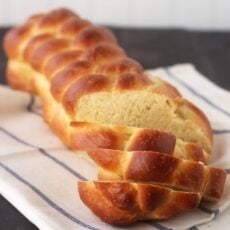
Texture: Moist and tender yet firm.
Ease: The steps are relatively easy they just require some patience. I always thought challah was extremely difficult to make but after watching someone do it in school I realized it shouldn’t be that intimidating.
Appearance: Challah is one of the most beautiful loaves of bread and this recipe creates a fantastic but uncomplicated braid.
Pros: So much better than store-bought challah and much more satisfying (both in terms of taste and accomplishment).
Cons: Requires pretty much a whole day to make,
Would I make this again? I’ve made challah probably 5 times at home already.
This post may contain affiliate links. Read our disclosure policy.
I’ve made challah bread way more times than I care to admit after learning how to make it in culinary school.
It’s such a gorgeous and complicated-looking bread that I was never really confident enough to try it.
This recipe is actually pretty easy, even if you’re not a super experienced bread baker.
I wanted to make a video about challah because I feel that once you see how easy it really is your at-home challah baking will be much more successful.
Be sure to save some day-old challah because it makes killer French toast!
*Please note: I am not Jewish so I am not claiming this is traditional or authentic challah.
Email This Recipe
Enter your email, and we’ll send it to your inbox.
Ingredients
- 3 to 3 1/4 cups (15 to 16 1/4 ounces) all-purpose flour, plus more for dusting
- 1 envelope (2 1/4 teaspoons) instant yeast
- 1/4 cup (1 3/4 ounces) sugar
- 1 1/4 teaspoons fine sea salt
- 3 large eggs, one egg separated (reserve the white for the egg wash)
- 4 tablespoons (2 ounces) unsalted butter, melted
- 1/2 cup plus 1 tablespoon water, at room temperature


Instructions
- In a medium bowl whisk together the flour, yeast, sugar, and salt.
- In the bowl of a stand mixer fitted with the dough hook, mix together the 2 whole eggs and 1 egg yolk, melted butter, and 1/2 cup of the water until combined. Gradually add the flour mixture. Increase the speed to medium and mix until the dough comes together. Knead for about 5 minutes, or until the dough is smooth and elastic, adding up to a 1/4 cup more flour if the dough is too wet and sticky. Mix the egg white and the remaining 1 tablespoon of water and cover and refrigerate until ready to use.
- Shape the dough into an even ball and place in a lightly oiled ball. Cover with plastic wrap and let rise until doubled in size, about 1 1/2 to 2 hours. Gently press down on the dough to deflate it then cover with plastic and let rise until doubled again, about 40 to 60 minutes.
- Transfer the dough to a floured work surface. Divide the dough into 2 pieces, one about half the size of the other (the small piece should weigh about 9 ounces, the larger should weigh about 18 ounces). Divide the large piece into 3 equal portions. Roll each portion into a 16-inch long rope. Line up the ropes and pinch them together at one end. Braid the rope pieces, pinching the other end together to seal the braid. Place the braid on a parchment or silicone mat-lined baking sheet. Repeat the exact steps with the remaining 3 smaller pieces of dough. Brush egg wash onto the large braid then carefully place the smaller braid on top. Loosely drape the loaf with plastic wrap and let rise until puffy, 30 to 45 minutes.
- Meanwhile, adjust an oven rack to the lower-middle position and preheat to 375°F. Brush the loaf with the remaining egg wash. Bake for 30 to 40 minutes, or until the loaf is golden brown and registers an internal temperature of 190°F with an instant read thermometer. Let the loaf cool completely before slicing.


I found the video first and was frustrated that it doesn’t provide the measurements for the ingredients. And no place to leave a comment. I do not have a stand mixer so used my hand mixer. Dough was EXTREMELY sticky and almost half of it was lost due to sticking to the plastic wrap. I will try again and add lots more flour.
The full written recipe with measurements will always be on my site! And if you’re watching a video on YouTube, the recipe link will always be in the description of the video. I’m sorry your challah didn’t turn out right! Did you try adding an additional 1/4 cup of flour as I suggest in the recipe if your dough is sticky?
If i make the dough 2 days in advanced and refrigerate it until ready to bake is that okay?
I loved it –
Hooray!
The crust was much too dark for my taste by the time it reaches 190° internally. Could I turn the temperature down to 350 and bake for the same length of time? How do I avoid this in the future?
Very nice recipe
Great bread. We love it so much that I’ve made it twice in 5 days. Simplicity and quality. Thanks!!
Tessa thank you for this recipe easier than others !! My issue, after 5 minutes of kneading with dough hook and adding 1/4 c. more flour, it was still sticky. I didn’t want to add any more flour in fear bread would be tough. I scooped the sticky dough onto lightly floured board and hand kneaded about 1 minute. Sure enough it finally came together. I watched your great video and for some reason my dough didn’t quite come together like yours on the dough hook. It is now covered and on first rise. Fingers crossed it will be okay. Will let you know.
You are the best and thanks for all of your recipes !!
I’m about to pop mine in the oven, and I’m wondering why the times are all over the place. The recipe says 30-40 minutes. Some people are saying it’s burnt by 30. Others are saying it is done at 20 minutes. One said 13 minutes. What is right? I know ovens vary a bit, but 13 versus 40 seems pretty drastic.
After trying so many different recipes unsuccessfully, I’ve decided to give yours a try. It turned out absolutely delicious! I used 6 TBSP of oil instead of the butter, but followed the rest of the recipe to a T.
Thank you Tessa. It’s definitely a keeper!!!
Tastiest and most moist challah recipe we’ve tried in lockdown so far! Thank you. It does require patience and the full rising time for great results. Just as well were not going anywhere!
Hi! Thank you for this recipe. One question – Why did you not let the yeast rise and bubble with water and sugar first? I know my yeast is “live” as I made bread the other day and it was perfect. However when I made this recipe the dough did not rise or grow at all. I followed the instructions to a T which told us to add yeast directly to flour etc I was just wondering the reasoning as I learn how to bake with yeast. thank you!
This was my very first time making break and it turned out great! I used a little bit more sugar (1/3 cup instead of 1/4). I also helped the rising process by microwaving some hot water and putting the dough in the microwave with the steaming water with the door shut for a while. Really sped up the rising process!