


Tessa’s Recipe Rundown
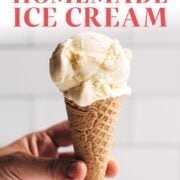
Taste: Loaded with vanilla flavor – and totally customizable, so you can make whatever flavor your heart desires!
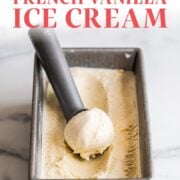
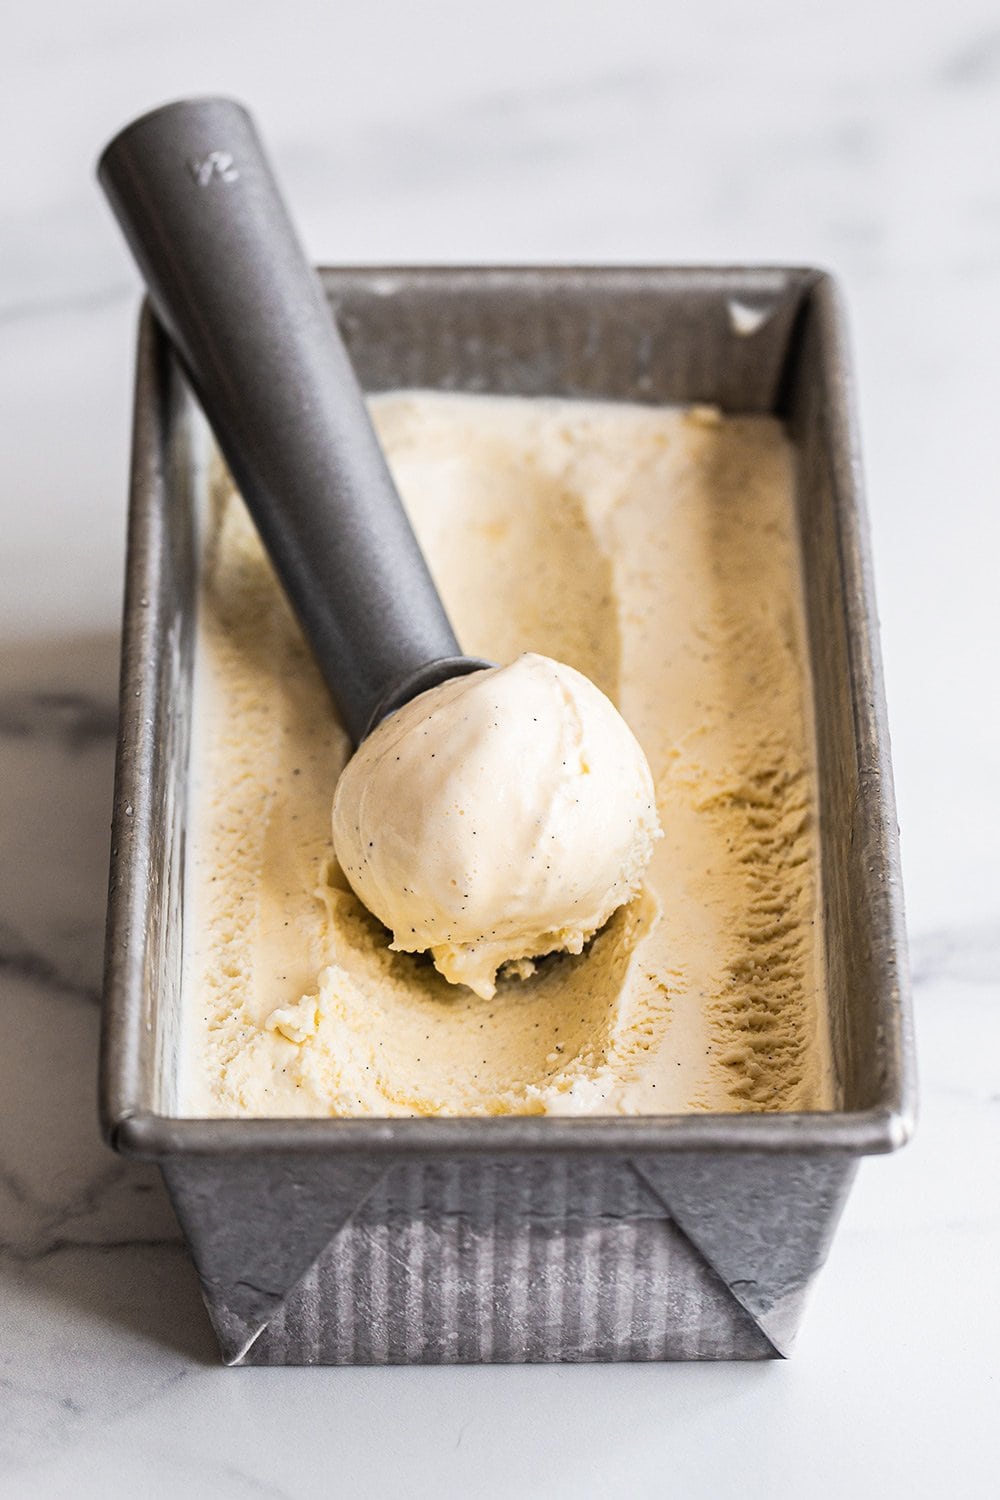
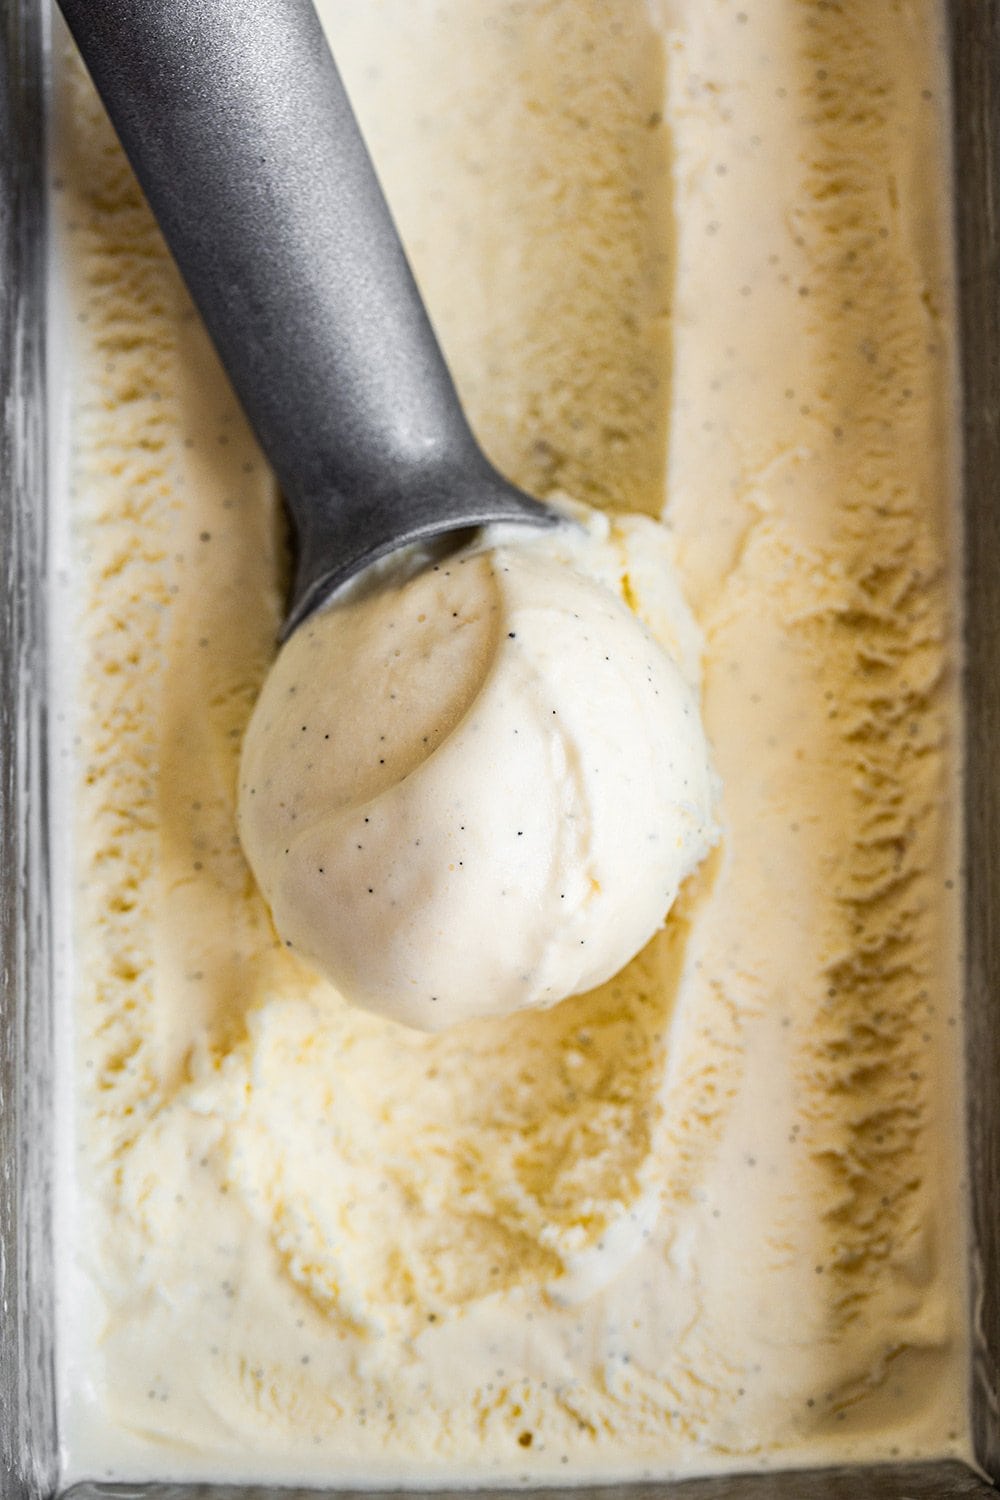
Texture: Rich, creamy, silky, and velvety.
Ease: So much easier than you might think, and each main step can be done ahead of time.
Why You’ll Love This Recipe: Better than any store-bought ice cream!
This post may contain affiliate links. Read our disclosure policy.


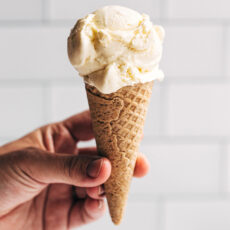
There is nothing quite like the creamy indulgence of homemade ice cream.
The rich, silky-smooth texture and incredible flavor of homemade ice cream is so much better than anything storebought.
I LOVE ice cream – and I’m kind of an expert on the topic. I wrote a whole cookbook on ice cream sandwiches!
Below, I’ll walk you through the simple steps for making your own ice cream right at home. I’ve even listed out 10 delicious flavor variations!
Step-By-Step How to Make French Custard Vanilla Ice Cream
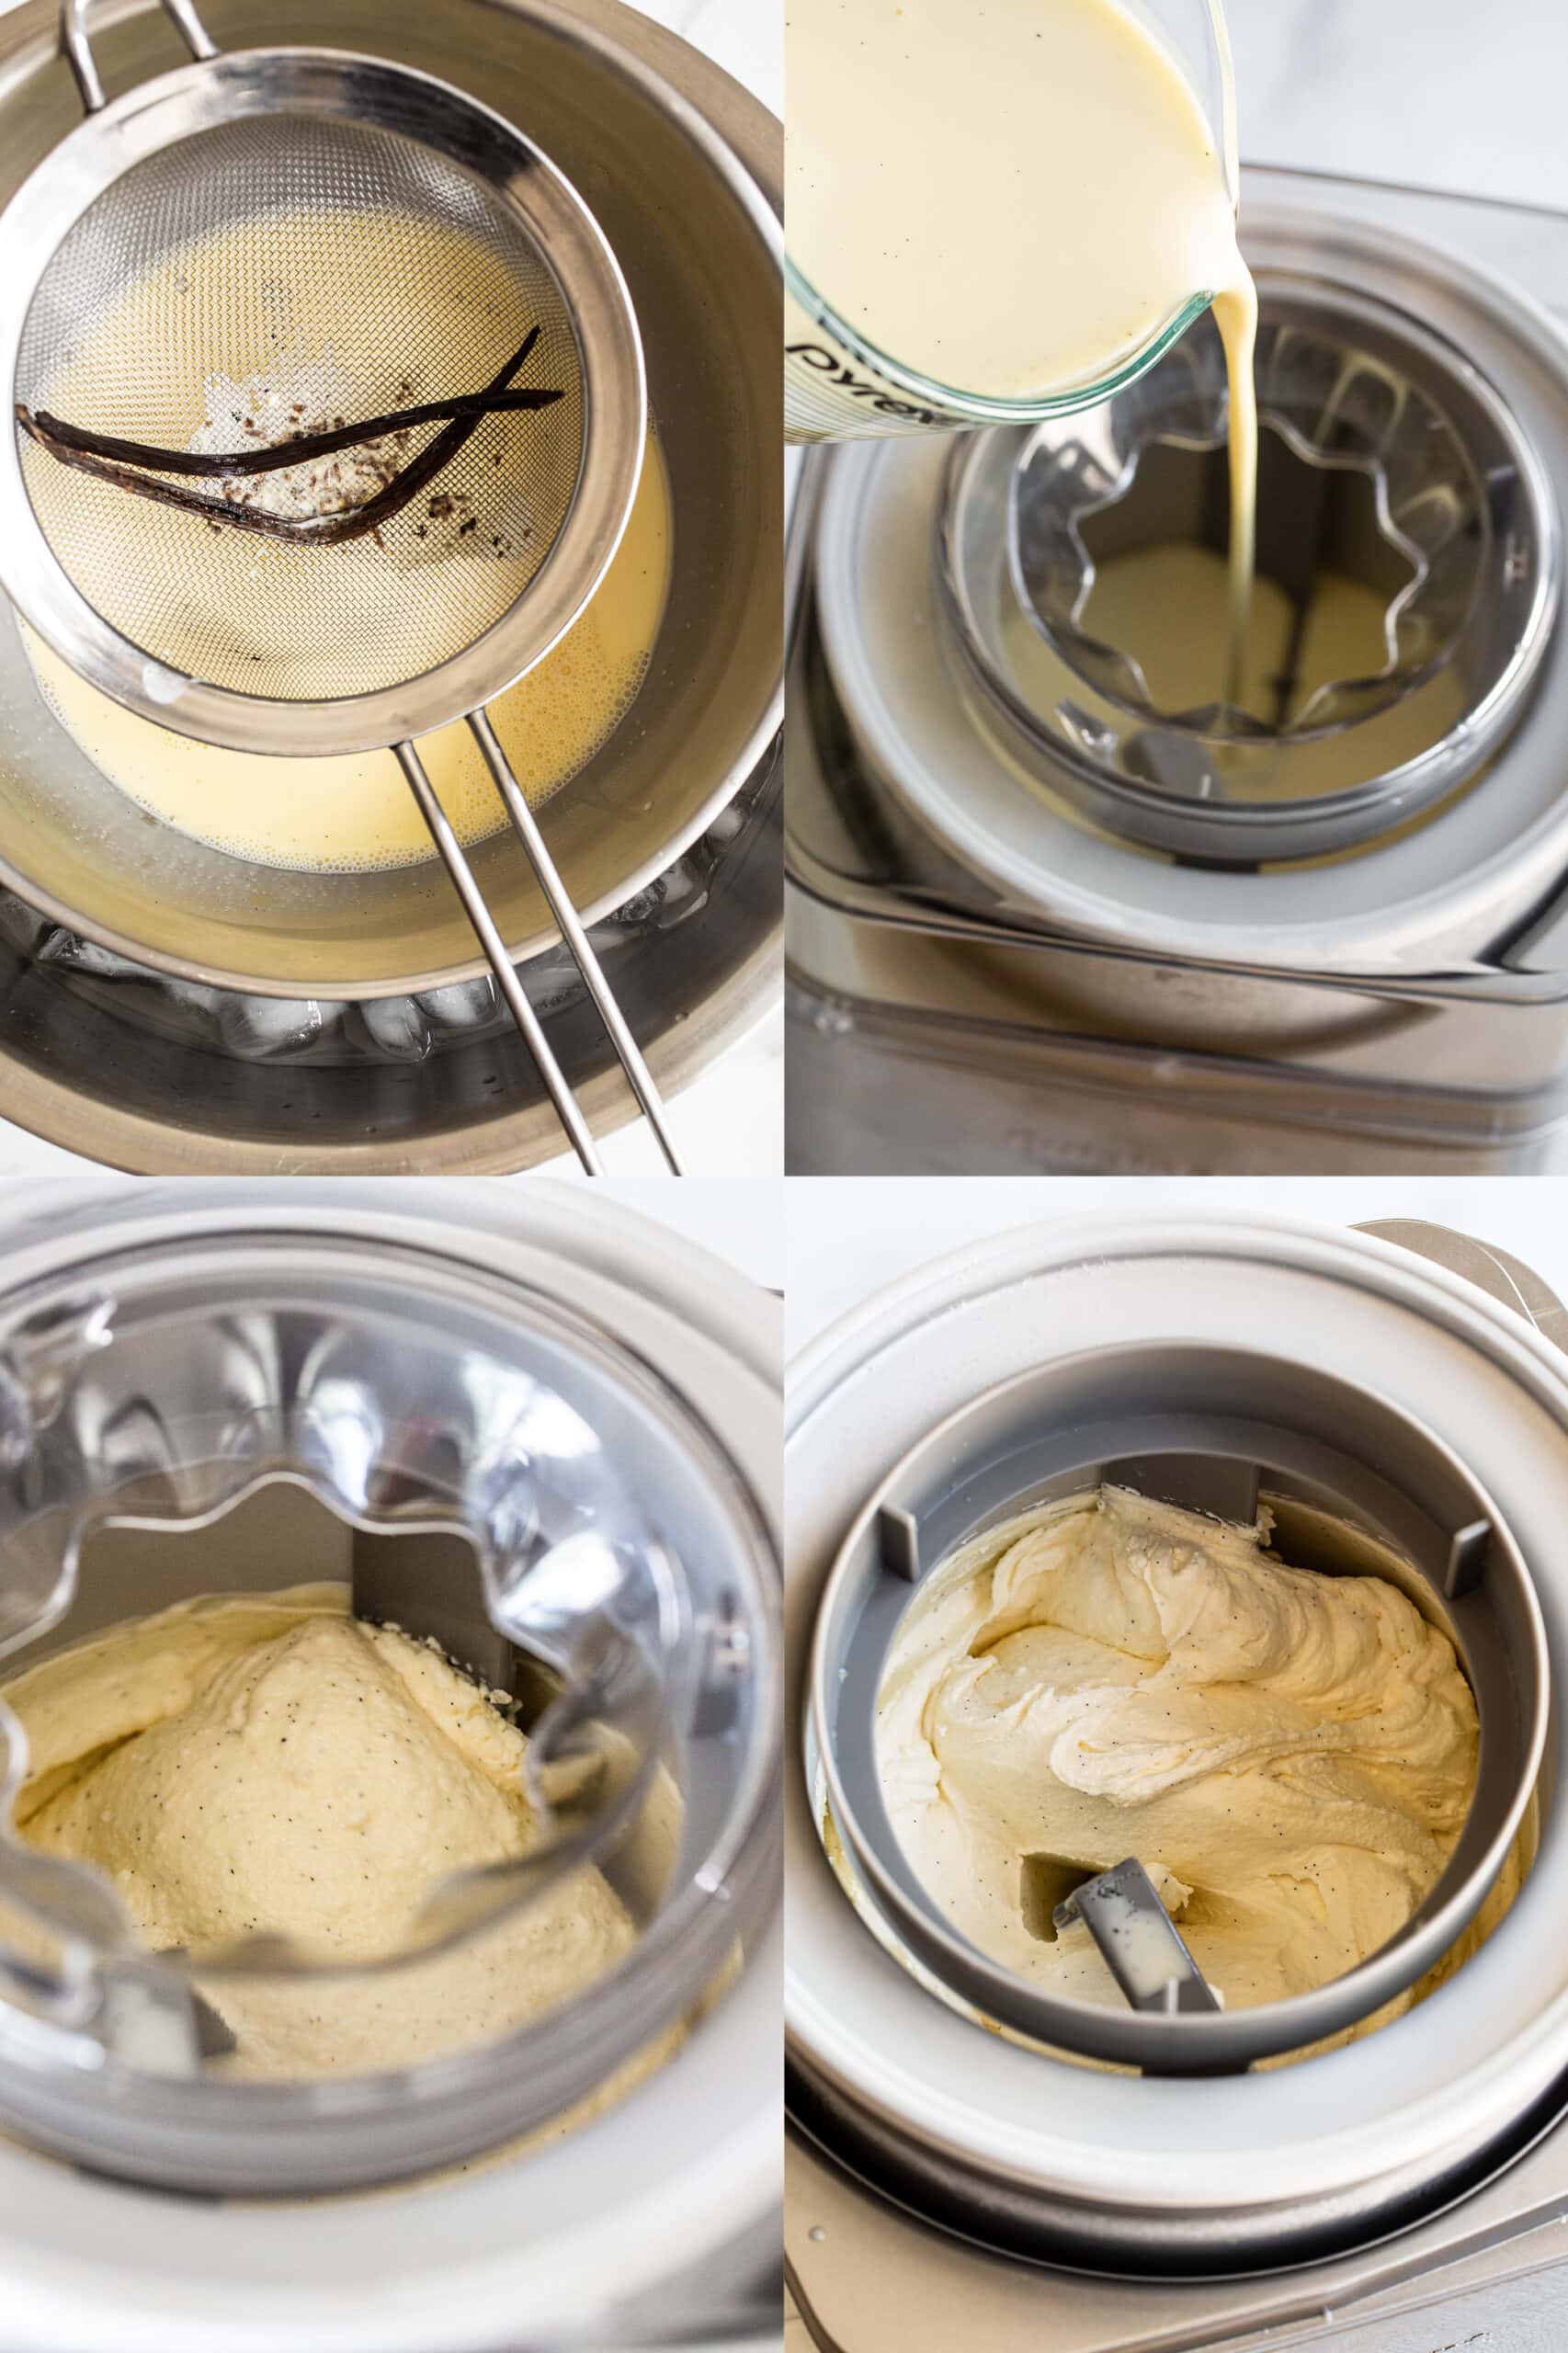
1. Prepare an Ice Bath
Fill a large bowl with ice cubes and a cup or two of water. Place a medium bowl fitted with a fine strainer inside the ice bath. Set aside.
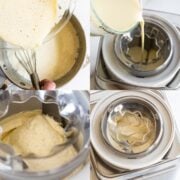
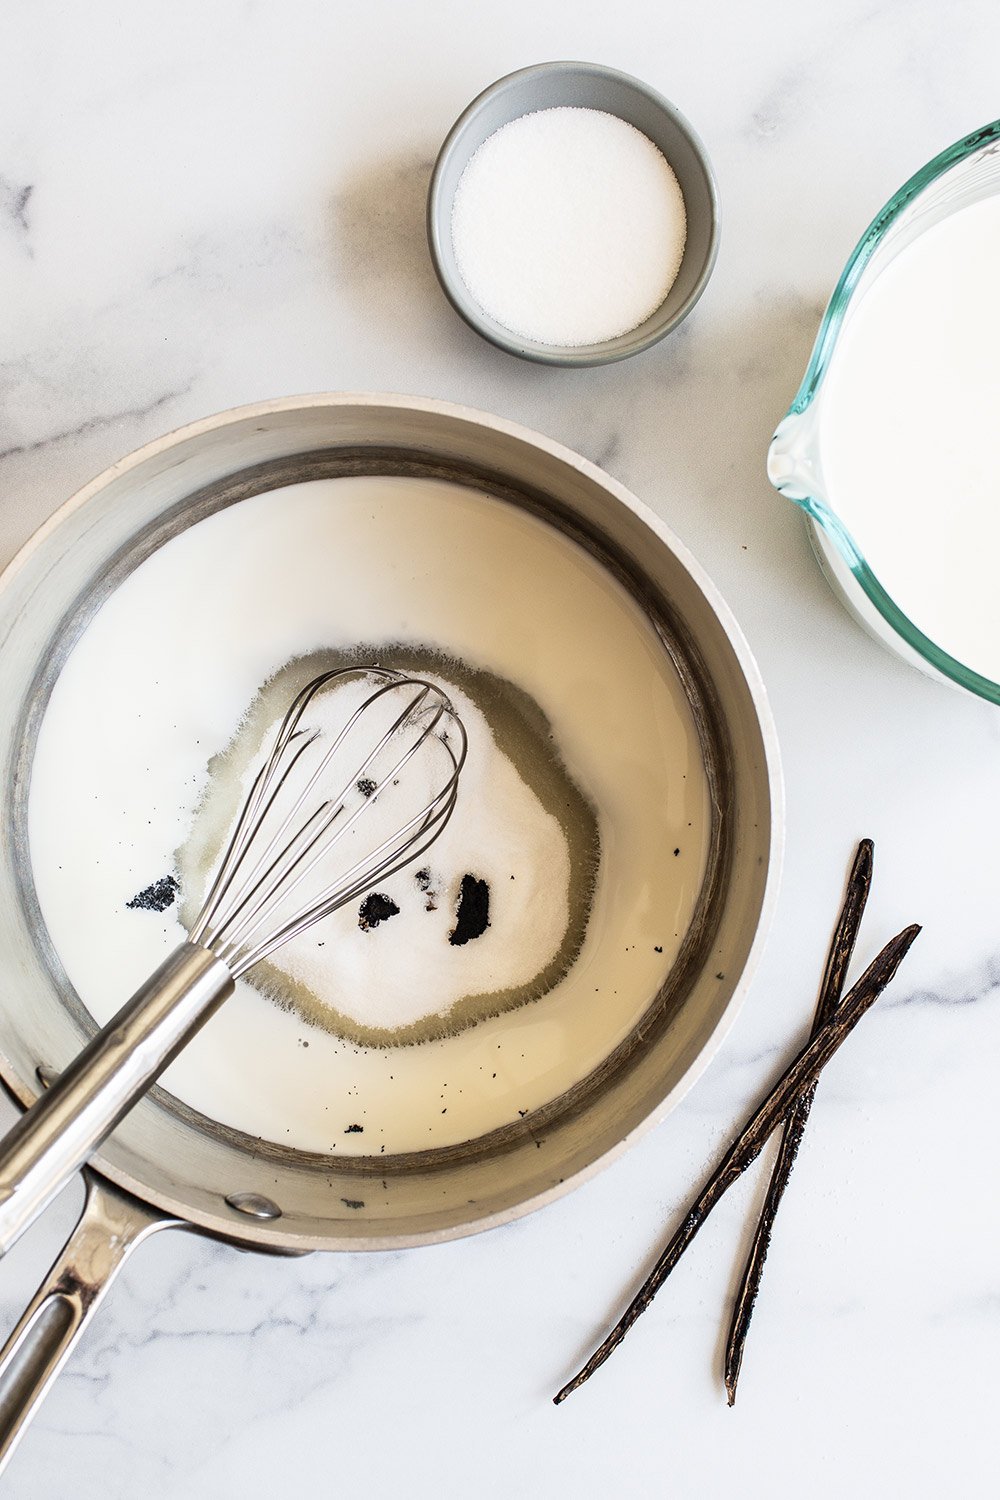
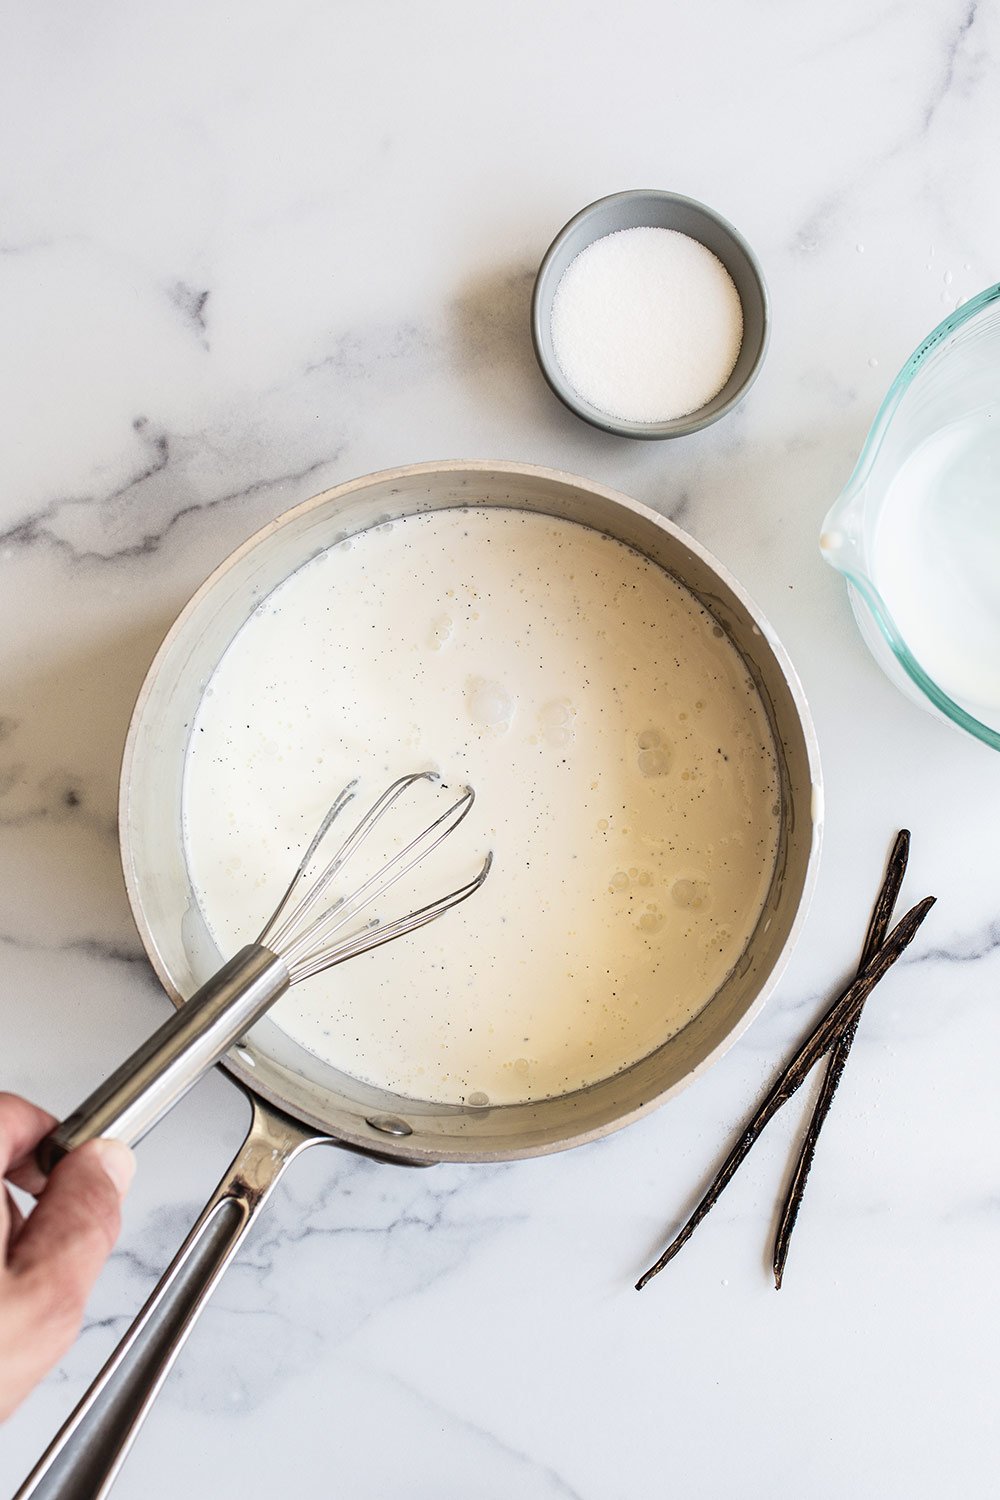
2. Begin the Custard Base
In a medium saucepan, combine the milk, cream, 1/2 cup of sugar, salt, vanilla seeds, and vanilla bean. Set over medium heat, stirring occasionally, until the mixture is warm and begins to steam, about 5 minutes.
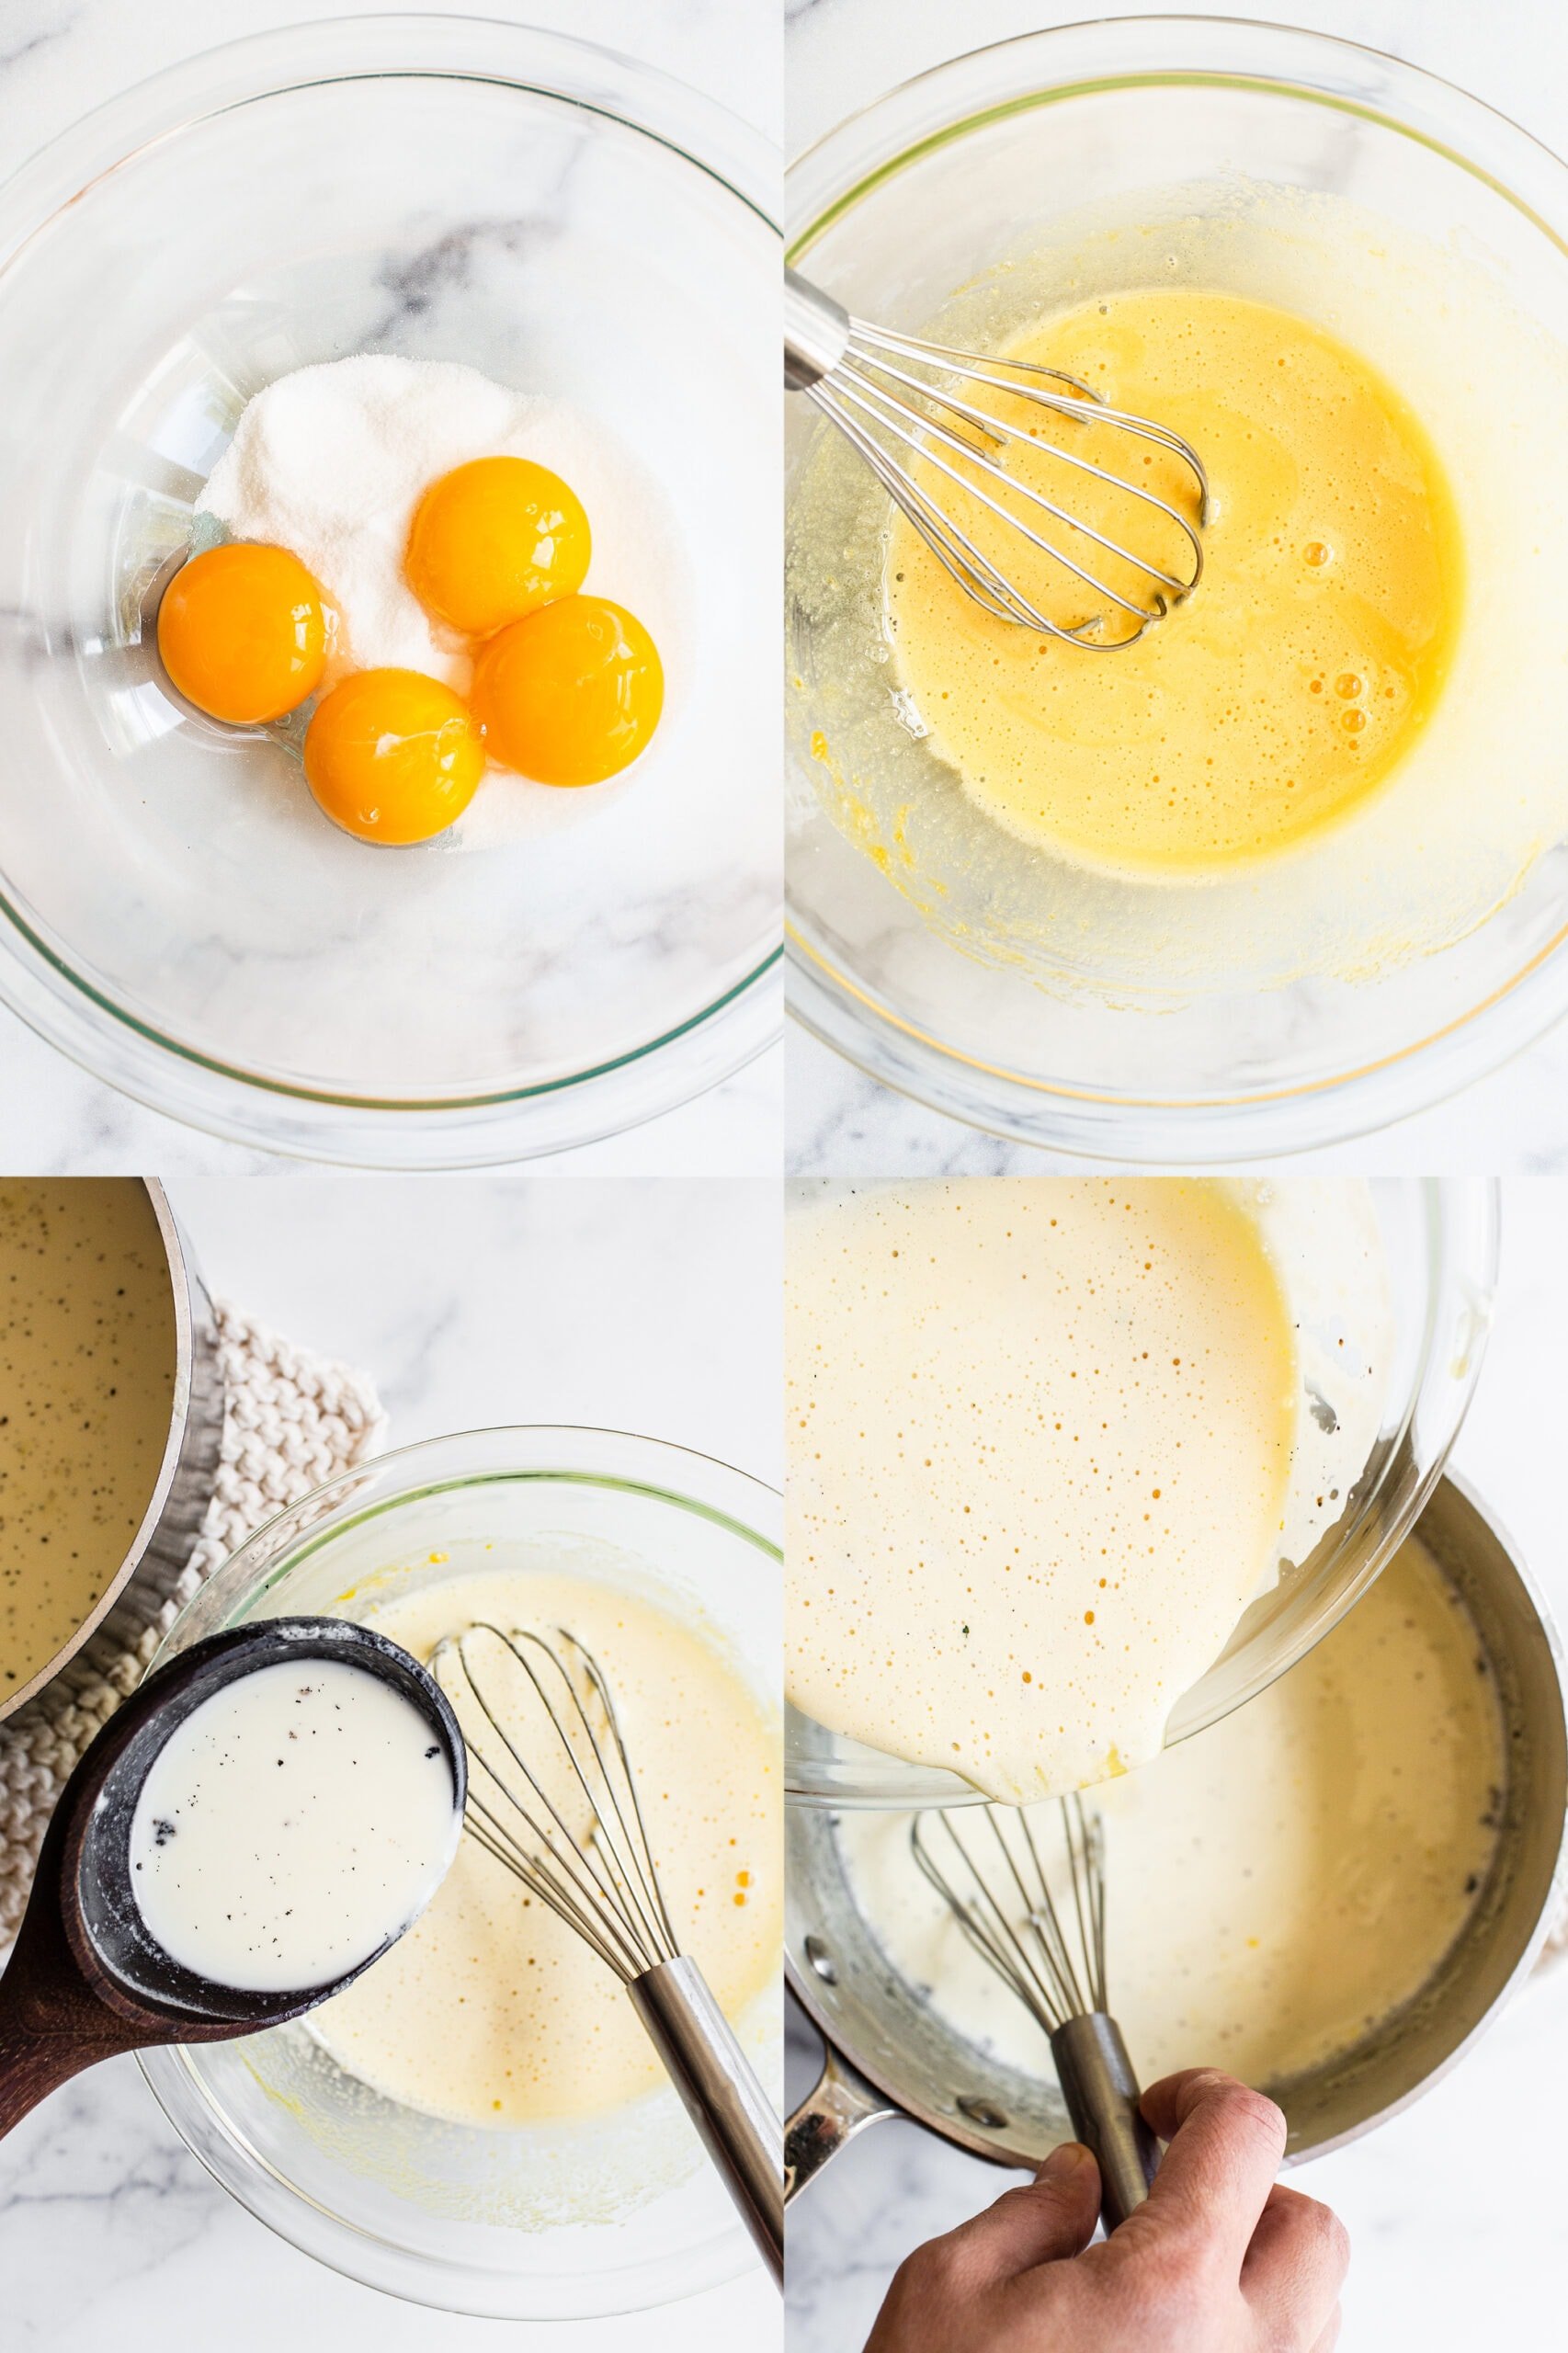
3. Temper the Eggs for Ice Cream
This process allows you to gently heat the yolks so you don’t scramble them and end up with (unintentionally) chunky ice cream.
- In a medium bowl, whisk together the egg yolks and the remaining 1/4 cup of sugar until very well combined and lightened in color.
- Carefully and slowly ladle half of the warm milk mixture into the egg yolks, whisking constantly, until the egg mixture is gently warmed.
- Slowly whisk the egg-milk mixture back into the saucepan.
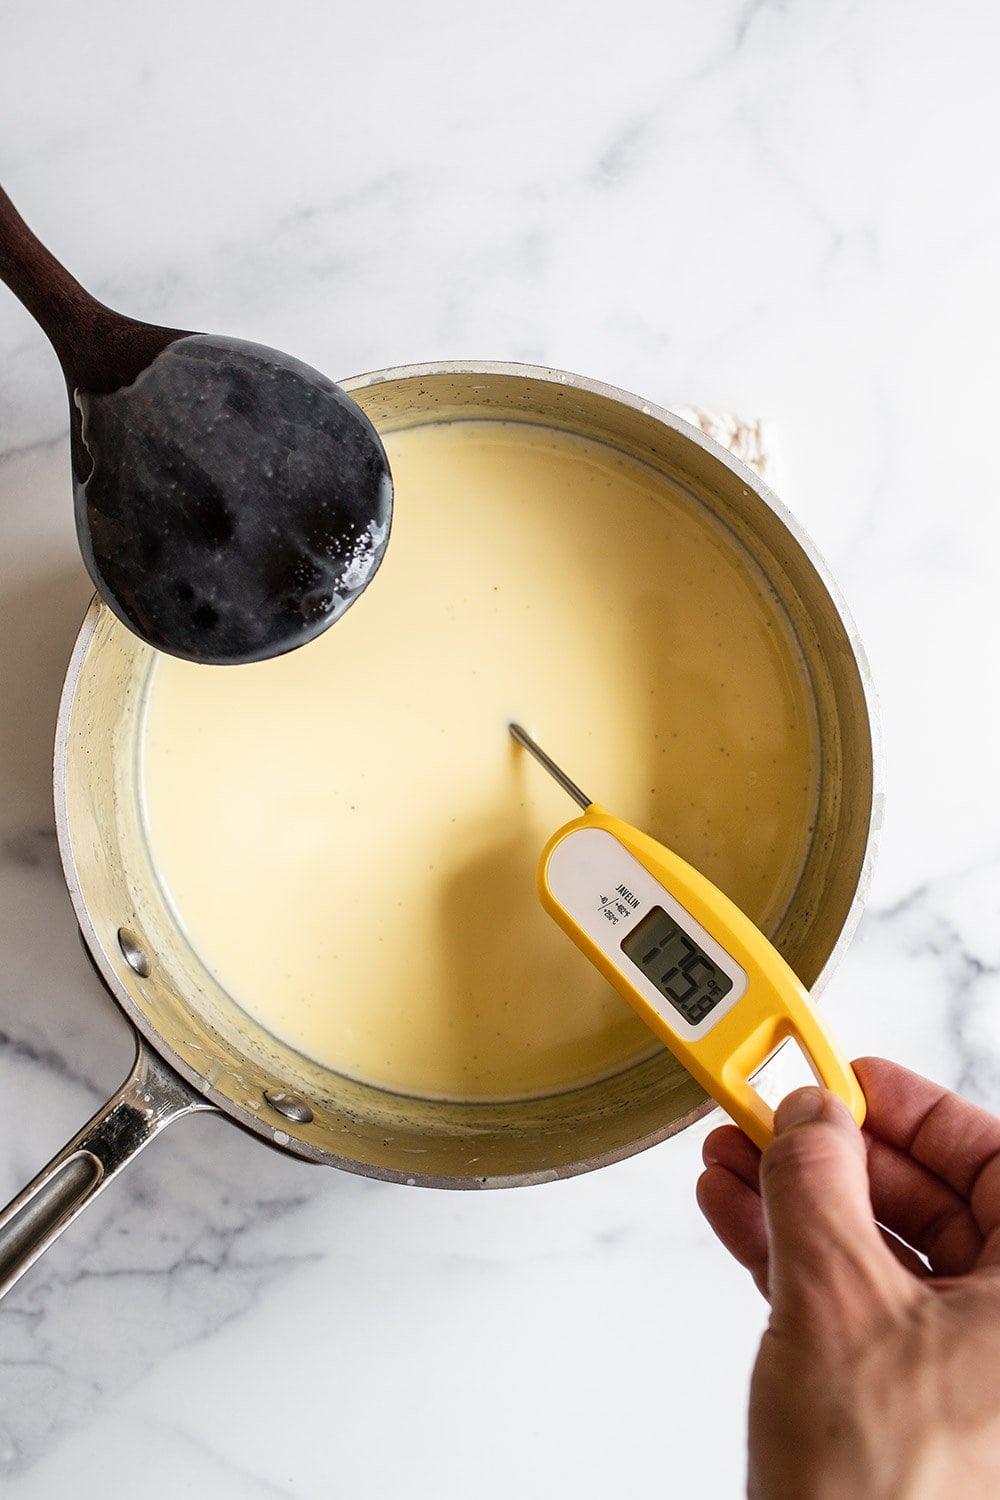
4. Cook the Custard
- Cook over medium heat, stirring constantly with a wooden spoon, until thick enough to coat the back of the spoon and registering around 175°F on an instant-read thermometer, about 5 to 7 minutes.
- Be careful not to boil the mixture to avoid scrambled eggs.
- Make sure your thermometer isn’t touching the bottom of the pan when you take the temperature.
5. Chill the Custard
- Immediately strain the mixture through the fine strainer into the prepared ice bath. This prevents overcooking.
- Discard the vanilla bean pod.
- Cool the custard in the ice bath until it’s at room temperature, stirring often.
- Press plastic wrap against the surface of the custard and refrigerate until chilled, about 4 hours or up to 1 day.
- Overnight is best for maximum flavor development.
6. Churn the Custard
- Pour the chilled mixture into an ice cream maker and freeze according to the manufacturer’s directions.
- Place inside an airtight container.
- Cover the ice cream surface with plastic wrap pressed against the surface before placing the lid on.
- Freeze until the ice cream is firm and the flavor is ripened, at least 2 hours.

Sprinkle of Science
Tips for How to Make Homemade Ice Cream
What is the Difference Between French vs. Philadelphia-Style Ice Cream?
French-style ice cream:
- Custard based.
- Ice cream made with an egg custard that’s cooked and then completely chilled before churning.
- It takes more time and effort, but the results are ultra-rich, creamy, and delicious.
- Since homemade ice cream is made without stabilizers and gums to keep it soft when frozen, going through the effort of making a custard base helps to create that velvety texture, instead of something that turns into a big ice cube in the freezer.
Philadelphia-style ice cream:
- Typically made by directly mixing together cream, milk, sugar, and flavorings, then churning it.
- Definitely faster, but far less rich in taste and texture.
- This style tends to harden more quickly in the freezer.
What Does Churning Mean? How to Churn French-Style Custard Ice Cream
Churning ice cream is simply the process of incorporating air into the custard while it’s being frozen. Ice Cream machines make easy work of this. Simply chill the cooked mixture, then the machine does the rest of the work!
You’ll notice some brands of ice cream contain much more air than others. Some cheaper manufacturers intentionally ‘overchurn’ to yield more – with a less satisfying outcome.
The wonderful thing about making homemade ice cream is you get to decide how much air you want to incorporate!
How to Make Ice Cream Without a Machine
No ice cream maker? No problem! Check out my article with 4 methods for How to Make Ice Cream Without a Machine (I’d recommend the food processor method for this recipe!).
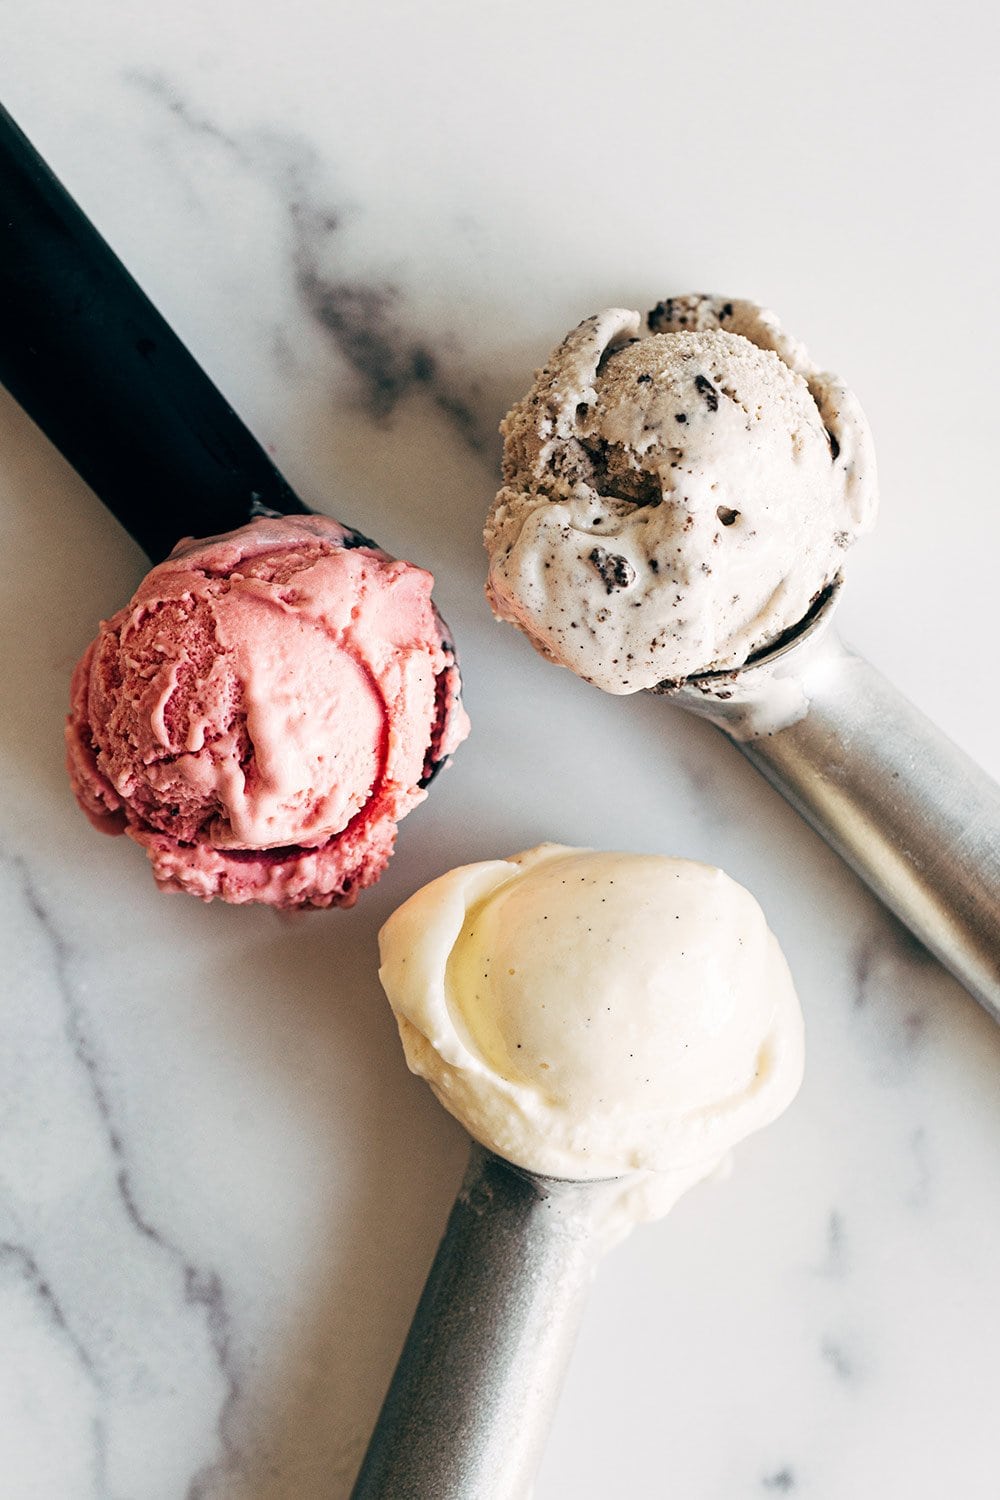
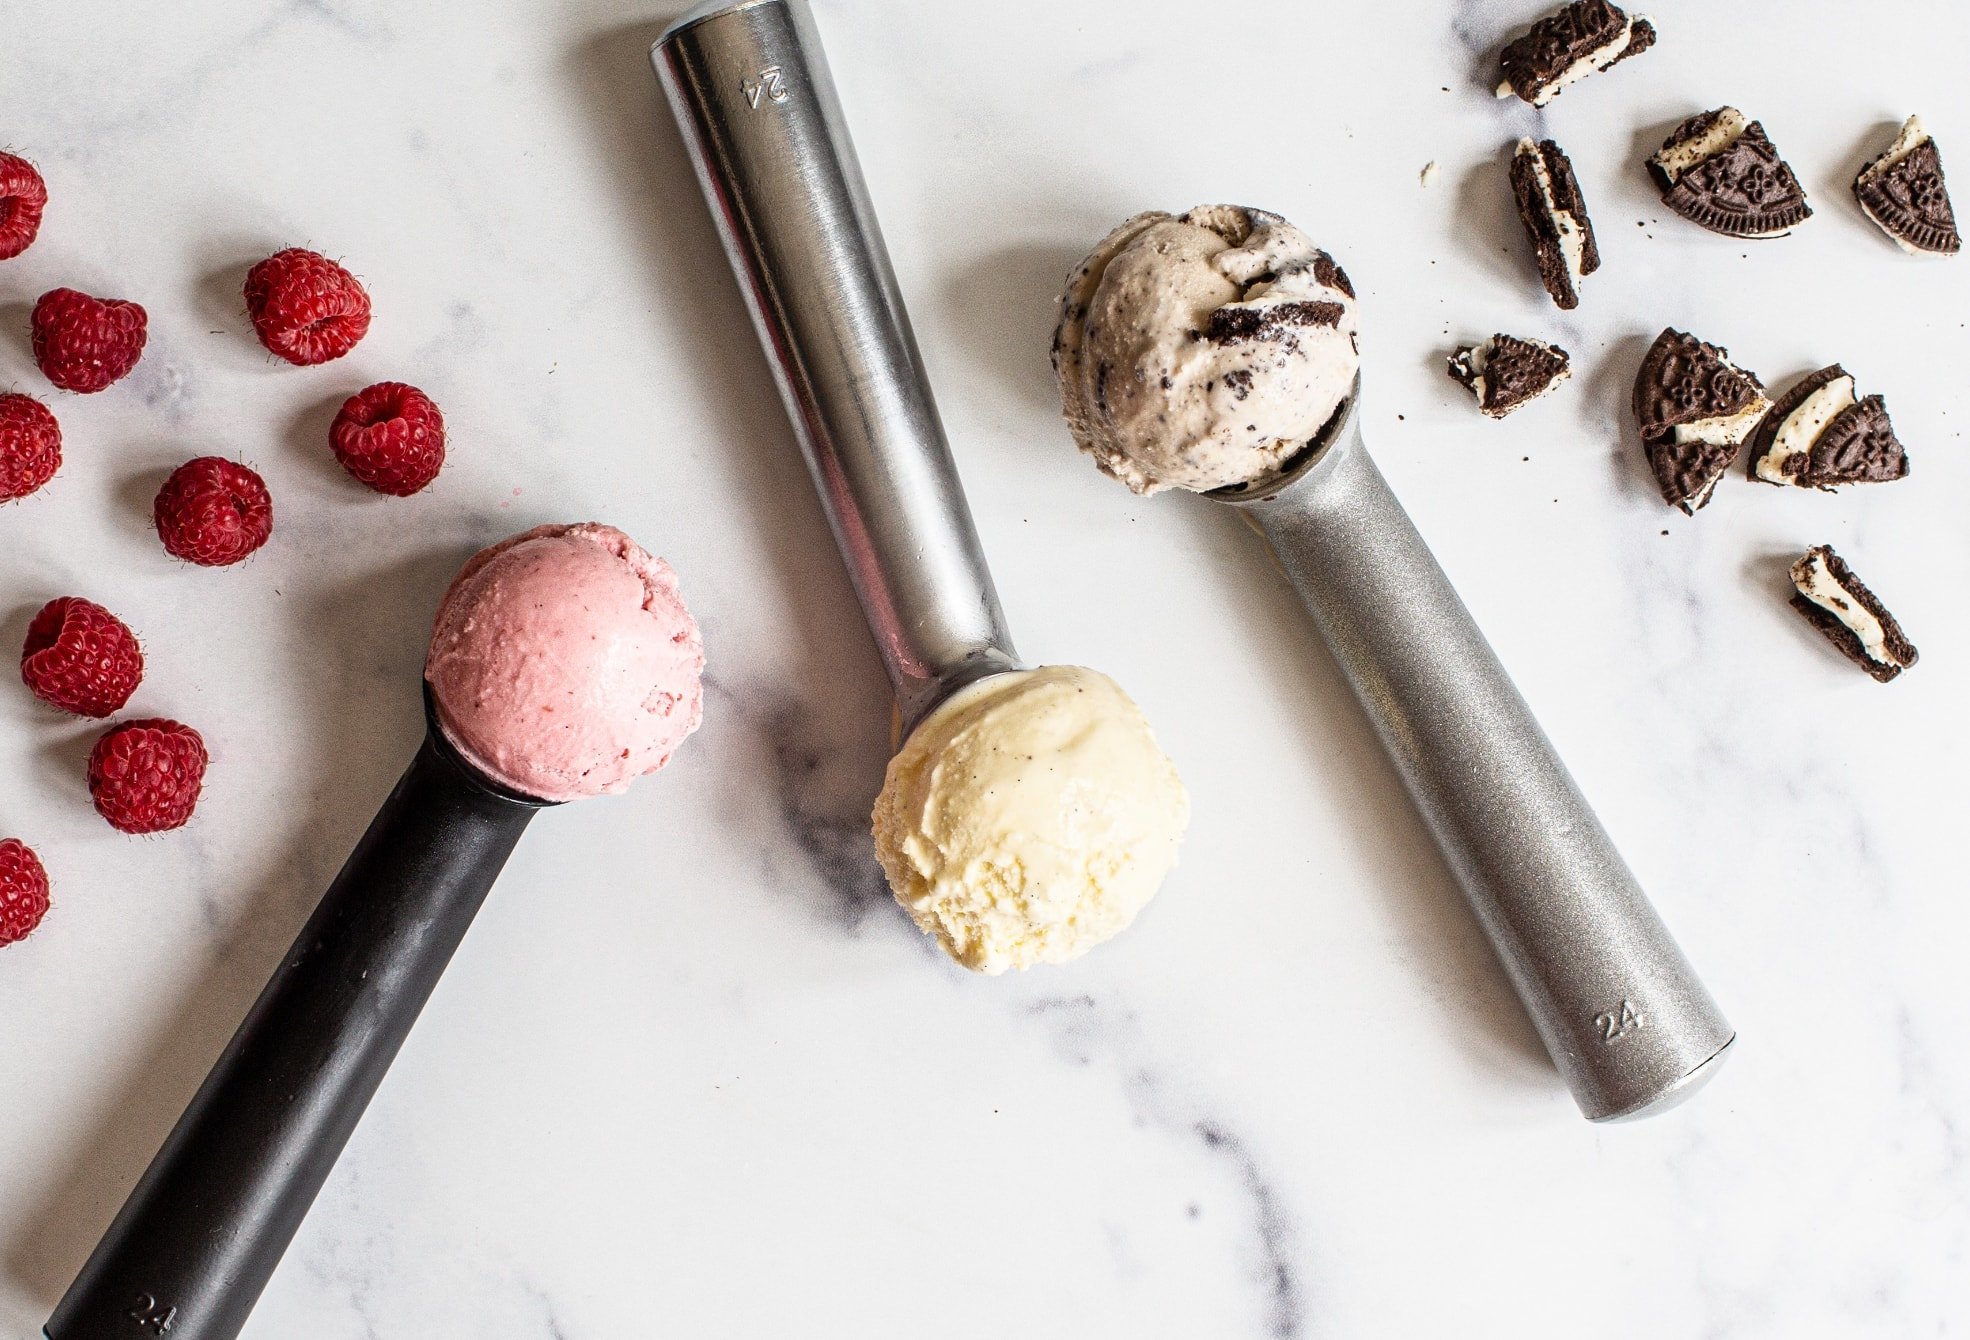
Homemade Ice Cream Flavor Variations
- Chocolate Ice Cream: I have a delicious Chocolate Ice Cream recipe here!
- White Chocolate Ice Cream: Add 6 ounces (170 grams) of melted and cooled white chocolate to the warmed milk mixture before adding the eggs. After cooking and straining the custard mixture, add an optional 1/2 teaspoon orange zest.
- Cookies & Cream: During the last 5 minutes of the churning process, pour in just over 1 1/2 cups coarsely chopped Oreo cookies (filling intact; about 15 Oreos).
- Mint Chocolate Chip: Add 1 teaspoon peppermint extract and 4 to 5 drops of optional green food coloring after straining the cooked custard into the ice bath. During the last 5 minutes of churning, add 1 cup (170 grams) mini semisweet chocolate chips or chopped Andes mints.
- Malted Vanilla: Add 1/2 cup plain malted milk powder along with the milk and cream.
- Cherry: Increase the egg yolks to 5 total. After cooking the custard, stir in 1 1/2 cups fresh pitted sweet dark cherries. Let cool in an ice bath then transfer to a food processor or blender to puree. Strain as you transfer to an airtight container.
- Nutella: Add 1 cup (270 grams) Nutella after straining the cooked custard mixture into the ice bath, stirring to combine. Don’t worry if it doesn’t dissolve completely. It’ll mix in during the churning process.
- Peanut Butter: In a medium saucepan over medium heat, add 1 cup (270 grams) of peanut butter and stir constantly until melted and smooth. Add the milk, cream, 1/2 cup sugar, salt, and vanilla and continue with the recipe as written. During the last 5 minutes of churning, add 1/2 to 1 cup of chopped peanut butter cups if desired.
- Mocha: Add 3 tablespoons cocoa powder, preferably Dutch-processed, and 2 tablespoons instant espresso powder along with the salt.
- Raspberry: In a food processor or blender, 2 1/2 cups of fresh or thawed frozen raspberries. Strain into a mixing bowl, discarding seeds and pulp. Refrigerate while you prepare the vanilla ice cream base. Once in the ice bath, stir the raspberry puree into the custard mixture. During the last minute of churning, add 1 tablespoon of raspberry liqueur such as Chambord.
Check out all the answers to your FAQ just under the recipe!
Email This Recipe
Enter your email, and we’ll send it to your inbox.
Ingredients
- 1 1/2 cups whole milk
- 1 1/2 cups heavy cream
- 3/4 cup (150 grams) granulated sugar, divided
- 1/4 teaspoon fine sea salt
- 1 vanilla bean, split in half lengthwise and seeded
- 4 large egg yolks

Instructions
Prepare the ice bath:
- Fill a large bowl with ice cubes and a cup or two of water. Place a medium bowl fitted with a fine strainer inside ice bath. Set aside.
Begin the custard base:
- In a medium saucepan combine the milk, cream, 1/2 cup (100 grams) of the sugar, salt, vanilla seeds and vanilla pod. Set over medium heat, stirring occasionally, until the mixture is warm and begins to steam, about 5 minutes.
Temper the eggs:
- In a medium bowl, whisk together the egg yolks and the remaining 1/4 cup (50 grams) of sugar until very well combined and lightened in color. Carefully and slowly ladle half of the warm milk mixture into the egg yolks, whisking constantly, until the egg mixture is gently warmed. Slowly whisk the egg-milk mixture back into the saucepan.
Cook the custard:
- Cook over medium heat, stirring constantly with a wooden spoon, until thick enough to coat the back of the spoon and registers around 175°F on an instant-read thermometer, about 5 to 7 minutes. Be careful not to boil the mixture.
Chill the custard:
- Immediately strain the mixture through the fine strainer into the prepared ice bath. Discard the vanilla bean pod. Cool the custard in the ice bath until it’s at room temperature, stirring often. Press plastic wrap against the surface of the custard and refrigerate until chilled, about 4 hours or up to 1 day.
Churn the custard:
- Pour the chilled mixture into an ice cream maker and freeze according to the manufacturer’s directions. Place in an airtight container. Cover the ice cream surface with plastic wrap before placing the lid on. Freeze until the ice cream is firm and flavor is ripened, at least 2 hours.
- If the ice cream has been in the freezer for more than a couple days, it’ll need to soften before scooping and serving. Allow it to sit in the fridge for 30 minutes before scooping for best results.
Photos by Ashley McLaughlin.
Homemade Ice Cream FAQs
If you accidentally heat your custard over too high a temperature or cook for too long, there is one option to salvage it:
1. While it’s still warm, blend the mixture with an immersion blender or carefully ladle it into a standard blender (don’t fill more than half full).
2. Blend until smooth.
3. Once smooth, strain into the ice bath as described in the recipe.
The Cuisinart ICE-21 1.5 Quart Machine is my favorite Ice Cream Maker. I’ve had mine for over 10 years and used it to test all the recipes in my ice cream sandwich cookbook.
Unless you have a self-freezing ice cream machine, make sure your ice cream machine’s freezer bowl is thoroughly chilled according to the manufacturer’s directions. If it’s not cold enough, you may end up with liquid even after 30 minutes of churning.
Check out my article How to Use an Ice Cream Maker here for more tips.
I recommend using a whole vanilla bean pod. In the recipe, you’ll notice I scrape out the seeds and steep the milk and cream mixture with the vanilla pod to ensure maximum flavor.
If you don’t have a vanilla bean pod, the next best thing is vanilla bean paste so you still get those flecks of vanilla seeds. I recommend using about 2 teaspoons.
If you’re flavoring your ice cream with another bold flavor (like many of the customization ideas listed above the recipe) feel free to simply use vanilla extract. This is an easier and more economical option since the other ingredient will likely overpower the vanilla flavor anyway.
Allow the ice cream to soften by placing it in the fridge for 30 minutes before serving. This allows it to soften evenly, as opposed to letting it sit at room temperature where it’ll soften most at the edges and remain hard at the center of the container.
Next, get a good quality ice cream scoop like this OXO one or this Zeroll one. It makes a huge difference! Make sure it’s totally dry before using.
If you have issues with ice cream hardening, try adding up to 3 tablespoons of alcohol during the last few minutes of churning. This helps since alcohol doesn’t freeze.
Vodka works well for vanilla ice cream, and for other ice cream flavors, liqueur products like kirsch not only enhance taste but also maintain that creamy texture.
If you prefer not to use alcohol, adding a tablespoon of corn syrup can also help to prevent the ice cream from crystallizing.
Also, correct storage is important in keeping your ice cream smooth and creamy. See just below for tips on storage.
Once the ice cream is churned, place it in an airtight container (I love this 1-quart ice cream tub or this 1.5-quart ice cream tub), pressing plastic wrap against the surface to avoid ice crystals forming.
For best results, freeze until firm, at least 2 hours. The longer you freeze, the more time the flavors will have to ripen.


This is definitely the best vanilla ice cream I’ve ever made or tasted! It was so creamy, and the vanilla flavour is perfect. Not too sweet, either, so everyone loved it!
When I made death by chocolate ice cream, it barely filled a container that you normally would get Chinese soup takeout in. I would say it was a little over half full. Was I supposed to add more whole milk or cream to the fill line on the ice cream canister?
Hi Rose! How odd! Our Death by Chocolate Ice Cream recipe should make about 1½ quarts of ice cream regardless of which method you use. Did you use the full amount of milk and cream listed in the recipe? I’d also double-check the ingredient list to make sure all of the ingredients made it into the mixture, as that would definitely affect the yield.
This was absolutely delicious! I didn’t have vanilla beans so I poured some extract in until my heart told me to stop haha. I froze it for 24 hours and used my Ninja Creami on Ice Cream setting and it came out perfectly.
Brilliant recipe! Relatively easy to make especially if you use the thermometer while heating the custard. Im a very picky ice cream fan. This recipe rivals with the best custard based ice cream
I ever had. Congratulations!
I made the vanilla version and the chocolate one is in the make.
I’ve made this recipe 3 times now and it’s become my go-to vanilla bean base! The only tweaks I’ve made are adding 1.5 tsp vanilla extract in addition to the vanilla bean and upping the salt to 1/2 tsp. I find that upping the salt and vanilla helps the flavor stand up to other additions, or if I’m turning it into chocolate chip cookie ice cream sandwiches!
I’m so glad, Sarah. Those are great tips, thanks for sharing!
I tried this French vanilla ice cream recipe, and it turned out so smooth and creamy, just like you promised! The step-by-step process made it easy to follow. Thanks for sharing this amazing recipe. And one more thing, if you’re a pet lover like me and want to treat your dog with something special, try Frostreats. It’s a dog-friendly ice cream made with natural ingredients. My pup loves it just as much as I love homemade vanilla
While cooling, the smaller bowl capsized. I still do not get why you cannot just put it straight into the refrigerator?
Mohit, you should cool everything before putting into the fridge. It’s not safe to put hot things in a Fridge.
That is a myth. Hot food can and SHOULD be placed directly into the fridge. From the USDA website: Cool Food Rapidly
To prevent bacterial growth, it’s important to cool food rapidly so it reaches as fast as possible the safe refrigerator-storage temperature of 40° F or below. To do this, divide large amounts of food into shallow containers. A big pot of soup, for example, will take a long time to cool, inviting bacteria to multiply and increasing the danger of foodborne illness. Instead, divide the pot of soup into smaller containers so it will cool quickly.
Cut large items of food into smaller portions to cool. For whole roasts or hams, slice or cut them into smaller parts. Cut turkey into smaller pieces and refrigerate. Slice breast meat; legs and wings may be left whole.
Hot food can be placed directly in the refrigerator or be rapidly chilled in an ice or cold water bath before refrigerating.
You can and should put it directly into the fridge. The advice you were given is inaccurate and dangerous.
I just tried making this ice cream. I have it sitting in the freezer for tomorrow night. I am excited to try it!
I do have 2 questions about the recipe since I see myself making it again.
Do you have any tips for adding guar or xantham gum?
If I wanted to make the heavy cream to milk ratio 2:1, how would I adjust the recipe?
Thank you!
Don’t add that UPF muck to your food. You don’t need it to achieve great ice cream results, and it’s terrible for your gut health.
First, let’s establish the current total liquid volume and calculate the target volumes for a 2:1 ratio.
Original liquid volume:
1.5 cups whole milk
1.5 cups heavy cream
Total: 3 cups liquid
We want to maintain a similar total liquid volume (around 3 cups or approx. 700-750ml) for a consistent yield.
For a 2:1 cream to milk ratio, out of 3 parts:
2 parts will be cream
1 part will be milk
So, for a total of 3 cups:
Heavy Cream: 2/3 of 3 cups = 2 cups
Whole Milk: 1/3 of 3 cups = 1 cup
Now, let’s convert all ingredients to grams (using common approximations for density):
Whole Milk: 1 cup ≈ 244 grams
1 cup whole milk = 244 g
Heavy Cream: 1 cup ≈ 240 grams (slightly less dense due to fat)
2 cups heavy cream = 2×240 g=480 g
Granulated Sugar: 3/4 cup is already given as 150 grams.
Fine Sea Salt: 1/4 teaspoon ≈ 1.5 grams (can vary, but this is a good estimate for fine salt)
Vanilla Bean: This is by unit, not weight.
Large Egg Yolks: 4 large egg yolks ≈ 72 grams (assuming 18g per yolk)
just made a recipe with 2 to 1 ratio and it was like lard on my tongue. To much fat in that much cream
What, if anything, is wrong with using all heavy whipping cream, no milk?
it’s like eating lard. Literally makes it feel like greasy lard on your tongue.
Made this ice cream today & churned in my ice cream maker. It turned out beautiful. Made double batch. One kept it plain vanilla & the other I added spirulina for the green colour & peppermint extract with chocolate chips. Both batches tasted absolutely gorgeous. Will be using this recipe again & will experiment with other flavours. Thank you so much for this recipe
That sounds delicious, Devi, thanks for sharing!
Can I use an extract or paste for this instead of vanilla beans. And will this work in a ninja creami
Yes, the vanilla bean has nothing to do with the structure of the ice cream so subbing in extract will have no effect besides flavor. For fun, add also a touch of orange essence to give you “creamsickle” flavor
Hi Antonio! You can absolutely use an extract or paste instead of vanilla beans. Check out our FAQs box just below the recipe for Tessa’s vanilla recommendations. We haven’t tried making this recipe in a Ninja Creami, so I can’t say for sure how it will turn out, but let us know if you give it a try!