


Tessa's Recipe Rundown
Taste: Sweet, salty, and perfectly balanced.
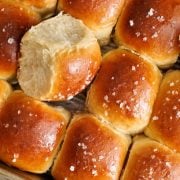
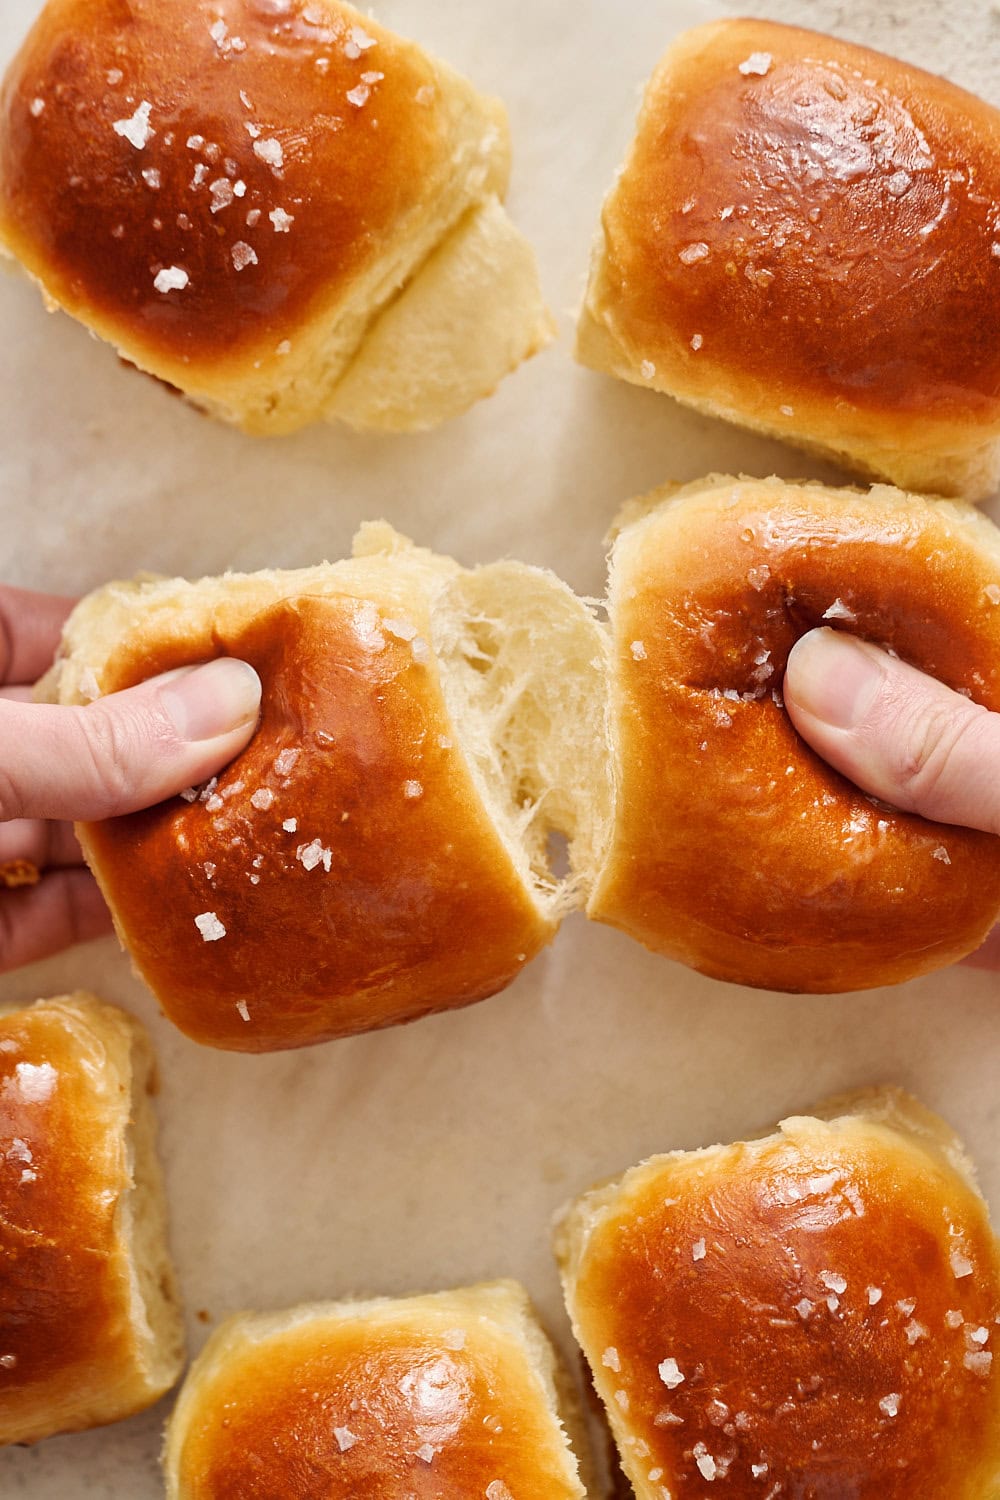
Texture: Oh so pillowy soft and tender!
Ease: The dough is a little sticky before the first rise, but then it’s a dream to work with.
Why you’ll love this recipe: I made 30 of these rolls for 19 people at Thanksgiving, and they vanished within 10 minutes. A total HIT.
This post may contain affiliate links. Read our disclosure policy.


I cannot underscore how positively obsessed I am with this recipe enough. After several rounds of recipe testing, I made it four more times to serve for different events and gatherings.
I served it to friends for a BBQ night with brisket & creamed corn, and again for Thanksgiving. Note to self: make a triple batch for next year! I made it for breakfast sandwiches (incredible!).
It always hits the spot. I’ve got a couple of baked dinner rolls tucked away in my freezer for when the next craving strikes. I know they won’t last long!
Key Ingredients
Whole Milk: The added fat in the whole milk adds essential richness to these rolls. Here are a couple of substitution options:
- 1 cup + 2 tablespoons of 2% milk plus 2 tablespoons half-and-half
- 1 cup + 3 tablespoons 2% milk plus 1 tablespoon heavy cream
Butter: I like to use unsalted butter, but if you only have salted then reduce the salt in the recipe to 1 ¼ teaspoons.
Eggs: These are essential for rich, tender, and golden brown rolls. I have not found a suitable substitute.
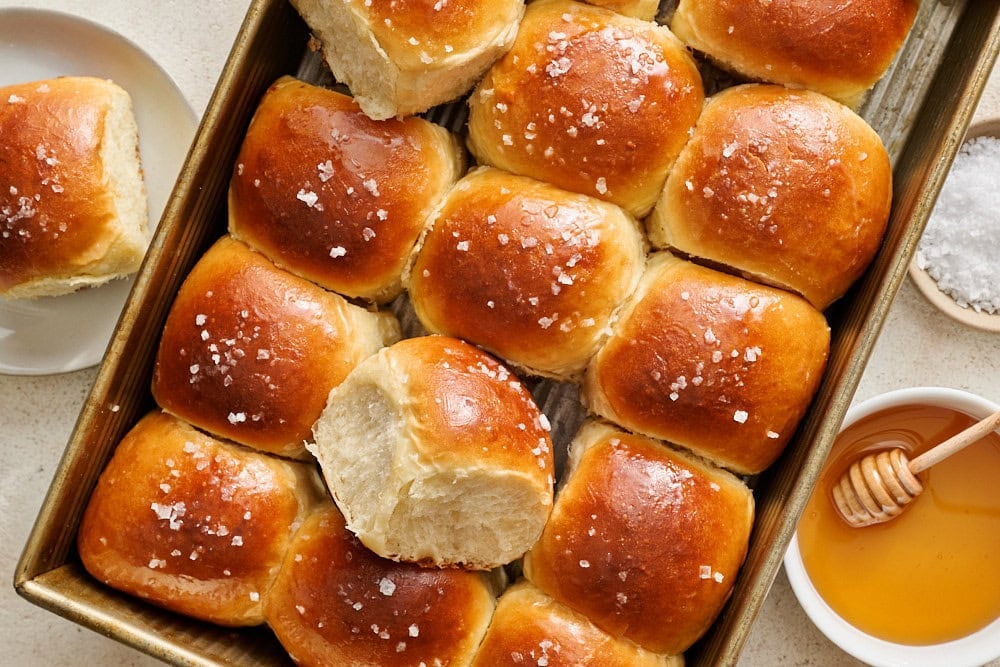
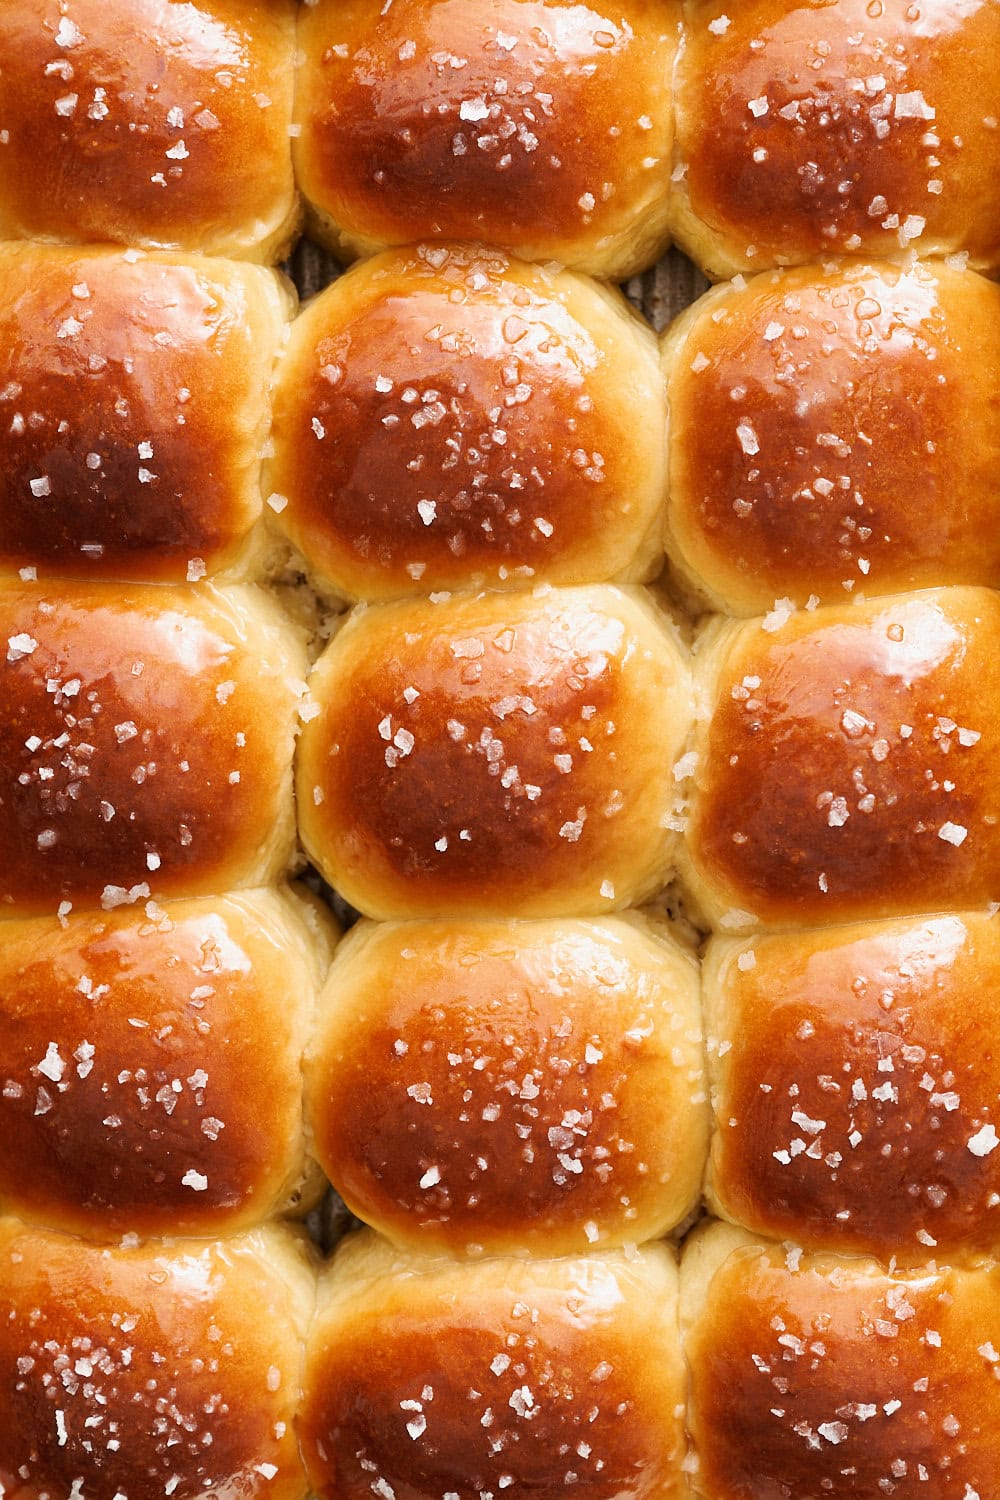
Honey: The star ingredient! In the dough, it obviously adds sweetness, but also feeds the yeast. This is especially helpful for such a rich dough, which would otherwise slow down yeast activity. The final touch: brush melted butter + honey onto the rolls right after baking for a beautiful glossy finish.

Instant Yeast: Since this dough is so enriched, instant yeast helps accelerate the rising times. Even still, expect each rise time to be a bit longer, at about 90 minutes. You can use active dry in place of instant at a 1:1 swap, but note your dough will take even longer to rise. Be sure your milk and butter mixture is about 115-120°F to activate the yeast in either case!
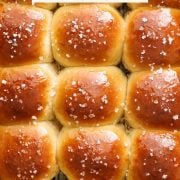
Salt: I prefer the taste of fine sea salt in the dough, but table salt will work too. Avoid kosher salt, as its coarser granules won’t dissolve as readily, and because different brands of kosher salt have wildly different levels of saltiness. I also top these rolls with flaky sea salt, like Maldon!

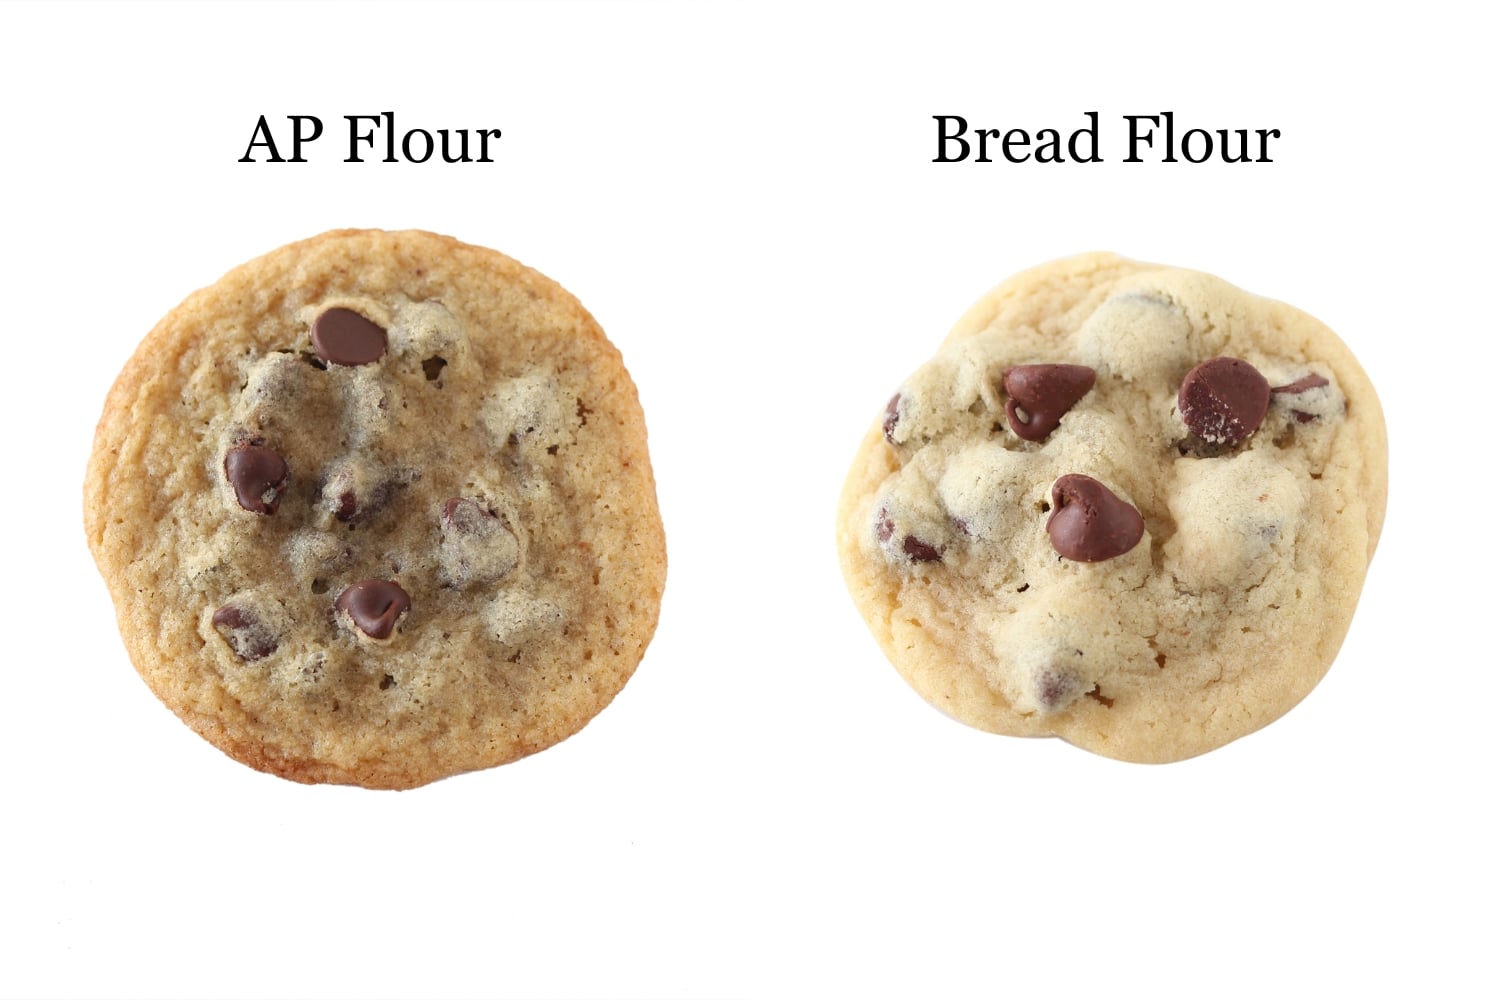
Bread Flour: I know, I know, you may not have this on hand already. But it is KEY to develop the gluten in these rolls so the dough rises tall and the rolls bake up tall and fluffy. I like King Arthur.
How to Make (Step-by-Step)
Heat the milk + butter until the butter is melted. The mixture should be cooled to about 115-120°F before it touches the yeast. If it’s too hot, the yeast will die. If it’s too cold, the dough will take a long time to rise.
Knead the dough. This dough is sticky, so a stand mixer fitted with the dough hook is essential. It’ll take at least 10 minutes at medium-low speed until a soft, smooth, and elastic dough is formed. The dough will be slightly sticky.
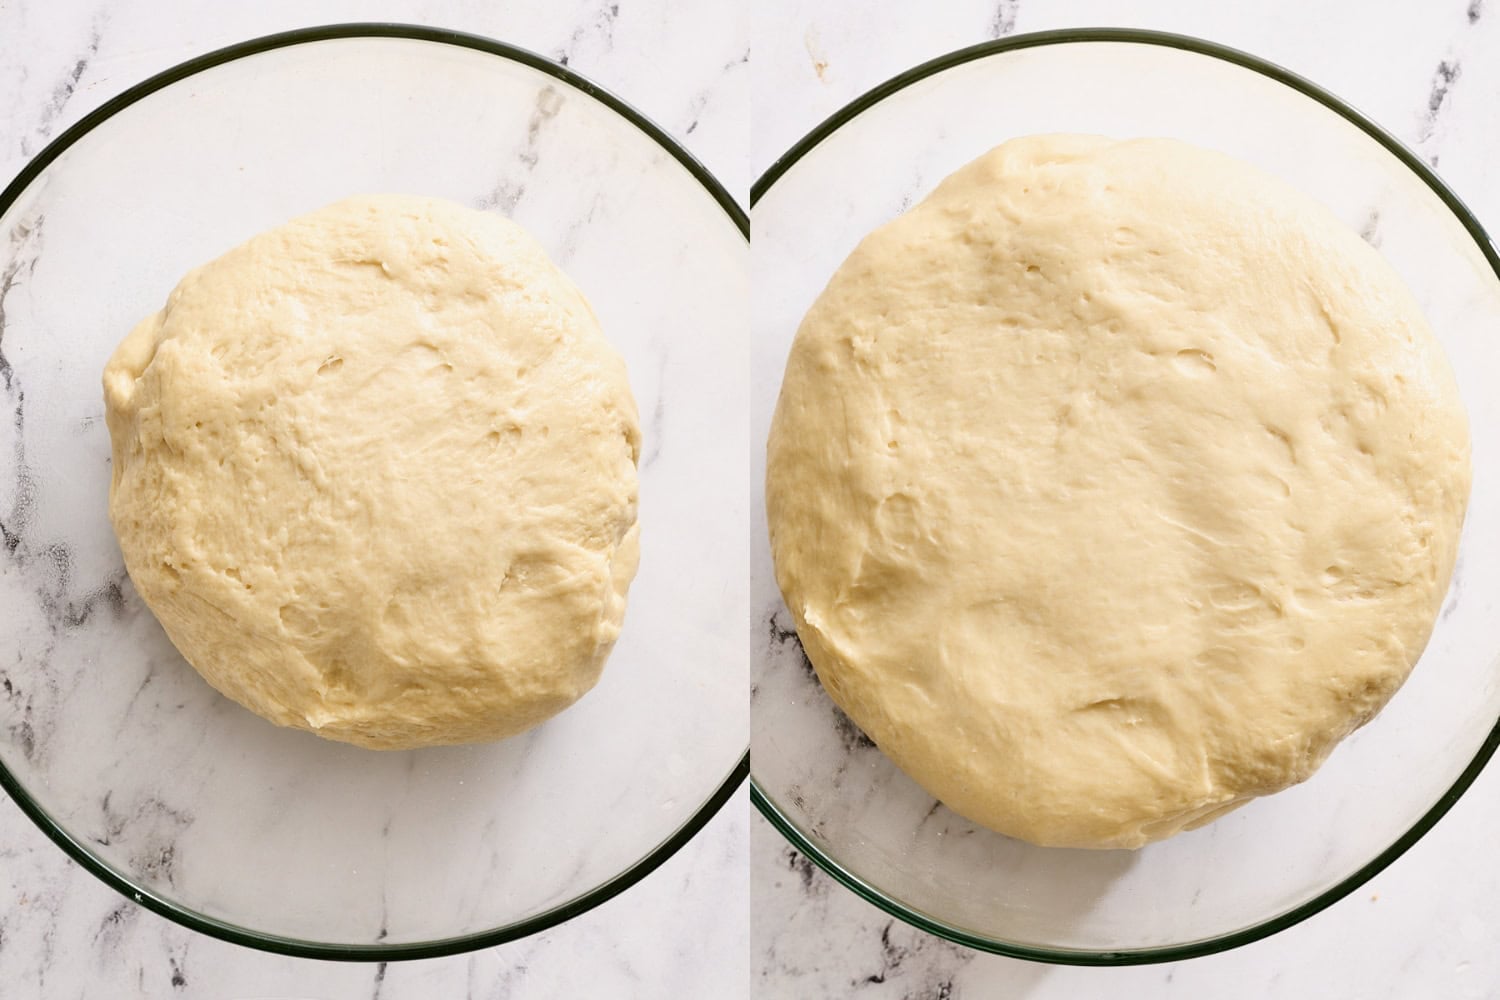
First rise. Remove the dough to an oiled bowl. Since it’s sticky, I like to use a plastic, flexible bench scraper to remove the dough. Cover tightly and let rise in a warm place until doubled in size, about 90 minutes to 2 hours.
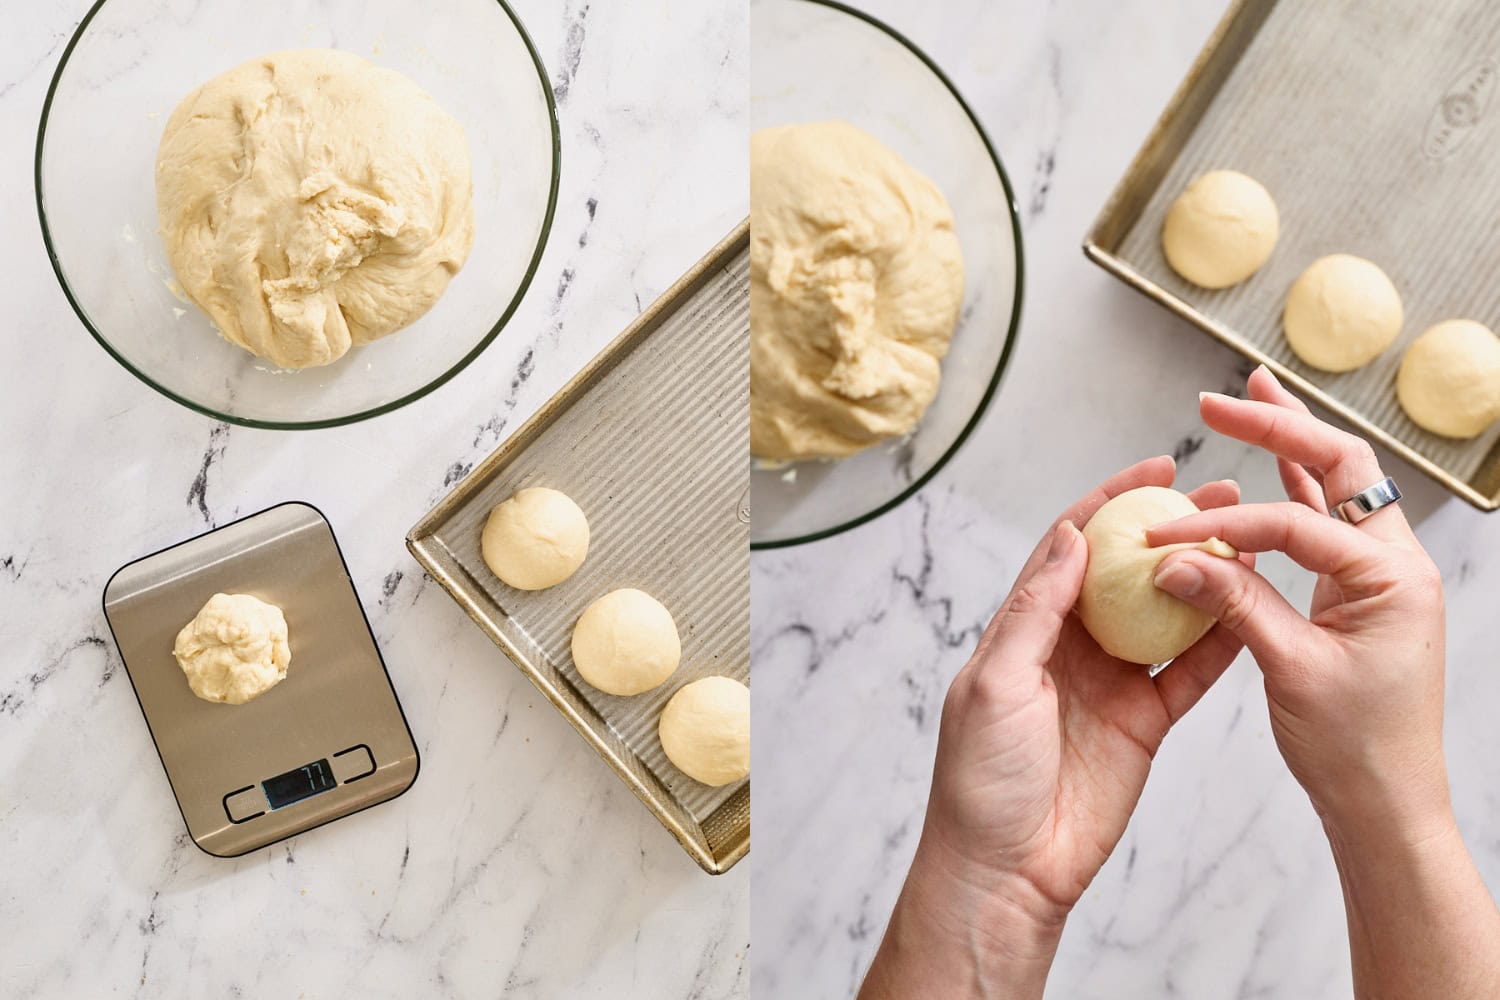
Divide the dough into 15 equal pieces. You can eyeball this, or use a scale. Weigh the entire mass of dough and divide by 15. Each portion will weigh about 80 grams, depending on if you added more flour.
Shape into a tight ball by gathering pieces of dough into one central point and pinching that point firmly together to create surface tension. Roll each dough ball on an unfloured counter and place seam side down. If you shape too loosely, your rolls will be a bit flat.
Second rise. Cover and let the shaped dough rise until puffy and about doubled in size, about 1 hour to 90 minutes.
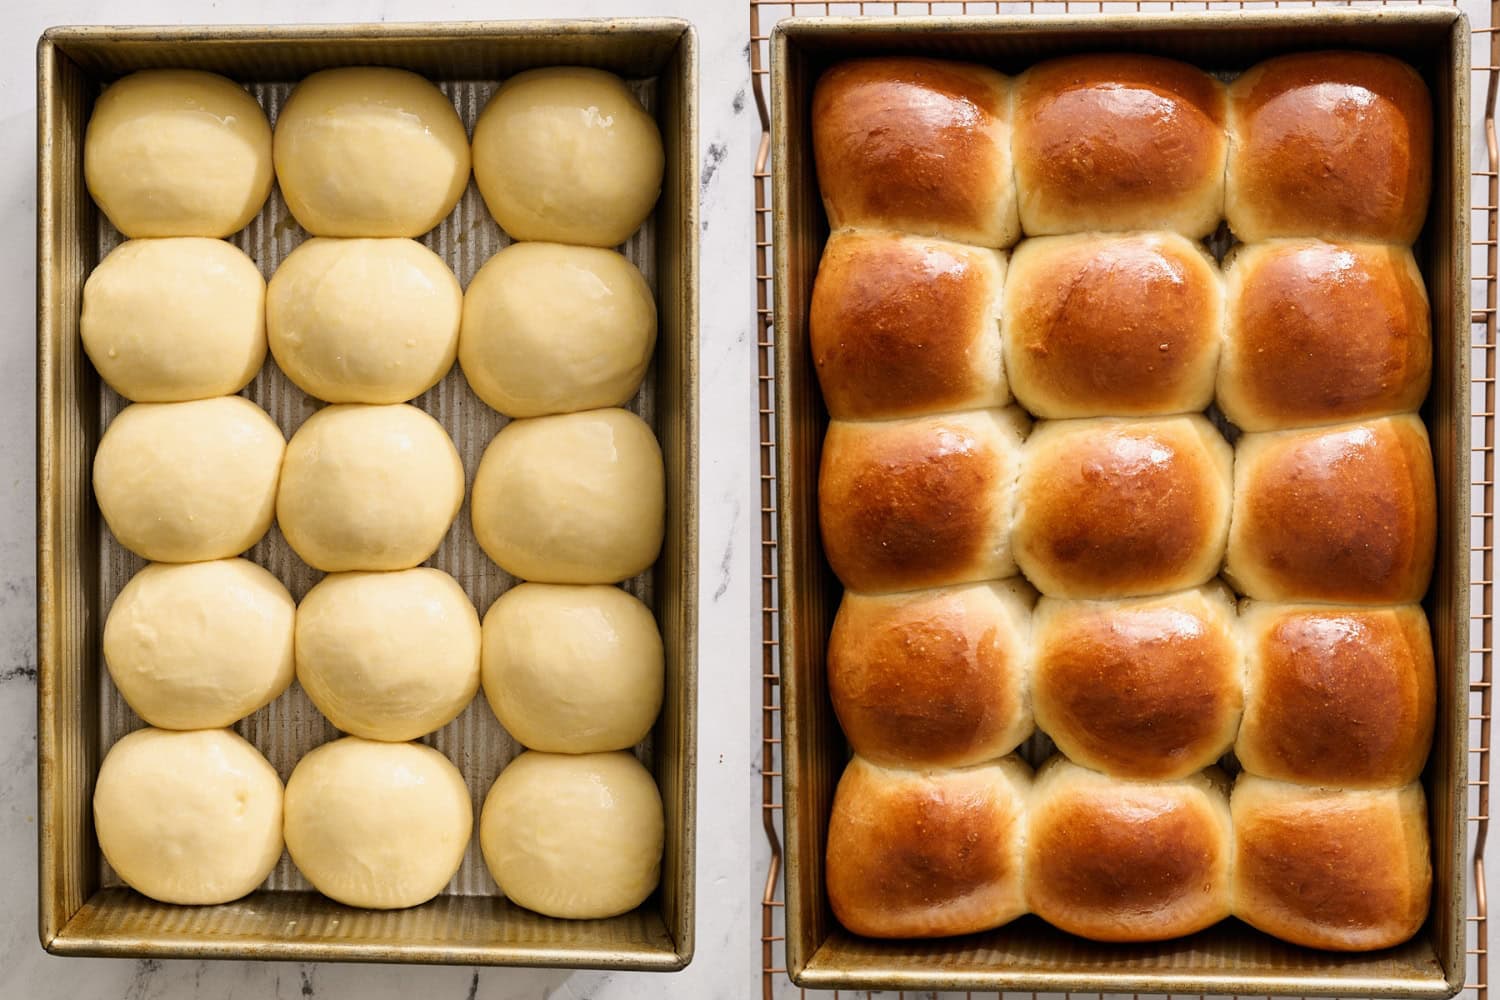
Bake. Brush with egg wash and bake at 375°F for 20-22 minutes, or until golden brown.
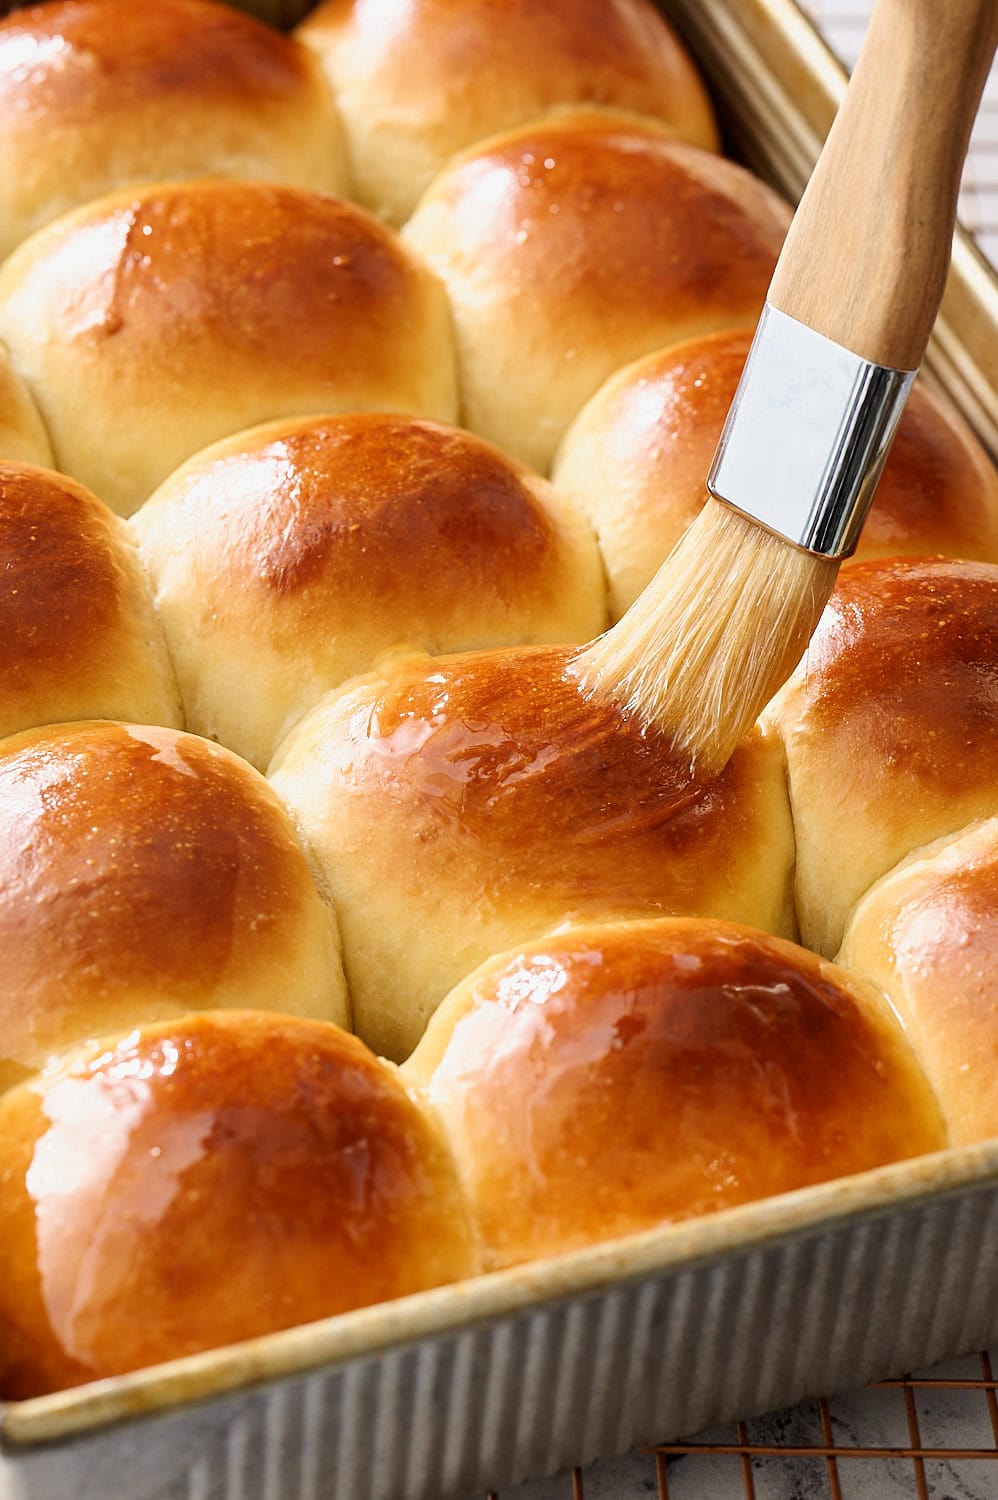
Top with honey butter. As soon as they come out of the oven, brush with the mixture of honey and melted butter. Sprinkle with flaky sea salt.
How to Work with a Stickier Dough
This dough is very rich and slightly sticky. In order for your final rolls to bake up soft, tender, light, and fluffy, it’s important to avoid adding too much additional flour.
Note: if you live in a humid climate or use unbleached flour (like King Arthur Bread Flour), you may need to add 2 extra tablespoons (16 grams) of flour.
It’s FAR better for the dough to be sticky. As it rises, the flour will absorb moisture and it’ll become easy to handle.
So even if you need to use a flexible plastic bench scraper to get the dough into its oiled bowl for rising, that is far better than adding extra flour to make it more manageable to move, only to end up with dense, dry, or tough rolls.

How to Tell If the Dough is Done Rising
Gently stick a finger into the risen dough. If an indentation remains, the dough is done rising and ready to shape. If the dough springs back, it needs more rising time.
Storage & Make ahead
You can make these rolls ahead in one of two ways:
Option 1: Refrigerate during the first rise
Let the dough rise for 30 minutes, then transfer to the fridge for several hours or overnight. Shape into rolls and proceed with the second rise as the recipe instructs, adding more time to account for the dough being cold.
Option 2: Refrigerate after shaping
Cover the pan of shaped rolls tightly with plastic wrap and let rise for about 20 minutes at room temperature, then refrigerate for up to 24 hours. Chilling slows the rise and allows more flavor to develop overnight.
When ready to bake, bring the rolls to room temperature and allow them to finish rising until about doubled in size (this timing will depend on how warm your kitchen is). Bake as the recipe directs.
Storing & Freezing Baked Honey Butter Rolls:
Store leftovers in an airtight container at room temperature for up to 3 days. Rolls can be frozen for up to 1 month, with or without honey butter topping, though freezing plain yields best results. To serve, thaw at room temperature for several hours, warm in a 350°F oven for about 5 minutes, then brush with honey butter and finish with flaky sea salt, if needed.

FAQs
Reheat them for a few minutes in a 300°F oven or toaster oven until they’re warmed through to refresh before serving. If they seem a little stale, you can also toast them to serve as a slider or sandwich! Avoid microwaving, which will make the rolls spongy.
Yep! Use the same amount (1 envelope or 2 1/4 teaspoons) and note that your rising times will be longer. You can proof the active dry yeast with the warm (115-120°F) milk, butter, and honey for 5 minutes to help activate it. This isn’t necessary but may speed up the rising times.
They’re perfect with soup, Thanksgiving turkey, Christmas or Easter ham, with BBQ meats, or as slider buns for burgers or breakfast sandwiches.
Nope! With rolls, I find that glass or ceramic pans work well, too.
Yes! I recommend making 12 smaller rolls (instead of 15 larger ones) so they can be divided evenly among two pans.

Email This Recipe
Enter your email, and we’ll send it to your inbox.
Ingredients
For the rolls:
- 4 tablespoons (57 grams) unsalted butter
- 1 1/4 cups (296 grams) whole milk
- 2 large eggs, lightly beaten
- 1/4 cup (84 grams) honey
- 2 1/4 teaspoons (1 packet) instant yeast*
- 1 1/2 teaspoons fine sea salt
- 4 3/4 cups (603 grams) bread flour**
For topping:
- 1 egg, lightly beaten
- 2 tablespoons (28 grams) unsalted butter
- 1 tablespoon (21 grams) honey
- Flaky sea salt, for sprinkling
Instructions
- In a small saucepan, melt butter. Add the milk and heat until warm, about 115-120°F (any hotter and you risk killing the yeast).
- Combine the milk, butter, eggs, honey, yeast, and salt in the bowl of a stand mixer. Add about half of the flour and stir with the dough hook until a rough, shaggy dough forms. Attach the dough hook to the mixer, turn to medium-low speed, and gradually add the remaining flour.
- Knead until a mass of dough begins to form. Continue kneading on medium speed for about 10 minutes, or until a soft, smooth, and elastic dough ball is formed. The dough should be tacky and will stick slightly to the bottom of the bowl. If it’s unbearably sticky, add up to 3 tablespoons additional flour, 1 tablespoon at a time. Avoid adding too much additional flour, otherwise your rolls will become dense.
- Lightly spray a large, clean bowl with nonstick cooking spray and place the dough inside. If the dough is sticking to your hands, use a plastic scraper to help remove it to the oiled bowl.
- Cover the bowl lightly with plastic wrap. Let rise at room temperature until doubled in size, about 90 minutes to 2 hours.
- Spray a 9 by 13-inch baking pan with nonstick cooking spray.
- Gently deflate the dough. Divide the dough into 15 equal pieces. For extra precision, weigh the mass of dough and divide by 15. Weigh out each portion as you go.
- Shape each piece into a tight ball by gathering pieces of dough into one central point and pinching that point firmly together to create surface tension. Roll each dough ball on a clean (unfloured) counter and place seam side down in the prepared pan.
- Lightly cover with plastic wrap and let rise until doubled in size, about 1 hour to 90 minutes.
- Preheat the oven to 375°F.
- Brush the rolls gently with the beaten egg. Bake for 20 to 22 minutes, or until golden brown.
- While the rolls bake, melt the butter in a small heatproof bowl in the microwave. Stir in the honey until combined.
- Brush the rolls with the honey butter immediately after baking, then sprinkle with flaky salt. Serve warm. Store leftovers in an airtight container for up to 3 days.
Notes
More Dinner Roll Recipes You’ll Love:
Photos by Joanie Simon.


Just made these for Easter and the family loved them! They were super easy to make and delicious.
My only feedback would just be a bit of clarification in the recipe. For example, I made the recipe following the second bake ahead instructions (putting them in the fridge after shaping), but was confused in the morning how long to leave them out before baking. It said until doubled in size, but since they had risen overnight in the fridge, does that include that rise or should they have doubled the size they were after coming out of the fridge? I also didn’t have baking spray, so I greased my pans with a bit of oil but wasn’t sure if there was a better/recommended way to do it.
These rolls are perfect! Just a hint of sweetness and the salt on top is the best touch. A new favorite!
These rolls are incredible!! I can’t make them enough for my family!!! Many Thanks
I am wondering about letting these have their second rise in the pan overnight in the fridge and baking them in the morning before church? Any thoughts on whether that would work?
Hi, Margo! Yes, these rolls can be refrigerated after shaping — see make-ahead instructions above the recipe here. Enjoy! 🙂
I made these rolls yesterday and they are absolutely delicious!! I followed the recipe exactly except I made 12 (huge) rolls instead of 15. The egg wash really helped give them a gorgeous color and I loved the sprinkling of salt on top of the honey-butter glaze. They were equally fantastic this morning for breakfast. Outstanding recipe, definitely a keeper!!
So happy you loved them, Paula! Thanks for the wonderful review 🙂