Sandwich Rolls - Handle the Heat
Filed Under: Bread | Savory

Sandwich Rolls

  |  
April 13th, 2011
4.91 from 11 votes
4.91 from 11 votes

Sandwich Rolls made from scratch are about 100 times better than the preservative-laden store-bought kind! See just how easy they are to make.

Yield: 6 rolls

Prep Time: 25 minutes

Cook: 17 minutes

Tessa's Recipe Rundown...

Taste: Like a more tasty version of the bread rolls from your local grocery store. Texture: Rich, soft, sturdy. Ease: The dough comes together very easily (especially if you have a mixer or bread machine) and is easy to shape as it's not too sticky. 
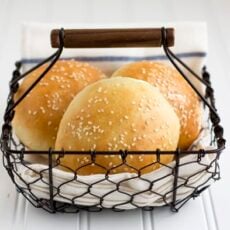
Appearance: Lovely golden brown exterior accentuated by sesame seeds. Poppy seeds would also make for a beautiful roll. Pros: Dough is easy to work with, tastes great, and freezes well. Perfect for sandwiches, great for hamburgers. Cons: None. Would I make this again? I made a double batch to freeze half of them and have already tapped into the frozen batch for hamburgers.

This post may contain affiliate links. Read our disclosure policy.

I don’t know why more people don’t bake their own bread. Most of the time spent creating the bread isn’t hands on. In fact, I’ve even gone grocery shopping and exercised during the dough’s rising times. Bread making is perfect for a day off work and believe me, it’s worth the few hours. Homemade bread just tastes and feels so much better than store-bought, not to mention the smell of bread baking is intoxicating. You also get to control what goes into your bread, so no high fructose corn syrup or hydrogenated oils. And, you can make double batches and freeze whatever you don’t plan on using so you can have homemade bread available anytime. To me, it’s a win, win, win, win!

4.91 from 11 votes

How to make
Sandwich Rolls

Yield: 6 rolls
Prep Time: 25 minutes
Cook Time: 17 minutes
Inactive Time 2 hours
Total Time: 2 hours 42 minutes
Sandwich Rolls made from scratch are about 100 times better than the preservative-laden store-bought kind! See just how easy they are to make.

Ingredients

  • 3 cups King Arthur Unbleached All-Purpose Flour
  • 1 1/2 teaspoons instant yeast
  • 1 1/2 teaspoons sugar
  • 1 1/4 teaspoons salt
  • 1 large egg
  • 2 tablespoons unsalted butter
  • 3/4 cup water

Directions

Manual Method:

  1.  In a large bowl, or the bowl of your electric mixer, combine all of the ingredients, stirring till the dough forms a cohesive mass and begins to clear the sides of the bowl. Knead the dough for 5 minutes, then allow it to rest for 10 minutes (which gives the dough a chance to absorb the liquid, and the gluten in the flour a chance to relax.) Knead the dough for an additional 5 minutes, or until it’s smooth and supple. The dough should be quite stiff, but not at all “gnarly;” adjust its consistency with additional flour or water, as necessary. Transfer the dough to a lightly greased bowl or dough-rising bucket, cover the bowl or bucket, and allow the dough to rise till it’s noticeably puffy, about 1 hour.

Bread Machine Method:

  1.  Place all of the ingredients into the pan of your machine, program the machine for manual or dough, and press start. About 10 minutes before the end of the final kneading cycle, examine the dough’s consistency; it should be quite stiff, but not at all “gnarly;” adjust it consistency with additional flour or water, as necessary. Allow the machine to complete its cycle.

Shaping:

  1.  Transfer the dough to a lightly greased work surface, and divide it into six equal pieces. Shape the pieces into round balls, and place them on a lightly greased or parchment lined baking sheet. Cover the rolls, and allow them to rise for 45 minutes to 1 hour, or until they’ve almost doubled in volume.  Dip tops in milk and coat with poppy or sesame seeds, if desired.
  2. Bake the rolls in a preheated 425°F oven for 15 to 17 minutes, or until they’re golden brown. Remove them from the oven, and cool on a wire rack.

Recipe Notes

Adapted from King Arthur
Course : Side Dish
Cuisine : American

Tessa Arias
Author: Tessa Arias

I share trusted baking recipes your friends will LOVE alongside insights into the science of sweets. I'm a professionally trained chef, cookbook author, and cookie queen. I love to write about all things sweet, carb-y, and homemade. I live in Phoenix, Arizona (hence the blog name!)

Tessa Arias

About Tessa...

I share trusted baking recipes your friends will LOVE alongside insights into the science of sweets. I'm a professionally trained chef, cookbook author, and cookie queen. I love to write about all things sweet, carb-y, and homemade. I live in Phoenix, Arizona (hence the blog name!)

Find Tessa on  

Leave a Comment & Rating

Add a Review or Question

*Please select a rating to complete your comment.

Recipe Rating


  1. #
    Sue Burns — May 24, 2023 at 9:33 am

    These were super easy! And I make bread all the time! I followed your recipe exactly as you stated. I used my kitchen aid for every step. They baked for 15mins and have a beautiful honey top. I put sesame seeds on half. This Is A definite keeper in my book. I’m sharing with my friends. To anyone that’s a beginner this will not be intimidating to you at all.

  2. #
    Cheryl — April 29, 2023 at 2:06 am

    These turned out so beautifully; I couldn’t be happier. First knead with the dough hook in my stand mixer and 2nd knead by hand. Really easy dough to work with. Soft, fluffy and delicious!

  3. #
    Roy — March 7, 2022 at 10:42 am

    Can I use a dough hook on my mixer to knead this dough?/ I f so, how long should I mix it with the dough hook?
    Thank you
    Roy

    • #
      Emily — March 8, 2022 at 10:30 am

      Hi Roy! We recommend kneading by hand as it’s a bit gentler, producing gluten that stays together better, which can ultimately lead to a chewier texture (it’s a stress reliever too!). That being said, the difference isn’t dramatic enough to not use a mixer 🙂 If using a mixer, use the dough hook, and you’ll knead for about half the time stated. Be sure to pay attention more to the sensory indications in the directions (i.e. smooth and supple). I hope that helps!

  4. #
    Bruce Botelho — February 5, 2022 at 2:10 pm

    Easiest recipe I ever made. Dough was nice and fluffy baked nicely and delicious. Did it all in a stand mixer. This will be my go to recipe.

  5. #
    Liz — December 19, 2021 at 4:01 pm

    Whipped a batch of these up last week. So good! Now I am trying out a double batch – because we eat these too much! Freezing them works really well so they always taste nice and fresh.

  6. #
    Bill — September 17, 2021 at 7:26 am

    Can I freeze this

    • #
      Emily — September 17, 2021 at 10:47 am

      Sure! You can actually freeze the rolls after they’re baked, just let them defrost at room temperature and rewarm in the oven. You can also freeze the dough, but we prefer to freeze them baked Hope that helps!

  7. #
    Sonya — April 22, 2021 at 4:20 am

    This sandwich rolls recipe is excellent. I will make them again.

    • #
      Tessa — April 22, 2021 at 2:23 pm

      Wonderful! So glad you loved them, Sonya!

  8. #
    Cheryl Walter — December 24, 2020 at 6:02 am

    How do you dip the tops in milk?

  9. #
    Danielle — November 11, 2020 at 12:00 pm

    This was the first time that I baked bread. It was AWESOME much better than I could have imagined. I fed it to my mother and my children and they all loved it.

    • #
      Tessa — November 13, 2020 at 11:50 am

      Ah that makes me so happy! So thrilled this recipe was enjoyed by your family.

  10. #
    Annie — August 18, 2020 at 11:38 am

    I made these rolls for our wedding anniversary and my husband loves them. I think I have to adjust the temperature for my gas oven, the bottom got slightly dark and I like a little more crust on the top, but that is minor. Great recipie, well worth trying, thank you.

  11. #
    Juanita — August 5, 2020 at 8:07 pm

    One of the best and easiest recipes I found yet! I did add one extra tbs of butter and and doubled the sugar and added a bit more water (I live in a dry area). Omg you are amazing for this recipe! I can’t wait to make more and to try other recipes

  12. #
    Debbie — July 21, 2020 at 12:41 pm

    Can I use King Arthur bread flour

  13. #
    Tess — July 17, 2020 at 7:45 pm

    Do you freeze after baking and cooling the rolls? If so, to reheat, do you put the frozen rolls in the refridgerator for 24 hours then warm back up in the oven? What do you suggest?

  14. #
    Shawnmarie — April 4, 2020 at 10:07 am

    Does it matter if I use bread flour. It was to late before I realized.

  15. #
    Rich — March 29, 2020 at 5:58 am

    I made this in the bread machine and they are delicious. Nice crust and soft inside.

  16. #
    Bonnie — March 15, 2020 at 4:25 pm

    It didn’t quite turn out like your picture. Tasted good though.

  17. #
    Tracie — October 31, 2018 at 7:53 pm

    These were awesome! Making and freezing the dough next time so I can have hot, fresh rolls whenever!

  18. #
    Bryan — November 20, 2017 at 2:20 pm

    What size are these supposed to be when they are finished baking ? Will regular (not instant) yeast work with this ? Thank you, have a great day !!

  19. #
    Jocy — September 8, 2016 at 3:20 pm

    Hi Tessa, if i want to triple this recipe, do i triple each ingredient or are there some vatiations?

  20. #
    Sandra — May 16, 2015 at 9:42 am

    Made these yesterday….loved them! One question: Was I supposed to pat down the balls of dough before baking? My baked rolls came out very tall (not wide at all)…but still delicious.:)

  21. #
    Kim Baumgart — December 2, 2012 at 2:27 pm

    These rolls are delicious and beautiful – my children thought I had bought them at a store and want me to make them again……and again….

  22. #
    Patsy A — July 22, 2012 at 10:24 pm

    I made these for dinner, and they turned out great. I will definitly be using this recipe again.

  23. #
    Jen G — April 19, 2012 at 4:43 pm

    I know this post is a year old but we made these last night and they were awesome!! Did you freeze the dough or the baked rolls? If you froze the dough, at which step did you freeze? Thanks so much!! Jen

    • #
      handleheat — April 19, 2012 at 4:56 pm

      I froze the baked rolls!

  24. #
    Jun — April 14, 2011 at 4:53 am

    It looks so inviting! Round and puffy… Mine were not that nice!

  25. #
    Tracey — April 14, 2011 at 1:47 am

    I totally agree Tessa – I rarely buy bread anymore because it's so easy and fun to make at home. Your rolls look perfect!

  26. #
    Maris — April 13, 2011 at 10:42 pm

    These look totally professional! I am sure they taste as great as they look!

  27. #
    Cookin' Canuck — April 13, 2011 at 10:03 pm

    These are the most beautiful sandwich rolls. There is nothing like homemade bread.

  28. #
    Flavia — April 13, 2011 at 4:18 pm

    I've made these as well–the exact same recipe! It was part of a Memorial Day menu I made for dinner with friends: http://www.flaviasflavors.com/home/memorial-day-m… These rolls are the best I've had and so easy to make! Wonderful post Tessa!

  29. #
    iscribbler — April 13, 2011 at 3:57 pm

    Just to double check – once I shape, dip and seed the rolls, is that when I can freeze them? I'm thinking about making these this weekend since we planned to have hamburgers, too, and I want to freeze some of them. 🙂 Thanks! They look really good!

    • #
      Tessa — April 13, 2011 at 4:20 pm

      Hi! You can actually freeze the rolls after their baked, just let them defrost a room temperature. You can rewarm in the oven too. You can also freeze the dough, but I prefer to freeze them baked 🙂 Hope that helps.

  30. #
    fooddoodles — April 13, 2011 at 3:52 pm

    I completely agree! I love making my own bread. Your rolls look fantastic 🙂

  31. #
    Linds@TheLeanGrnBean — April 13, 2011 at 2:52 pm

    these are beautiful!!! love your bread basket. i think i need to branch out from bread into rolls. this might be just the recipe!

Trackbacks/Pingbacks

  1. Pingback:Chewy and Soft Oat Healthy Sandwich Roll - Homecooknblog

Join the Handle the Heat Community

Cookie Customization Chart
Do you want a more delicious life?
Instead of digging through cookbooks and magazines and searching the internet for amazing recipes, subscribe to Handle the Heat to receive new recipe posts delivered straight to your email inbox. You’ll get all the latest recipes, videos, kitchen tips and tricks AND my *free* Cookie Customization Guide (because I am the Cookie Queen)!
As Seen On....
NPR People Time Glamour Readers Digest The Huffington Post BuzzFeed