


Tessa Arias, Chef and Cookbook Author
This post may contain affiliate links. Read our disclosure policy.

Check out The Ultimate Guide to Chocolate Chip Cookies Part One, plus The Ultimate Guide to Chocolate Chip Cookies Part 2 and Ultimate Guide to Chocolate Chip Cookies Part 4!
Have you ever wondered what ingredients you could substitute in a chocolate chip cookie recipe for dietary needs? How to make cookies healthier, whole wheat, vegan, gluten-free, egg-free, or butter-free?
Today I’m SO thrilled to be sharing with you my Ultimate Guide to Chocolate Chip Cookies part THREE! We’re diving into dietary and health restrictions today. I can’t tell you how often I’m asked how to make a recipe work for special diet needs, and I received many requests to do an Ultimate Guide to Chocolate Chip Cookies on just that topic. As someone without any special diet or health needs, this is an area I am fairly unfamiliar with. I thought this experiment would be the perfect way to dip my feet into this world!
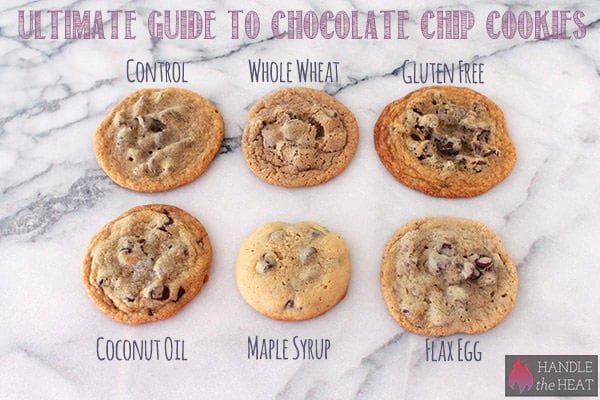
I used an adapted version of the Nestle Tollhouse Chocolate Chip Cookie recipe as my control and made small variations among the ingredients to show you how they affect the cookie, all with dietary restrictions and health needs in mind. I kept everything else the same in each recipe test so we could observe the differences in the finished cookie, photographing all the results for you. See the comparison photo at the end of this post.
Tools and Ingredients Used (when applicable):
–Spring-Loaded Cookie Scoop (Medium or 1 1/2-Tablespoon size)
–Chicago Metallic sheet pans
–Escali Digital Food Scale
–KitchenAid 5-quart Stand Mixer
–Oven thermometer
–Unbleached parchment paper
-Gold Medal All-Purpose Flour
-Fine sea salt
-Light brown sugar
-Large eggs
-Unsalted butter at a cool room temperature
Control Recipe

Ingredients:
1 cup plus 2 tablespoons (142 grams) all-purpose flour
1/2 teaspoon baking soda
1/2 teaspoon salt
1 stick (113 grams) unsalted butter, at room temperature
1/4 cup plus 2 tablespoons (75 grams) granulated sugar
1/4 cup plus 2 tablespoons (75 grams) packed light brown sugar
1/2 teaspoon vanilla
1 large egg
1 cup (170 grams) semi sweet chocolate chips

Directions:
Preheat oven to 350°F. Line baking sheets with nonstick baking mats or parchment paper.
In a medium bowl combine the flour, baking soda, and salt.
In the bowl of an electric mixer beat the butter, granulated sugar, and brown sugar until creamy, about 2 minutes. Add the egg and vanilla, beating well to combine. Gradually beat in the flour mixture. Stir in the chocolate chips. Scoop 1 1/2 tablespoon-sized balls and place onto prepared baking sheets.
Bake for 10 minutes, or until golden brown. Cool for 2 minutes before removing to wire racks to cool completely.
Whole Wheat Flour:
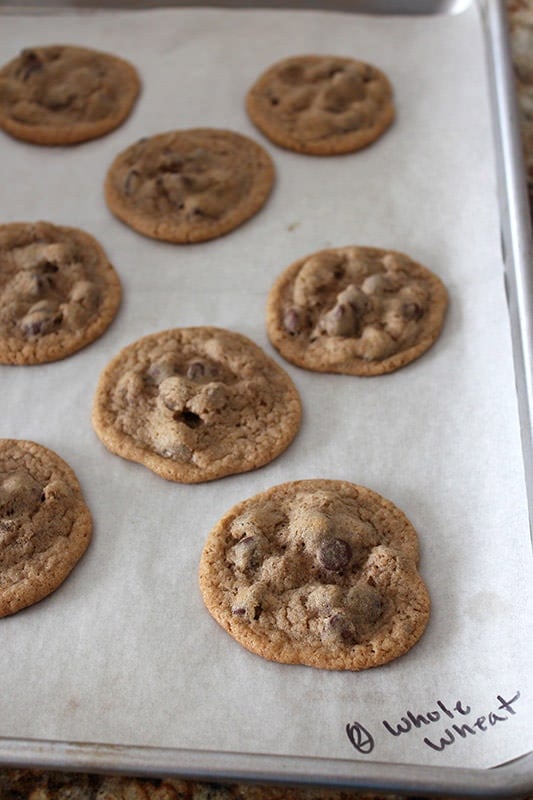
For this batch I substituted all of the 1 cup plus 2 tablespoons (5 ounces or 142 grams) of all-purpose flour in the control recipe with 1 cup plus 2 tablespoons (4.7 ounces or 135 grams) of King Arthur Whole Wheat Flour, proceeding with the instructions as written. The whole wheat dough was much stiffer than the control dough and the finished cookies were chewy, firm, with a nutty flavor. I was actually quite surprised by how delicious they were, I put a little smiley face on my notes. If you’re looking to add more fiber and whole wheat goodness to your diet, you can DEFINITELY get away with substitute half, if not all, whole wheat flour in your chocolate chip cookie recipes. I’m sure white whole wheat flour would be even less noticeable.
Gluten-Free:
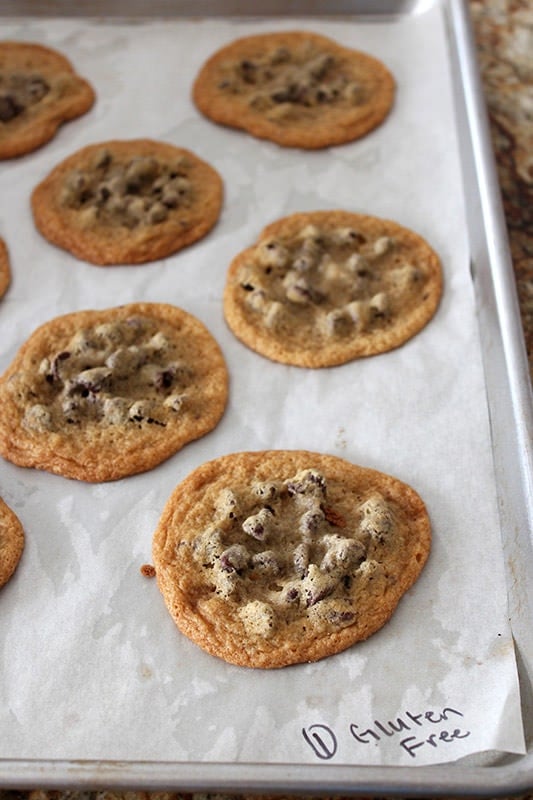
To make a batch of gluten-free cookies, I substituted all of the flour with the same exact amount of Cup 4 Cup Gluten-Free Flour, as directed in the Cup 4 Cup package directions (the name is quite literal). Beyond Amazon, you can find Cup 4 Cup at Sur la Table and Williams-Sonoma. I know there are MANY blends of flours and various ingredients to create a gluten-free flour mixture but I wanted to use something streamlined that I knew you guys would be able to get your hands on, and not have to spend a small fortune on half a dozen different specialty flours and ingredients. Since those who cannot eat gluten are often well versed in gluten-free recipes, I thought this would be especially helpful to those unfamiliar with gluten-free baking who may need to serve a gluten-free guest occasionally.
The gluten-free dough with Cup 4 Cup was pale and sticky. Overall, the Nestle control recipe is a fairly wet dough to begin with so I think when substituting with Cup 4 Cup, the recipe could have used a little more flour. Despite the sticky dough I proceeded, since I was trying to gauge just how effective this gluten-free product is, if it can truly be substituted one-for-one. The cookies unsurprisingly spread fast and flat with crunchy edges. I’d venture to assume that if I were to add a 1/4 cup more of the Cup 4 Cup they wouldn’t have spread so much. When I took my first bite into these cooled cookies I was pretty impressed. If I hadn’t known they were gluten-free I probably would have never guessed. The only other change was that the texture was ever so slightly grainy. Hardly noticeable though. Cup 4 Cup is definitely a great gluten-free option for cookies, though you may need to experiment to get it just right.
Coconut Oil:
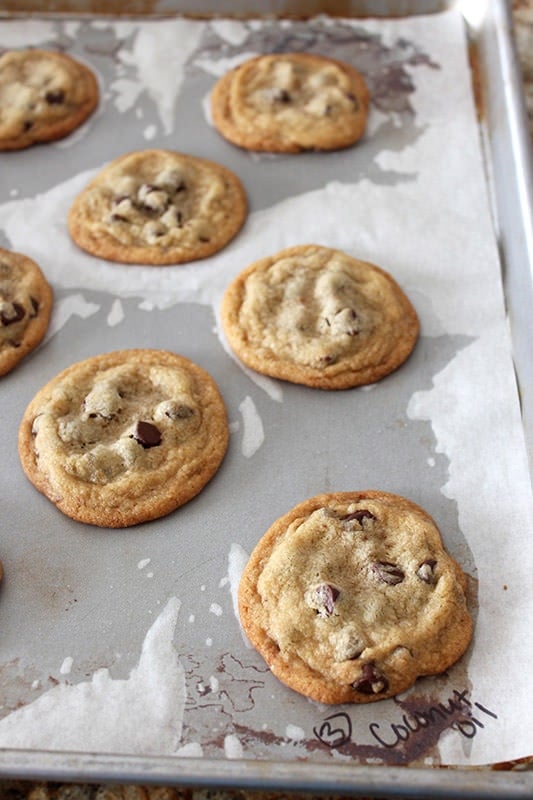
I know many people cannot have dairy, so I wanted to experiment with a butter-free cookie recipe. I substituted the stick of unsalted butter (1/2 cup or 4 ounces) in the control recipe with 1/2 cup room temperature coconut oil, weighing 3.68 ounces. I proceeded with the recipe as written and the resulting dough was ultra soft, pale, and slightly greasy. The baked coconut oil cookies were super chewy and moist, with just a hint of coconut flavor. I actually think the coconut scent was stronger than the flavor. These cookies LOOKED just like normal cookies, but were quite greasy. Regardless, they were delicious and had a great overall mouthfeel.
Maple Syrup:

Just like dairy, I know many people cannot consume processed sugar. My mom is actually allergic to cane sugar, so I was extra motivated to test out a sugar-free batch. Instead of the combined 3/4 cup total of brown and granulated sugars in the control recipe, I used 1/2 cup of pure grade A dark amber maple syrup. Since I was adding so much liquid to the dough, I also added in a 1/4 cup of additional flour, an amount based off some internet research I did into baking with maple syrup. I used my electric mixer to beat the butter by itself until creamy, then added the maple syrup and beat until very well combined before proceeding with the rest of the recipe as written. The dough was still very, very sticky but I proceeded, trusting my substitution research. To my surprise, the cookies barely spread. Usually, very wet doughs spread more (such as the gluten-free batch), but these maple syrup cookies remained small, tall, soft, and slightly cakey with a little crispness at the edges. They definitely had a more mellow sweetness to them, but were still quite tasty.
Flax Egg:
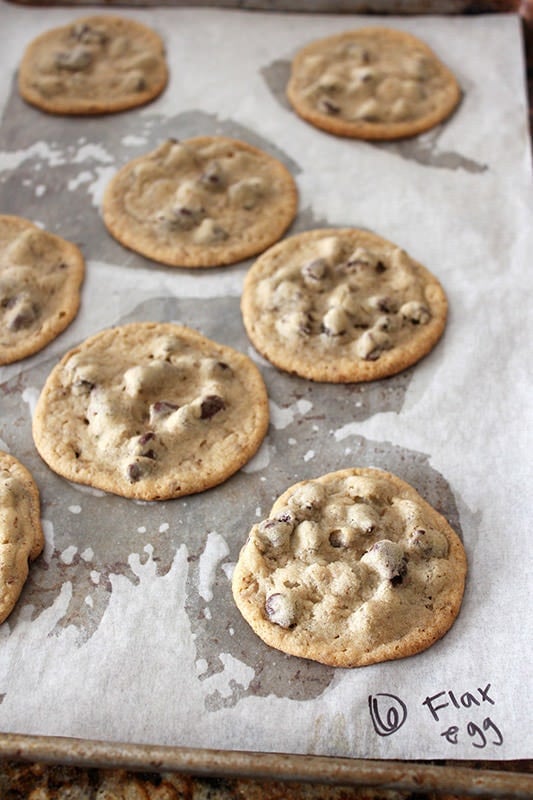
Eggs are a common allergen and I am frequently asked how to substitute them, whether for allergies or to make a recipe vegan-friendly. There’s nothing else in the world like an egg, so I’ve always been hesitant to experiment with egg substitutions. I actually LOVE adding an extra egg yolk in my cookies because it makes them more rich and chewy. So the thought of using NO eggs makes me nervous and unfortunately I am sad to say, it still does. It appears I have more experimenting to do though I’m not quite sure with what – vegan friends can you help me out? The most common egg substitute according to the internet is the flax egg, which is 1 tablespoons ground flax meal mixed with 3 tablespoons water. This is what I used to substitute the egg in the control recipe. The resulting cookies were flat, grainy, gritty, and super sweet with no depth of flavor. These were absolutely my least favorite of the experiments. I think flax eggs can work well as a one-for-one substitute in many recipes, but to me it’s far too noticeable in a chocolate chip cookie recipe. If you had absolutely no choice in the matter, a flax egg cookie could probably satisfying a cookie craving but I won’t be using it again since I don’t need to do so.
Final Comparison:
*If you use these images PLEASE give proper credit to me and link back to this post.*
What did you think of these experiments? Have you had success with any dietary substitutions in cookie recipes? Will you be trying out any of these substitutions? Let me know in the comments below – I’d love to hear from you!
All Three Guides in Comparison:
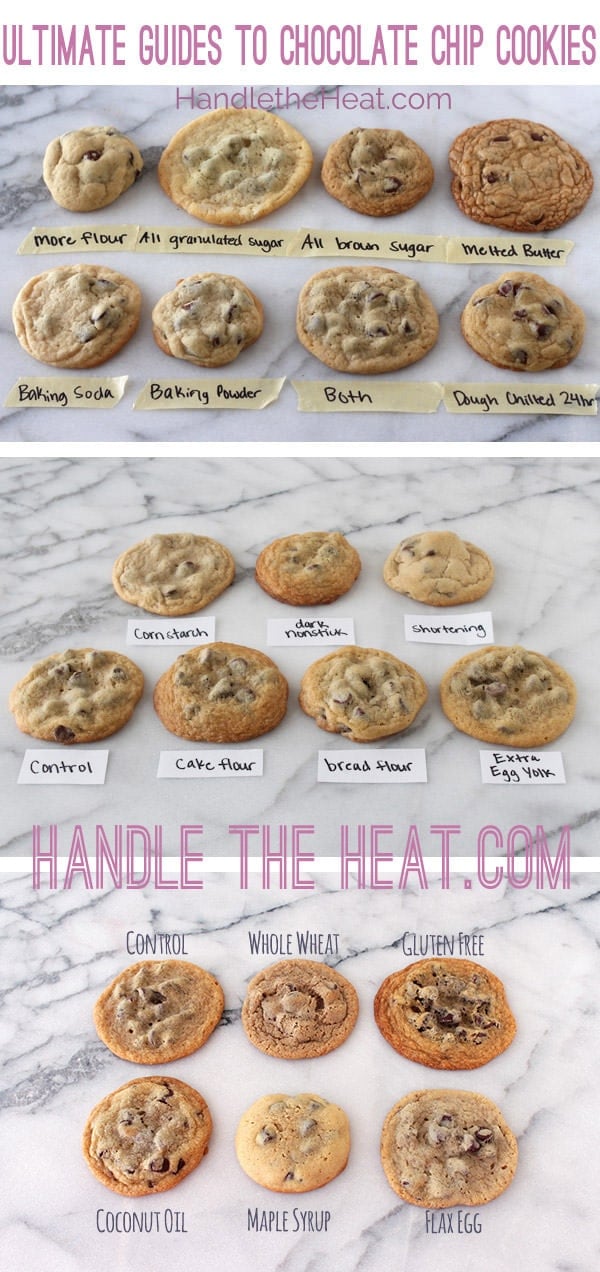
Check out The Ultimate Guide to Chocolate Chip Cookies Part One, plus The Ultimate Guide to Chocolate Chip Cookies Part 2 and Ultimate Guide to Chocolate Chip Cookies Part 4!


I enjoy articles like this. It will take me a little while to digest every thing in the 4 parts. I stopped using the dark cookie sheets a year or so ago. I still have several; what if I put parchment on them? I assume that the dark metal will still affect my cookies. I will use your guidelines as to what happens on all kind of cookies. I have some cook books from America’s Test Kitchen that covered some aspects that you have — never never have I seen as comprehensive a job. Thank you.
I know this was posted a long time ago but I just read it and tried some of them they turned out good. Except I did not like the egg-less. Then I did research and found our you can use 2 Tbsp of water, 1 Tbsp of oil, and 2 tsp of baking powder in replace of an egg. THEY TURNED OUT AMAZING!!! Just like the original recipe did.
I cannot tell you how much I love this!!
Chocolate chip cookies are one of my all time favorite things, and since avoiding gluten, dairy, and sugar it’s been such a mission to find one that works. Just the fact that you’ve experimented with so many variants including gluten free, maple syrup, and coconut oil makes me feel like I’m one step closer to finding my ultimate cookie!
{Teffy’s Perks} X
Try using chia seeds in place of flax meal for the vegan version, holds up and tastes much better. I personally only use the flax eggs for savory preparations and the chai seed eggs for baking. Try it out!
Thanks for the tip!
I wonder if the flax egg would work ok with some psyllium husk? 🙂
Hi Tessa – this is a fun post! I know dairy-free best, and almost always make my cookies with oil, so thought i would weigh in on that one. Think about nutritional ratios – butter has 11 grams of fat per tablespoon while oil has 14! If you use the exact same amount (8 tablespoons) – that is the equivalent of adding 24 grams of extra fat or over 2 tablespoons – hence the greasy results! You need to use much less oil to get suitable, non-greasy cookies 🙂
As for the eggs, I’ve done a lot of subs for those, and agree that flax isn’t my favorite for cookies. Often a “sub” isn’t needed, but just a little more moisture. My favorite in cookies though, is actually dairy-free yogurt. I use just 3 tablespoons per egg.
Friendly vegan here. I love that you’ve done this, soo helpful. I wish I could remember where I read this to give her credit, but this tip really, *really* made a difference in my cookie bakes; Use 3 tablespoons HOT water with 1 tablespoon ground flax seeds. I’ve read the oil goes rancid VERY quickly when you break the seeds up, so I’ve never used the pre-ground stuff, I grind a bunch in my coffee grinder and freeze leftovers. it freezes very well. Anyway, mix it well with a fork just like you would beat an egg, and refrigerate it for 20-30 minutes (or longer, I’ve left it overnight) before using. I’ve tried adding it right away and it worked out similar to what you’re describing. Not too good. 20-30 minutes makes all the difference. The flavor of flax I’ve read can be strong, not sure how it would taste with white flour, but when I use it with whole wheat flour it just adds more of a nutty flavor imo.
Try substituting the egg for a mashed ripe banana. It adds a nice subtle banana flavour, and who doesn’t love the combination of Chocolate and Banana! I love your breakdown of how each ingredient can change a cookie. I am always on the quest for the perfect chocolate chip cookie and I will try some of your suggestions!
Flax eggs done right:
1) Use whole golden, not brown, flaxseeds. Purely aesthetic to avoid discoloration. Do not use pre-ground brown flaxseed unless you want gritty ugly flax eggs.
2) Grind 1 Tbsp. flaxseeds extremely finely until floury. A spice grinder will yield better, and faster, results than a mortar and pestle.
3) Add 3 Tbsp. water and stir well.
4) Refrigerate for at least 5 – 10 minutes to allow the flax egg to set. Don’t skip this step. Exposed to water, the flax seeds will release a viscous, protein-rich mucilage — vegan egg white! Tip: Prep flax eggs ahead of time so they’ll be ready when you need to add them to your recipe.
5) Sub for 1 chicken egg. Whip your gloriously slimy pale-yellow flax eggs into any baked good recipe and enjoy.
For additional eggs, simply increase the recipe amounts, keeping a ratio of 3:1, water to flaxseed. A large batch of flax eggs can be made all at once in a pinch. You can even make extra flax eggs and freeze them for later use. Check out this guide for a more advanced technique: http://www.veganbaking.net/recipes/egg-replacers/flax-seed-egg-replacer
This is brilliant!!!
Hi Tessa
Try substituting buttermilk for the eggs. I use 1/4 cup of buttermilk for each egg. It gives your baked goods a wonderful, creamy/buttery texture and adds extra moisture to any cakes and muffins.
I substitute eggs in all my baking as I am vegetarian and although I do eat eggs my family don’t and they look forward to eating homemade baked goodies at my house as you can’t find eggless stuff in the shops very easily.
Thanks for the suggestion!
Hi Tessa, Love all the details in your blog. I am from Malaysia. Looking forward to read more. I will surely very eager to try your recipes and take note of all the info given… Thanx so much Tessa.
Nice to know you..
Welcome and thank you!