


Tessa’s Recipe Rundown
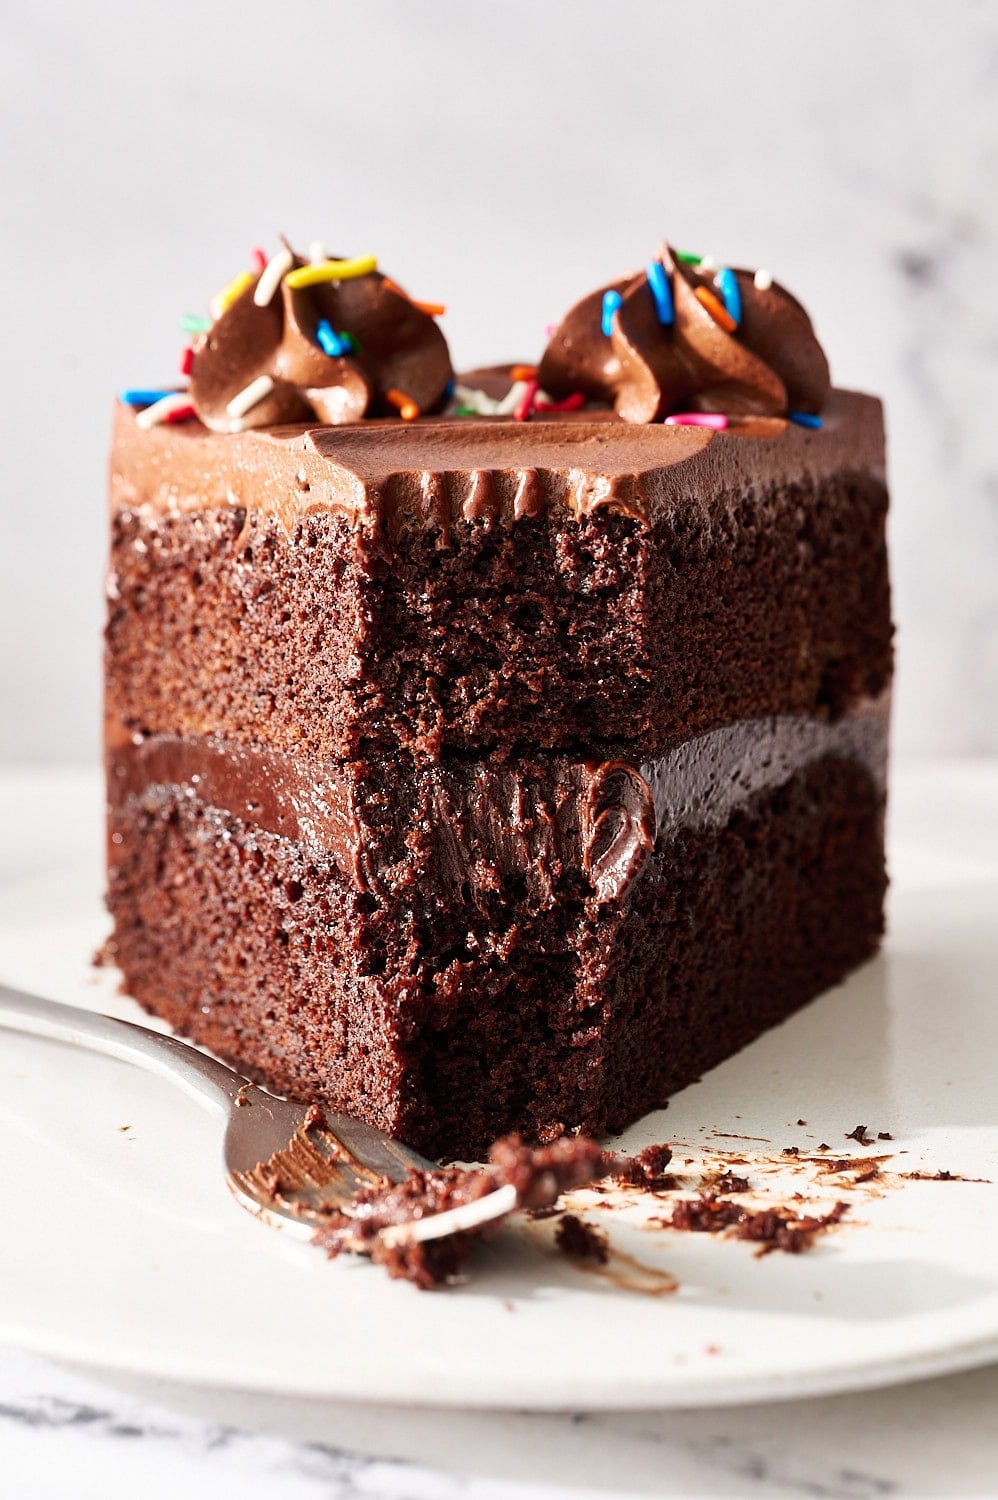
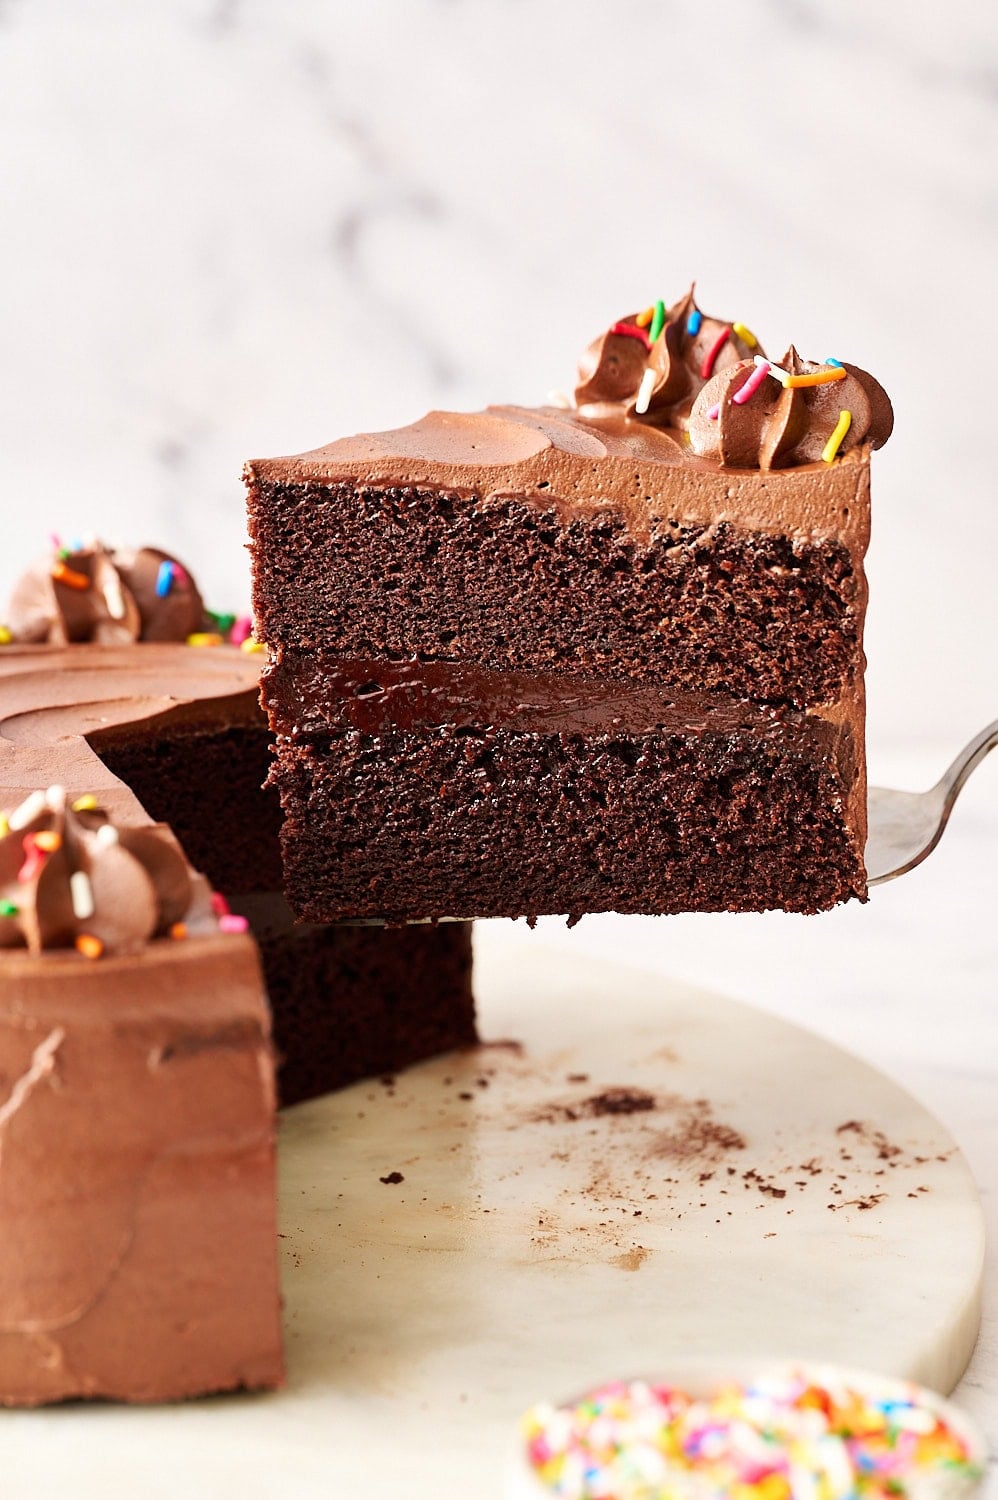
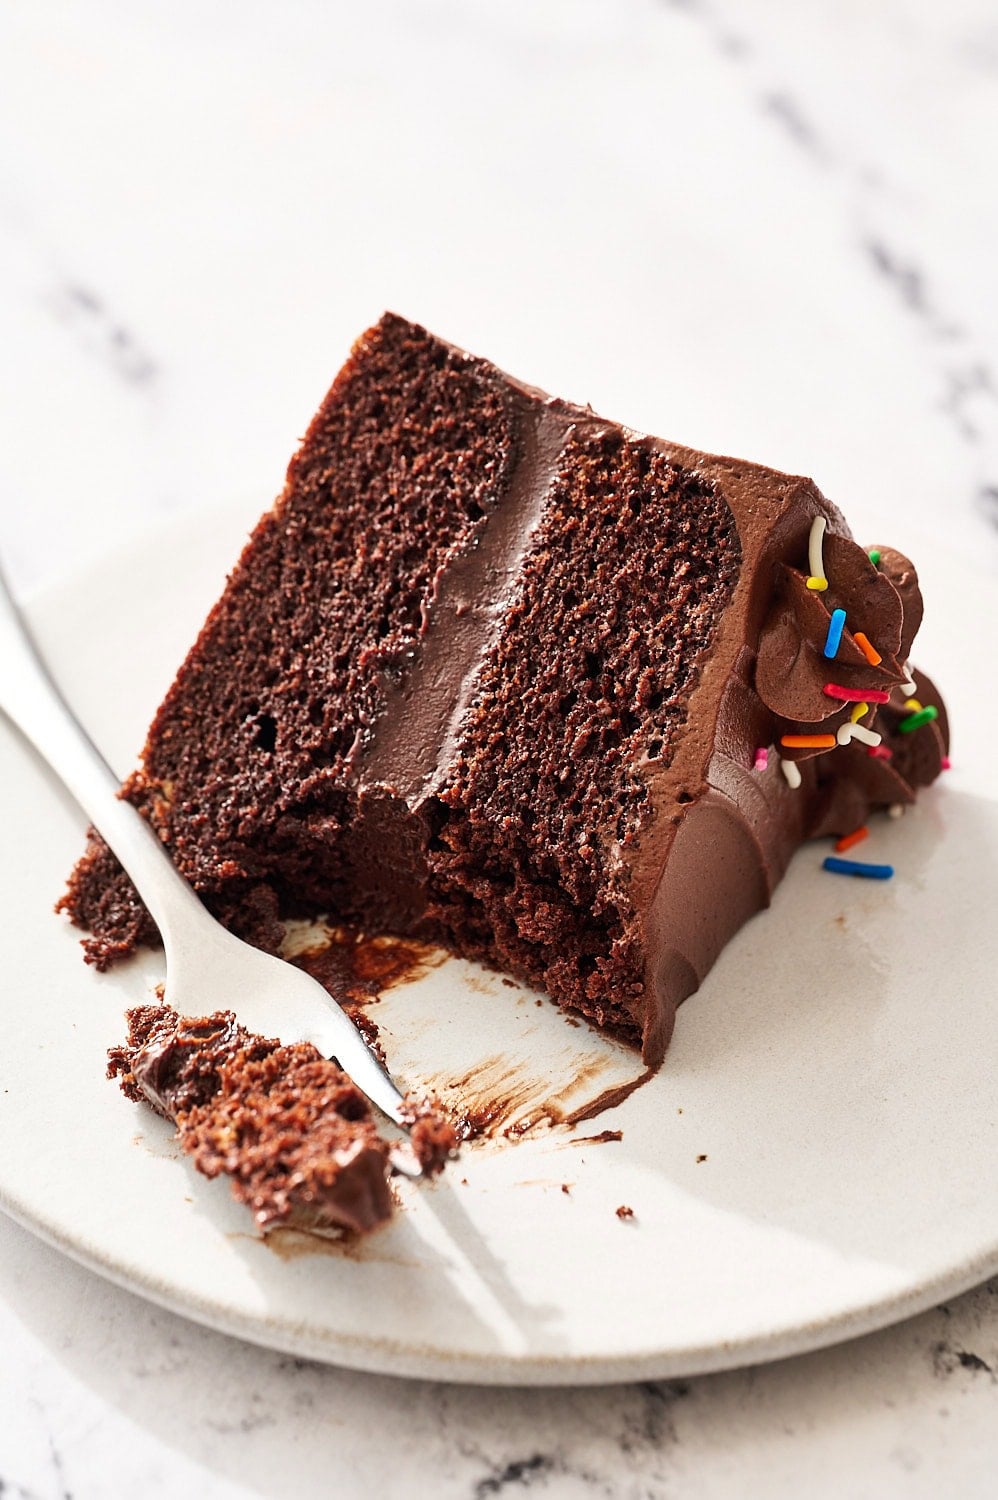
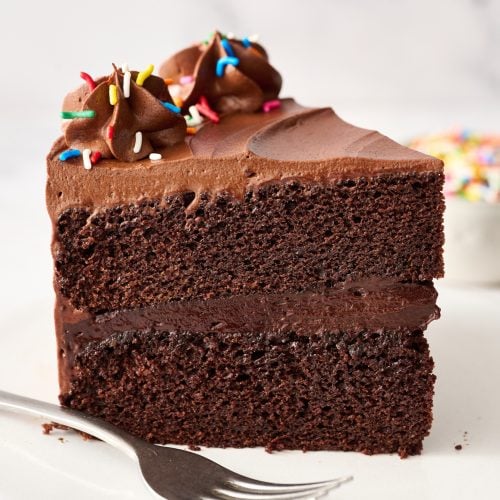
Taste: So rich with chocolate flavor but not overpowering.
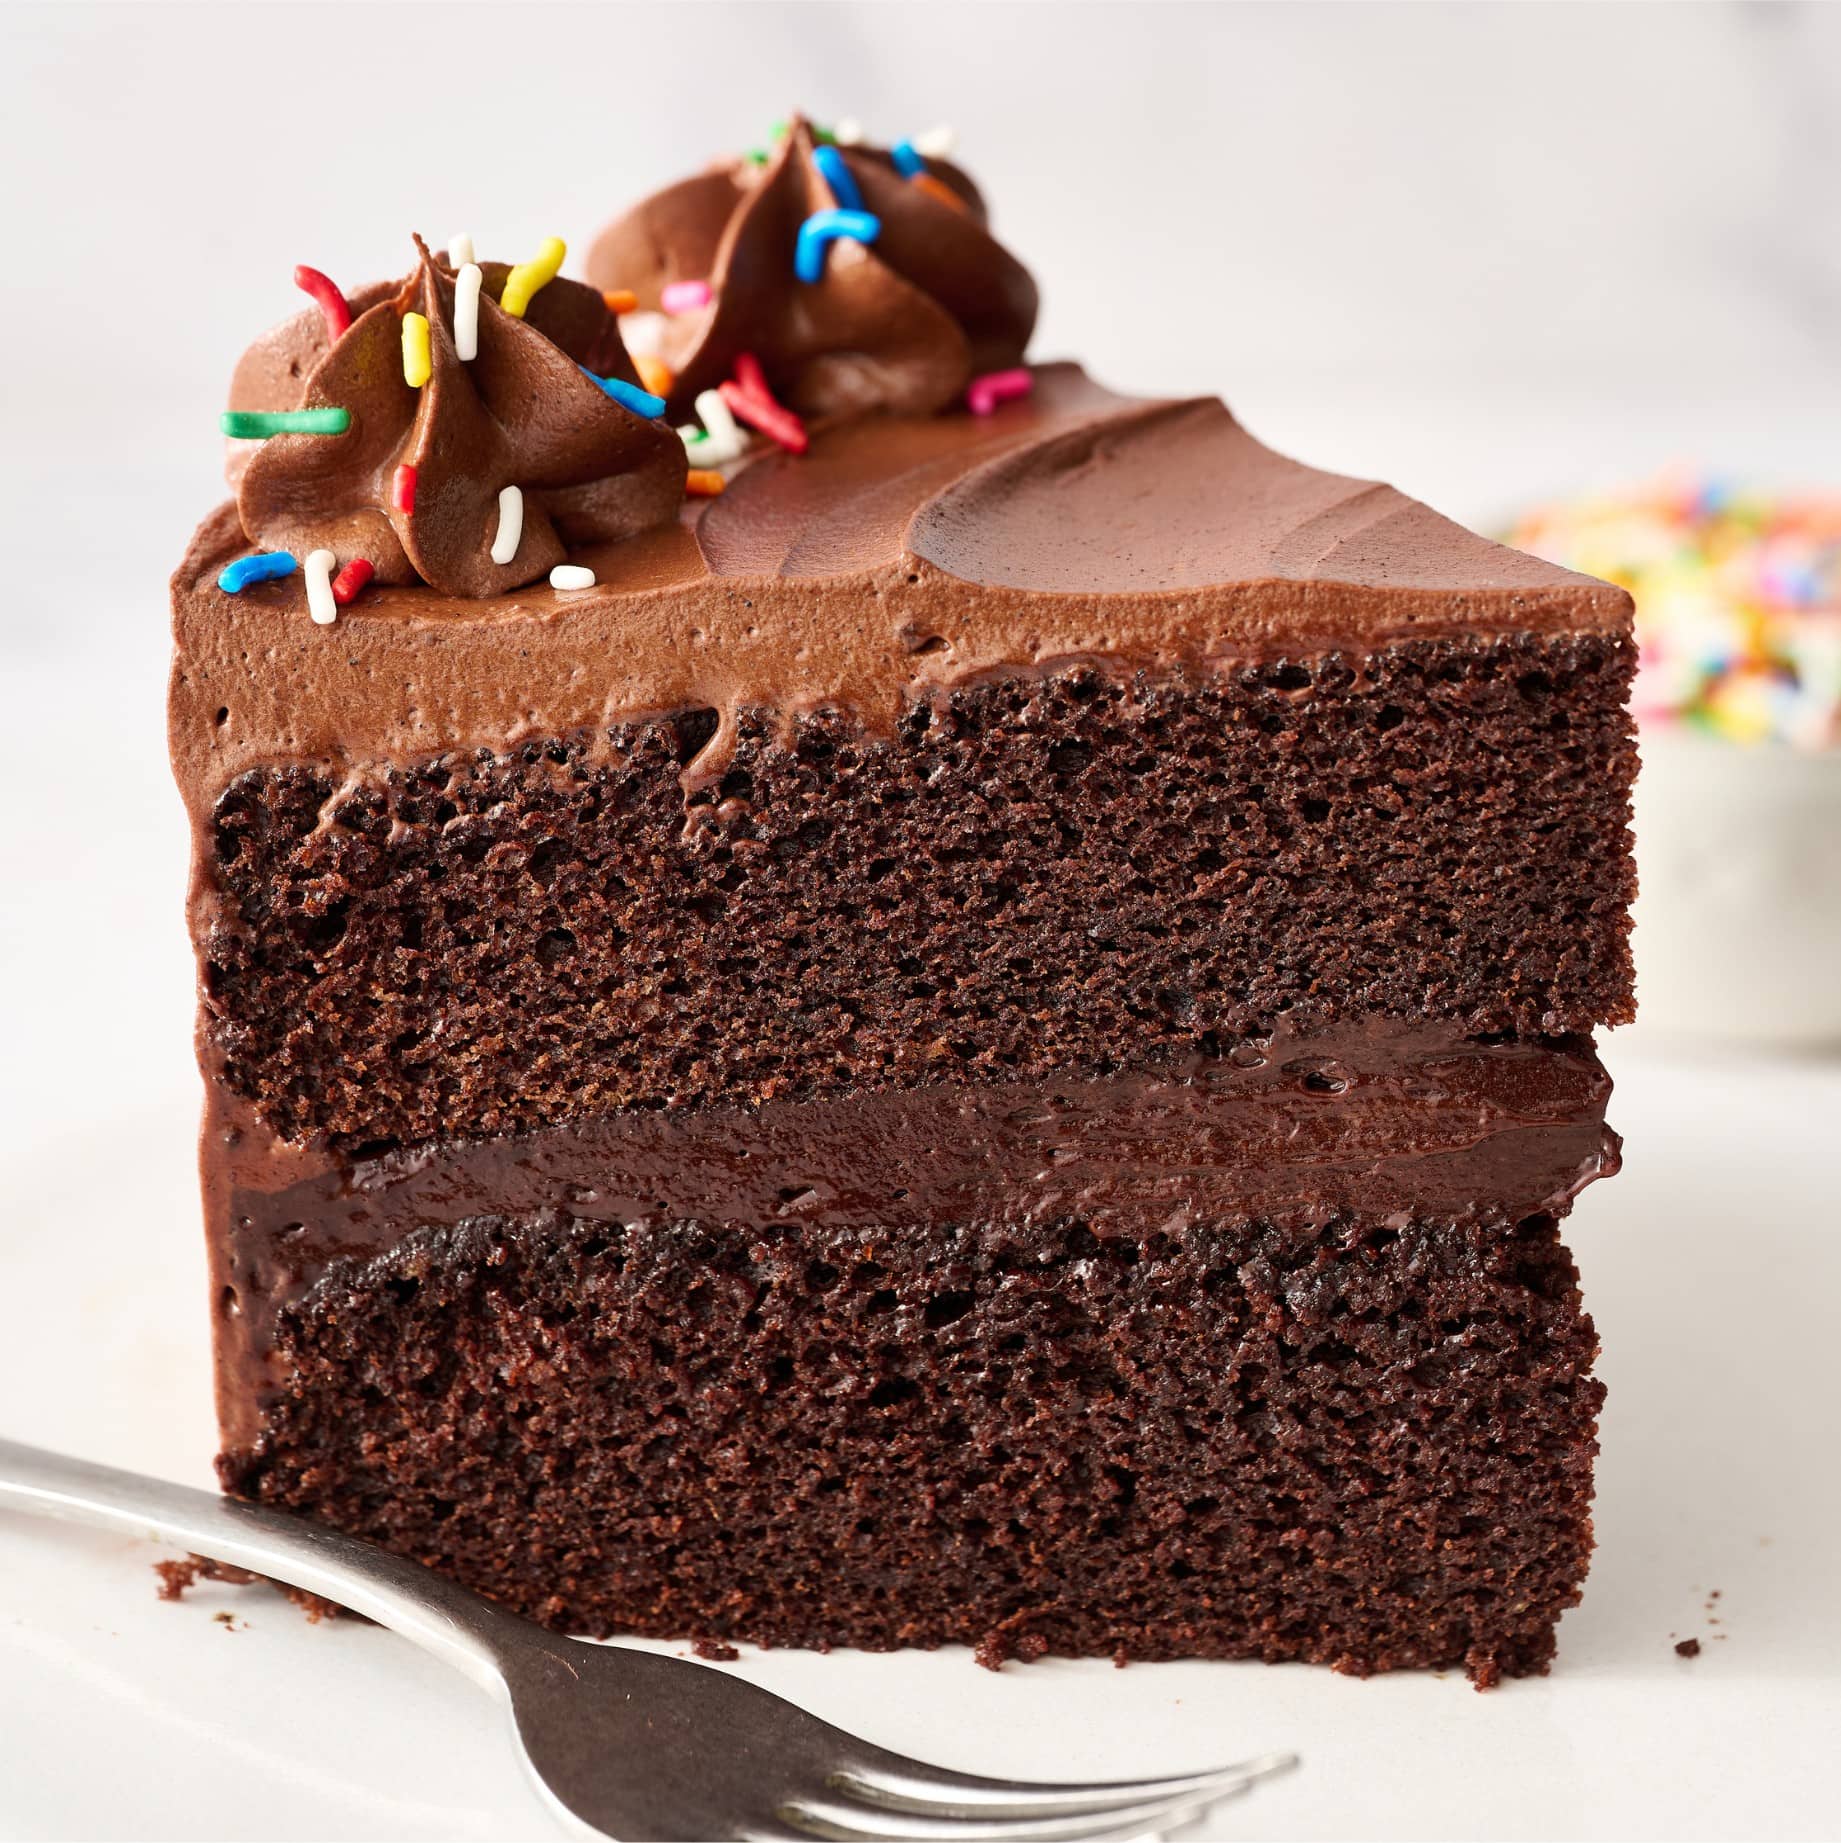
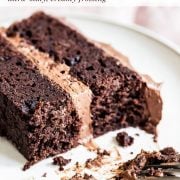
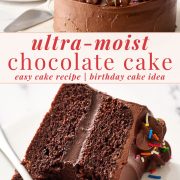
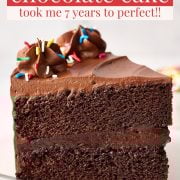
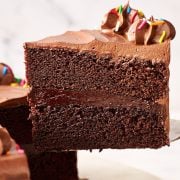
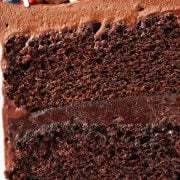
Texture: Unbelievably moist and fudgy with an insanely velvety frosting.
Ease: The cake layers come together in minutes, and the frosting is simple and straightforward (but tastes so gourmet).
Why You’ll Love This Recipe: My improved cake is quicker, easier, and cheaper to make with deeper chocolate flavor and a more moist texture!
This post may contain affiliate links. Read our disclosure policy.
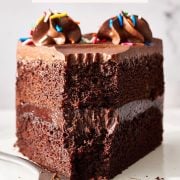
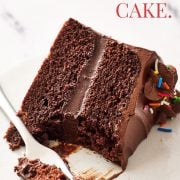
This is the best chocolate cake I’ve ever made, no joke. It’s deeply chocolatey, ultra-moist, and surprisingly easy. (Apologies in advance for the excessive use of the word “moist.”)
After 7 years of reader feedback and over a year of testing, I simplified the ingredients, improved the texture, and made it more moist than ever. The result is a homemade chocolate cake that stays soft for days and tastes rich without being too heavy or overpowering.
Why I Updated This Recipe
This chocolate cake has been one of the most popular recipes on Handle the Heat for years… but something always bothered me.
I kept getting the same question: “How can I make it more moist?” So I went back to my kitchen and tested it again. And again. And again.
After nearly 10 test batches, multiple recipe testers, and a lot of side-by-side comparisons, I realized the answer was counterintuitive: less chocolate actually made a better chocolate cake. Removing the melted chocolate from the batter improved moisture, texture, and flavor, making the recipe quicker, easier, and cheaper to bake!
Ingredient Notes
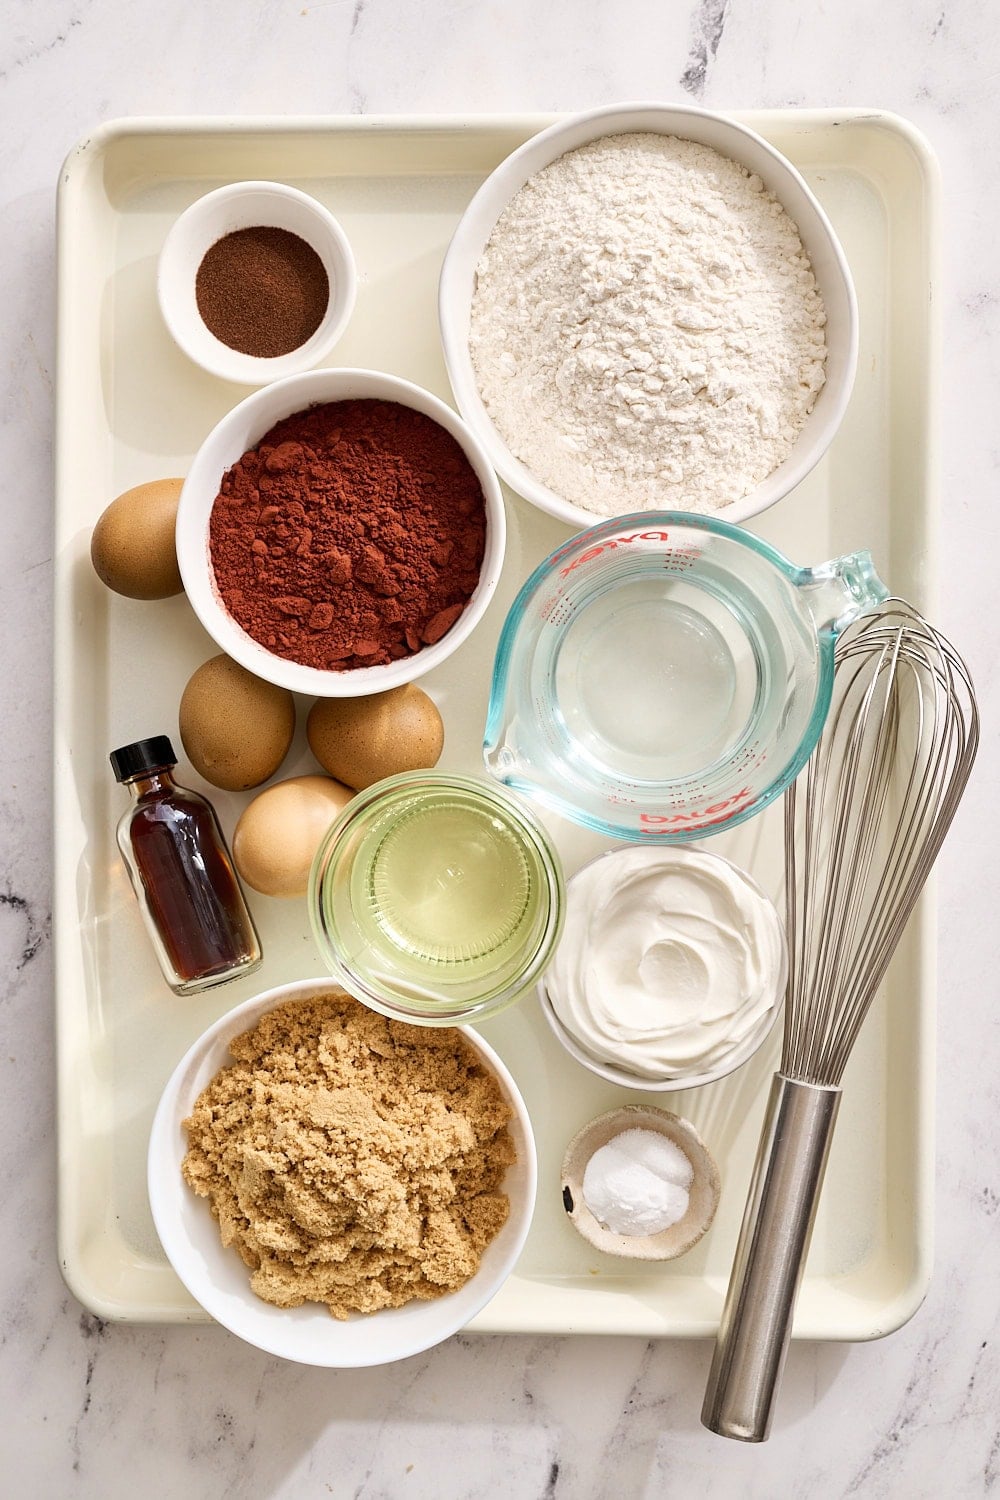
Dutch-Process Cocoa Powder
This recipe relies on cocoa powder for the primary chocolate flavor. Cocoa powder actually transmits more chocolate flavor than solid chocolate. Dutch-process cocoa creates a smoother, darker, more balanced chocolate taste without bitterness.
Espresso Powder + Hot Water (Or Coffee)
Espresso powder intensifies chocolate flavor without making the cake taste like coffee. Blooming cocoa powder in hot liquid releases fat-soluble flavor compounds, giving the cake a deeper chocolate taste. Hot coffee works too, as well as just hot water if you don’t drink coffee.
Light Brown Sugar
Brown sugar adds moisture and softness thanks to its molasses content. In testing, replacing granulated sugar with all brown sugar yielded a more moist and flavorful cake that stayed moist for longer.
Sour Cream
This is a key moisture and flavor ingredient! The acidity activates the baking soda and, coupled with the fat content, tenderizes the texture and balances the sweetness with its distinct tang. Use full-fat for best results. You can also use full-fat plain yogurt.
Eggs
Eggs are key to both structure and richness. Room-temperature eggs emulsify better, creating a smoother batter and more even crumb. I have yet to find a suitable substitute for eggs.
Oil (Not Butter)
Oil stays liquid at room temperature, which keeps this chocolate cake moist for longer than butter-based cakes. Use any neutral oil that doesn’t solidify: vegetable, canola, avocado, etc., but not coconut oil.
How to Make Chocolate Cake (Step by Step)
Prep the pans and oven
Preheat your oven to 350°F. Line two 8-inch round cake pans with parchment rounds (I like these ones with pull tabs!) and spray with nonstick spray (I like Baker’s Joy). This ensures a clean release.
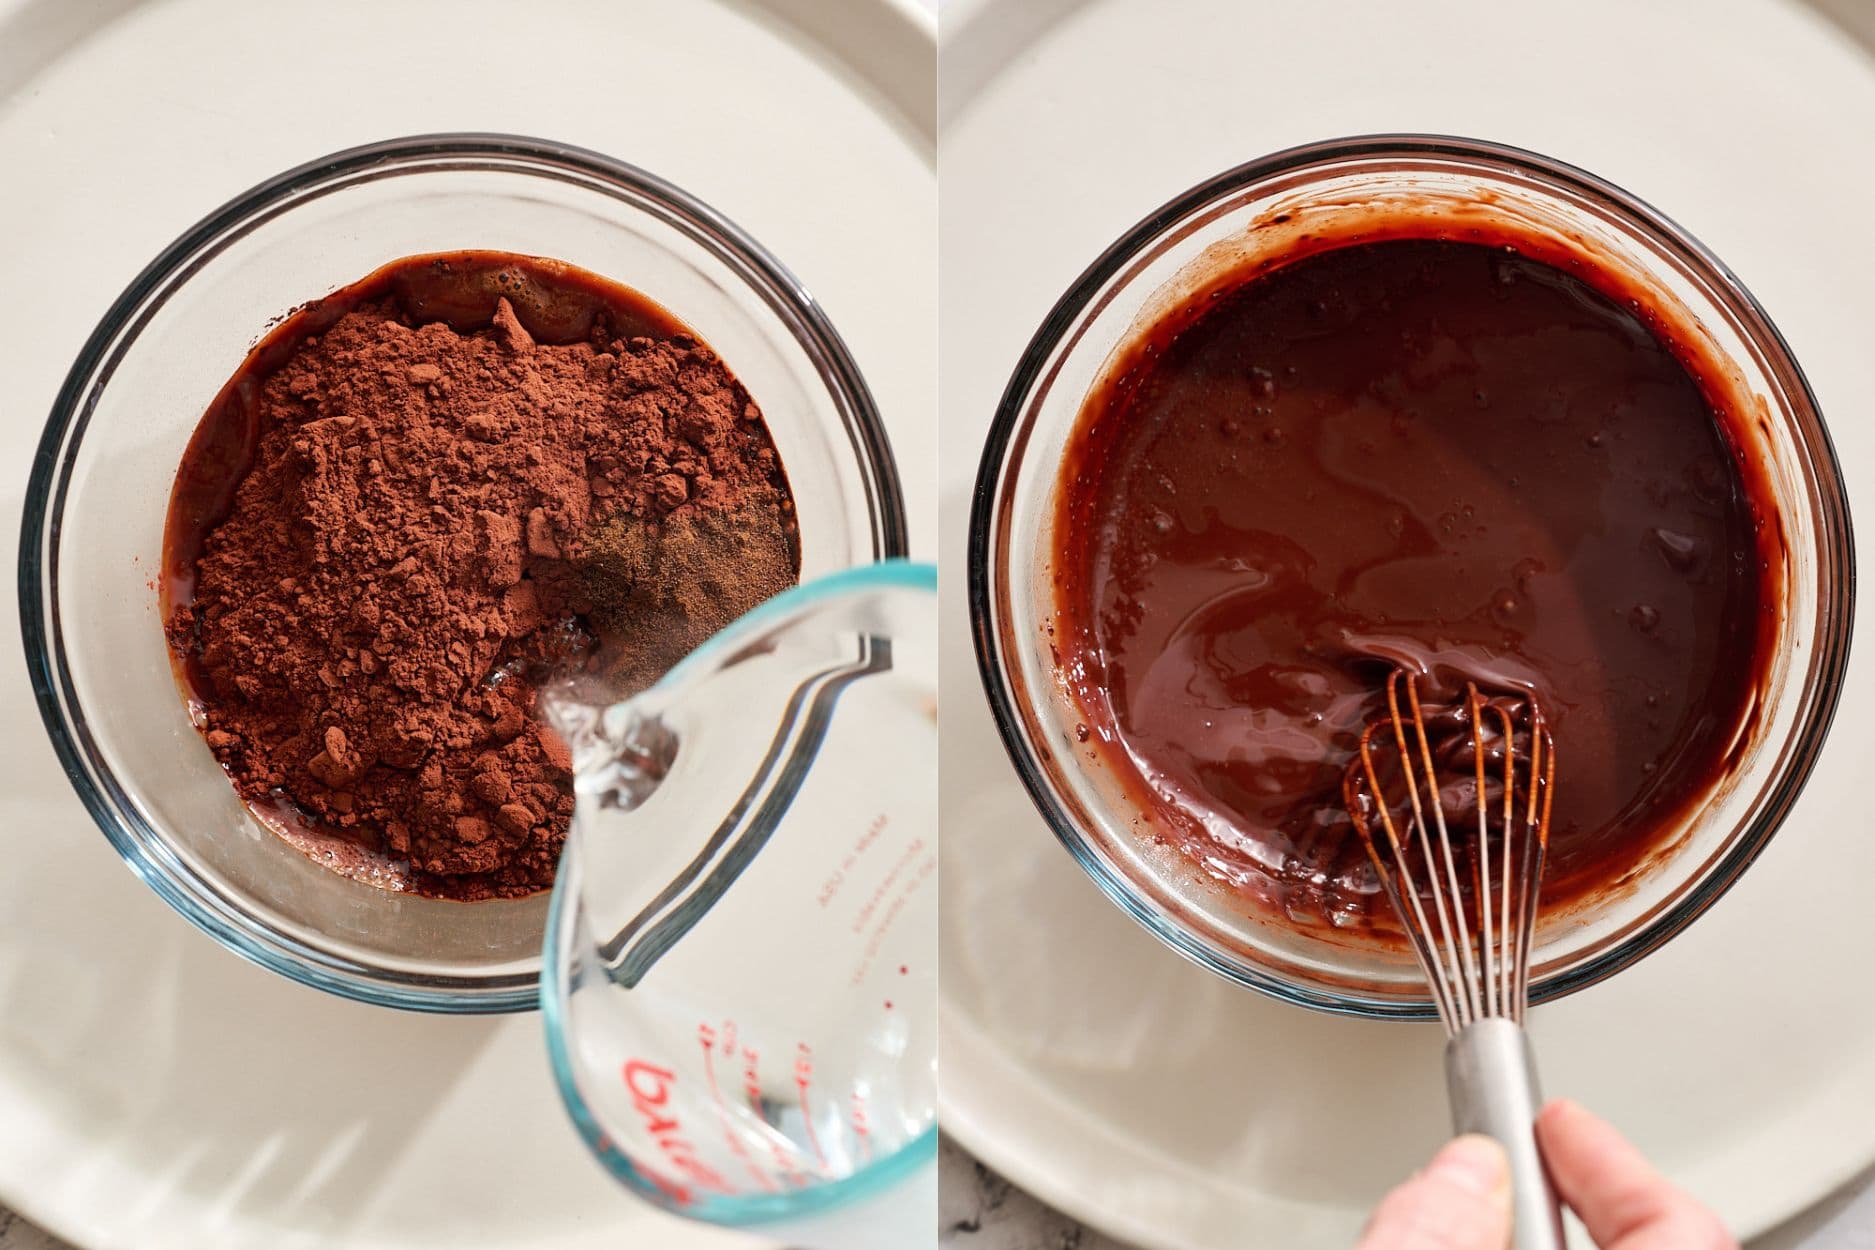
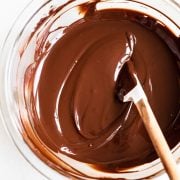
Bloom the cocoa
Pour boiling water over the cocoa and espresso powder (or use coffee). Whisk until smooth and glossy. Set aside to cool completely. This “blooms” the chocolate flavor compounds in the cocoa.
Mix the dry ingredients
In a large bowl, whisk together the flour, salt, and baking soda. Add the brown sugar and whisk or use your fingers to break up any clumps until it looks like sand.
Combine the wet ingredients
In a separate bowl, whisk the sour cream, oil, eggs, and vanilla until smooth.
Make the batter
Create a well in the dry ingredients and pour in the wet mixture. Mix gently from the center outward until mostly combined. Avoid overmixing, which can cause “tunnels” in your baked cake or make the final texture rubbery.

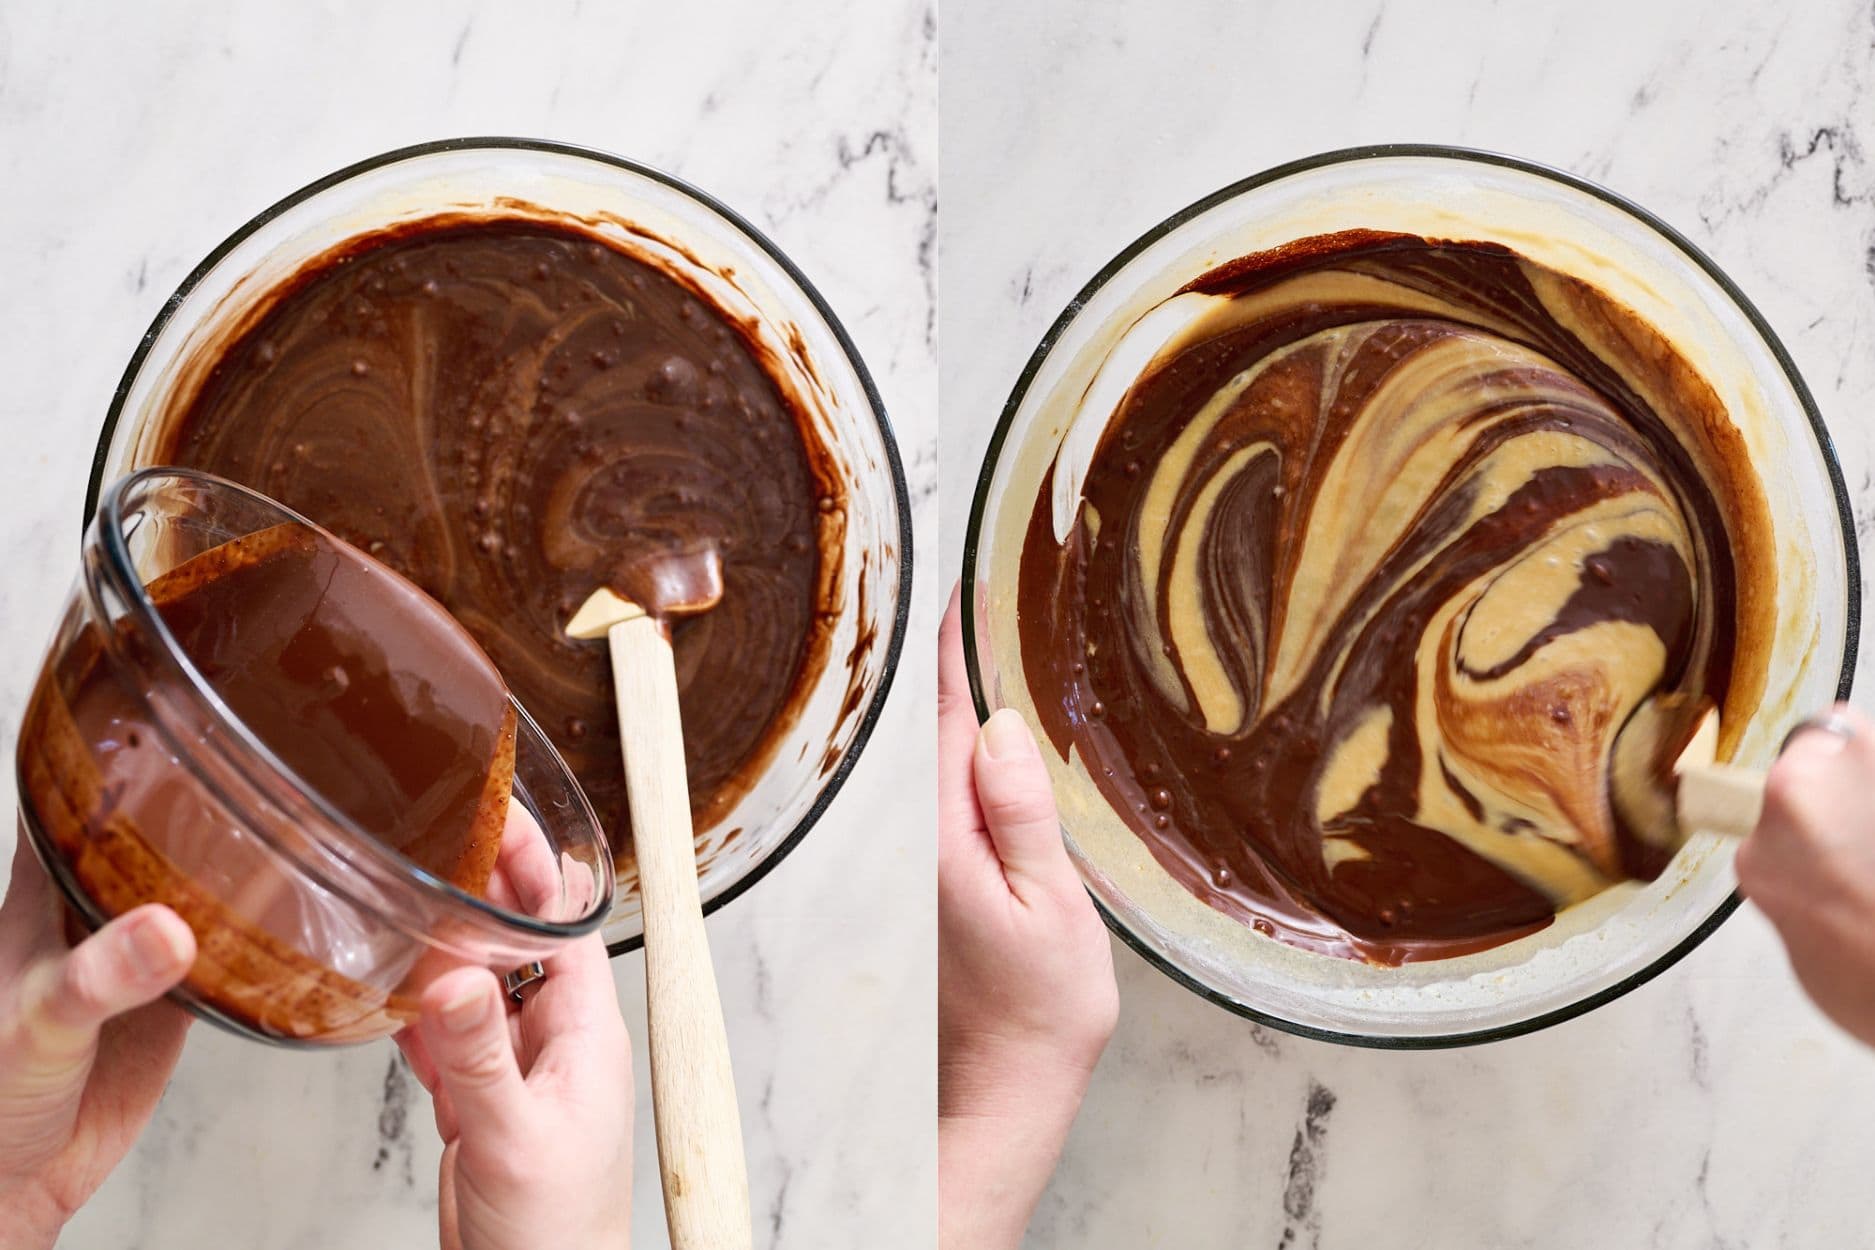
Add the cocoa mixture
Pour in the cooled (!) cocoa mixture and whisk until the batter is smooth and evenly combined. If this mixture is too hot, it’ll overly activate the baking soda and cause doming.
Bake
Divide evenly between pans (about 740 grams per pan if you’re using a scale). Tap pans on the counter to remove air bubbles. Bake 32–35 minutes, until a toothpick comes out with moist crumbs.

Cool completely
Cool in pans for 30 minutes, then turn out onto a rack and cool fully before frosting. For even easier frosting, chill the cake layers in the fridge for 30 minutes beforehand.
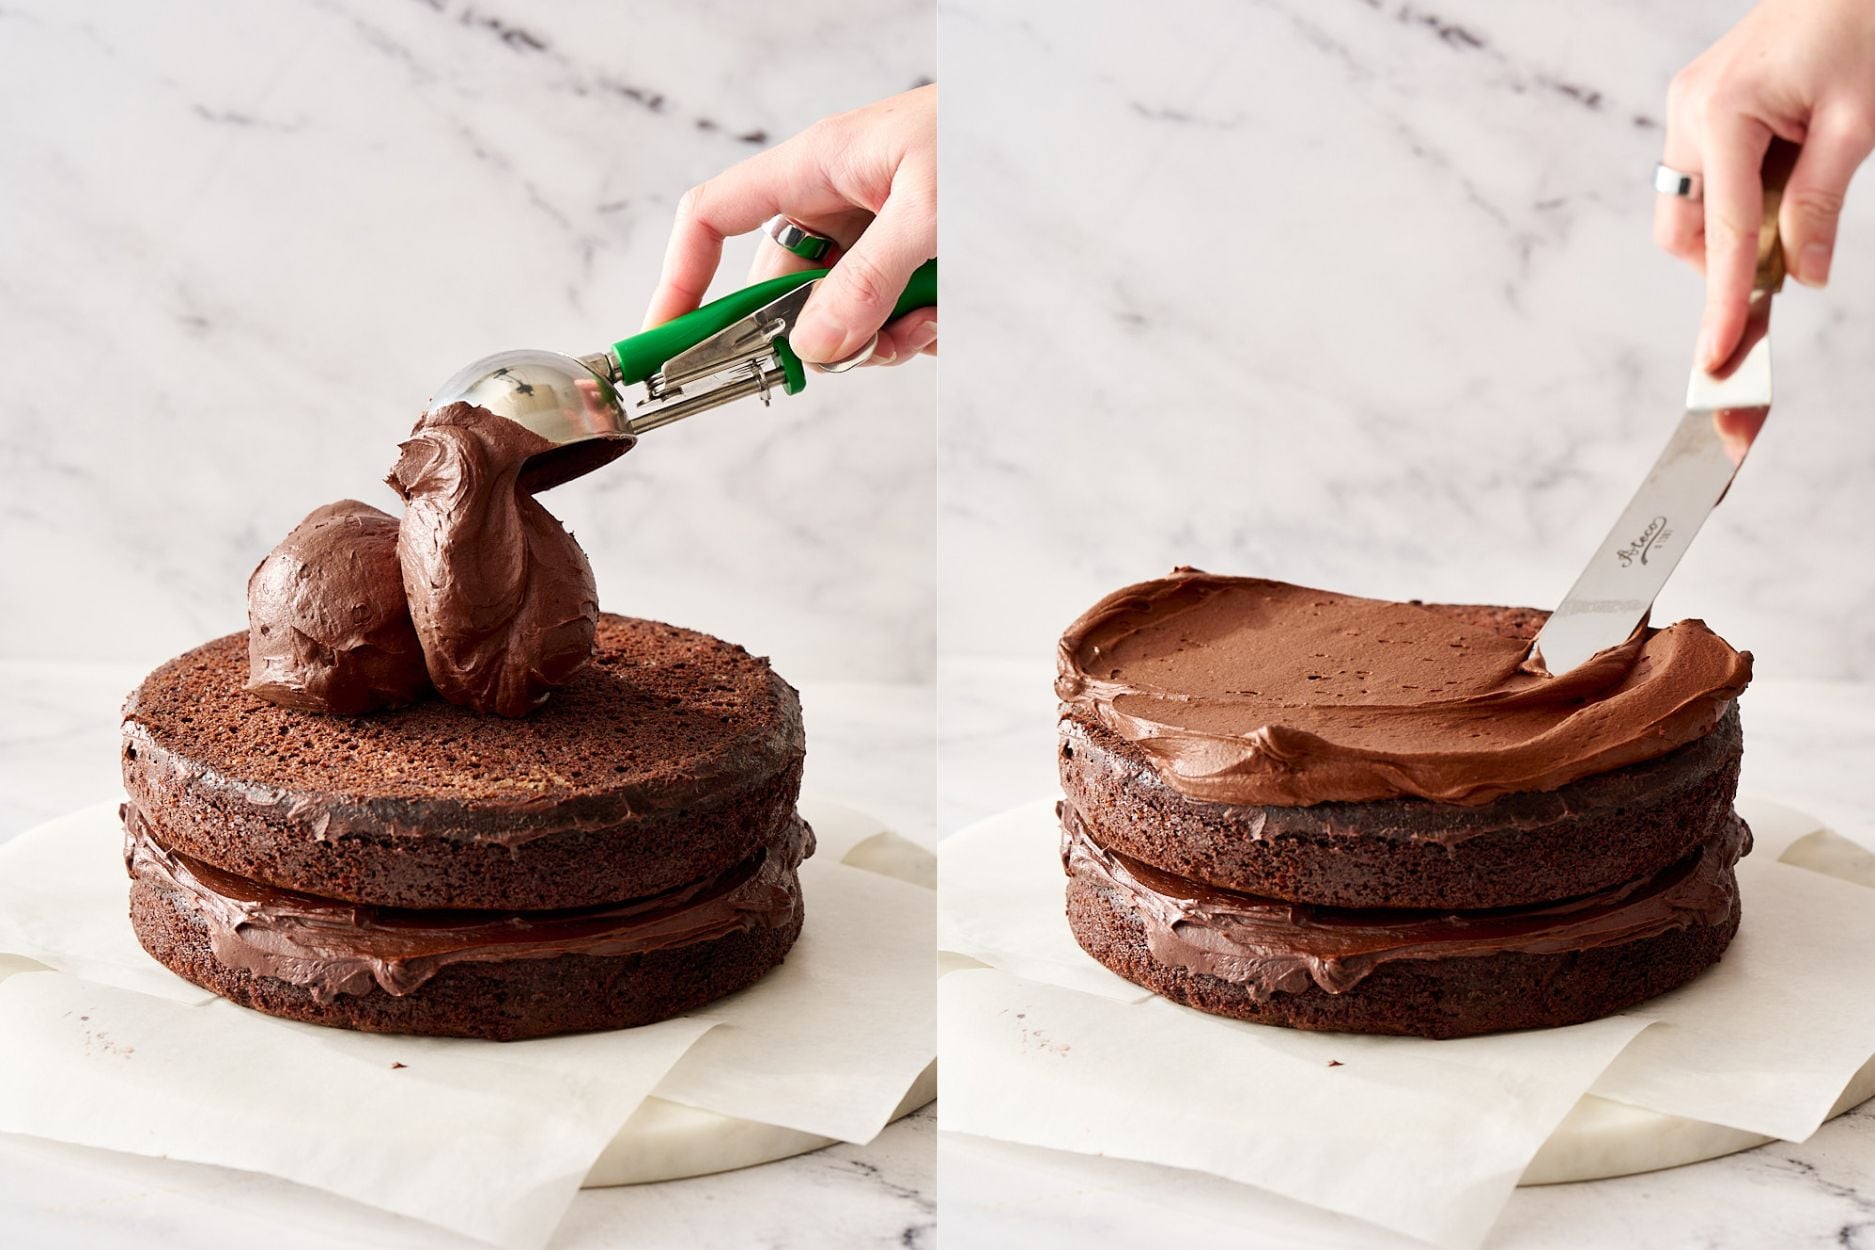
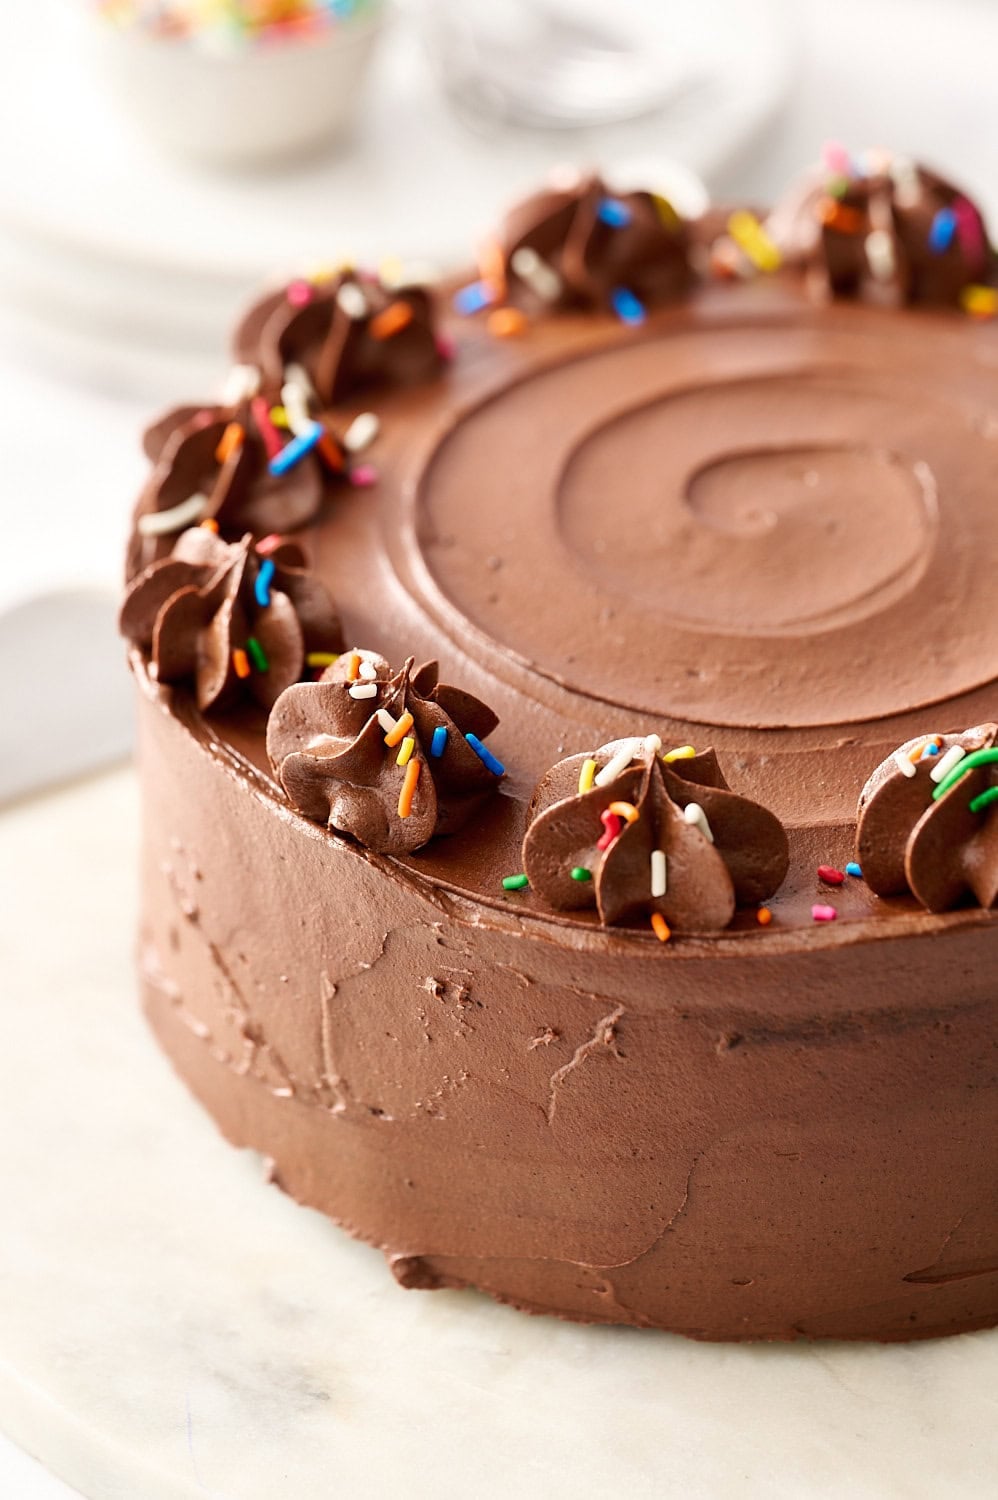
Cake Decorating Tips
There are a few products + tricks that make cake decorating a breeze. Luckily, this recipe is particularly easy to assemble and decorate. The cake layers are sturdy and the frosting is so velvety smooth that it’s perfect for beginners.
- Parchment Strips: Cut and tuck rectangular strips of parchment underneath the border of your base cake layer to catch stray frosting for quick and easy cleanup and presentation.
- Cake Leveler (optional): If your cake has domed at all, this makes easy work of leveling it flat for easier assembly and frosting. You can also use a serrated knife.
- Cake Turntable (optional): This is basically a lazy susan for cake, and it makes decorating so quick, easy, and enjoyable. I like to place my cake plate on top of this so I don’t need to worry about moving a frosted cake later.
- Offset Spatula: Practically an essential tool for cake decorating with any semblance of smooth and even frosting.

Sprinkle of Science
Why removing melted chocolate made this cake better:
Solid chocolate firms up as it cools. That’s because it’s saturated fat, like butter. This can create a tighter crumb and denser texture in cake that dries out faster.
Cocoa powder, on the other hand, delivers intense chocolate flavor without adding a ton of saturated fat that solidifies. Combined with oil (which stays liquid), the result is a cake that’s softer, more flavorful, and stays moist longer.
Storage & Make Ahead
Frosting: Cover and refrigerate for up to 2 days. Bring to room temperature and re-whip before using. It will oxidize (darken in color), but this won’t affect flavor or texture.
Unfrosted cake layers: Wrap and freeze for up to 2 months.
Frosted cake: Refrigerate for up to 2 days. Serve chilled for an extra fudgy cake, if desired!
Freezing leftovers: Freeze slices for up to 2 months. Freeze on a parchment-lined baking sheet until solid, then wrap in plastic and place in an airtight container. Thaw overnight in the fridge.
Test Kitchen BTS
This recipe underwent about 20 iterations between myself and four recipe testers in four different states.
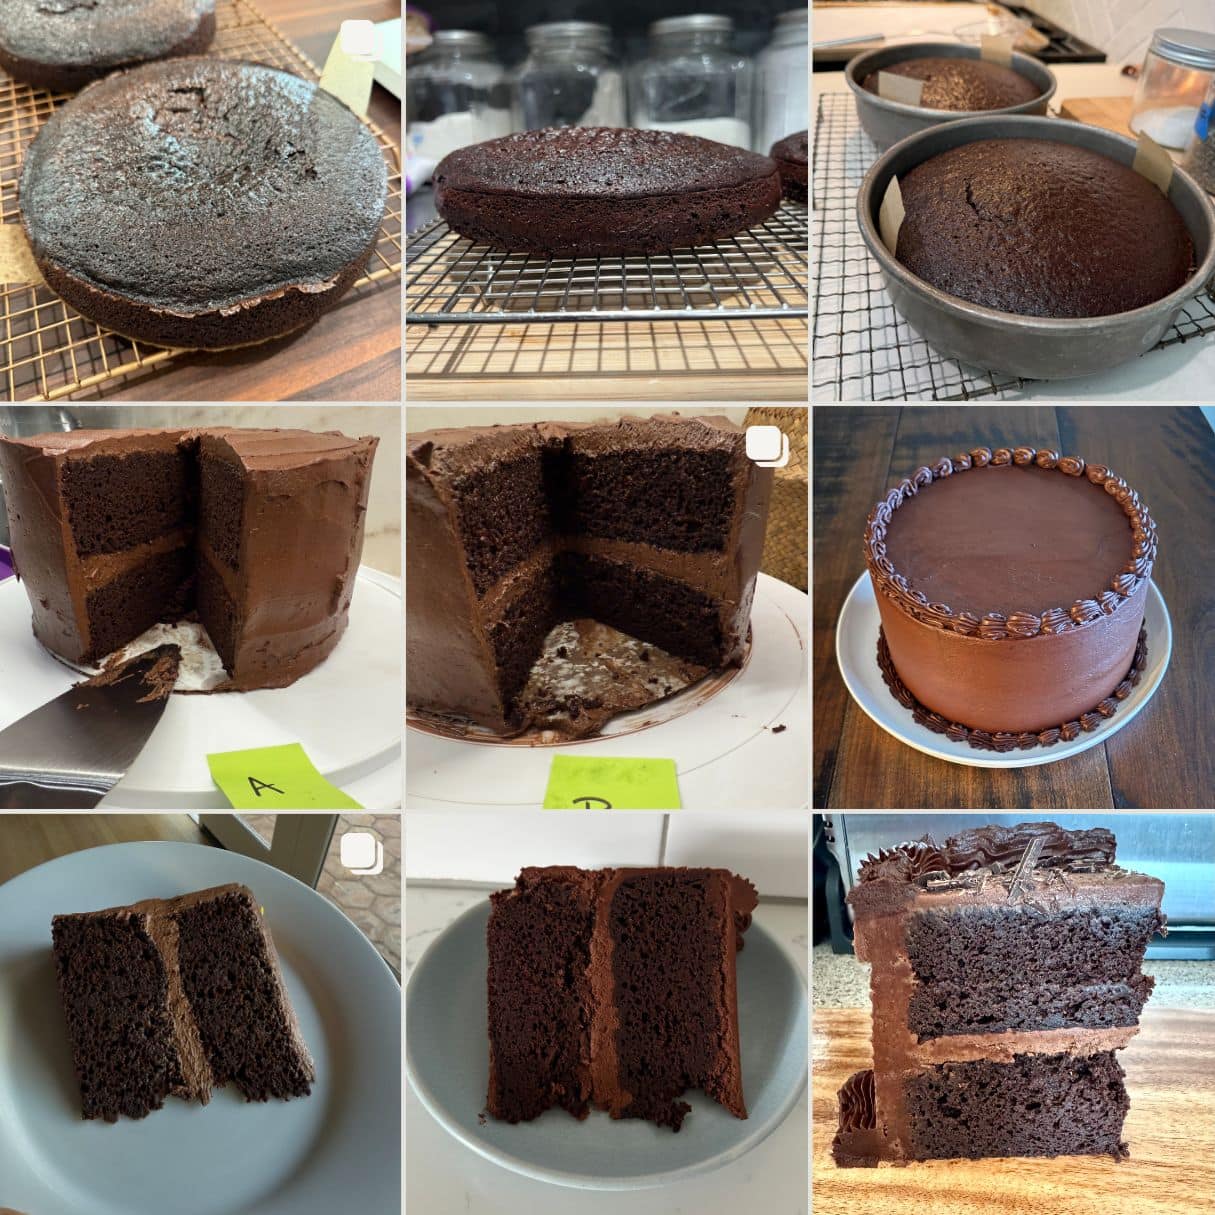
We experienced just about every issue you could imagine: sinking, doming, tunneling, dry edges, sticky cake layers, etc. I gave away multiple cakes and involved many friends in taste testing! It was a journey.
FAQs
What makes chocolate cake moist?
Oil, brown sugar, and sour cream keep this chocolate cake moist. Oil stays liquid at room temperature, while brown sugar and full-fat sour cream prevent drying.
Can I make this chocolate cake without coffee?
Yes. Replace the espresso powder and water with hot water only. The cake won’t taste like coffee either way.
What are the best cake pans?
I adore my Fat Daddio’s 8-inch cake pans. I prefer the 2-inch deep size. If you use 3-inch-deep cake pans, note that you may experience more cake doming.
Can I make this into a sheet cake?
I haven’t tested that, but I do have a Chocolate Sheet Cake recipe already!
What frosting works best with chocolate cake?
I wrote this recipe with my favorite Chocolate American Buttercream because it’s easy, smooth, and balances the cake without overpowering it. However, you can also use my Chocolate Swiss Meringue Buttercream if you prefer.
Why do my cake layers have big holes in them?
Big holes, or tunnels, happen when the batter is overmixed or ingredients aren’t at room temperature. Overmixing forms strong gluten strands that trap air bubbles, creating holes. To prevent this, mix just until combined, use room-temperature ingredients, and tap your pans before baking to release large air pockets. Also, try sifting your dry ingredients!
Why did my chocolate cake sink?
This is often due to underbaking your cake. Make sure your cake tester or toothpick comes out with moist crumbs, not wet crumbs. Check out my article on how to prevent sinking cakes here.
Best Chocolate Cake

Email This Recipe
Enter your email, and we’ll send it to your inbox.
Ingredients
For the cake:
- 1 cup (85 grams) Dutch-process cocoa
- 2 teaspoons instant espresso powder*
- 1 cup (237 grams) boiling water
- 1 3/4 cups (222 grams) all-purpose flour
- 1 teaspoon fine sea salt
- 1 teaspoon baking soda
- 2 cups (400 grams) lightly packed light brown sugar
- 1 cup (227 grams) sour cream or full-fat plain yogurt, at room temperature
- 4 large eggs, at room temperature
- 1/2 cup (112 grams) neutral oil, such as canola or avocado oil
- 2 teaspoons vanilla extract
- 1 batch Chocolate Buttercream Frosting
Instructions
Make the cake:
- Preheat the oven to 350°F. Line two 8 by 2-inch cake pans** with parchment rounds and spray evenly with nonstick cooking spray.
- In a small heatproof bowl, whisk together the cocoa powder and espresso powder. Pour the boiling water over mixture and whisk gently until smooth. Set aside to cool completely.
- In a large bowl, either sift*** or whisk together the flour, salt, and baking soda. Add brown sugar and use your hands to break up any clumps until the mixture resembles sand.
- In a separate small bowl, whisk together the sour cream, oil, eggs, and vanilla until smooth. Make a well in the center of the dry ingredients and pour in the wet ingredients. Starting in the center, use a whisk to slowly pull the dry ingredients into the wet until mostly combined. The batter may be slightly lumpy.
- Add the cooled cocoa mixture and whisk until the batter is smooth and evenly combined.
- Divide the batter evenly between the prepared pans (about 740 grams per pan). Tap each pan firmly on the counter a few times to pop any air bubbles. Bake for about 32 to 35 minutes, or until a toothpick or cake tester comes out with moist crumbs attached.
- Cool in the pans for 30 minutes, then (if needed) run a thin knife around the edges and remove to a wire rack to cool completely.
Assemble the cake:
- If your cake has domed at all, level with a serrated knife or cake leveler until it is flat.
- Place one cake layer on a cake turntable or cake stand. Place strips of parchment paper under the cake to prevent a frosting mess.
- Spread a generous, even layer of frosting over the top, pushing it out over the edges slightly. Place the second layer upside down onto the frosting so the top of the cake is nice and flat.
- Using an offset spatula, spread the remaining frosting evenly all over the cake, smoothing the edges. Serve immediately, or cover and refrigerate for up to 2 days. Let sit at room temperature for an hour before serving.
Recipe Notes
More Cake Recipes You’ll Love:
This recipe was originally published in 2018, and updated in 2026 with a recipe overhaul, new photos, and more baking tips. Photos by Joanie Simon.

I made this chocolate cake for my dad’s birthday and it was a big hit! PS: Can you see my husband’s smiling proud face in the reflection of the microwave? Ha!


I made the best chocolate cupcakes and decided to give this one a go for my birthday. Hands down the best chocolate cake I have ever made. I haven’t tried out the icing. I decided to go with a Norwegian coffee/chocolate icing that I always had growing up. Amazing! I topped it with shredded coconut.
Hi Amy! We are so excited to hear that you love this cake and the corresponding cupcakes so much! Happy belated birthday 🙂
I’ve made the best chocolate cupcakes and they were absolutely amazing. Best recipe I’ve ever made and I can’t wait to try this one out for my birthday. Is it possible to use a 9×13 sheet pan instead of the round?
Hi Amy! I’m so excited to hear that you love the cupcakes so much! We have not tried making this make into a 9×13 pan, but that should work okay – you will just have to watch the bake time carefully, and be sure to remove it from the oven as soon as a toothpick inserted comes out clean (you don’t want to underbake, but you definitely don’t want to overbake!). As we have not tried baking this cake as a sheet cake, I cannot guide you on how long to bake for, sorry! Alternatively, this Chocolate Sheet cake is similar and also delicious, if you prefer not to experiment a little! Happy baking! 🙂
I made this for Father’s Day because my dad loves chocolate cake. My mom said it was the best chocolate cake she has ever had! Absolutely delicious and moist. The icing is AMAZING! The only chocolate cake I will ever make again.
Wow, what a compliment!! So thrilled to hear you all loved this cake so much! 🙂
Hi Kiersten,
Thank you for your quick response! I will try your suggestions for using orange extract and zest in the chocolate cake.
Thanks again,
Laurie
I can’t wait to hear how it turns out, Laurie! 🙂
Hi Kiersten,
I finally made the Best Chocolate Cake recipe and added the zest of two oranges and one teaspoon of orange extract. It was delicious! So many compliments on not only the flavor but also the texture and how moist the cake was.
I also love the fact that I didn’t need to use my mixer!! Thank you for your input
Hooray!! I’m so excited to hear that, Laurie!! I’ll have to make that version for myself sometime – I LOVE orange chocolate 🙂 Thanks for letting us know how it went!!
I am not someone who would usually go for chocolate cake over vanilla. I made this recipe for my mom for her birthday since she loves chocolate cake, and I’ve made it at least three times since then. This cake is so delicious, moist, and flavorful. I’m a chocolate cake convert!
Hi Morgan! Wow, that’s such a huge compliment, coming from a vanilla cake lover! So happy you love this recipe 🙂
And I’m still coming back to it!
I’m looking for a chocolate orange cake recipe. I see it’s suggested to add orange zest. How much would it take in order for the orange flavor to come through?
Thank you!
Hi Laurie! We haven’t tested an orange chocolate version yet, but a tablespoon should be a good starting point. However, if you are looking for a really bold orange flavor, replace the vanilla extract with orange extract in the cake. You can also experiment with adding orange extract or orange zest to the frosting; just be warned that the orange extract is really strong, so a little goes a long way (and you can always add more to the frosting once you taste it). I recommend experimenting with these combinations and seeing what your taste preference is once baked and frosted. Please let us know how you go with these experiments! Happy baking 🙂
I would like to expand this recipe to use 3 8 inch cake pans, do you have a recommendation on how to do so?
Hi Carol! We haven’t tested this recipe using three 8-inch pans, as the recipe was written to use just two 8-inch pans. You could make this into more layers in a couple different ways! Firstly, you could make the recipe as written, and once the cake layers have cooled completely, you could slice them both in half horizontally. This will give you four cake layers. Alternatively, if you wish to bake three individual cake layers, you can make the recipe as written, but greatly reduce the bake time and stick closely to the sensory indicators outlined in the recipe (bake until a cake tester or toothpick comes out clean). I cannot tell you exactly how long the cake layers will need, because the pans will contain much less batter than when we tested this recipe, but I would start around 20 minutes and increase by a few minutes at a time from there, until a cake tester or toothpick comes out clean. I hope that helps! Happy baking 🙂
I love chocolate cake. Thank you for sharing this recipe.
Wonderful blog!! The recipe for Chocolate Cake is stunning. Writing skills are too good. Love your recipe. Thanks a lot.
If I use two 7inch pans how should I adjust the bake time? Also if I want to skip the coffee what’s the alternative? Milk? Thanks!
Hi Dorothy! We haven’t tried using 7-inch pans, so I can’t say for sure! We recommend using Wilton’s handy cake serving guide. Please check out the pink box above the recipe for more details regarding the espresso powder. Can’t wait to hear what you think of this recipe 🙂
Would you please share the height of the 8 inch cake pans?
Wanted to use this information for conversion purpose
This is the best chocolate cake ever!! I’m just starting to back and followed the recipe exactly. It was easy and came out so yummy. I don’t like buttercream frosting but this is amazing!! Thank you!!
What a compliment! So happy to hear how much you love this cake and the buttercream frosting 🙂 Thanks for taking the time to comment, we appreciate hearing from you!
Can a malt flavour be added or cream cheese to the icing.Looking for a light malt and cream cheese frosting to go with this cake sponge.Thankyou.
We haven’t tried that, but you’re welcome to experiment! Please let us know how it goes if you do 🙂
Hi, i was wondering if we can store the Cake in fridge for a night after frosting and use the next day?
Tessa actually talks about this in the pink tip box above the recipe, but you are welcome to refrigerate it if you prefer 🙂 Just let it come to room temp before serving, otherwise the buttercream will be a bit solid. Enjoy!