


Tessa’s Recipe Rundown
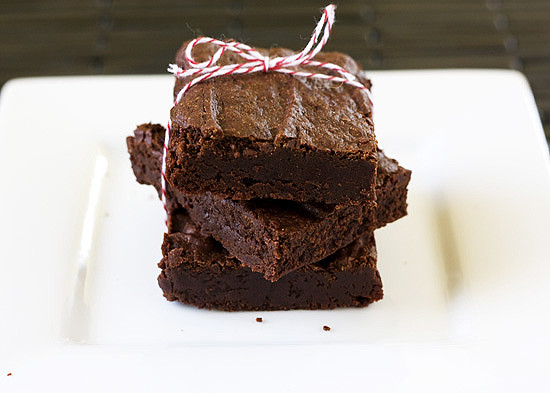
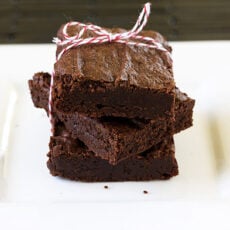
Taste: Intensely chocolatey and not too sweet.
Texture: Rich, chewy, and gooey. Does it get any better?
Ease: One of the easiest scratch-baked brownie recipes I’ve ever made.
Appearance: Brownies always look delicious, especially when they have that crinkly crust like these ones.
Pros: Convenient, cheap, delectable.
Cons: None.
Would I make this again? Maybe tonight!
This post may contain affiliate links. Read our disclosure policy.
It doesn’t get any better than these Cocoa Brownies! Rich, chewy, AND gooey.
Brownies have always been one of my all time favorite desserts. I especially love chocolate-y, gooey, and chewy brownies with a lovely crinkly crust. But I hate brownies that are overly sweet, cakey, or artificial tasting. I’ve tested quite a few brownie recipes and for a while the Baked brownie was my favorite. But that recipe requires a little work and a lot of chocolate. Actually, most homemade brownie recipes require either expensive chocolate, or that your butter be a room temperature (who wants to wait for that?) or require you to use multiple bowls and tools before you’ve got your batter in the pan. Not these cocoa brownies. No expensive blocks of chocolate, just cocoa. And only one bowl. These brownies are so easy and cheap to bake which makes them a wonderful holiday gift.
Email This Recipe
Enter your email, and we’ll send it to your inbox.
Ingredients
- 10 tablespoons (141 grams) unsalted butter
- 1 1/4 cups (250 grams) granulated sugar
- 3/4 cup plus 2 tablespoons (75 grams) unsweetened cocoa powder (natural or Dutch-process)
- 1/4 teaspoon fine sea salt
- 1/2 teaspoon pure vanilla extract
- 2 large eggs, cold
- 1/2 cup (64 grams) all-purpose flour

Instructions
- Position a rack in the lower third of the oven and preheat the oven to 325°F. Line the bottom and sides of an 8×8-inch square baking pan with parchment paper or foil, leaving an overhang on two opposite sides.
- Combine the butter, sugar, cocoa, and salt in a medium heatproof bowl and microwave for 1:30 minutes. Remove and stir until the butter is melted and the mixture is smooth. Set aside briefly until the mixture is only warm, not hot. It looks fairly gritty at this point, but don’t fret — it smoothes out once the eggs and flour are added.
- Stir in the vanilla with a wooden spoon. Add the eggs one at a time, stirring vigorously after each one. When the batter looks thick, shiny, and well blended, add the flour and stir until you cannot see it any longer, then beat vigorously for 40 strokes with the wooden spoon or a rubber spatula. Spread evenly in the lined pan.
- Bake until a toothpick plunged into the center emerges slightly moist with batter, 25 to 30 minutes.
- Let cool completely on a rack. Lift up the ends of the parchment or foil liner, and transfer the brownies to a cutting board. Cut into 16 or 25 squares.


Hello. Can I get the recipe in gms pls.
Hi Emerald! We’re in the (slow) process of updating all of our older recipes with metric measurements, but with over 1000 recipes on the site, it’s taking a while! 🙂 I just updated this one for you, but please feel free to use our Ingredient Measuring Guide in the future to convert any of our recipes that don’t yet contain gram measurements. Enjoy!
These are great brownies, but I don’t like chocolate chips in my brownies. Could you make a recipe for people like me? (P.S. I’m 10.)
Hi Lydia! Glad you like these brownies 🙂 We typically include chocolate chips in our brownie recipes because chocolate chips help the shiny, pretty crust form on top of brownies! Feel free to experiment with leaving them out of any brownie recipe – just note that this will impact the texture and the appearance 🙂
I’ve now made this recipe 3x and it has quickly become my favorite brownie recipe! I have made several of your recipes and they are my all incredible. One question – I doubled the recipe this last time and made it in a 13×9 pan, but had trouble figuring out the baking time. Do you have a recommendation for how long to bake for?
Hi Laura! So happy you love this recipe so much, thanks for letting us know! When doubling brownies in a 9×13 pan, it shouldn’t take that much longer than the original time (completely depending on your pan–glass/ceramic will take longer). I’d still check it at the 25 minute mark, then every 2-3 minutes beyond to make sure it’s not overbaked. I hope that helps!
I’ve made these in the past and wasn’t impressed they turned out dry and lacked flavor- but even though I was hesitant, all I had was cocoa powder and no unsweetened baking chocolate today so decided to try this recipe again- NOT DISSAPOINTED this time they were PERFECT and delicious, guess I did all the things right! Moist and flavorful, my son loved how the top turned out with just a slight crinkle! And you can’t beat that it only takes one bowl!
Yay! So happy you came back to this recipe and tried again with perfect results! Thank you for letting us know, Marissa!
Hi Tessa
Your recipe does not say at which temperature you bake the cocoa brownies….
Ronnie from South Africa
oop sorry, new year’s blues, I overlooked the temperature (325F). But my brownies came out rather flat
Ronnie from South Africa
Hello, I l absolutely love your blog. I baked these twice and they were so yummy but didn’t get crinkly on top. I believe I followed all the instructions. Could there be something I did wrong? Thank you!