


Tessa’s Recipe Rundown
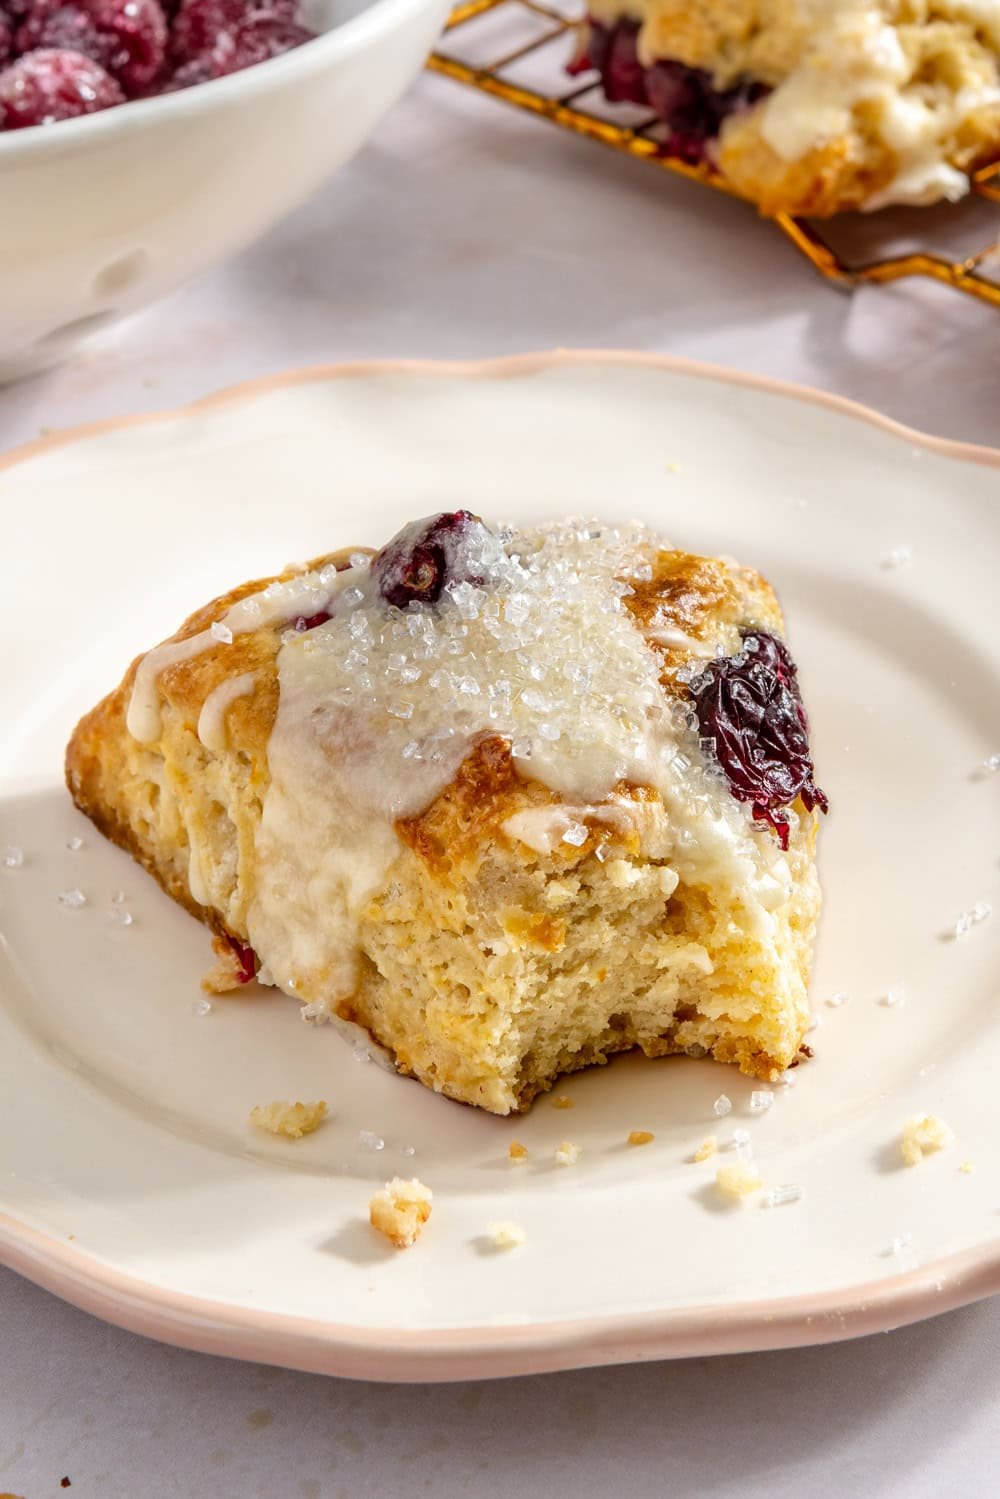
Taste: The perfect balance of tart, sweet, and bright.
Texture: Ultra-light and fluffy with pops of cranberry throughout.
Ease: Quick & simple. Almost takes as long to make as it would to hop in the car and drive to the coffee shop and back!
Why You’ll Love This Recipe You’ll want to enjoy the entire pan, that’s how good these are!
This post may contain affiliate links. Read our disclosure policy.


My Cranberry Orange Scones are simple enough to whip up without trekking to the coffee shop for an overpriced, dry, and bland scone.
And yes, you can make these ahead, freeze them, and bake them off for fresh results. They’re perfect for holiday season entertaining for Christmas morning, day-after Thanksgiving breakfast, Mother’s Day, or just because!
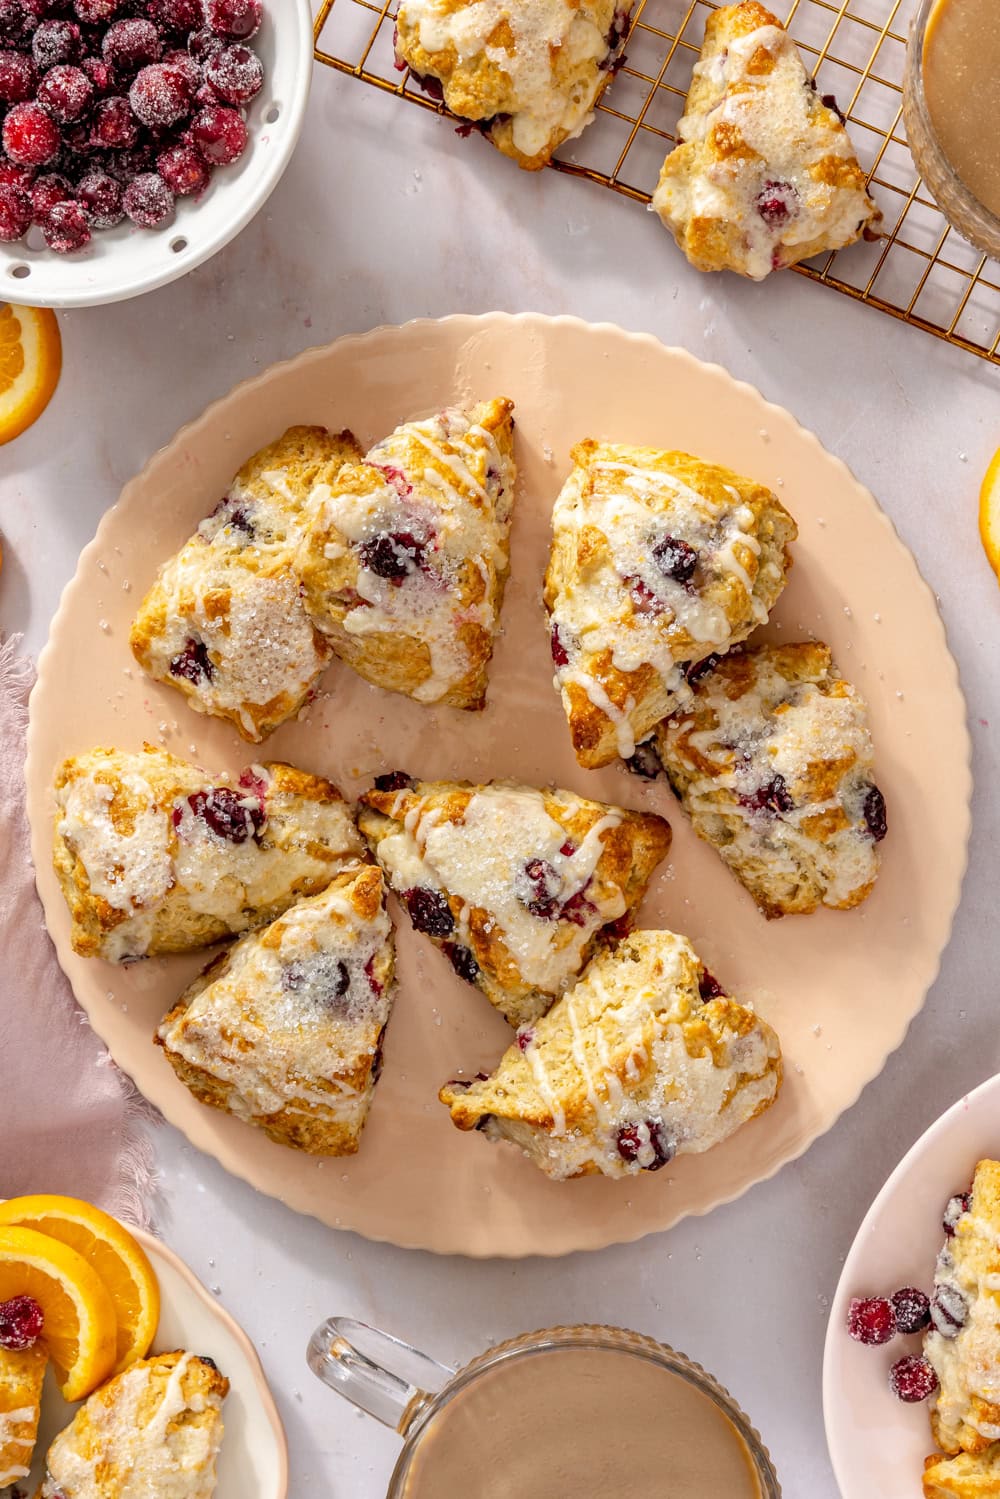
There’s just something about ultra-fresh orange flavor and tart cranberries that makes for magic. It’s such an incredible flavor combination.

Sprinkle of Science
Ingredient Notes for Success
The full ingredient list is in the recipe card below, but these are the ingredients to pay special attention to:
- Orange Zest: use FRESH orange zest for the best flavor. You’ll need 2-3 oranges, depending on their size. Zest before juicing.
- Butter: use COLD butter for flaky and tender scones. This is KEY. I like to use unsalted butter to control the salt, but if you only have salted, halve the amount of salt added to the dry ingredients.
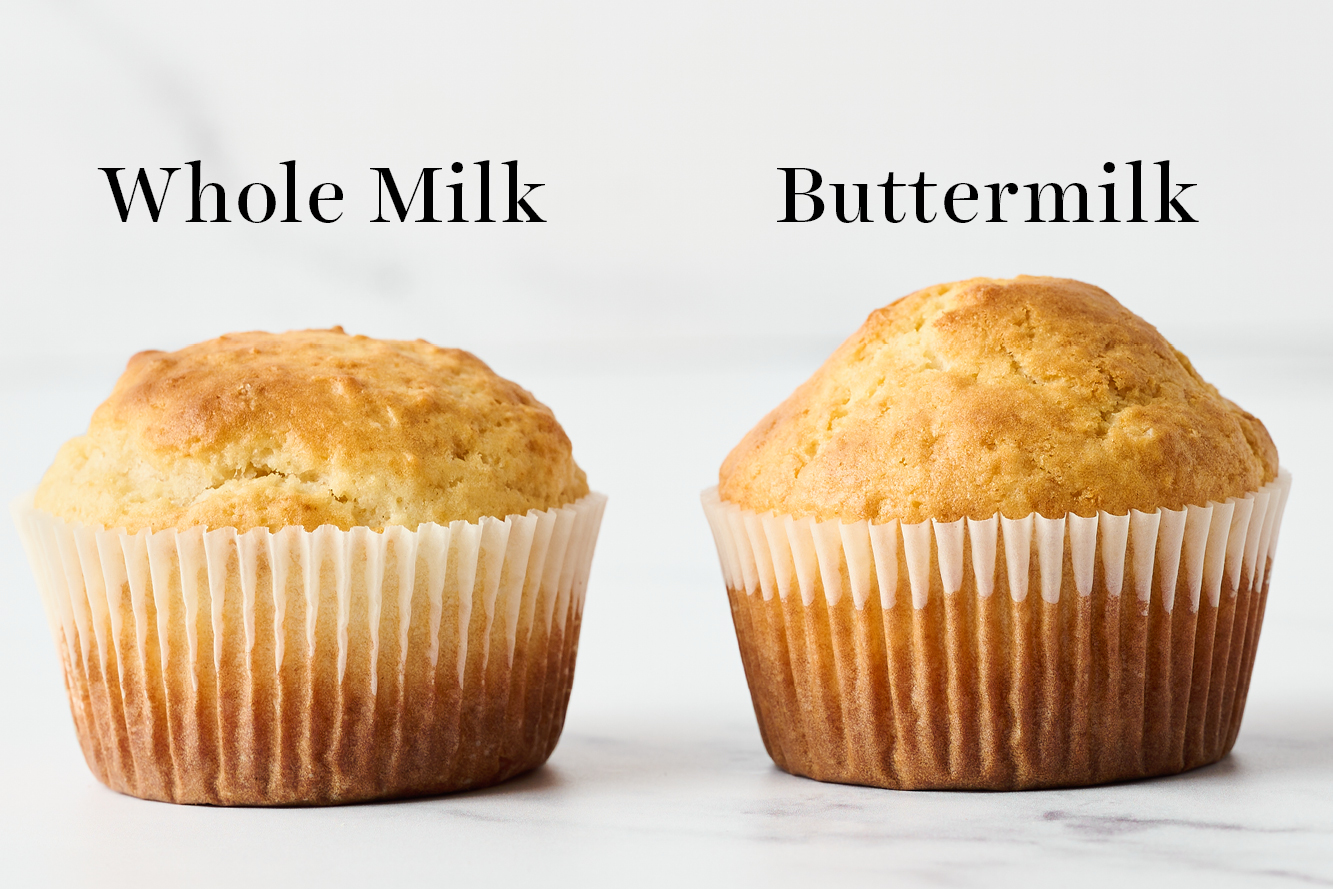
- Buttermilk: for the best tall, tender, and slightly tangy scones, use REAL buttermilk (learn why buttermilk is so important here). You can also use plain Kefir instead.
- Cranberries: use fresh or frozen! Don’t thaw frozen cranberries before using. You can also use dried, but the flavor and texture will obviously be quite different.
- Sparkling sugar: this is an optional topping for extra pretty festive scones with an added crunch.
Scone Baking Tips from a Pro Baker
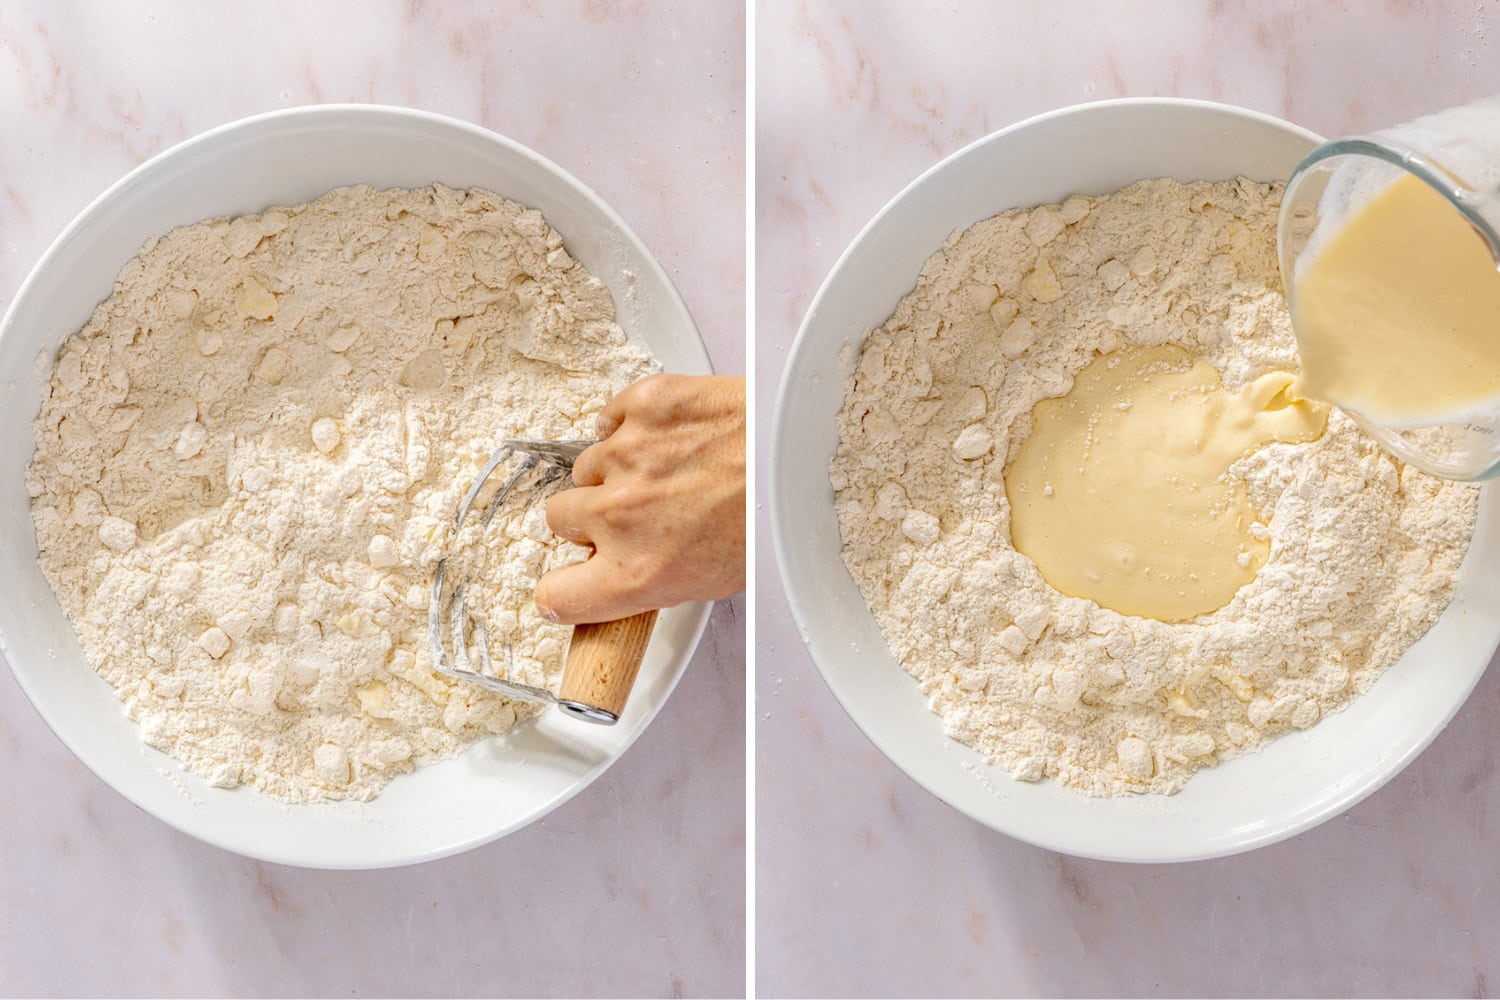
- Use cold butter (I cube and freeze it while I gather my other ingredients and equipment) and cut into the flour until it’s the consistency of coarse meal. The bits of cold butter melt in the oven and create steam pockets which develop those flaky layers.
- Keep the dough cold the entire time. If you feel your butter or dough softening, chill for 10–15 minutes in your fridge or freezer. If it’s extra hot in your kitchen, you can even cool down your work surface with bags of ice water before mixing the scone dough.
- Measure flour properly: use a digital scale, or the spoon-and-level method. Too much flour = dry, dense, crumbly scones.
- Avoid overmixing. Doing so will result in flatter, tougher, and less flaky scones.
Make-Ahead Instructions:
Scone dough made with fresh cranberries can be cut into wedges and chilled overnight. When ready to bake, brush with egg wash (this helps achieve a golden brown finish) and add a few minutes to the bake time.
Do not chill scone dough overnight if using frozen cranberries. They will bleed and change the scones’ color and texture.
Storage & Freezing Instructions:
Storing Baked Scones: These scones are best enjoyed the same day they’re baked, but you can store them in an airtight container at cool room temperature for up to 2 days.
Freezing Scones:
- Unbaked: Freeze cut scones for up to 1 month. Place on a parchment-lined baking sheet and freeze until firm, about 1 hour, then transfer to an airtight container. Bake from frozen (don’t thaw!) at 400°F for about 15-16 minutes, brushing with egg wash first.
- Baked: Baked scones can also be frozen unglazed, but the texture will change slightly, becoming more like a dense strawberry shortcake biscuit.
PS: If you love cranberries, check out my homemade Cranberry Sauce recipe. So much better than store-bought!
FAQs
Yes — I strongly recommend it. It’s the secret to tall, tender scones. You’ll notice the difference vs. non-acidic cream or thin milk. If you must substitute, use kefir instead. Or, you can use heavy cream, but the flavor and texture will be different.
Yes, but the taste & texture will be different.
Absolutely — the scones are fabulous plain, especially if you prefer less sweetness.
Use cold butter, don’t overwork the dough, and don’t skip the buttermilk, its acidity helps to tenderize the scones!

Email This Recipe
Enter your email, and we’ll send it to your inbox.
Ingredients
For the scones:
- 1 1/2 sticks (170 grams) unsalted butter, cold
- 1/3 cup (66 grams) granulated sugar
- 1 tablespoon freshly grated orange zest*
- 3 cups (381 grams) all-purpose flour
- 1 tablespoon baking powder
- 1 teaspoon salt
- 1/2 teaspoon baking soda
- 1 cup (240 grams) buttermilk
- 1 large egg
- 1 teaspoon vanilla extract
- 1 cup (110 grams) fresh or frozen cranberries**
- Sparkling sugar, for topping, optional


For the egg wash:
- 1 large egg
- 1 teaspoon water
For the glaze:
- 1 1/2 cups (188 grams) powdered sugar
- 2 ½ tablespoons orange juice
- 2 tablespoons (28 grams) unsalted butter, melted
- 1 teaspoon freshly grated orange zest*
Instructions
Make the scones:
- Preheat the oven to 400°F. Line two baking sheets with parchment paper.
- Cut the butter into small cubes. Keep it in the fridge or freezer while you prepare the other ingredients.
- In a large bowl, combine the sugar and zest. Rub them together with your fingers until fragrant. Whisk in the flour, baking powder, salt, and baking soda.
- In a separate bowl, whisk together the buttermilk, 1 egg, and vanilla extract. Set aside.
- Add the cold butter to the dry ingredients and cut with a pastry cutter or a fork until the butter pieces are the size of large peas. Work quickly to keep the butter cold.
- Make a well in the center of the dry ingredients and pour in the liquid mixture. Stir with a spatula until streaks of flour remain.
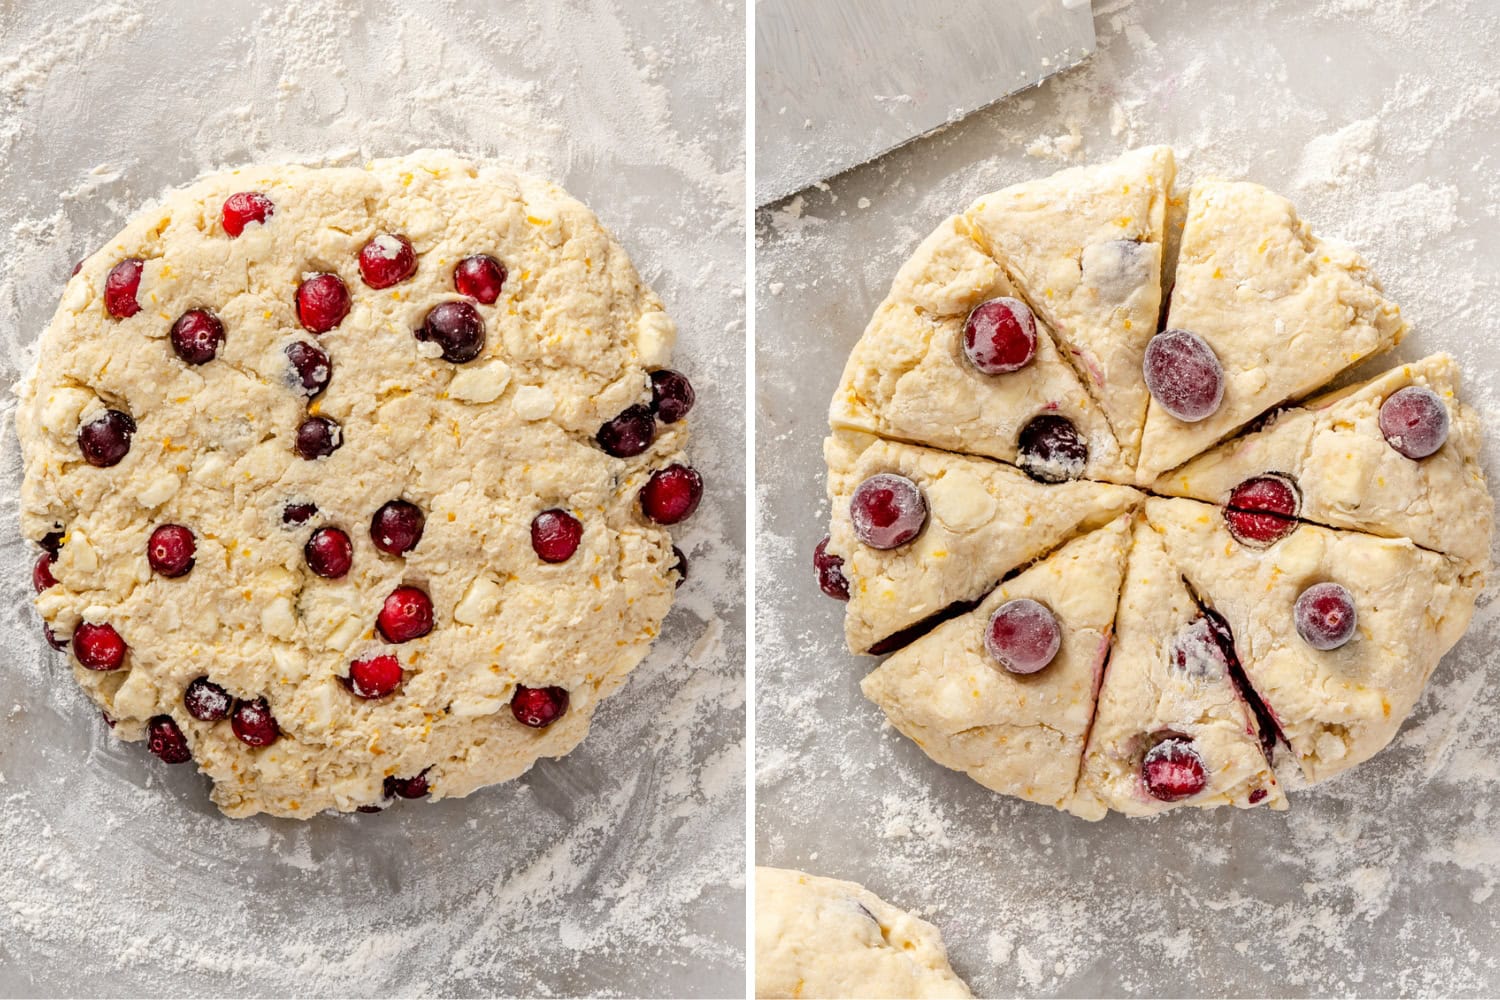
- Gently fold in the cranberries until barely combined. The dough will look crumbly and messy at this point.
- Transfer the dough onto a floured surface. Pat into a rough circle, pressing any loose cranberries back in. Fold the dough in half, then fold in half again the opposite direction. This helps create flaky, tall layers.
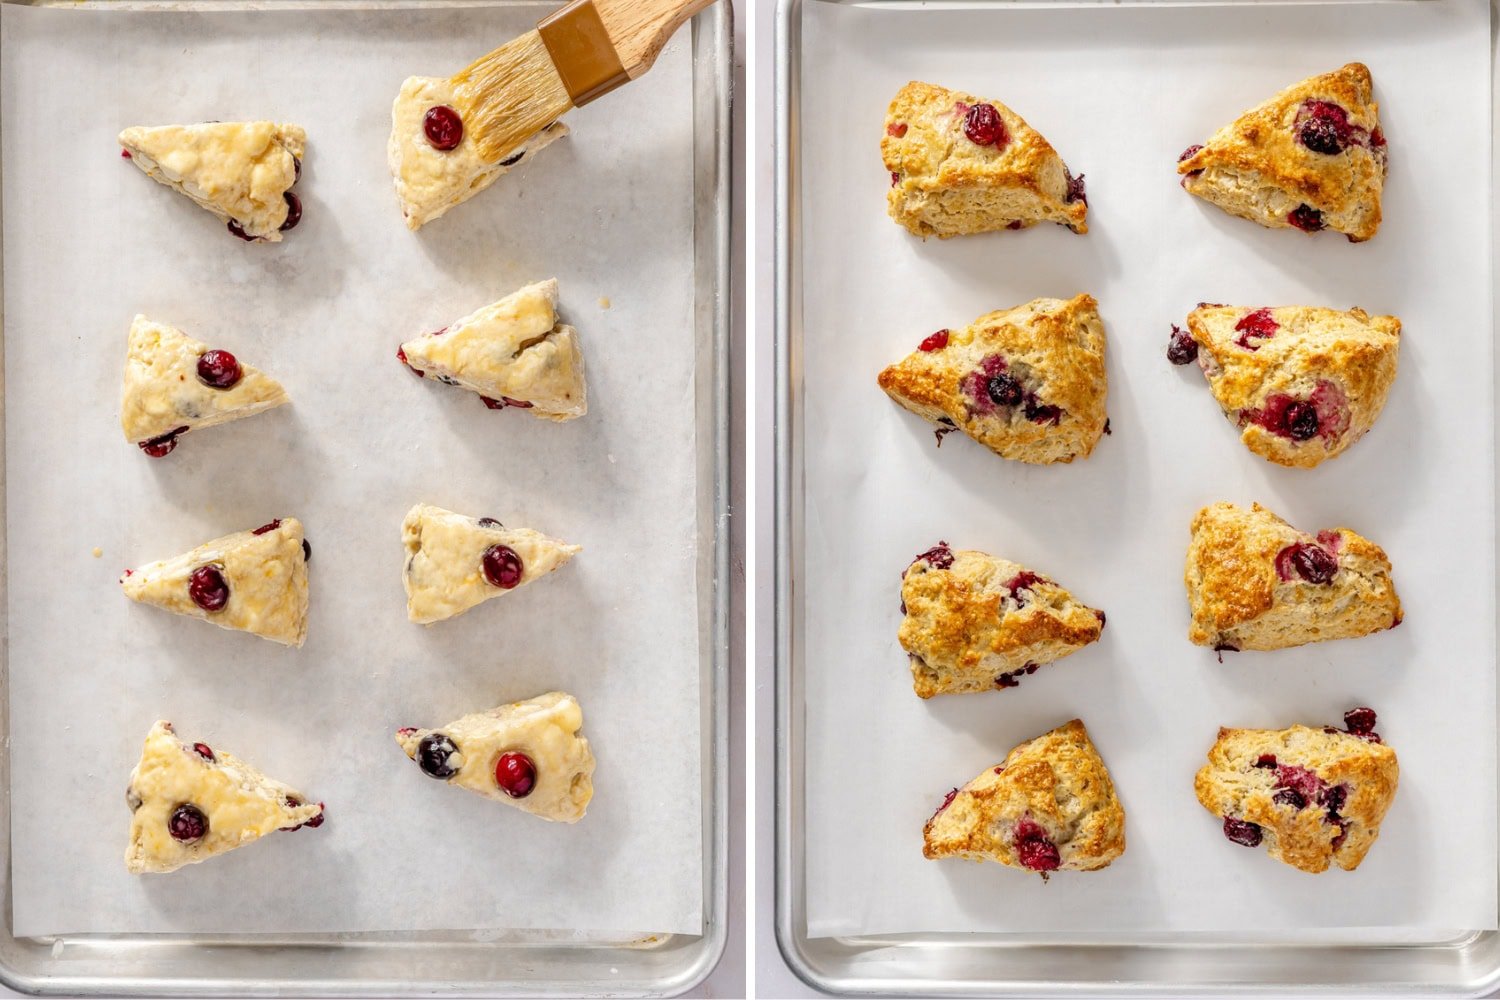
- Using a sharp knife, divide the dough in half. Pat each half into a 6-inch round, about ¾-inch thick. Cut each round into 8 wedges. Place the wedges on the prepared baking pans, spacing about 2 inches apart.
- MAKE AHEAD***: At this stage, you can freeze the unbaked scones for up to 1 month. Place the baking sheet in the freezer and freeze uncovered for about 30 minutes, or until firm. Then transfer to an airtight container or freezer bag. When ready to bake, brush with egg wash and add about 2 minutes to the baking time (no need to thaw).
Make the egg wash:
- In a small bowl, whisk together the remaining egg with 1 teaspoon water. Brush lightly over the scones.
- Bake for about 13 minutes, or until the tops are lightly golden. Cool on a wire rack before glazing.
Make the glaze:
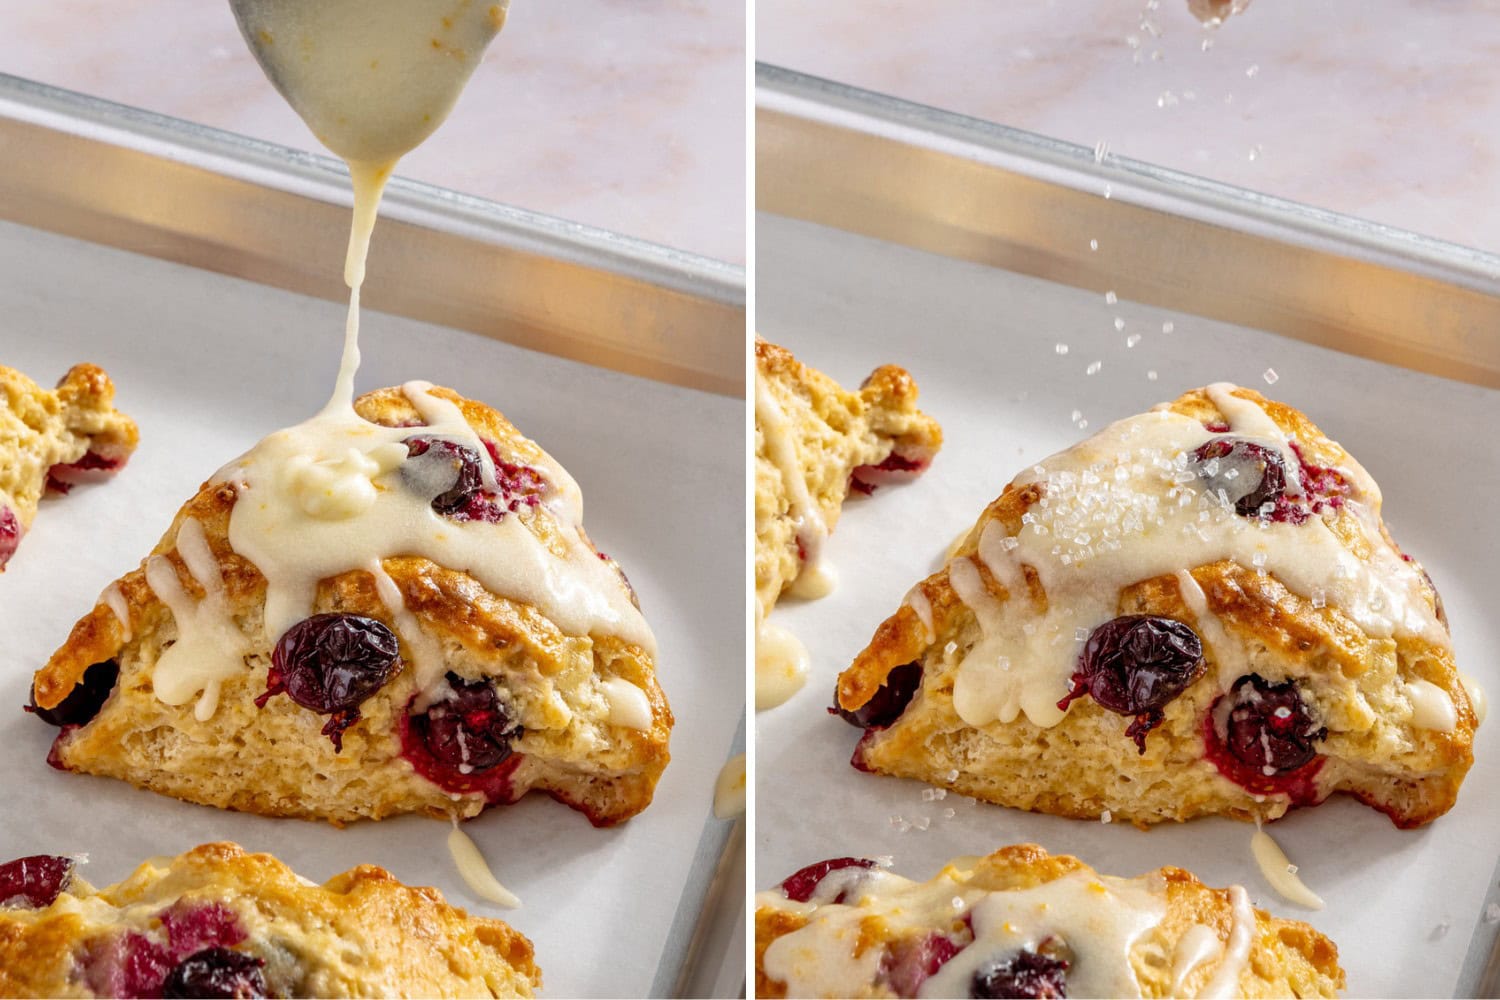
- In a small bowl, whisk together the powdered sugar, orange juice, melted butter, and orange zest until smooth. It should be thick but pourable. Add more orange juice if too thick, or more powdered sugar if too thin.
- Drizzle over cooled scones. Sprinkle with coarse sugar if using. Let set before serving.
- Scones are best enjoyed the same day they’re baked.
Notes
More Recipes You’ll Love:
This recipe was originally published in 2019 and has been updated to use fresh or frozen cranberries. Photos by Jess Gaertner.


These were very tender and flaky scones as well as being delicious. However, the dough was very sticky and I had a hard time cutting them into triangles so they were very messy looking next time. I’ll use more flour.
I have a question about this recipe… I love your recipes and your teaching style… You make everything look and feel so easy. All the recipes I have tried have always turned out great!. I would like to try these scones, but I need you to put on your science hat. The recipe calls for buttermilk, and I am not a big fan of milk… so it often spoils before I can use it up. I use it for cooking and baking, so I keep it in powdered form, including Saco brand powdered buttermilk. So, my question is, can I use it in reconstituted form? And, if so, can I add it to the dry ingredients and then add the required liquid (water), or do I need to mix it first? Or must it be fresh? Thank you for your time!
Hi Donna, thank you so much for your kinds words! Feel free to use plain kefir in place of buttermilk here. We haven’t tested this recipe with powdered buttermilk, and from Tessa’s past buttermilk experiments, it’s not her preferred option. If you did want to give it a try, the Saco instructions typically have you whisk the powder into the dry ingredients. One more tip you might find super helpful: you can freeze leftover buttermilk! It thaws beautifully for baking. Here’s Tessa’s full guide on buttermilk if you’re curious to learn more 🙂
QUESTION:
Can i use leftover whole berry cranberry SAUCE (from T’giving turkey dinner) instead of just the cranberries?
If so, what adjustment should I make to the cranberries and liquid component?
Hi Leo! As delicious as that sounds, I wouldn’t recommend adding cranberry sauce to the dough — the extra liquid and sugar will affect the scone’s taste and texture, and our team hasn’t tested it to offer adjustments. Instead, you could always swirl some into the glaze for a pretty pink color!
Thank you. I’ll look at other recipes to use it up.
These were very tender scones and delicious. I thought 1.5 cubes of butter was too much and settled on one cube (which still was too much). I used 2 tsp. of dried powdered orange zest which gave it a nice hint of orange and switched the flour to sprouted spelt for a healthier version. I also eliminated the glaze which would have made the sugar content excessive.
Made these for Garden Club and everyone enjoyed them and asked for the recipe.