


Tessa’s Recipe Rundown
TASTE: Sweet without being cloying or artificial-tasting.
TEXTURE: This icing sets so it won’t damage if stacked, but not so much that it ruins the texture of the sugar cookie.
EASE: Super easy.
PROS: Fun to make and even more fun to use!
CONS: As with most cookie icings, you’ll need about 24 hours for your cookies to be fully set.
WOULD I MAKE THIS AGAIN? Every time I decorate cookies!
This post may contain affiliate links. Read our disclosure policy.


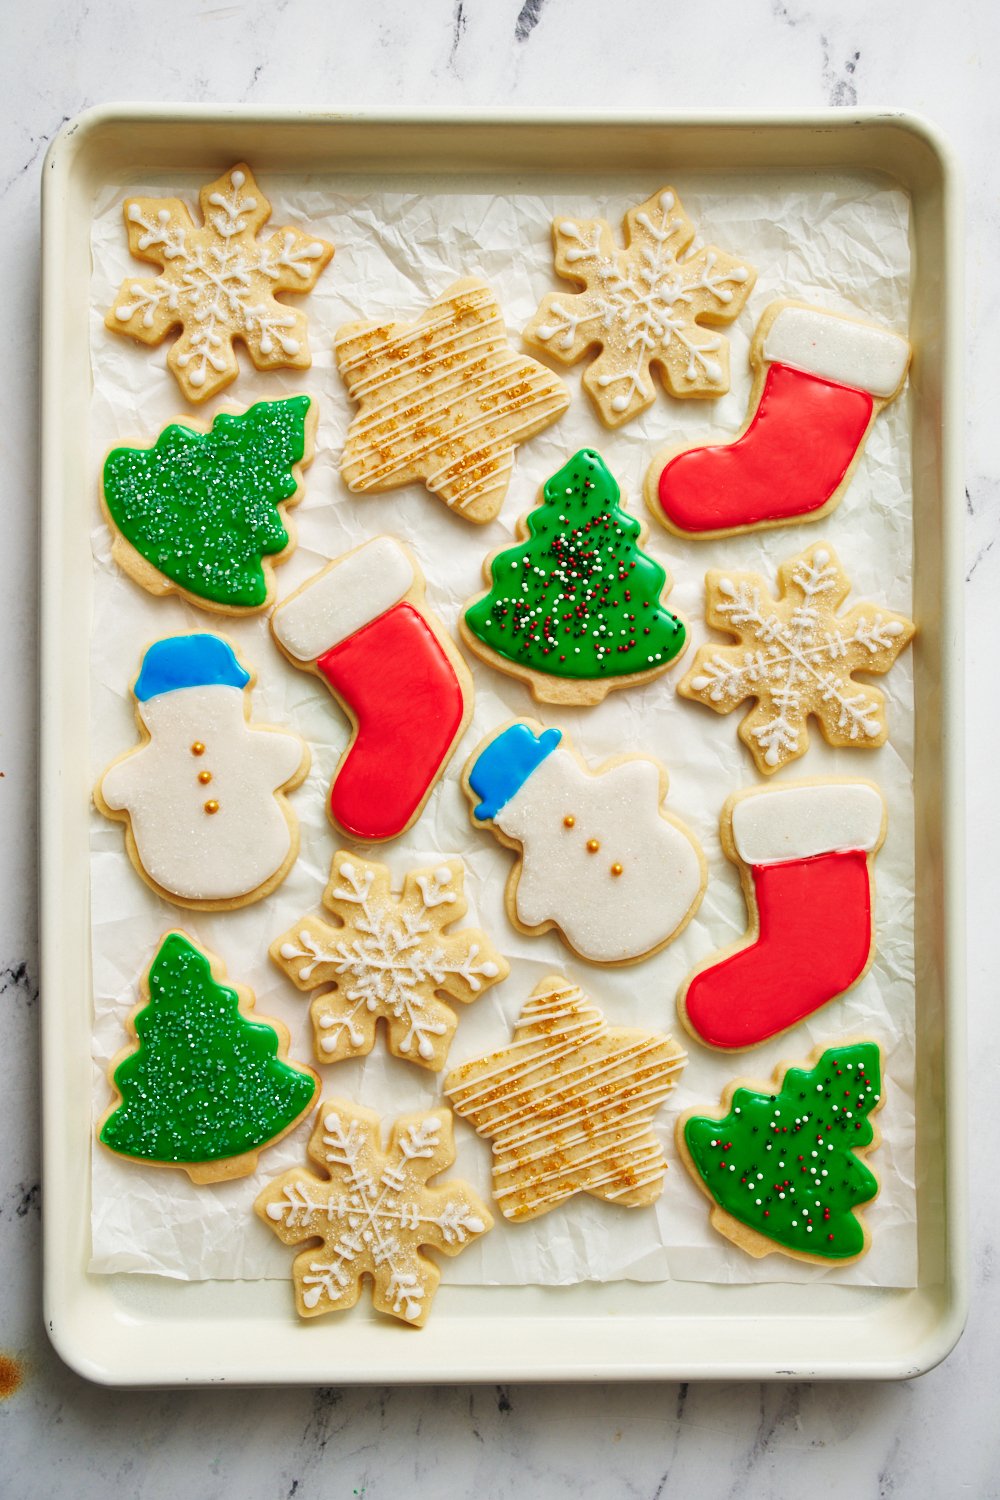
Nothing truly says ‘Christmas’ quite like a platter of beautifully decorated sugar cookies – and this Sugar Cookie Icing is the Christmas cookie game-changer you’ve been searching for!
It’s quicker and simpler to make than royal icing, which, while pretty, can be a hassle and isn’t always the tastiest. No mixer is needed here either, making this recipe even easier.
This icing is the perfect finishing touch to my Easy Cut-Out Sugar Cookies or classic Gingerbread Cookies for a festive treat everyone will love.
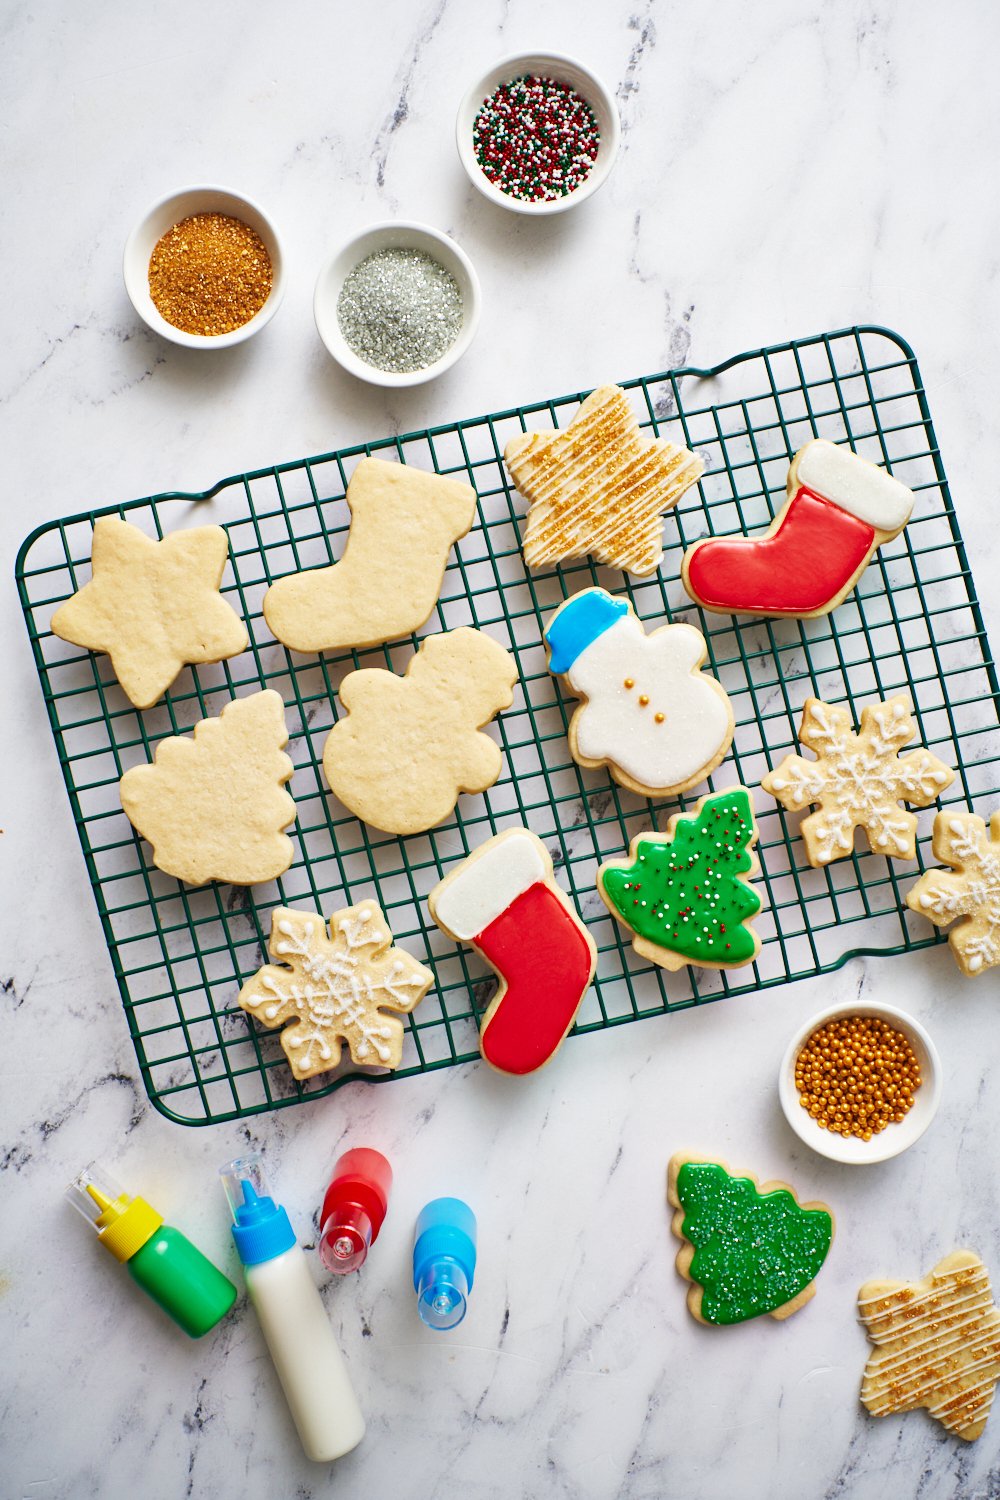
This Sugar Cookie Icing is the icing on the cake – I mean, cookie (😉). Enjoy creating memories with the kiddos as you ice your cookies for the holidays!

Sprinkle of Science
How to Make Easy Sugar Cookie Icing
Ingredients for Sugar Cookie Icing:
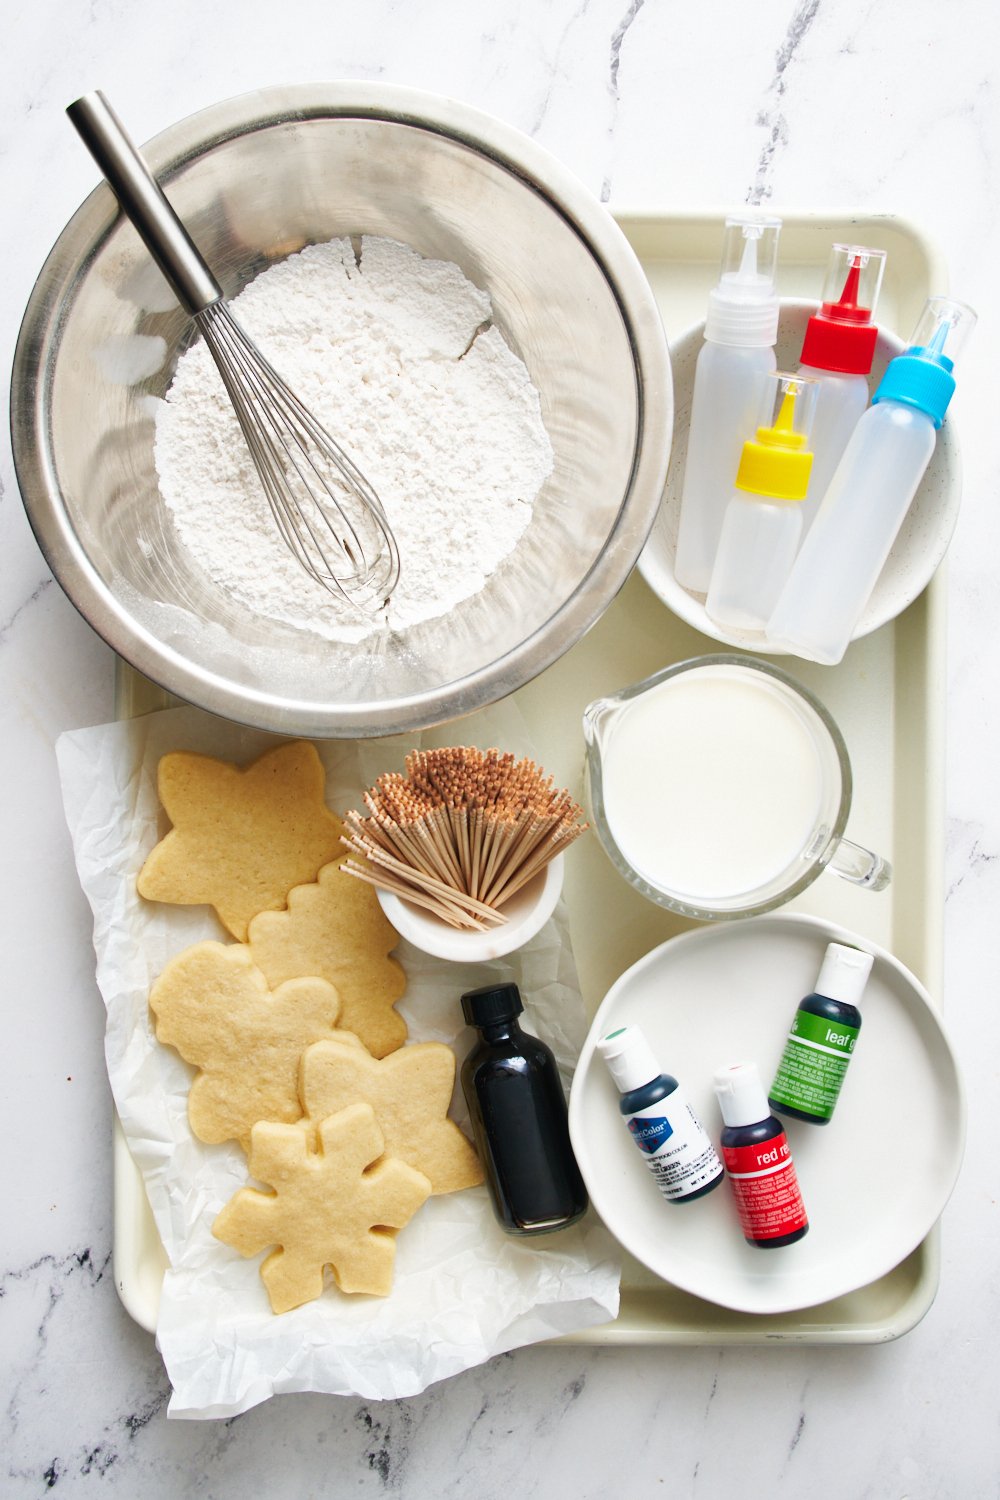
- Powdered sugar: Also known as confectioner’s sugar or icing sugar, this is the base for our cookie icing. Do NOT skip sifting your powdered sugar. More on powdered sugar below.
- Milk: In testing this recipe, we found that whole milk produces a slightly better-tasting cookie icing that’s also easier to pipe. You can use water instead, but check out the notes at the bottom of the recipe card for my recommendations. I haven’t tried any dairy-free milk alternatives.
- Vanilla extract: For flavor. Feel free to use any extract in place of the vanilla extract. Peppermint, almond, or orange would all be delicious, but keep in mind that extract strengths differ, so you’ll need less of some extracts than others. Start with 1/8 teaspoon and increase to taste.
- Gel food coloring: Gel coloring packs a powerful punch without adding extra liquid to the mixture. Americolor gel food coloring is my favorite. Start with just a drop, adding another drop or two until you reach your preferred color.
The Powdered Sugar
- Use 10-X powdered sugar for the smoothest results, labeled as ’10-X’ on the package. This means it’s ground 10 times finer than granulated sugar. Both Domino and C&H are 10-X, as are most store brands, even if they don’t specify.
- Avoid organic powdered sugar, which I often recommend for buttercream, but not for this icing recipe. Many organic powdered sugar products will give the icing a gray color instead of pure white. They also absorb moisture differently, requiring more tinkering to get the correct ratio.
If You Want a Crisp White Icing
Use conventional powdered sugar (like Domino or C&H) and skip the vanilla extract to avoid tinting the icing.
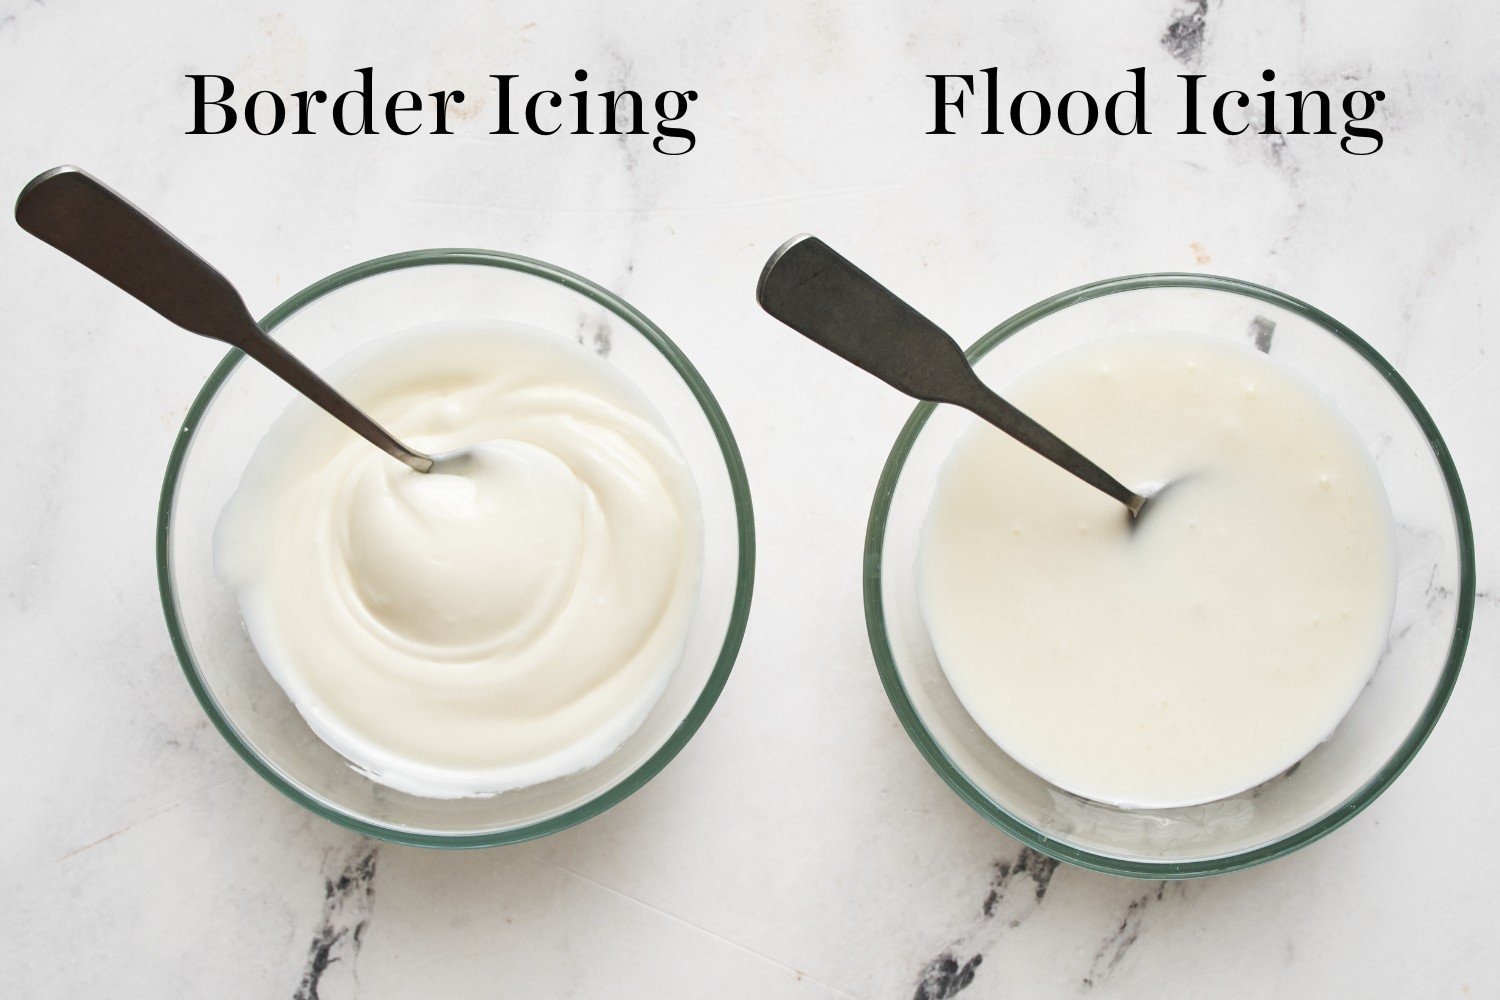
How to Get the Perfect Consistency for Cookie Icing
Every kitchen will be slightly different in the amounts of liquid needed, depending on the humidity levels and the brand of powdered sugar used. Simply adjust the ratio until it’s right for you, adding a little more sifted powdered sugar to thicken or a tiny splash (½ teaspoon at a time) more milk to thin.
Practice Your Designs Before Piping
Use a piece of parchment paper to test the consistency of the icing and to practice your decorating. Scrape the designs back into your bowl to avoid waste.
Tips for Piping Cookie Icing
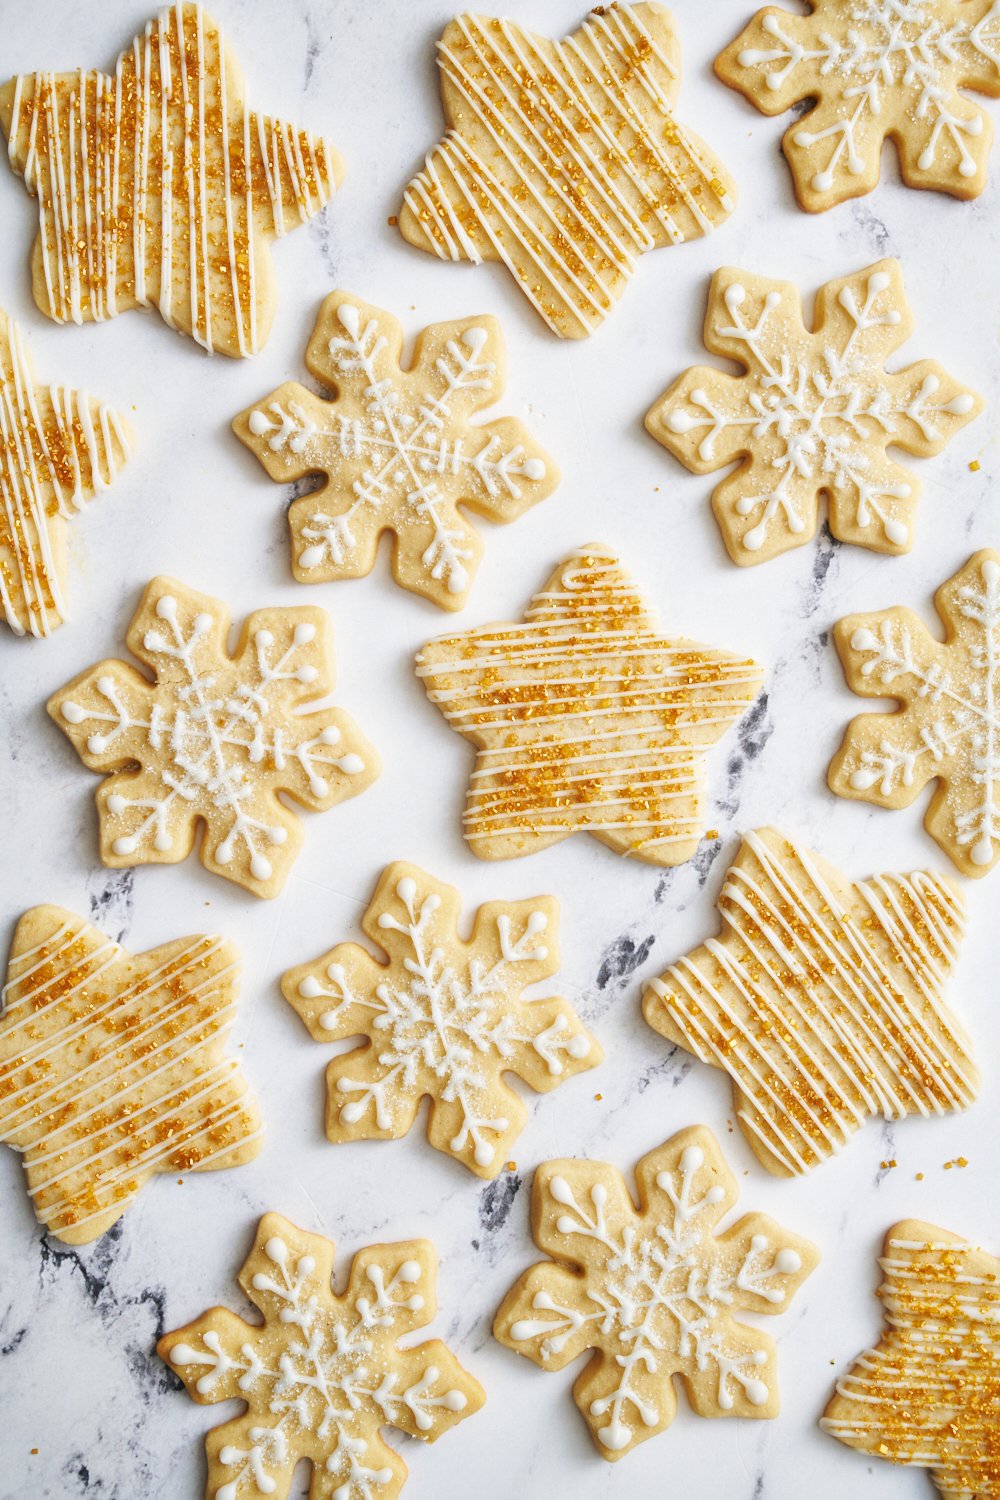
1. Use small squeeze bottles or pastry bags fitted with small plain tips. I prefer squeeze bottles – I find they’re easier to hold and handle, and they make less of a mess (especially if you’re getting the kids involved!)
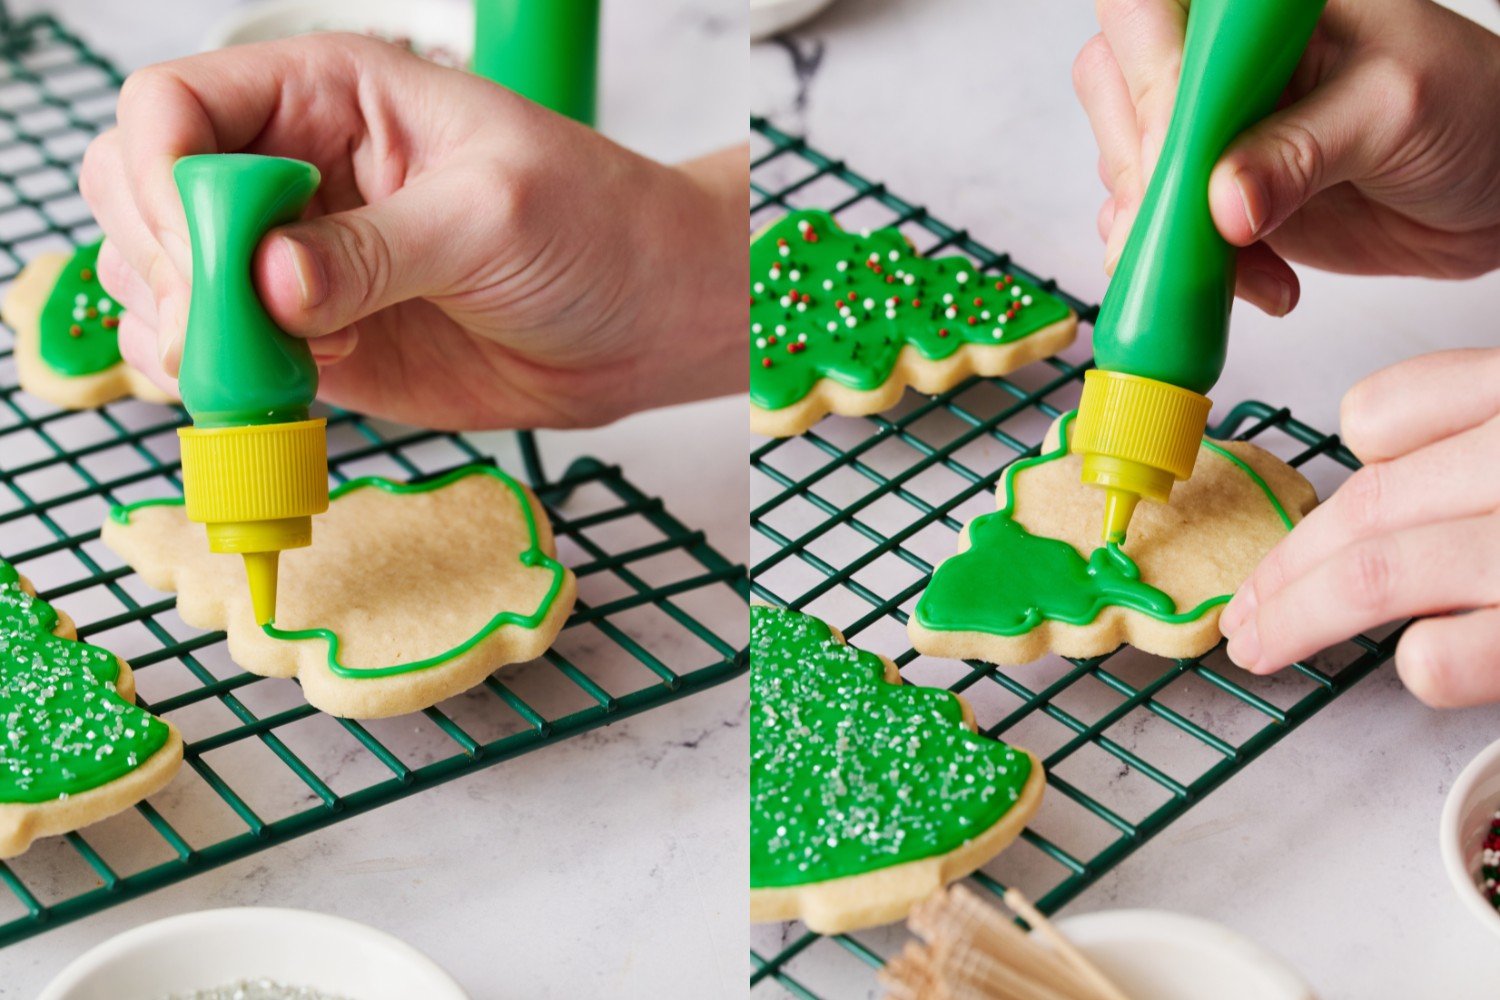
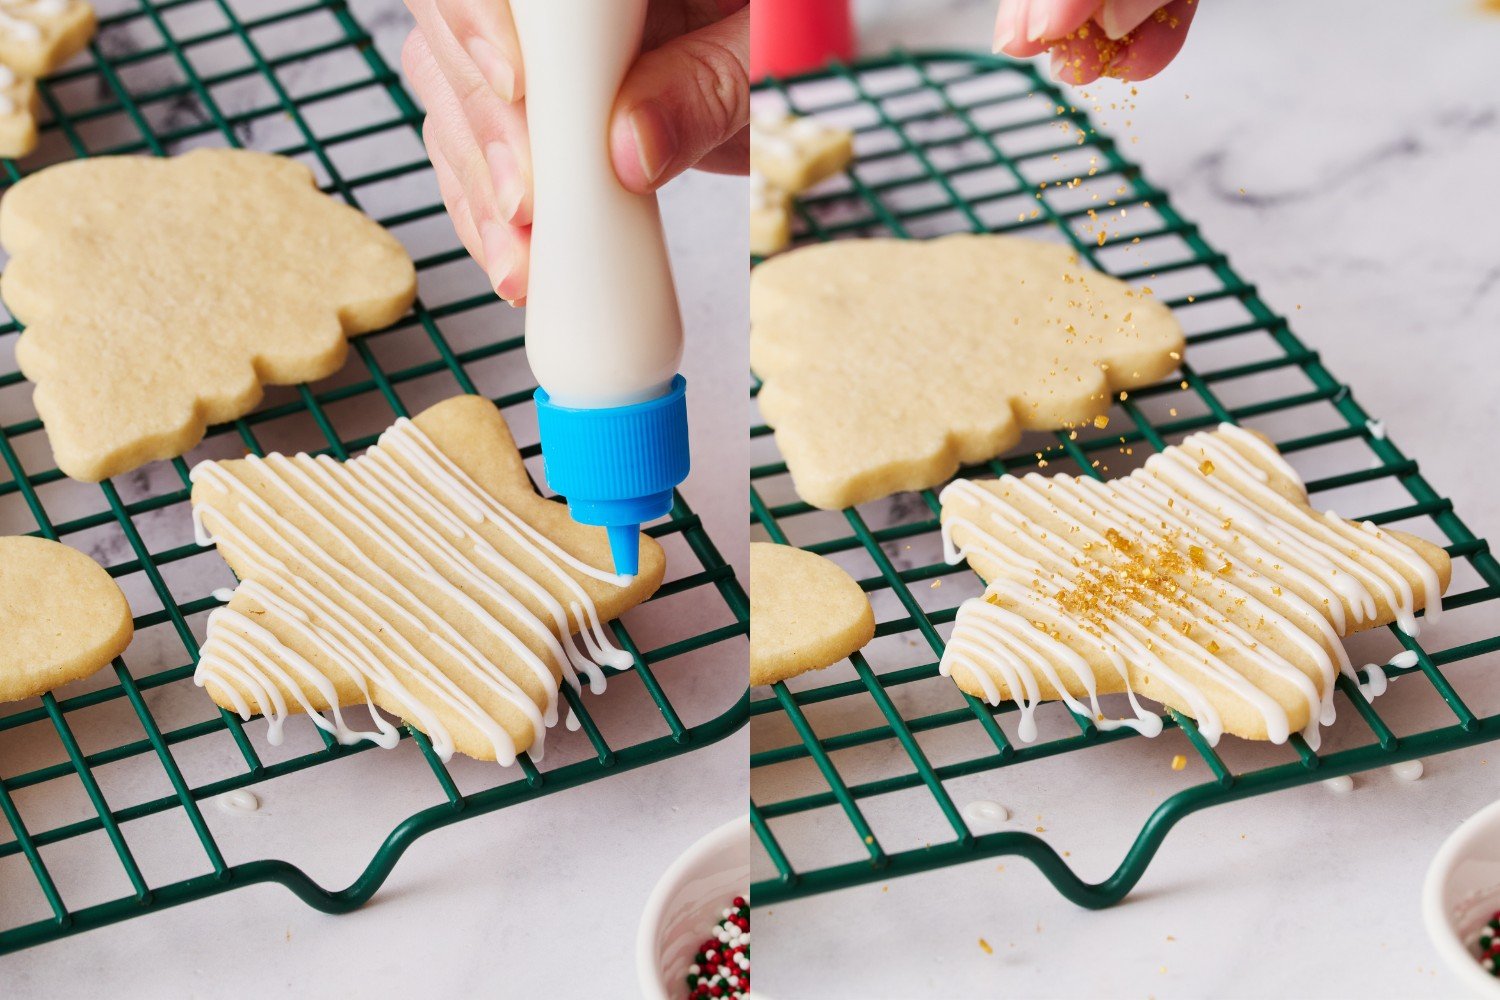
2. If your flood icing doesn’t quite meet the edges, use a toothpick to gently encourage the icing all the way to the edges.
3. Apply sprinkles or glitter immediately, but wait at least 15 minutes before adding any layered piped detail (longer in humid environments) to prevent the details from sinking into the flood icing.
4. Use the border icing for any detail work.

Adding Corn Syrup
This recipe has a slight gloss and dries well without corn syrup – but if you want to add more shine and create a more viscous consistency, add 1 teaspoon.
Can I Double This Recipe?
Yes! Simply double all ingredients for both the border and flood icings in medium bowls – no other modifications needed.
Can Cookie Icing be Made Ahead of Time?
For best results, use the sugar cookie icing the day it’s made. If you need to prep it ahead, store inside an airtight container at room temperature for up to one day, re-mixing with a fork before using.
How Long Before Cookie Icing Hardens?
Once your cookies are iced, they can take up to 24 hours sitting untouched at room temperature before they will completely harden enough to stack or transport without damaging. Feel free to serve sooner than this, but note that the icing may be soft and difficult to transport without damaging the decoration.

More Christmas Recipes You’ll Love:
You can find even more Christmas baking recipes here at my Christmas Recipe Headquarters here!

Email This Recipe
Enter your email, and we’ll send it to your inbox.
Ingredients
For the border icing:
- 1 cup (125 grams) powdered sugar, (see Recipe Notes1), sifted
- 1/2 teaspoon vanilla extract
- 1-2 tablespoons milk2
- Gel food coloring, if desired
For the flood icing:
- 1 cup (125 grams) powdered sugar, or more, sifted
- 1/2 teaspoon vanilla extract
- 2-3 tablespoons milk2
- Gel food coloring, if desired
Instructions
For the border icing:
- In a small bowl, use a fork to beat together the sugar, vanilla, and 1 tablespoon of the liquid. If it’s too thick, add more liquid until you achieve your desired consistency. Mix in the food coloring, a few drops at a time, until colored to your liking. The mixture should be very thick but still pourable. Add more sifted powdered sugar as needed to thicken, or more liquid to thin.
- Transfer the border icing to a squeeze bottle using a funnel. You can also scoop into a pastry bag fitted with a small plain tip. Before you begin icing any cookies, take a few moments to practice on a piece of parchment paper to get the feel of the icing.
- Holding the bottle or bag tip directly over one corner of a cookie, begin tracing an outline of the cookie, squeezing gently and using both hands if needed to maintain consistent pressure. I prefer to allow a little slack in my icing line as I go. If you mess up, simply wipe the icing off and start again. Allow the icing to dry slightly before continuing with the flood icing.
For the flood icing:
- In a small bowl, use a fork to beat together all the ingredients, starting with 2 tablespoons of liquid. If too thick, add more liquid. Mix in the food coloring, a few drops at a time, until colored to your liking. The mixture should still be pretty thick but will drizzle more freely than the border icing. Add more sifted powdered sugar as needed to thicken, or more liquid to thin. Pour the flood icing into a squeeze bottle or a pastry bag fitted with a small plain tip.
- Prepare as many batches and colors of flood icing as you need to decorate your cookies.
- Begin filling the interior of the border drawn on each cookie with the flood icing, being careful not to add too much that it overflows the border icing. Use either the nose of the bottle or a small toothpick to push the icing evenly over the cookie and up against the corners.
- Cookies may be served after drying for 30 to 60 minutes. If you plan to package, stack, or transport the cookies, allow the iced cookies to dry for at least eight hours, with 24 hours recommended for best results. The cookies are fully dry when the surface is smooth and doesn’t smudge when touched. Once dried, store the cookies between sheets of parchment paper in an airtight container at room temperature for up to 10 days.
Notes
Border: 1 Tablespoon + 1 teaspoon water
Flood: 1 ½ Tablespoons water 3. Border vs. Flood icing: Use the Border icing for any cookies with any doming, such as drop cookies, as it stays put and covers the top better. For layered detailed decorations like lights on Christmas trees or vines on pumpkins, wait at least 20 minutes (or longer in humid conditions) before adding them to prevent sinking into the flood icing. Use the border icing for these details to ensure they stay defined. Yield: This recipe will ice approximately 18 medium-sized cookies, but this number will depend on the size of the cookies and the thickness of the icing piped on each cookie. Feel free to double or triple this recipe as needed to ice more cookies.


Dear Tessa
Try adding a few drops of rose water to your icing mixture…next level yumminess❣
Great recipe! Will definitely make again
Greetings from Greece. Love your recipes and all your detailed comments. Thank you for all your hard work.
Commenting on the icing recipe – where has the egg white gone?
Never tried it with just milk of water before.
Pls share any commenta that you might have.
Thank you for your time.
Happy Holidays!!
Ersi
Hi Ersi! Our recipe doesn’t require egg whites or meringue powder to still set beautifully! 🙂 Excited for you to give it a try!
I definitely will and let you know soon. Thank you for your reply.
Well, I finally got around to making my cookies with your icing. While it tasted a lot better than the egg white one, and it also behaved a lot better, it did not keep the original shine and the sharpness of the color. Plus the fact that the different color details started to “spill”. It’s a pity because it is much easie to handle and the taste is great. Oh well, next Christmas will try it again. Happy Holidays!
Do you have a gingerbread cookie recipe? (Preferably one that doesn’t spread like crazy and isn’t brick-hard, but works great to cut out.)
☺
Hi Marissa! We do have a Gingerbread Cookies recipe! If you’re looking for a gingerbread house recipe, we don’t currently have one, but it’s a great idea for a future festive recipe!
Thank you! A regular gingerbread cookie recipe is just what I need.
I can’t wait to get your book!!
We can’t wait to hear what you think of Tessa’s book, Linda! 🙂