


Tessa’s Recipe Rundown
Taste: This cheesecake delivers rich, chocolatey Oreo flavor in every bite, balanced with a tangy, vanilla-forward cheesecake filling.
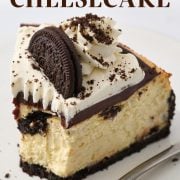
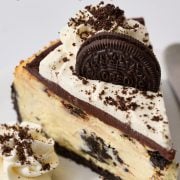
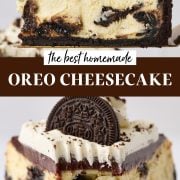
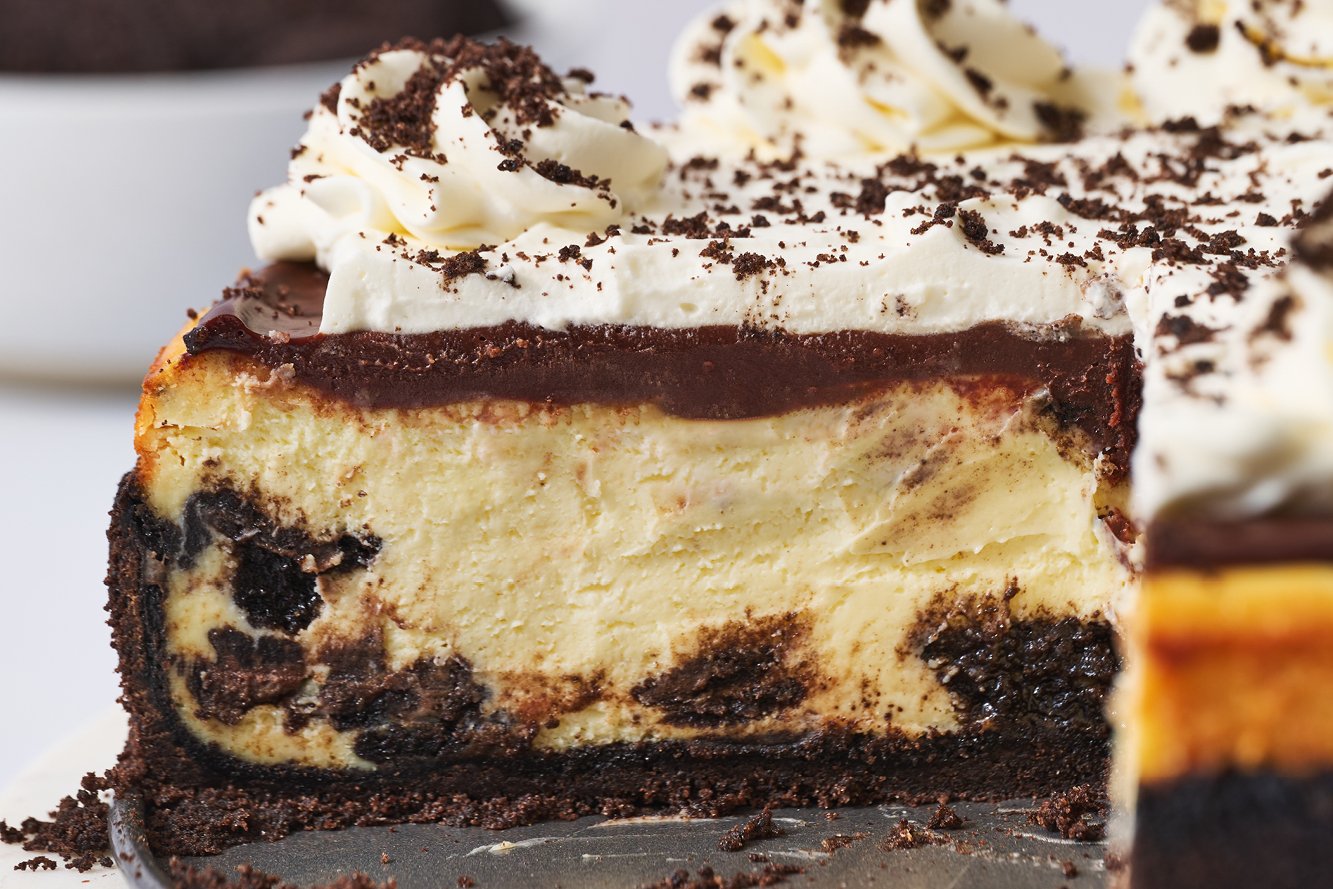
Texture: I love the contrast between the crunchy Oreo crust and the ultra-creamy cheesecake.
Ease: Cheesecake does take some time to make, but the lengthiest parts are mostly hands-off.
Why You’ll Love This Recipe: This dessert is every Oreo-lover’s dream, with whole Oreos, not just crumbs. The cheesecake can be made entirely ahead of time, too!
This post may contain affiliate links. Read our disclosure policy.
Who doesn’t love an Oreo? They’re the highest-selling packaged cookie in the world for a reason!
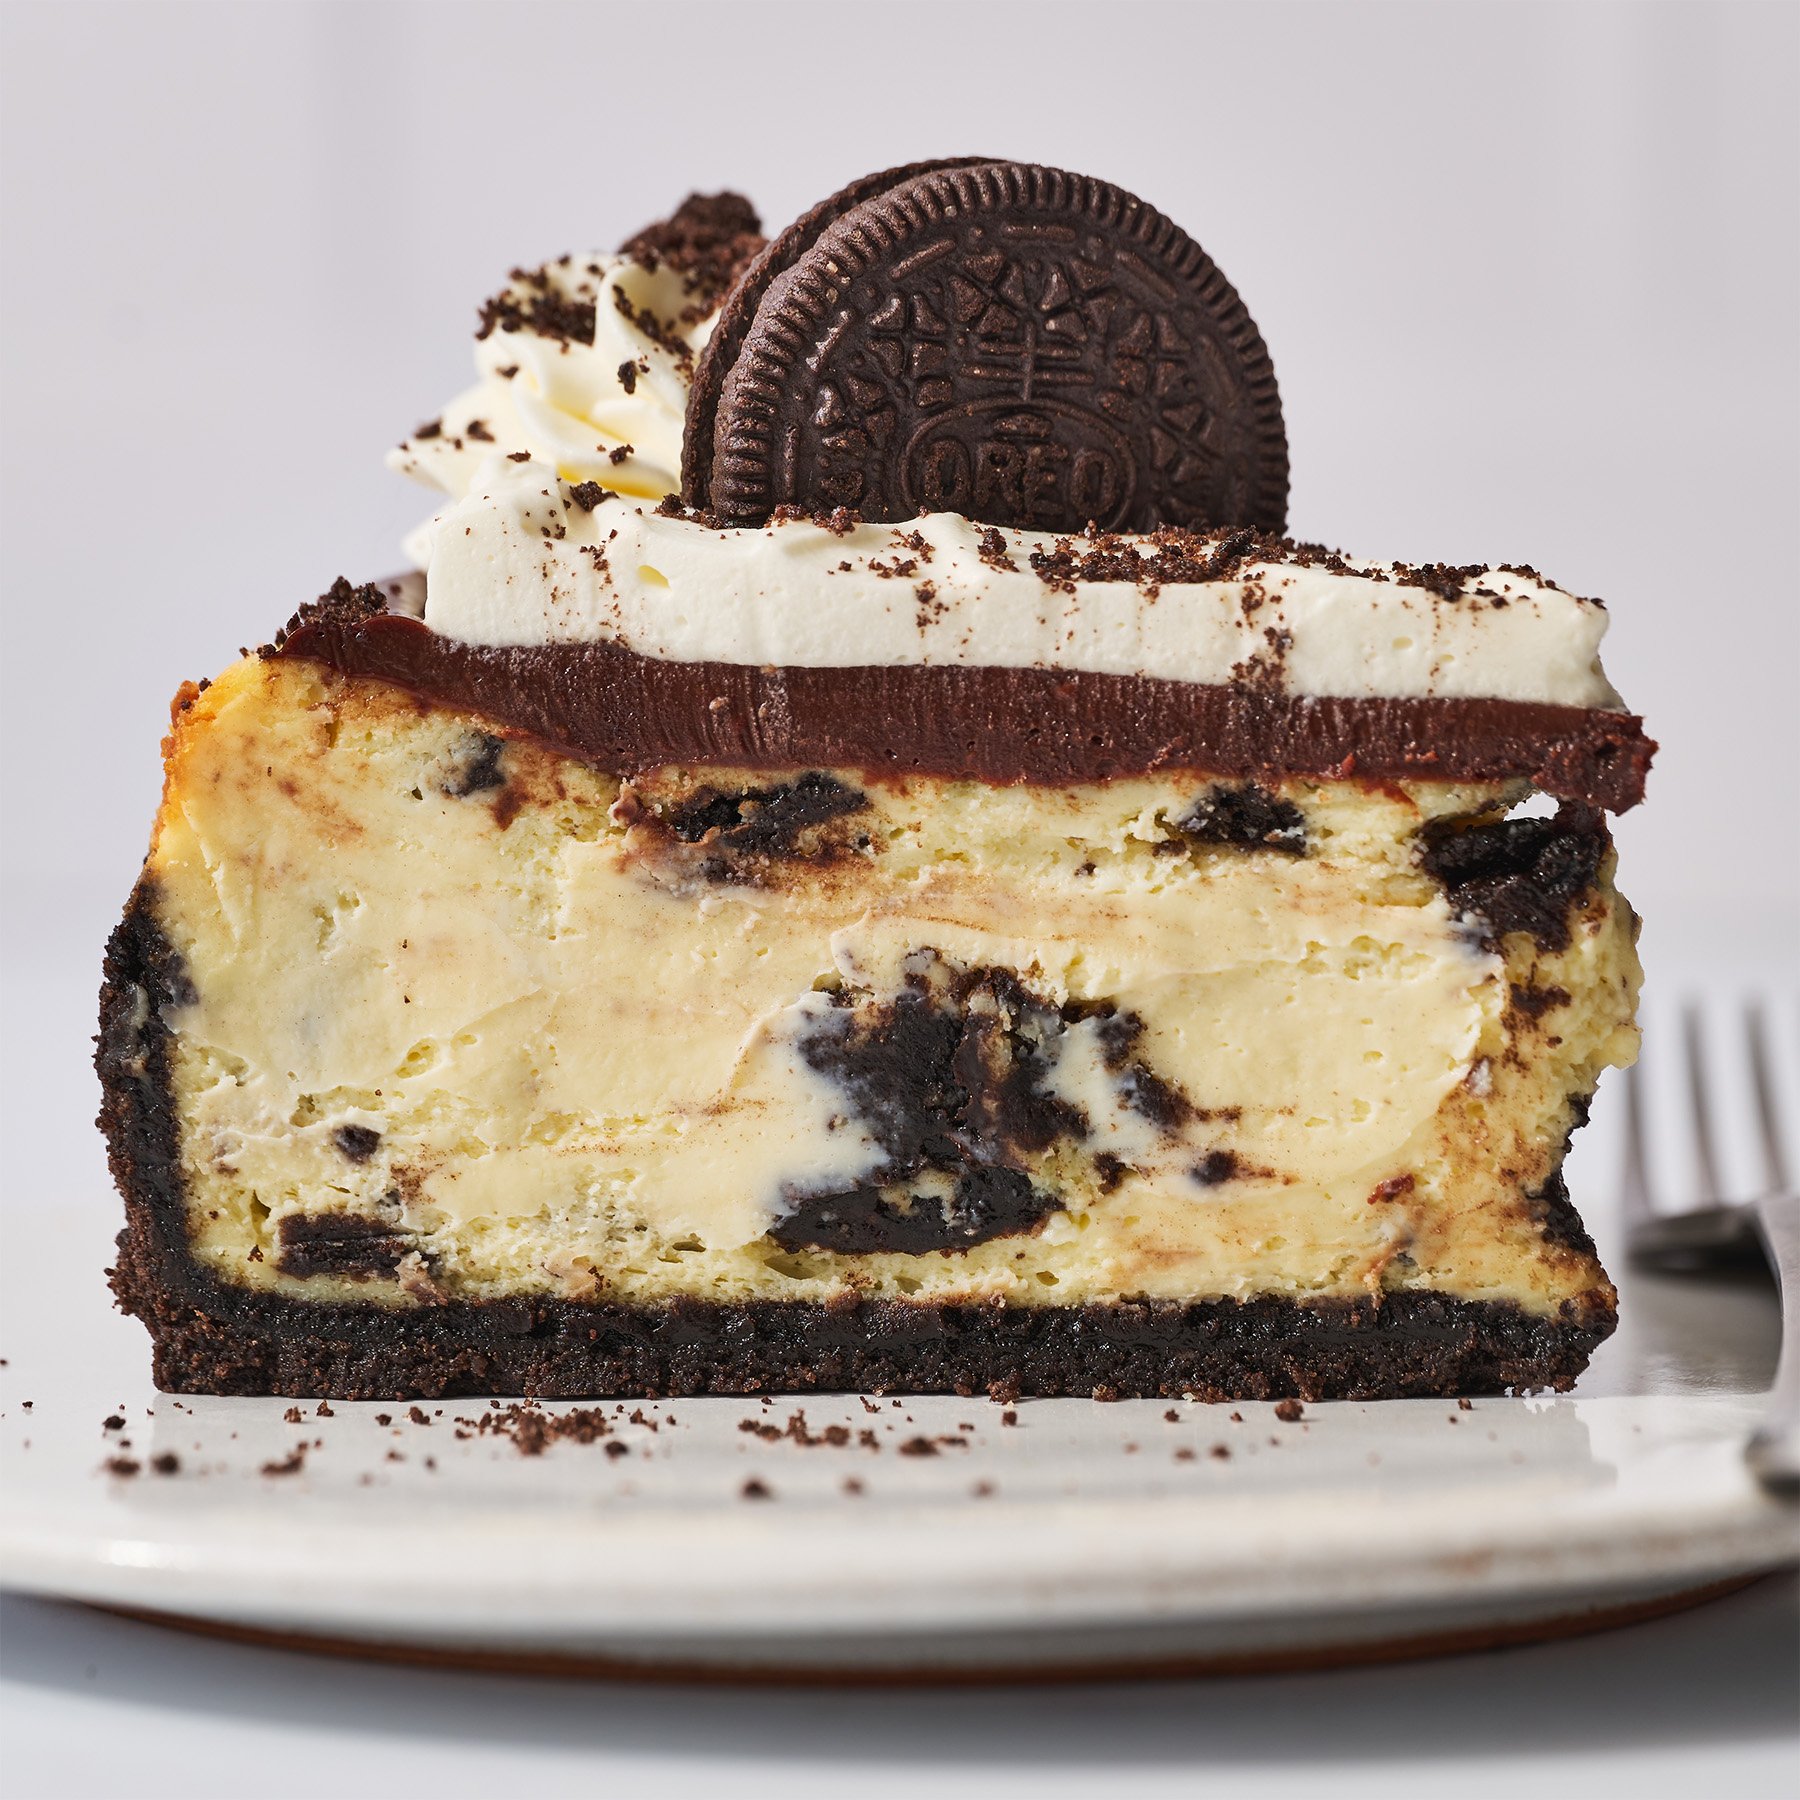
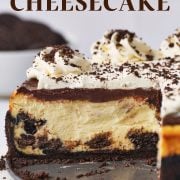
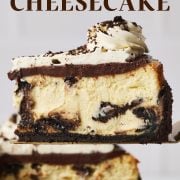
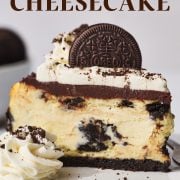
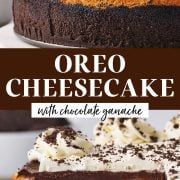
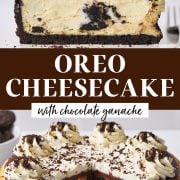
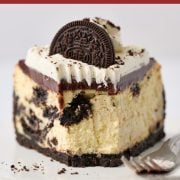
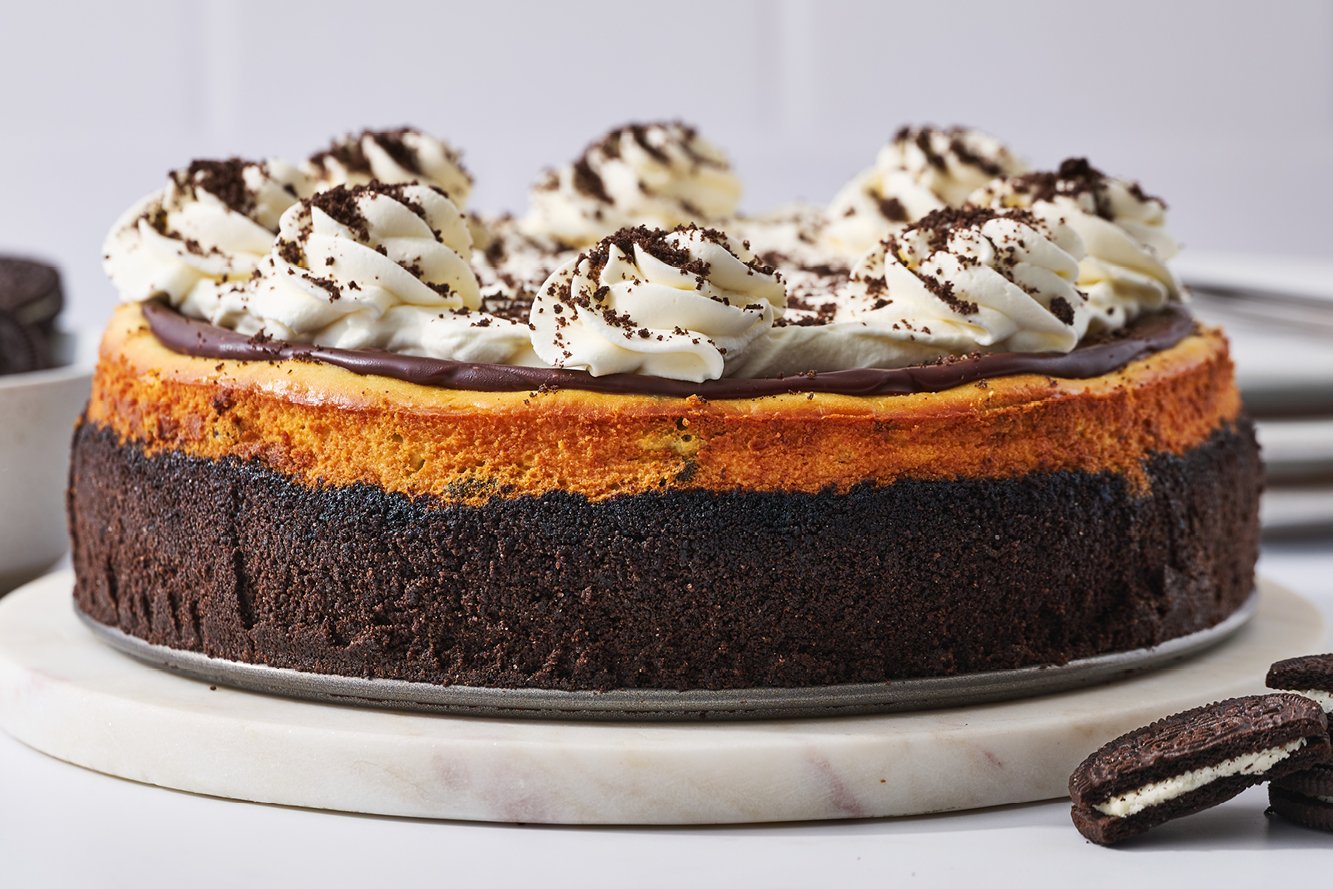
This Oreo Cheesecake is the ultimate dessert for Oreo lovers of all ages. I start with a rich, buttery Oreo crust and layer on an ultra-creamy cheesecake filling packed with whole Oreos. Then finish it with a simple homemade whipped cream topping.
Seriously, who doesn’t love an Oreo? They’re the highest-selling packaged cookie in the world for a reason!
This recipe combines my love for Oreo cookies with creamy, tangy cheesecake, into one gloriously decadent dessert.
This recipe combines my love for Oreo cookies with classic, tangy cheesecake to create a truly decadent dessert that always impresses. While it does take a little time, it is absolutely worth the wait, and you don’t even need a water bath to bake this baby!
Reader Love
Loved this recipe!!! It came out perfectly.
–
Reader Love
Oh man! Made this recipe to celebrate our 2 year anniversary and my boyfriend couldn’t get enough. He couldn’t believe I made it and figured it was bought from a fancy bakery. I am now making 2 more a week later for a family celebration this weekend! I shared pictures with my family and now everyone wants it! This Oreo cheesecake is awesome and so so delicious!
–
Ingredients Needed
This cheesecake recipe really lets the cookies shine, pairing a crunchy Oreo crust with an ultra-creamy cheesecake filling. My Oreo cheesecake ingredients may look familiar, but the details matter, and these are the ones that really take this recipe to the next level:
- Oreos: I use regular, classic Oreos and keep the filling intact. The cream filling adds sweetness and helps bind the crust. The cookie pieces create that iconic cookies-and-cream look and flavor. I haven’t tested this recipe with Double Stuf or flavored Oreos, but let me know if you’ve experimented in the comments!
- Cream cheese: Brick-style, full-fat cream cheese is essential for a smooth, rich cheesecake. Avoid cream cheese sold in tubs, as it contains more moisture and can lead to a softer, less stable filling.
- Butter: I prefer melted unsalted butter for the crust, allowing me to fully control the salt level. Salted butter can work, but the crust may taste slightly saltier.
- Sour cream: Full-fat sour cream adds extra creaminess and a subtle tang that balances the sweetness of the Oreos. This is a key ingredient for achieving that classic cheesecake flavor.
- Heavy cream: I use it in both the ganache and the whipped cream for richness and structure. I recommend using heavy whipping cream with a higher fat content for the best texture.
For a more chocolate-forward dessert, skip the whipped cream topping and serve this cheesecake with just the ganache. If you really love Oreo dessert recipes, try making them from scratch with my Homemade Oreo Cookies recipe!
Try Next: Chocolate Truffles
Helpful Tools and Equipment
The best Oreo cheesecake is much easier with the proper set up. These are the tools I recommend for the best results:
- Springform pan: I use a sturdy 9-inch springform pan with a 10-cup capacity as my cheesecake pan. This allows enough room for the filling without overflow. Not all 9-inch pans hold the same volume, so avoid filling it too close to the top with a smaller one.
- Electric mixer: A hand mixer or stand mixer fitted with the paddle attachment works for this recipe. The batter should be smooth and well-combined, but not overbeaten, especially after adding the eggs.
- Food processor: This makes quick work of turning whole Oreos into fine Oreo crumbs for the crust. If a you don’t have one, you can crush the cookies in a sealed bag with a rolling pin, but the texture of the crushed Oreos may not be as fine or even.
- Rimmed baking sheet: I always place my springform pan on a baking sheet before baking. It makes transferring the cheesecake easier and helps catch any potential leaks.
- Digital thermometer: This is one of my favorite tools for taking the guesswork out of cheesecake. The center should read about 150°F.
A water bath isn’t needed for this Oreo cheesecake. I bake it low and slow and use a gradual cooling method to prevent cracks. If you prefer to use one, follow my guide to making a water bath for cheesecakes. I use one with my Ultimate Classic Cheesecake if you want to test it out!

Sprinkle of Science
How to Make This Oreo Cheesecake Recipe
1. Make the Oreo Crust
Start by pulsing whole Oreos, filling included, into fine crumbs. Mixing the crumbs with melted butter creates a rich, chocolatey base that holds together beautifully. Press the crust firmly into the bottom and halfway up the sides of a springform pan, then bake briefly to set it. This step gives the crust structure so it stays crisp under the creamy filling.
2. Prepare the Filling
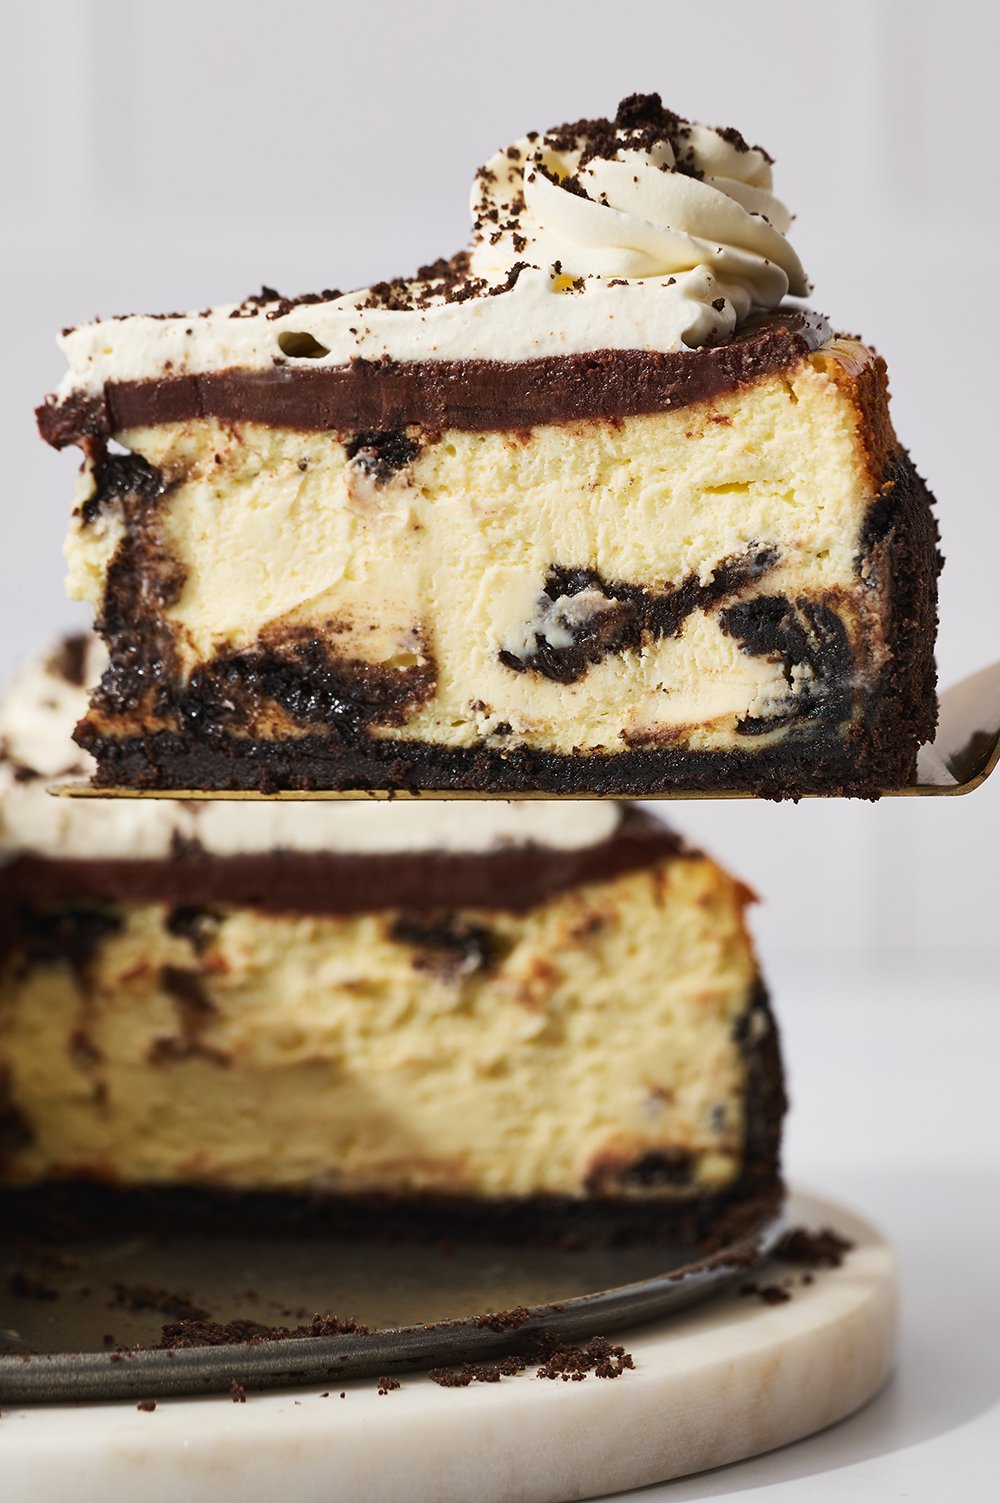
The key to an ultra-creamy cheesecake is starting with fully softened cream cheese. Beat it until completely smooth before adding anything else. Add the eggs one at a time and mix until just combined to avoid incorporating too much air. Finally, fold in the Oreo pieces by hand so they stay chunky and evenly distributed throughout the filling.
3. Assemble and Bake
Pour the filling into the warm crust and smooth the top. Bake the cheesecake low and slow until the edges look set, but the center still has a gentle jiggle like Jell-O. I always err on the side of underbaking here, since the cheesecake will continue to cook and firm up as it cools.

4. Cool Gradually
Once the cheesecake finishes baking, turn off the oven and crack the door open, letting it cool slowly inside. This gradual cooling helps prevent cracks and keeps the texture silky smooth. Afterward, let it cool completely at room temperature before chilling it in the fridge until it sets fully.
5. Finish and Chill
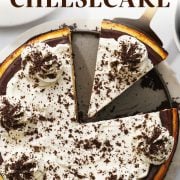
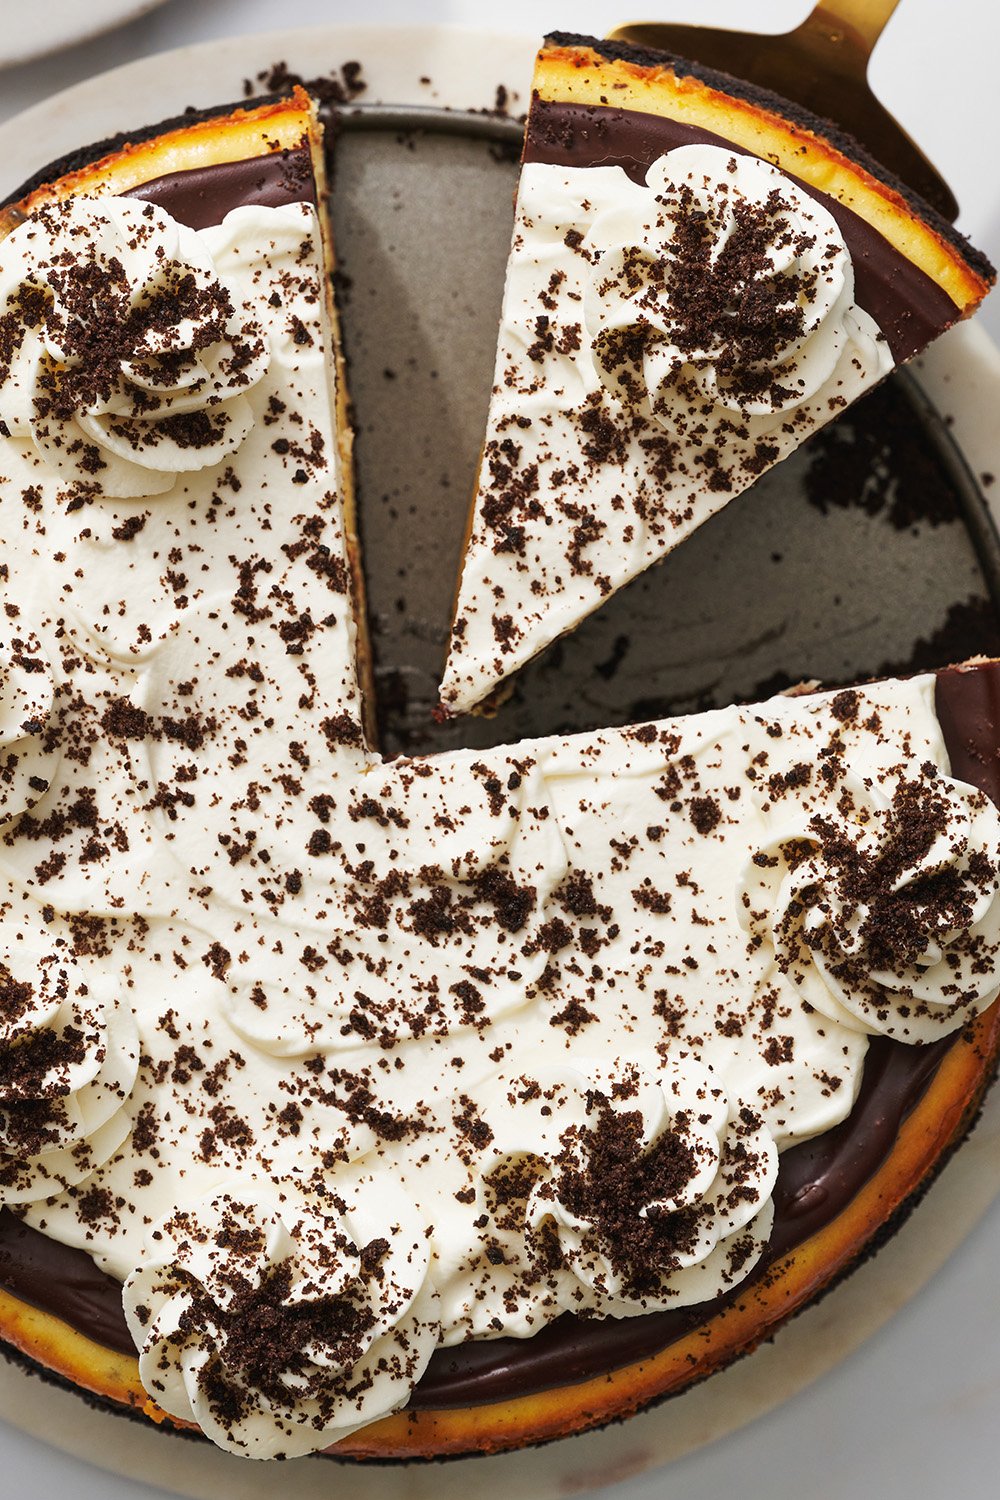
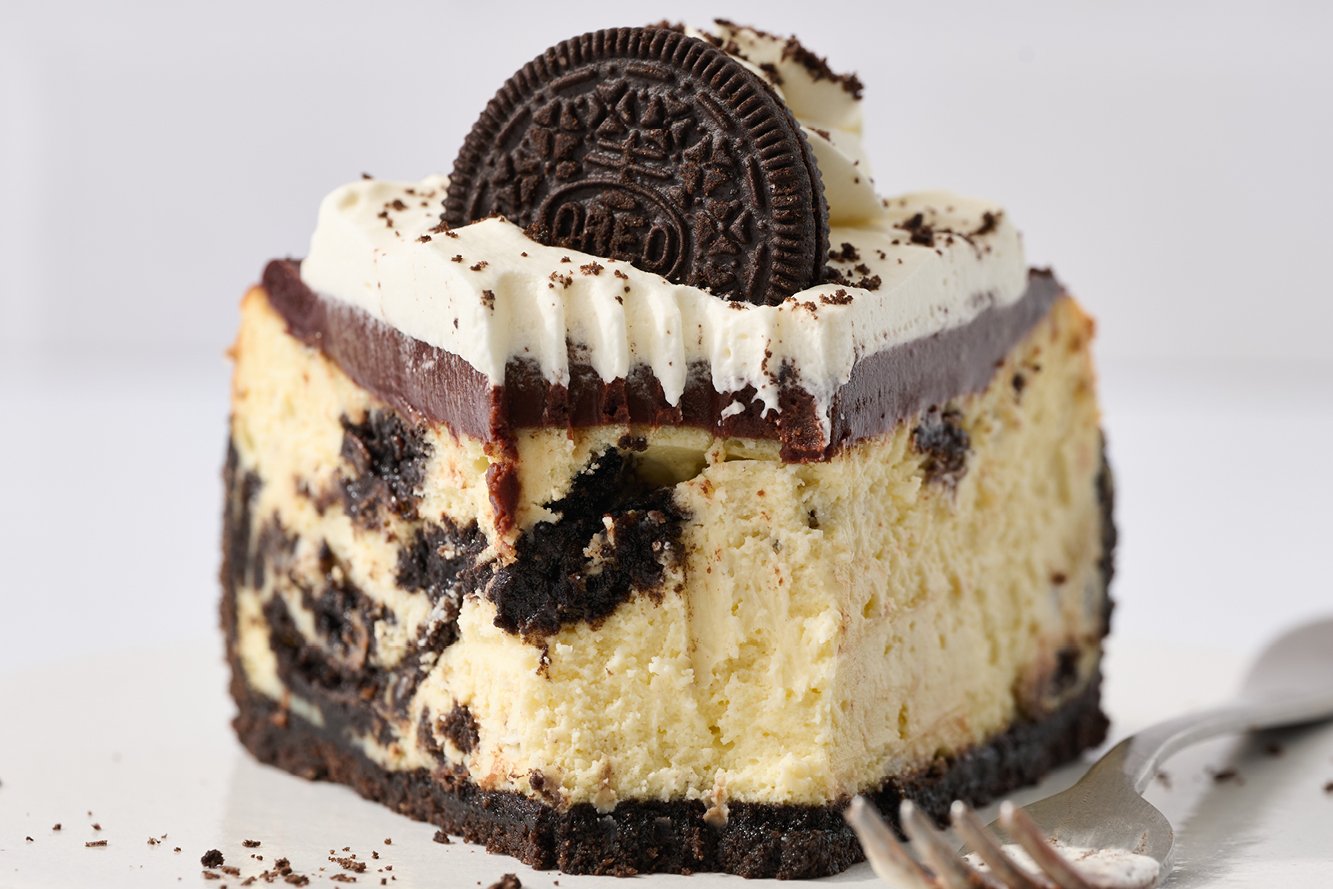
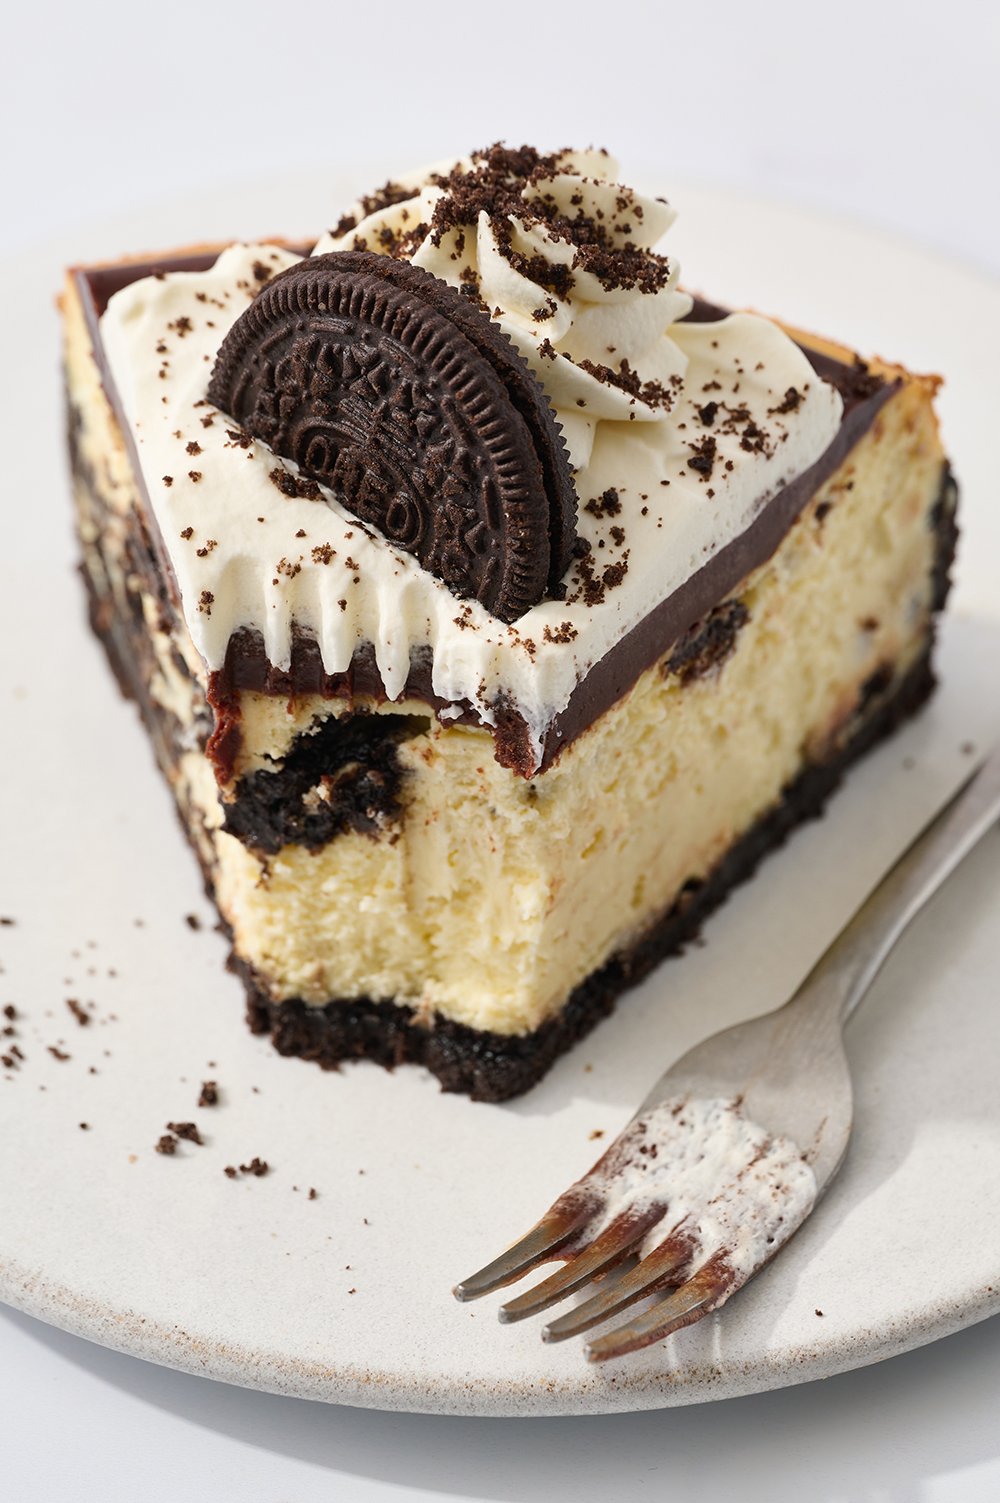
Once chilled, top the cheesecake with the chocolate ganache and optional whipped cream. (I love it this way!) Chilling overnight makes slicing easier and allows the flavors to fully develop for the best possible texture and taste.
Tips for the Perfect Cheesecake
Cheesecake can feel intimidating, but a few simple techniques make all the difference. Keep these tips in mind for a smooth, creamy, crack-free Oreo cheesecake:
- Use room-temperature ingredients. Fully softened cream cheese, room-temperature eggs, and sour cream blend much more smoothly than cold ingredients. This prevents lumps and helps create that ultra-creamy texture.
- Don’t overbeat the batter. Beat the cream cheese until completely smooth before adding anything else. After adding the eggs, mix until just combined. Overmixing incorporates too much air, which can cause the cheesecake to rise, sink, or crack.
- Don’t overbake. The edges should look set and slightly dry, while the center should still jiggle when you tap the pan. If using a digital thermometer, aim for an internal temperature of about 150°F. The cheesecake will continue to cook as it cools!
- Cool the cheesecake gradually. After baking, turn off the oven and crack open the door, allowing the cheesecake to cool inside for about 30 minutes. This slow temperature change helps prevent large cracks from forming.
- Chill thoroughly before serving. Once cooled to room temperature, refrigerate the cheesecake for at least 5 hours, or overnight for best results. Chilling allows the texture to fully set and makes slicing much cleaner.
Tessa’s Tip
If cracks happen, don’t stress. The ganache and whipped cream topping hide any minor imperfections, and the flavor will still be incredible.
How to Serve It
I like to top this Oreo cheesecake with ganache and my homemade whipped cream. For an even more indulgent version, try topping it with a tweaked version of my Peppermint Oreo Truffles.
Cut the recipe in half and omit the peppermint extract and crushed peppermint. (That’s unless you want a Christmas dessert recipe, of course!) After allowing the chocolate-dipped truffles to set, drizzle with melted white chocolate and place in the middle of the cheesecake.
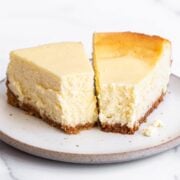
This cheesecake slices beautifully once fully chilled, making it perfect for parties, potlucks, or special occasions. Serve it chilled straight from the fridge for the best texture and flavor.
Storage and Make-Ahead Tips
This Oreo cheesecake keeps covered in the fridge for up to 5 days, making it a perfect make-ahead dessert. It also freezes well without the whipped cream.
To freeze a whole cheesecake, wrap it tightly in plastic wrap and place it in a freezer bag or an airtight container for up to 2 months. Then, defrost it overnight in the refrigerator.
For individual slices, freeze them on a baking sheet until firm. Wrap each slice in plastic and store in a freezer bag or an airtight container for up to 2 months. Defrost your slices overnight in the fridge or at room temperature for 30 minutes before serving.
More Cheesecake Recipes to Try
- Chocolate Peppermint Cheesecake
- Death by Chocolate Cheesecake
- No Bake Chocolate Peanut Butter Cheesecake
- No Bake Rocky Road Cheesecake
- Snickers Cheesecake
FAQs
How do you make mini Oreo cheesecakes?
I haven’t tried that, but I have a very similar recipe for Cookies and Cream Cheesecake Cupcakes that would be perfect if you’re looking for a mini version. This was my first-ever recipe to go viral back in the day, so you know it’s delicious!
Does using a water bath change the cooking time or temperature?
A water bath helps the cheesecake bake more gently and evenly, which can reduce cracking, but will add baking time. It’s not necessary for this recipe, though!
How can you prevent an Oreo cheesecake from cracking?
To prevent your Oreo cheesecake from cracking, use room-temperature ingredients, avoid overmixing, bake low and slow, and let the cheesecake cool gradually in the oven before chilling. Running a knife around the pan edges after baking also helps.
Can reduced-fat cream cheese be used in Oreo cheesecake?
Reduced-fat cream cheese contains more moisture and less fat, which can make the cheesecake softer, less creamy, and more likely to crack or sink. For a classic, ultra-creamy texture, full-fat, brick-style cream cheese works best.
Can mascarpone be substituted for cream cheese in Oreo cheesecake?
Mascarpone tends to work best in no-bake Oreo cheesecakes because it’s softer with a higher water content. In baked versions like this one, using mascarpone as a 1:1 substitution can make the filling too loose and prone to sinking. You’ll also lose some of that signature tang from the Oreo cream cheese filling.

Oreo Cheesecake Recipe

Email This Recipe
Enter your email, and we’ll send it to your inbox.
Ingredients
For the crust:
- 32 (367 grams) Oreo cookies* (regular-stuffed, keep filling intact), divided
- 4 tablespoons (57 grams) butter, melted
For the filling:
- 32 ounces (907 grams) cream cheese, completely softened to room temperature
- 5 large eggs, at room temperature
- 1 cup (200 grams) granulated sugar
- ½ cup (119 grams) sour cream, at room temperature
- 1 ½ tablespoons vanilla extract
- 20 (230 grams) Oreo cookies, quartered
For the ganache:
- 1 cup (170 grams) semisweet chocolate chips
- ½ cup (119 grams) heavy cream
For the whipped cream, optional:
- 1 cup (237 grams) heavy cream, cold
- 2 tablespoons powdered sugar
- 1 teaspoon vanilla extract
Instructions
- Preheat oven to 325°F.
Make the crust:
- In the bowl of a food processor, process the cookies until they are fine crumbs.
- Remove 22 grams (about ¼ cup) of crumbled Oreo and place in a small sealed container. You’ll use this later for topping the cheesecake.
- Add the butter to the food processor and pulse until moistened.
- Press into the bottom and half up the sides of a 9-inch nonstick springform pan.
- Place the pan on a rimmed baking sheet and bake for 10 minutes. Maintain oven temperature.
Make the filling:
- While the crust bakes, in the large bowl of an electric mixer, beat the cream cheese until smooth.
- Add the eggs one at a time, blending after each addition until just combined. Scrape down the sides and bottom of the bowl.
- Add the sugar, sour cream, and vanilla, and beat on low speed until combined. Be careful not to overmix.
- Using a spatula, fold in the Oreo cookies.
- Pour the batter into the baked crust. This will fill your pan to about 80%, but don’t worry about it overflowing in the oven.
- With the pan still on the baking sheet, bake for about 1 hour, or until set. The edges and top should look slightly dry. If the middle is somewhat wobbly, that’s fine. Err on the side of underbaking rather than overbaking.
- Turn off the oven heat and open the oven door by 1 inch. I use a wooden spoon to keep it open. Let the cheesecake cool inside the oven for 30 minutes. This helps to prevent large cracks from forming.
- Run a thin-bladed, flexible knife around the edge of the cheesecake to make sure it's not sticking to the sides of the pan, which can cause cracks as it cools.
- Let the cheesecake cool completely to room temperature on a wire rack, about 2-3 hours. Refrigerate overnight until completely chilled, or for at least 5 hours. Release the cheesecake from the pan onto a serving plate or cake stand.
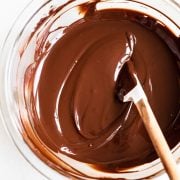
Make the ganache:
- Place the chocolate chips in a medium heatproof bowl.
- In a small saucepan, heat the cream just until simmering. Pour over the chocolate chips.
- Let sit for 3 minutes before stirring until the mixture is melted and smooth. Let cool slightly until thickened.
- Pour over the cheesecake and smooth evenly. Place the cheesecake in the fridge to slightly set the ganache while you make the whipped cream.
Optional: Make the whipped cream:
- Use an electric mixer to beat the cream, powdered sugar, and vanilla on high speed until stiff peaks form.
- Using a spatula, spread half of the whipped cream evenly over the cooled and slightly set ganache. Smooth to meet ganache at the edges of the cheesecake.
- Place the remaining half of the whipped cream in a piping bag fitted with a Wilton 1M tip. Pipe swirls around the outer edge of the top of the cheesecake.
- Lightly sprinkle the saved Oreo cookie crumbs on top of each piped swirl, then pour the remaining crumbs in the center of the cheesecake, gently spreading evenly.
Recipe Notes
This recipe was originally published in 2015 and has been updated with recipe improvements, additional baking tips, and photos. Photos by Joanie Simon.


Can I use milk chocolate chips for the ganache? I prefer the sweetness of milk chocolate, thanks!
Sure!
Hey, how big is the baking pan? 24cm or 26cm?
Thanks.
Adrianna
Hi Adrianna! We love using a 9-inch nonstick springform pan for best results with this recipe, which equates to 23 cm.
I made this most delicious cheesecake last weekend! The result was exactly as on the picture and it tastes heavenly good!!! Thank you so much for the recipe!
Mieke V from Belgium
Your cheesecake looks perfect! So happy you enjoyed, Mieke 🙂
Great recipe! I did have to bake for 15 extra minutes. Then left in the oven with door cracked to cool for an hour. Perfect!
This recipe is not quite done cooling, but I assume that it will be tasting quite good. It took longer than 40 minutes to prepare (my girl said that it was about 40 minutes but it felt a lot longer to me). But, good recipe. Keep up the good work. Would like to see more colorful treat recipes coming from you guys.
Yummeh
If you’re looking for a decadent dessert, you’ve come to the right place. This cheesecake is rich, creamy, and impressive. I guarantee people will be amazed, and the taste is out of this world. My only regret is not getting a better picture once it was out of the tin!
So glad you enjoyed this cheesecake, Kate! Looks amazing!
I have made it today! For daughter 😋 I always put cornflower 3 tbsp in all my cheesecakes.
Looks absolutely delicious, Iryna!
Hello! When you freeze , can you freeze with whipped topping? Or hold of till you unfreeze?
Hi Samantha! We recommend freezing without the whipped cream, as frozen and thawed whipped cream loses some texture and may weep once thawed, so it won’t look as nice. If you’ve already added the whipped cream and want to freeze the leftovers, feel free – it may not look or taste quite as nice upon thawing, but it won’t be the end of the world! Let us know what you think of this cheesecake once you have given it a try 🙂
Made it with Gluten Free Oreos. Knocked it out of the park! A great GF dessert for those of us who miss out on a few goodies! ⭐️⭐️⭐️⭐️⭐️ No one would ever guess
very easy to make, came out well, good directions. will update this after I make the ganache and serve it
For the crust do I remove the filling?
Hi Diego! Sorry for the delayed response, we were out of office on holiday break. As noted in the ingredients list, you’ll use regular-stuffed Oreos and keep the filling intact 🙂 Let us know how it went if you gave our recipe a try during the holidays! 🙂