


Tessa’s Recipe Rundown
Taste: Absolutely loaded with real peanut flavor to balance the sweet tanginess of the cheesecake.
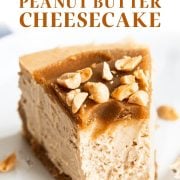
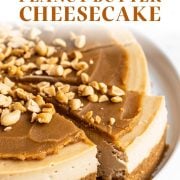
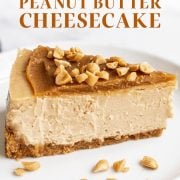
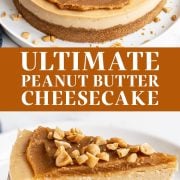
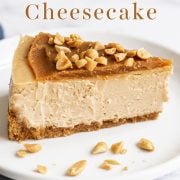
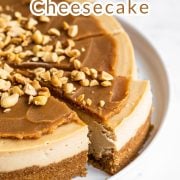
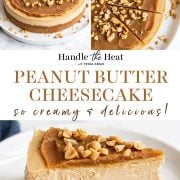
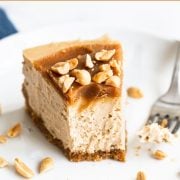
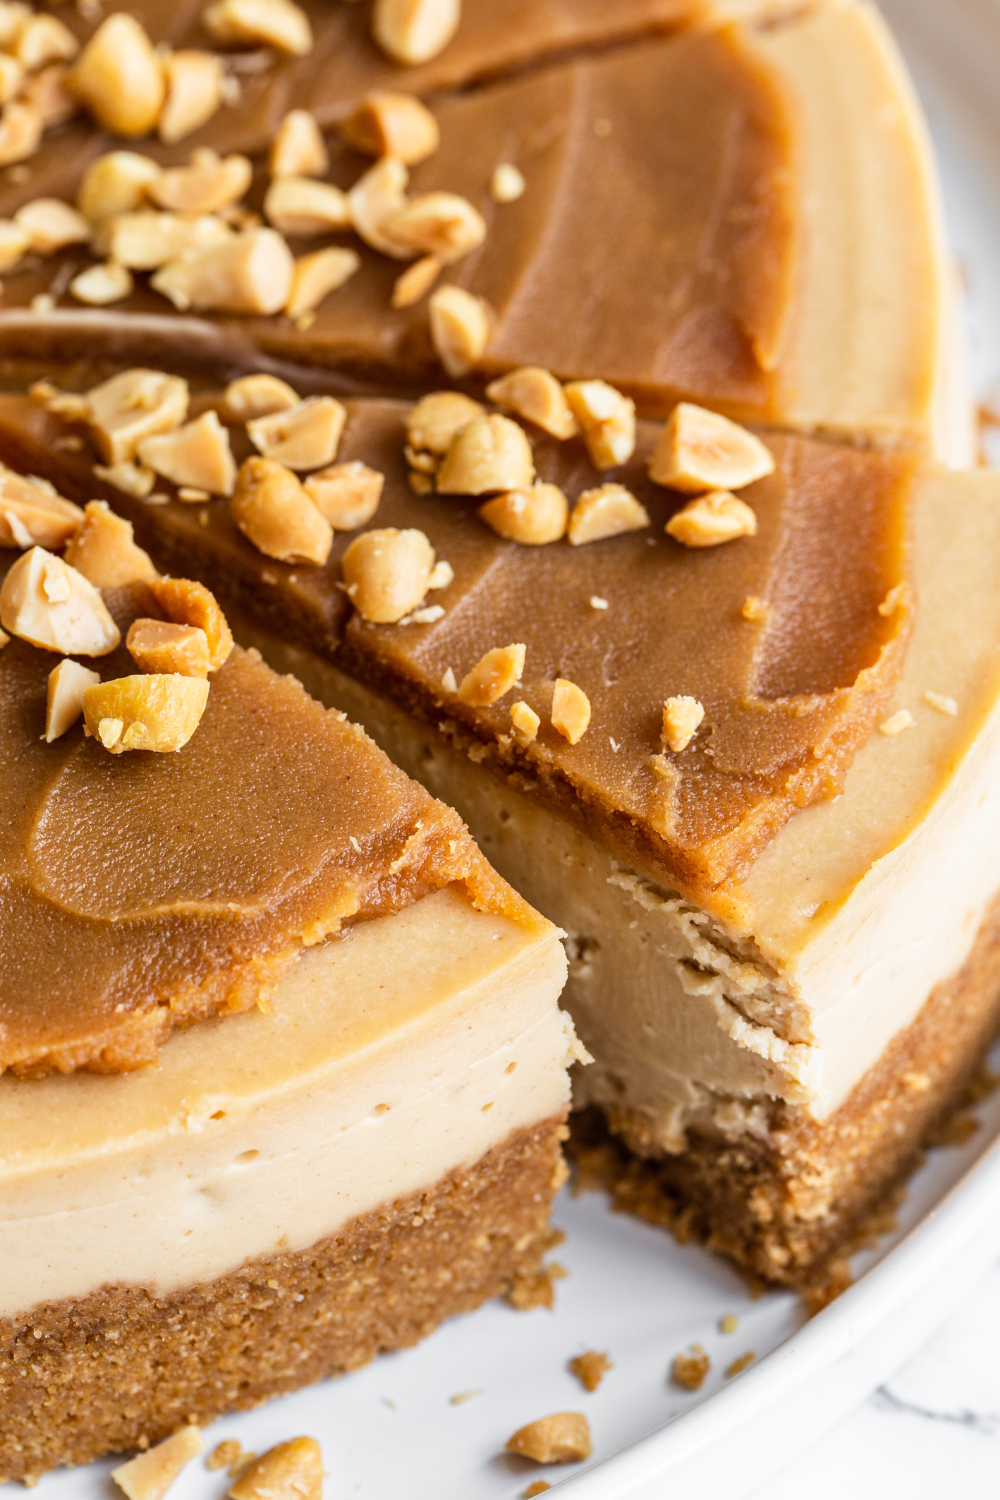
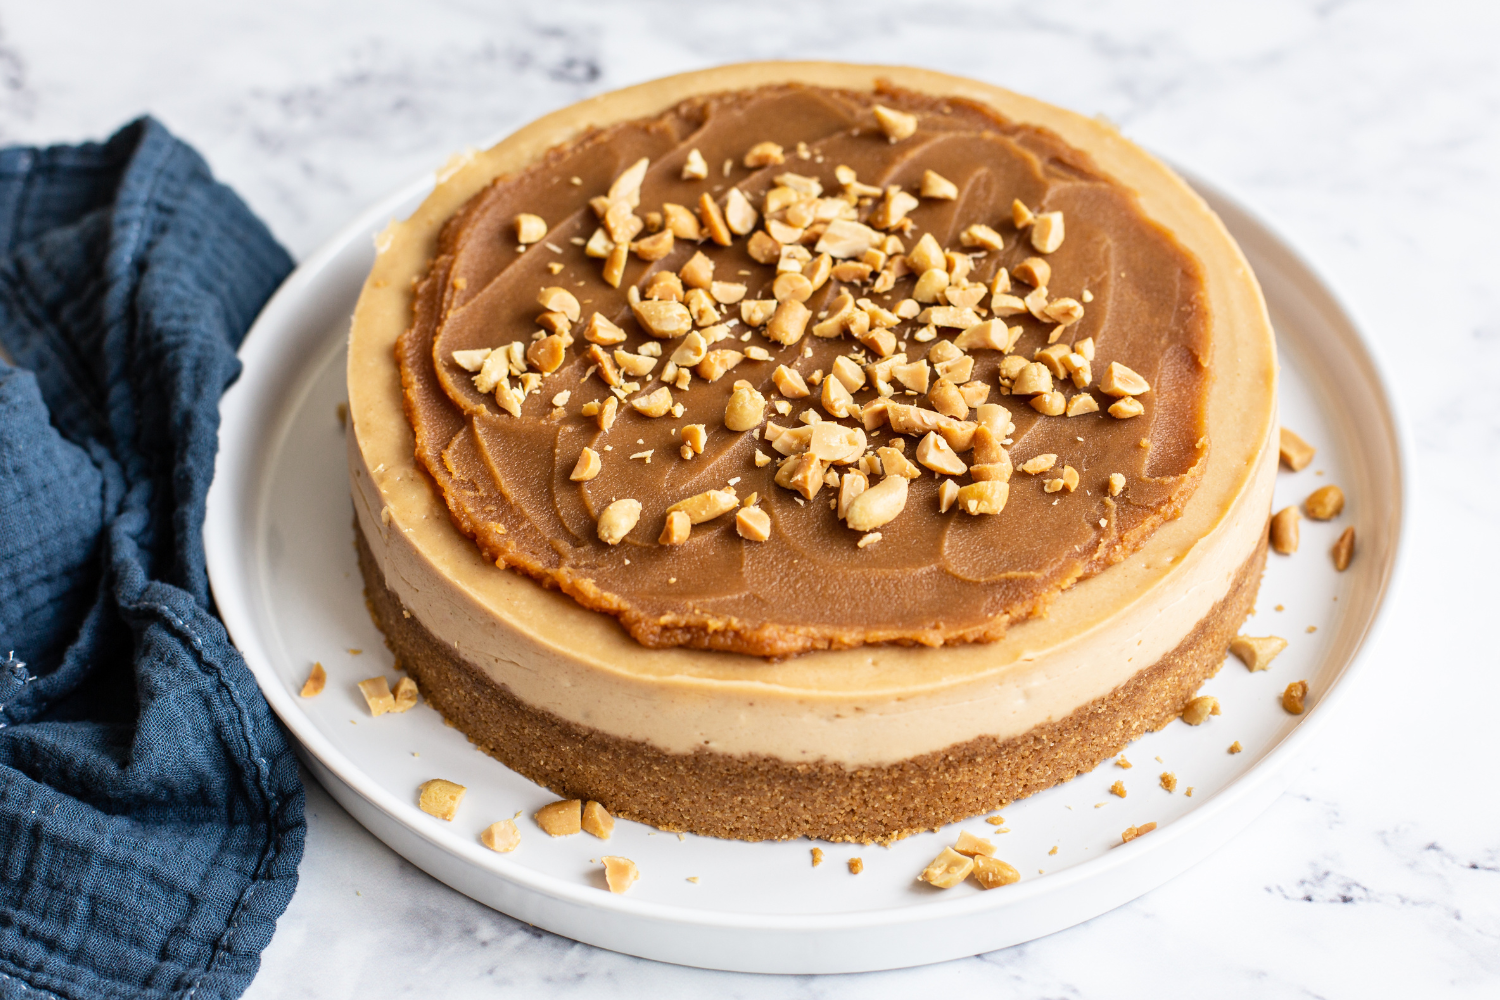
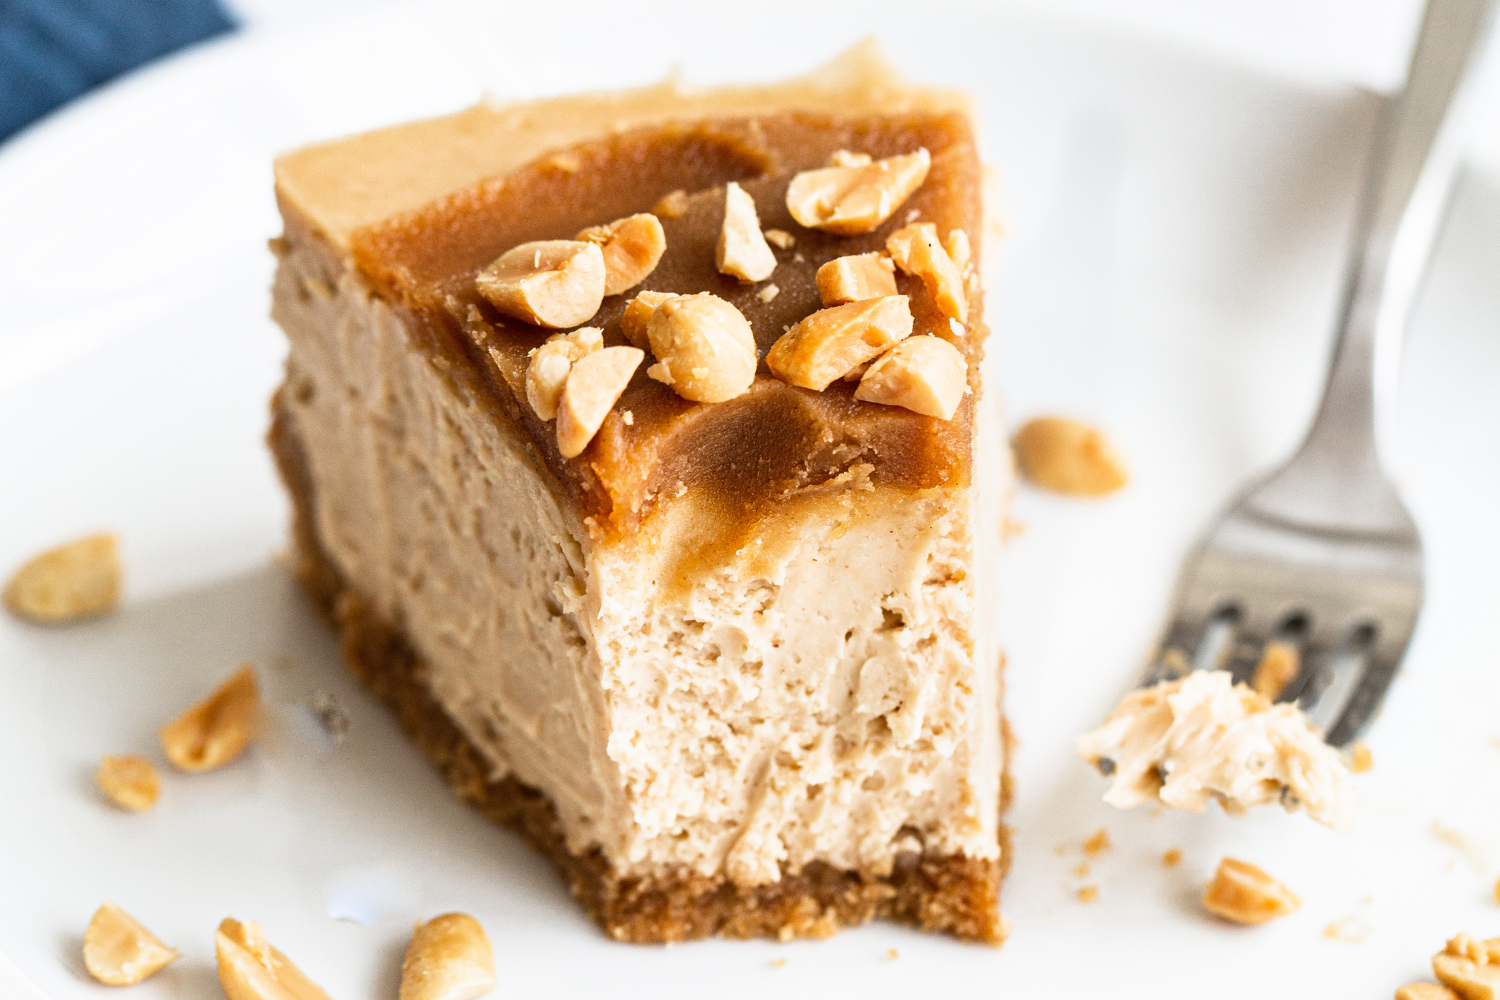
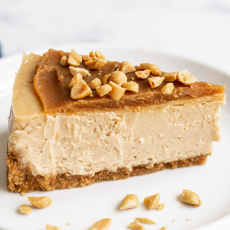
Texture: The crust is crunchy, the filling is velvety smooth, and the peanut butter topping is rich and fudgy.
Ease: A weekend baking project. The water bath and slow cooling are key, but totally doable with the tips below.
What You’ll Love About This Recipe: A peanut butter lover’s dream come tru!
This post may contain affiliate links. Read our disclosure policy.

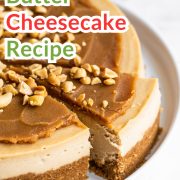
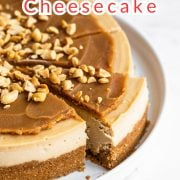
This is truly the Ultimate Peanut Butter Cheesecake. It’s what peanut butter dreams are made of!
It’s made ahead, serves a crowd, and is perfect for Father’s Day, Thanksgiving, Christmas, or even a fun alternative to birthday cake!
Reader Love
Tessa, I am to the point where I just won’t make a cheesecake recipe that isn’t yours. This peanut butter cheesecake is a dream…total perfection!! Thank you!
–
It does require some patience, as the cheesecake needs to cool slowly and chill completely before serving – but I promise it’s well worth the wait!

Sprinkle of Science
Ingredient Notes:
Cream Cheese
Use brick-style, full-fat cream cheese only. I prefer Philadelphia. Do not use spreadable cream cheese. It must be completely softened to room temperature or you’ll end up with lumps that won’t blend out.
Peanut Butter
Use conventional peanut butter with added oil for easier emulsification. Natural peanut butter can separate and create oily pockets, though it’ll offer more intense peanut butter flavor. If using natural, mix extremely well before measuring.
Sour Cream
Adds tang and smoothness to balance the richness of the peanut butter.
Eggs + Extra Yolk
The additional yolk adds richness and structure. All eggs must be at room temperature to prevent overmixing.
All-Purpose Flour
Helps stabilize the filling so it slices evenly.
Graham Crackers + Peanuts
The roasted peanuts in the crust reinforce peanut flavor and add extra crunch.
Heavy Cream (for topping)
Creates a smooth ganache-style peanut butter topping that sets but remains sliceable.
How to Make Peanut Butter Cheesecake (Step-by-Step):
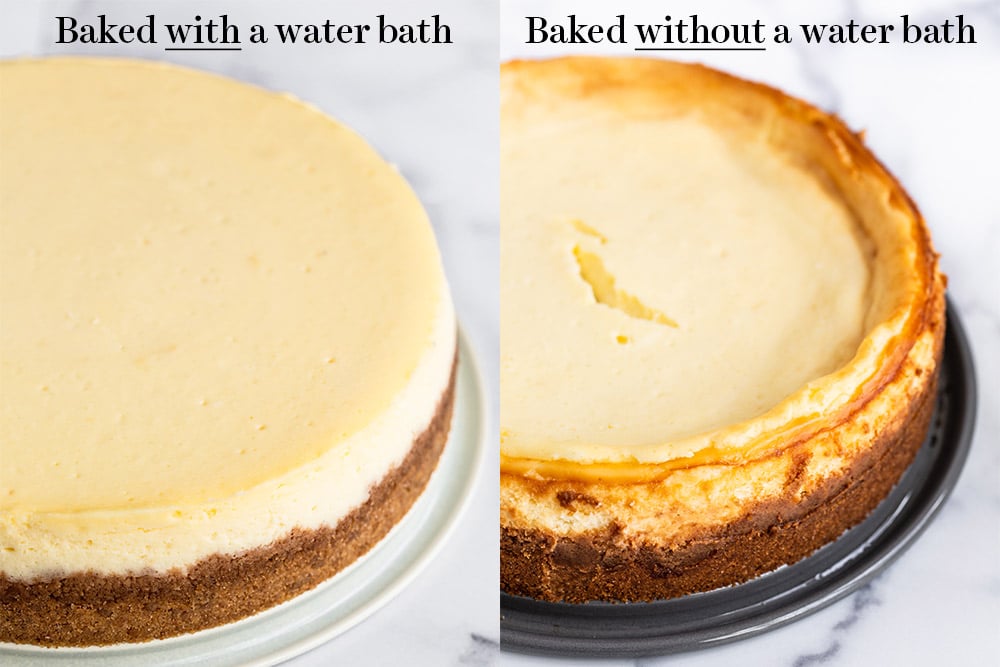
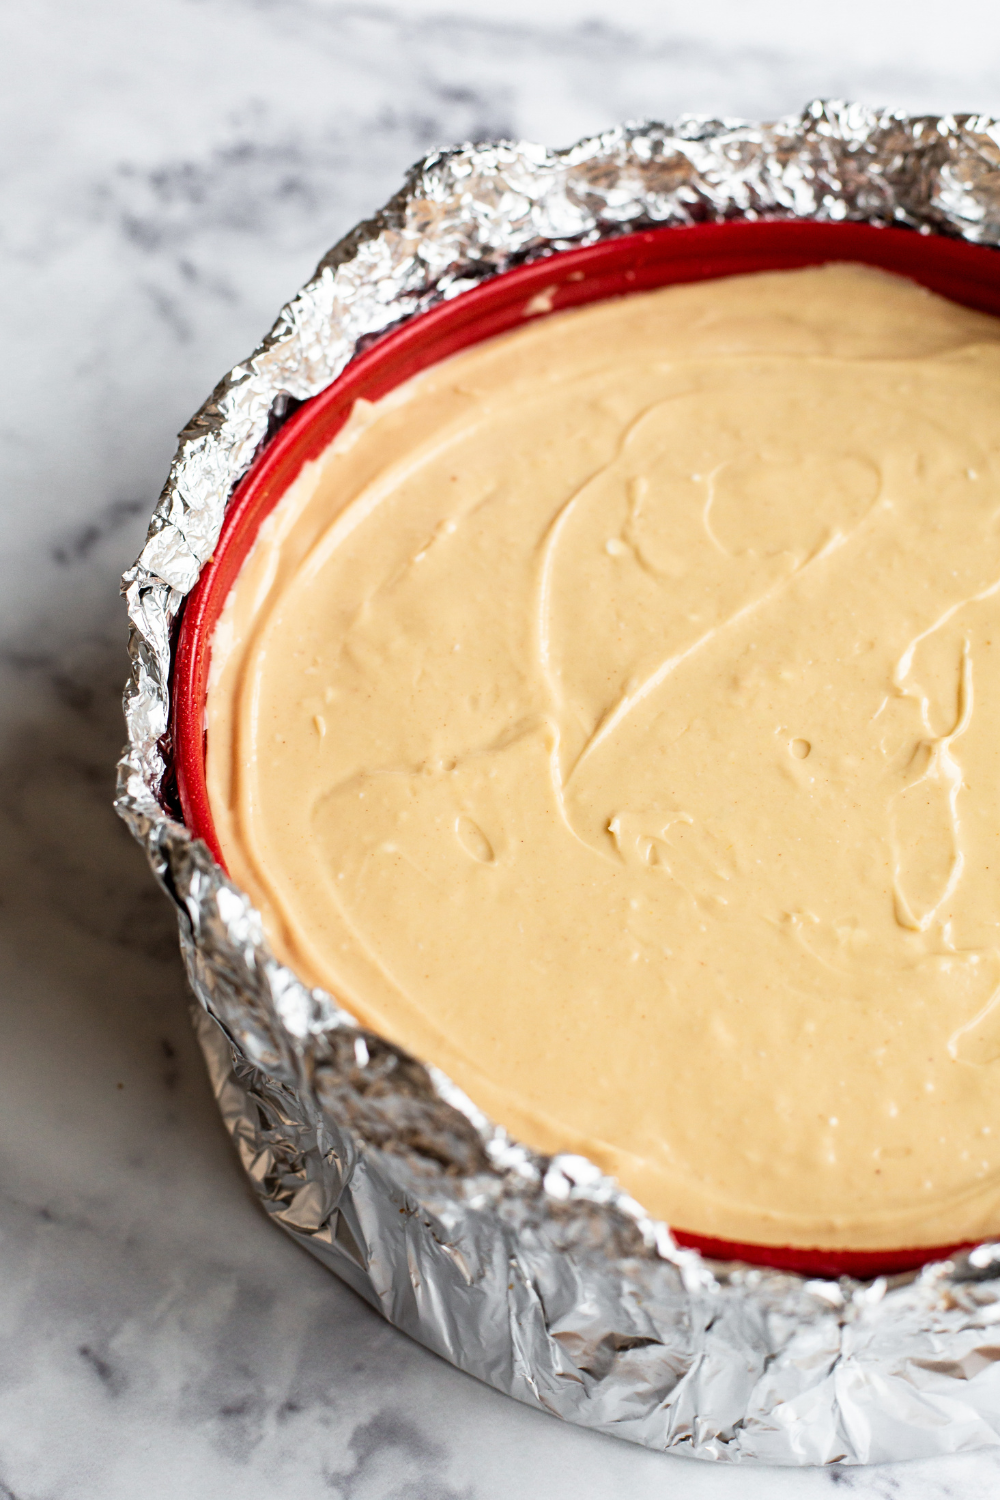
- Prepare the pan for a water bath. This is essential for an ultra smooth, velvety, creamy filling with zero cracks. Wrap a 9-inch springform pan with 3 layers of heavy-duty foil. OR, place the pan in an oven roasting bag to prevent leaks.
- Make the graham cracker crust. Pulse graham crackers, peanuts, sugar, and cinnamon until very finely ground. Add melted butter and pulse until it resembles wet sand.
- Make the filling. Beat the softened cream cheese until completely smooth. Add the peanut butter, sour cream, sugar, and flour and beat until smooth. Scrape down the bowl often. Add the eggs and yolk, one at a time, mixing until just combined. Tap the pan against the counter to remove air bubbles.
- Bake. Place a roasting pan on the middle rack of your oven. Place the cheesecake pan inside. Carefully pour boiling water from a kettle halfway up the sides. Bake at 325°F for about 1 hour. To tell when it’s done:
- The top and edges should look slightly dry.
- The center should wobble slightly.
- The internal temperature should register around 150°F.
- Cool slowly. Turn off the oven and crack open the door 1 inch (use a wooden spoon if needed). Cool inside for 30-60 minutes. Remove from oven. Run a thin knife around the edges to prevent cracks. Cool completely to room tempearture.
- Chill. Refrigerate for at least 6 hours, preferably overnight, to set and develop flavor.
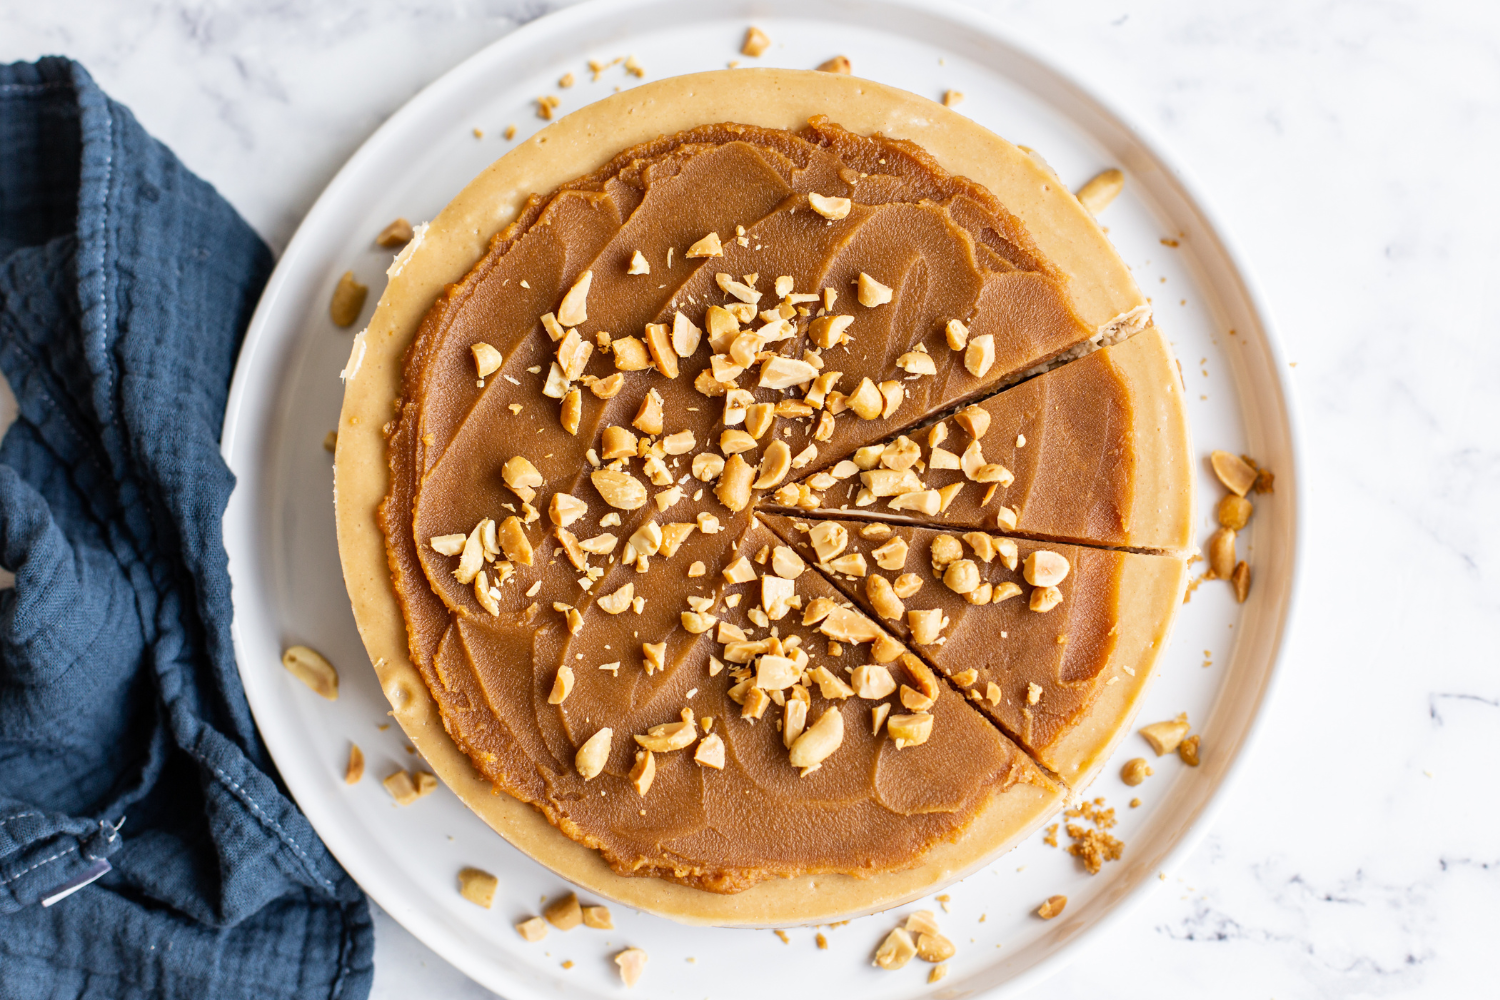
- Make the topping. Prepare a peanut butter ganache by combining hot cream and peanut butter, stirring until smooth. Cool until thickened before pouring over the chilled cheesecake.
How to Prevent Cracks in Cheesecake
1. Avoid overbeating
- You want to beat the cream cheese with the sugar, sour cream, and peanut butter very thoroughly.
- Scrape down the bottom and sides of the bowl often, and beat until totally smooth.
- However, once the eggs are added, ONLY beat until combined, then stop mixing.
2. Avoid overcooking
- The residual heat of the oven will continue to cook the cheesecake even after you’ve turned the heat off.
- Be sure to follow the tips below to know when the cheesecake is done baking.
3. Avoid quick temperature changes
- Quick temperature changes can be caused by opening the oven door too often or cooling the cheesecake down too quickly.
- You want gentle and slow heat. That’s why this recipe cools the cheesecake inside the oven with the door cracked.
- To prevent the cheesecake from cracking as it cools, run a thin knife around the edge of the cake as soon as it comes out of the oven.
- Only after chilling should you remove the springform ring.
Storage & Make Ahead
This cheesecake will keep for 5 days loosely covered in the fridge. Note that the longer it’s stored, the less crunchy the crust will be.
Cheesecake freezes beautifully:
- Place a whole cheesecake or individual slices on a baking sheet inside the freezer until firm.
- Once firm, wrap the cheesecake or each individual slice in plastic wrap and place in a freezer bag.
- Freeze for up to 2 months.
- To serve, defrost a whole cheesecake in the fridge overnight. You can also defrost individual slices in the fridge overnight, or at room temperature for about 30 minutes.
FAQs
If you have the time, let the cheesecake sit at room temperature for 30 minutes before serving, for the best taste and texture.
Open the springform latch and gently remove the sides.
Use a sharp knife to cut slices, running the knife under hot water and carefully wiping the blade dry between each cut, so the slices are clean and pretty.
Slide a pie metal server underneath the graham cracker crust to ensure it doesn’t crumble.
This depends. Natural peanut butter will offer more concentrated flavor, but will only work in baking if it’s very well stirred and smooth. Otherwise, conventional peanut butter with added oil tends to be easier to bake with.
The cheesecake should look dry on top and slightly wobbly in the center. An instant-read thermometer should register 150°F in the middle.
Yes. Freeze whole or in slices until firm, wrap tightly, and freeze up to 2 months. Defrost overnight in the refrigerator.
Lumps usually mean the cream cheese was too cold or wasn’t beaten smooth before adding other ingredients. Always soften completely to room temperature and beat until completely smooth first.
Email This Recipe
Enter your email, and we’ll send it to your inbox.
Ingredients
For the crust:
- 15 (230 grams) whole graham crackers
- 1/2 cup (70 grams) lightly salted roasted peanuts
- 1 tablespoon granulated sugar
- 1/4 teaspoon ground cinnamon
- 1 stick (113 grams) unsalted butter, melted
For the filling:
- 32 ounces (907 grams) cream cheese, completely softened to room temperature
- 1 cup (270 grams) conventional creamy peanut butter
- 1/2 cup (113 grams) sour cream, at room temperature
- 1 1/4 cups (250 grams) granulated sugar
- 2 tablespoons all-purpose flour
- 4 large eggs plus 1 egg yolk, at room temperature
For the topping:
- 1/2 cup peanut butter
- 1/2 cup heavy cream
For the water bath:
- Boiling water
Instructions
- Preheat the oven to 325°F.
Prepare the water bath:
- Prepare a 9-inch diameter springform pan with at least a 2 1/2-inch depth for a water bath. Place a large square of heavy-duty aluminum foil underneath the pan. Gently fold the edges up and around the pan. Repeat twice so there are three sheets of foil, to ensure a waterproof seal. Gently fold the top of the foil around the edge of the pan. Alternatively, use a turkey roasting bag to seal the pan from the water bath. Spray the pan with nonstick cooking spray.
Make the crust:
- In the bowl of a food processor, combine the graham crackers, peanuts, sugar, and cinnamon until very finely ground. Add the butter and pulse until the mixture is moistened like wet sand. Press firmly into the bottom and quarter-way up the sides of the prepared pan. Bake for 10 minutes. Place on a wire rack to cool. Maintain oven temperature.
Make the filling:
- In a large bowl, use an electric mixer to beat the cream cheese on medium speed until completely smooth and free of lumps, scraping down the sides and bottom of the bowl and the paddle as needed. Add the peanut butter, sour cream, sugar, and flour and beat until combined. Scrape down the bowl and paddle completely, then blend again until combined and smooth. Add the eggs and yolk, one at a time, and beat until just combined. Be careful not to overmix.
- Pour the batter into the prepared springform pan. It will fill almost completely to the top. Tap the pan against the counter a few times to release any air bubbles in the batter.
- Place the pan in a larger roasting pan. Pour boiling water into the roasting pan until the water is about halfway up the sides of the cheesecake pan. This is usually best done once the pans are already on the oven rack, to avoid spilling boiling water.
- Bake at 325°F for 1 hour, or until the top looks slightly dry and the middle is slightly wobbly. The internal temperature should read 150°F with an instant-read thermometer inserted into the center. Err on the side of underbaking rather than overbaking.
- Turn off the oven heat and open the oven door just by 1-inch. Sticking a wooden spoon in between the oven and the door can help with this. Let the cheesecake cool inside the oven for 30 minutes to 1 hour or until the oven is just warm. This will prevent cracks from forming.
- Remove the cheesecake from the oven and from the water bath, unwrap the foil, and transfer it to a cooling rack. Run a thin-bladed flexible knife around the edge of the cheesecake to make sure it's not sticking to the sides (which can cause cracks as it cools). Let the cheesecake cool completely to room temperature on the rack.
- Refrigerate until completely chilled, at least 6 hours but preferably overnight.
Make the peanut butter topping:
- In a small saucepan, bring the cream to a simmer. Add the peanut butter and stir until it begins to melt. Remove from heat and stir vigorously until smooth. Allow to cool to room temperature. Pour over the chilled cheesecake. Return to fridge for about 15 to 30 minutes to allow topping to set before slicing and serving.
- Store the cheesecake uncovered or very loosely covered to avoid condensation. Store for up to 5 days in the fridge.
More Cheesecake Recipes You’ll Love:
This recipe was originally published in 2020 and has been updated with additional recipe tips. Photos by Ashley McLaughlin.


I quartered the reciped completely, and used the pre-made mini Graham cracker shells from the store that come in packs of six and it made 6 perfect little cheesecakes. I baked for 16 minutes, at the 325 degrees and they are perfection. I’ve also made the full recipe before, but for just two of us we didn’t need so much so figured I’d give it a go. (For the egg I simply used one Large egg and it did the trick!)
Wanting to use your pb ganache on a different cheesecake but I wanted it salted as the crust will be pretzels & peanuts not cookies or crackers. Unsure how much salt to incorporate. Dont want overbearing just similar salted caramel taste. Sprinkling chopped pretzels on top and a chocolate drizzle.
This sounds so yummy!!
I really want to make a pistachio cheesecake. I know and trust your ultimate cheesecake recipe so I’m trying to turn that into a pistachio cheesecake. Wondering if I could adapt this recipe with pistachio butter instead of peanut butter? It is significantly runnier in consistency than peanut butter… Any advice appreciated
A pistachio cheesecake sounds lovely! I really wish I could give advice, but we haven’t tested this recipe using pistachio butter, so I can’t say for sure what adjustments, if any, would need to be made. For your experiment, I’d recommend researching pistachio cheesecake recipes online first and compare their ratio of ingredients to our recipe, then make tweaks from there. Let us know how it goes!
Would halving the filling ingredients result in a thinner/shorter cheesecake? Not really a fan of thick cheesecakes. Regardless this one looks too delicious not to try.
Halving the filling ingredients would result in a thinner cheesecake, but we haven’t experimented with this so I can’t say for sure how it’d turn out. Let us know how it goes if you give it a try!
This is delicious! I made it for the Superbowl and it was perfect. I did make a few adjustments, and it still ended up completely high-end, and all my guests declared it to be one of the best cheesecakes they’d ever had! For one, I made it with an Oreo crust, simply because I only had Oreos on hand, and I love the chocolate and PB combo anyway. I ended up making it in an 8-inch springform pan, which was very full, but I just baked it for 10 more minutes and it was great. I did not have the right equipment for baking with a water bath, so I used the old trick of putting a pan of boiling water on the rack below the cheesecake, and it still came out without any cracks! Of course, I did let it cool slowly in the oven which obviously would help with that as well. I let it sit in the fridge overnight and then added the PB ganache about an hour before consuming it. The PB ganache stayed at a good consistency for cutting through, so there were no issues with too-hard, cracking topping. The cheesecake itself was super dense and creamy, and the PB flavor was very strong, which made it not super sweet. It was however very rich, so everybody ended up getting small pieces, but that just meant all the more leftovers for me 🙂 Overall, this was a great dessert and a total winner! Definitely making again.
Tessa, I am to the point where I just won’t make a cheesecake recipe that isn’t yours. This peanut butter cheesecake is a dream…total perfection!! Thank you!
Thank you so much for your lovely comment, Mary! You’ll just make Tessa’s day when I pass along your kind words!! Happy baking 🙂
I can’t wait to make your cheese cake . I hope our Christmas Eve will be one to remember .MERRY CHRISTMAS !
I made this and it was mostly perfect and delicious. Would have given 5 stars, but when I made the topping it “broke? “, never got creamy, oil separated from the peanut butter. I ended up melting peanut butter and spread that on top instead.
What kind of peanut butter did you use? I have the same issues with natural peanut butter, but the normal kind never seems to do so.
Can you make the peanut butter topping and refrigerate it if your not eating it until the next day and then heat up the topping the next morning and then pour it on 30 min before cutting it.
Hi Valerie! We have not tried that, but it should work just fine! Just be sure to re-chill before slicing, so the topping has time to set. Happy baking! 🙂
I have a request, can the recipe be translated for an 8-inch springform pan? Please
Hi Hez! I’m sorry, but we haven’t tried this recipe in an 8-inch pan! I think this amount of cheesecake might potentially overflow and be too much for an 8-inch pan. I would recommend reserving some of the cheesecake (and perhaps making those into cupcake-sized cheesecakes!). Follow the sensory indicators Tessa mentions in the recipe (how the cheesecake should look, smell, etc) because the baking time will be a little different. Let us know how it goes! 🙂
I love this one. I even managed to make it in a toaster oven!
Wow, that’s so great to hear, James! So happy you love this cheesecake 🙂