


Baking Troubleshooter
What went wrong with your bake?
Let’s figure it out!
Results
My cookie spread into flat puddles
My cookies are greasy
My cookies didn't spread at all
My cookies are burnt at the edges
My cookies become hard or stale after storing
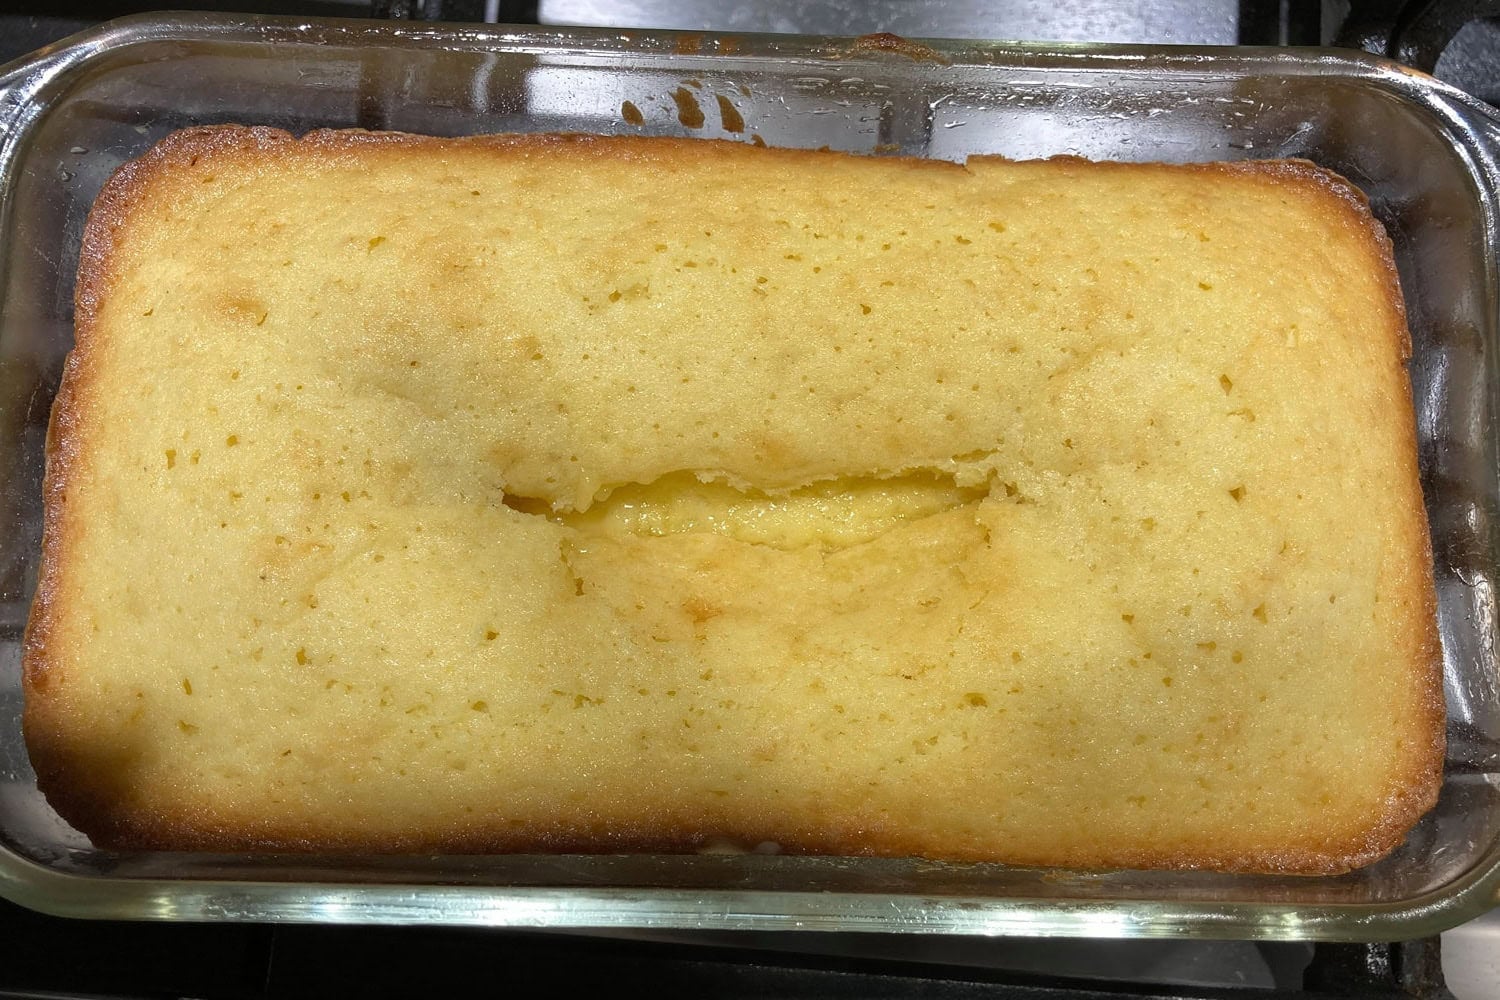
My banana bread or quick bread sunk in the center
My cake or cupcakes sunk in the center
My bundt cake stuck to the pan
My cupcakes are sticking to the liners
My buttercream is gritty
My pie dough is crumbly
My dough cracks when I roll it
My baked pie crust is soggy
My pie crust shrank
My pie crust is tough, not tender
My pie filling is runny
My pie crust browned too quickly
My dough didn't rise
My yeast bread is dense or heavy
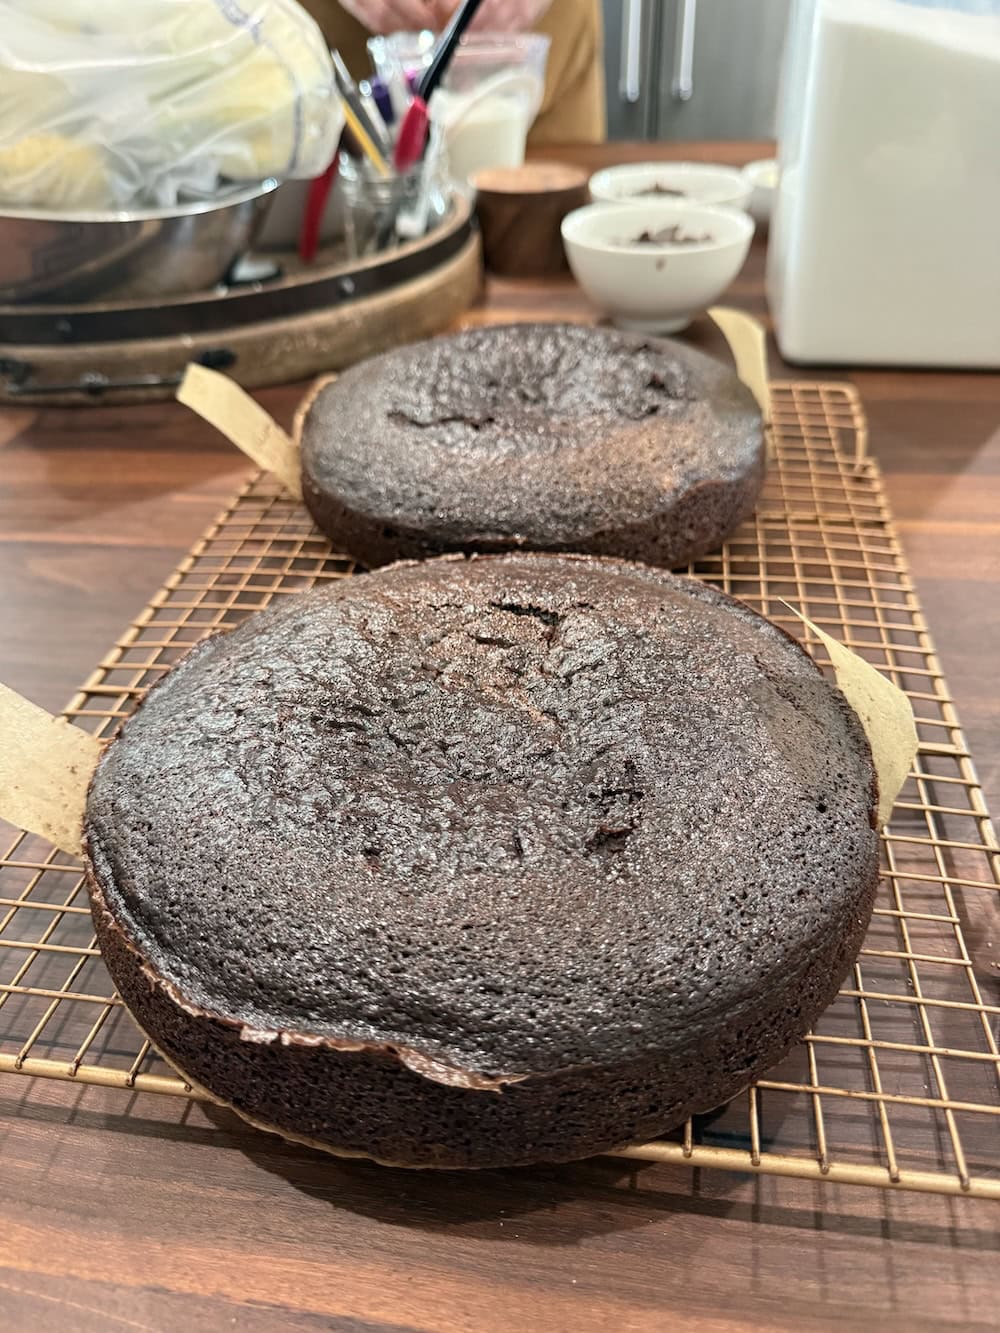
My brownies are gummy or too gooey in the center
My brownies are dry or crumbly
My brownies are cakey instead of fudgy
My brownies don't have that shiny, crackly top
My muffins are tough or rubbery
My muffins didn't develop tall muffin tops
Common Causes
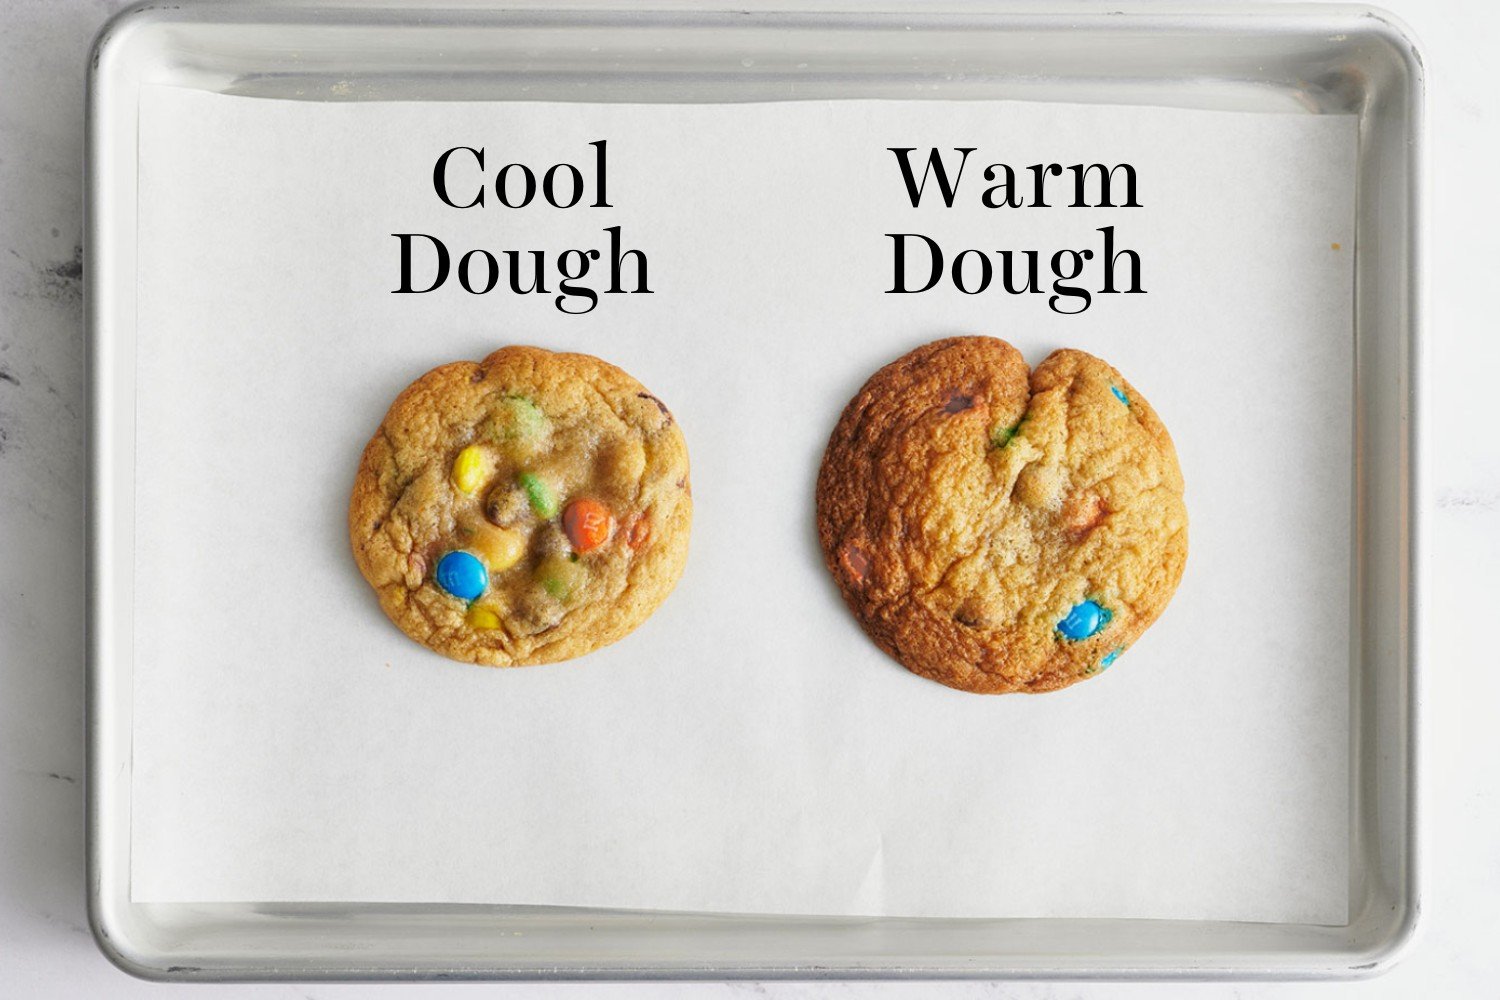
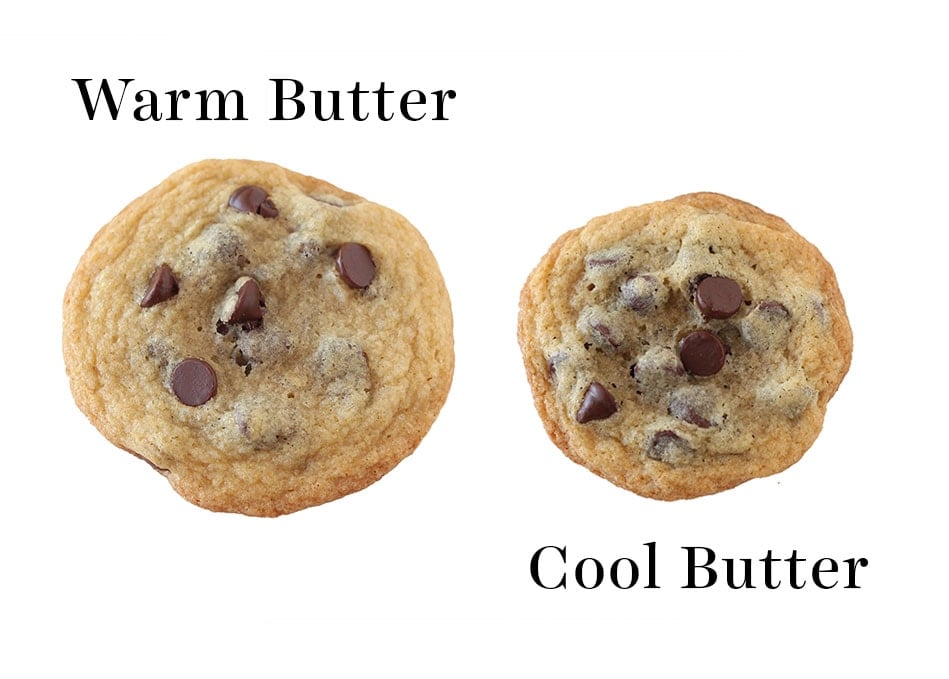
- Was the butter or dough too warm?
- The dough may have been too "wet."
- The oven temperature may have been too cold.
- Did you use nonstick cooking spray?
- Was the pan still hot from a previous batch?
How to Fix It
- To cream butter and sugar, the butter should be at a cool room temperature, about 67°F. Keep the butter and dough at this temperature until you bake the cookies to avoid spreading.
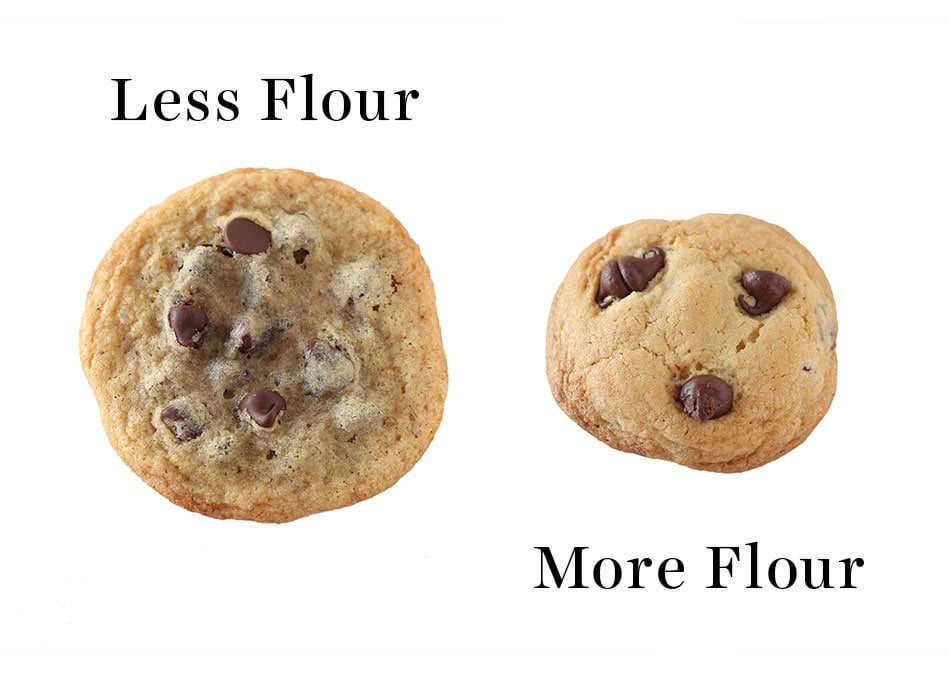
- Make sure to measure your flour correctly (ideally, by weighing it). If you're using unbleached flour (which is less absorbent) or live in a humid environment, you may need to add 1-3 tablespoons extra flour.
- If your oven is too cold, the cookie dough won't be able to set at the edges before it spreads too much. Thoroughly preheat your oven for at least 10 minutes before baking. Better yet, check your oven's accuracy with an oven thermometer.
- Never use nonstick spray for baking cookies, it causes excess spreading. I prefer to bake on parchment paper.
- Only bake on room temperature pans.
Common Causes
- Generic or lower-quality brand of butter.
- Was the butter too warm?
- Using melted butter instead of creaming.
How to Fix It
- Try using a different brand of butter, such as Challenge or Land O'Lakes.
- To cream butter and sugar, the butter should be at a cool room temperature, about 67°F. Keep the butter and dough at this temperature until you bake the cookies to avoid a greasy texture.
- If the recipe calls for creamed butter & sugar, using melted instead may create a greasy texture. Follow the recipe instructions.
Common Causes
- Was the flour over-measured?
- Was a dark nonstick baking pan used?
- Was the dough too cold or frozen?
- Was the sugar or fat reduced?
How to Fix It
- Too much flour will reduce spreading. This is surprisingly easy to do by accident when measuring by volume with measuring cups. I strongly suggest switching to a digital scale and measuring by weight!
- Dark nonstick pans should be avoiding in baking. They heat more aggressively and can set or burn edges too quickly, reducing desired spread in cookies.
- If the dough was cold or frozen, you will likely need to extend the baking time to encourage proper spreading. To bake from frozen, drop the baking temperature by about 25°F and add 1-3 minutes to the baking time.
- Sugar and fat are used in precise ratios to control spread. Altering one or the other will affect texture, often negatively.
Common Causes
- Using a dark colored nonstick baking pan.
- Baking on the bottom oven rack.
How to Fix It
- I recommend only baking cookies on unlined aluminum baking pans, like Nordicware or Chicago Metallic. Dark nonstick pans heat more aggressively and are likely to burn your cookie bottoms or edges. If that's all you have, try reducing the oven temperature slightly, as well as the baking time.
- Always bake cookies on the middle oven rack for best results.
Common Causes
- Improper storage.
How to Fix It
- Make sure your cookies are stored in an airtight container at room temperature, not in the fridge.
- Add a flour tortilla, apple wedge, or piece of white bread to the container to help the cookies keep their moisture.
Common Causes
- Your quick bread is underbaked.
- Using a glass or ceramic loaf pan.
- Used the wrong size loaf pan.
- Your leavening agent was expired.
- You're baking at high altitude.
How to Fix It
- The best way to ensure your quick bread (i.e. banana bread or a lemon loaf) is actually done baking, is to use an instant-read digital thermometer. Insert it into the center of the bread, it should reach 200 to 205°F to finish cooking through.
- Glass or ceramic don't conduct heat as effectively as metal. This means your recipe may not be completely cooked through by the end of the recommended baking time. I highly advise switching to metal loaf pans. If that's not possible, reduce the heat to 325°F and add anywhere from 5-15 extra minutes to the cook time.
- Underbaking can also happen when you use a loaf pan that's smaller than the recipe was designed for. If your recipe calls for a 9x5-inch pan but you use an 8.5x4.5-inch pan, that can be too much batter for a smaller pan. Use the size specified in the recipe, or reduce the amount of batter if using a smaller pan.
- Be sure your baking powder and/or baking soda is fresh and active.
- If baking at high altitude, you'll likely need to use less leavening and make other adjustments in order to avoid your quick breads and loaves from sinking.
Common Causes
- Your cake or cupcakes were underbaked.
- Your leaveners are expired.
- The oven door was opened & closed too many times, or even slammed.
- You're baking at high altitude.
- Your batter was overbeaten.
How to Fix It
- Be sure to bake for long enough. For most recipes, you want a toothpick inserted into the center to return a small amount of moist crumbs or none at all. If it comes out with wetness or raw batter still clinging on, it’s not baked through and will likely sink. Cakes are done when they reach an internal temperature of 205 to 210°F.
- Be sure your baking powder and/or baking soda are fresh to be effective.
- For some ovens, opening and closing the door too frequently will reduce the temperature inside to the point your cake won't cook through fully. Slamming the oven door can also collapse a delicate cake.
- If you’re baking at a higher altitude, you’ll need less leavening to achieve the same result as sea level. Without proper altitude adjustments, your products may sink.
- The key to proper creaming of butter & sugar is incorporating just the right amount of air to achieve a light and fluffy texture. Too little air and your cake won’t rise properly; too much and it may collapse from being overly aerated. Avoid creaming at too high of speed.
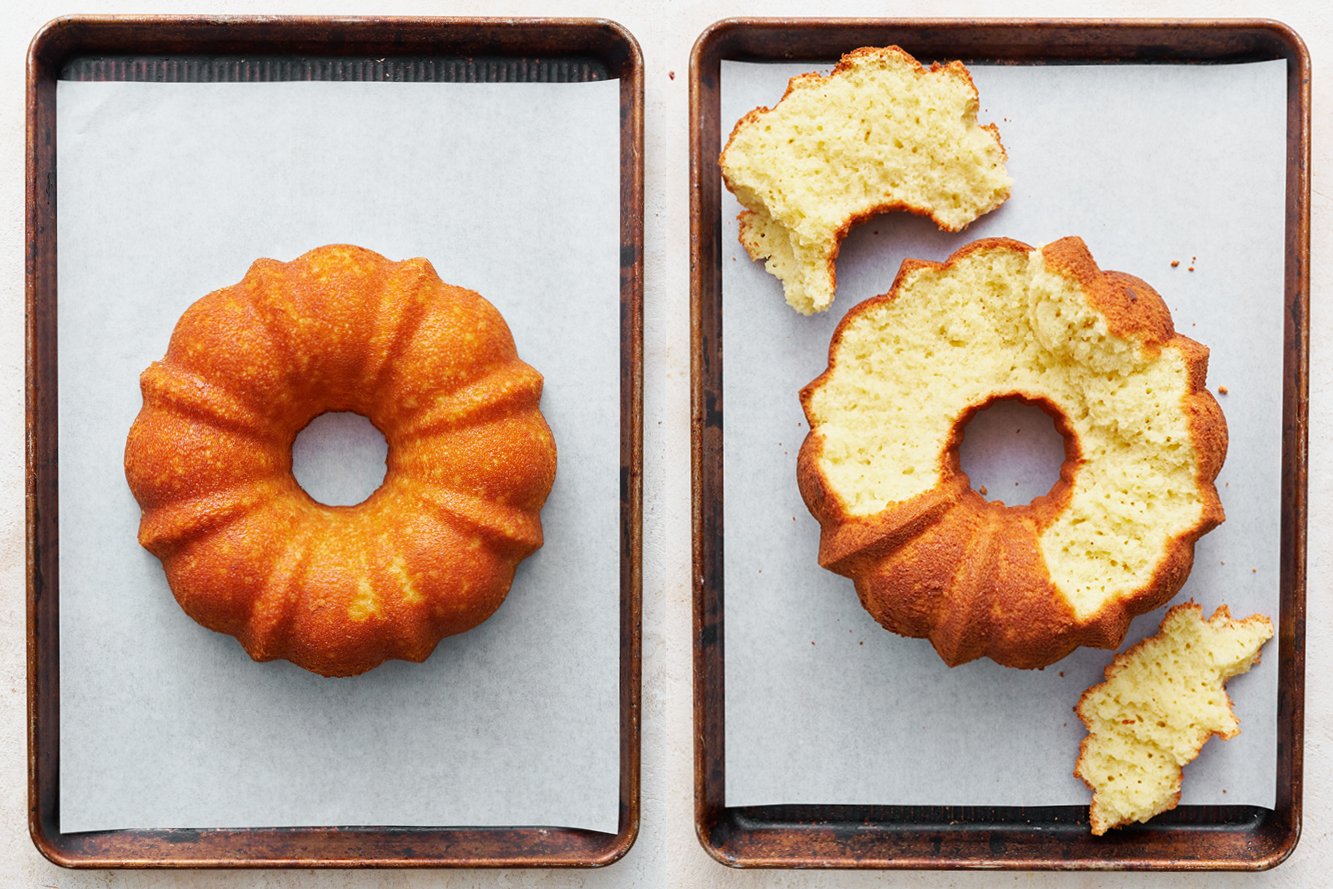
Common Causes
- Insufficient or improper greasing
- Letting the cake cool completely in the pan
- Using the wrong bundt pan
How to Fix It
- Use a generous amount of Baker's Joy or melted vegetable shortening (not butter) to grease your pan. You can also try "cake goop" which is equal parts shortening, flour, and vegetable oil. Grease *just* before filling with batter. Use a silicone pastry brush to get the grease into every nook and cranny.
- Once the cake comes out of the oven, run a small, flexible silicone or plastic utensil to loosen the edges of the cake. Cool the cake upside-down for 5 minutes before removing it to a cooling rack.
- Avoid a bundt pan that has any damage to its nonstick coating (this can happen with dishwashing or using metal utensils that scratch the coating). Also avoid intricate pan designs which increase the chances of sticking.
Common Causes
- Using poor-quality liners.
- Removing the liners before the cupcakes have cooled.
How to Fix It
- Use high-quality liners. Many options on Amazon are poor-quality. Check reviews before buying!
- Allow the cupcakes to cool completely before attempting to remove the liners.
Common Causes
- Didn't sift the powdered sugar.
- Used the wrong kind of powdered sugar.
- Didn't mix for long enough.
How to Fix It
- Always sift your powdered sugar with a sifter or fine mesh sieve before adding to the buttercream mixture.
- Be sure to use powdered sugar that's been ground to 10x fineness (5x may result in a gritty texture). Even better, use organic powdered sugar that contains tapioca starch instead of cornstarch for an even smoother consistency.
- Beat your buttercream with the paddle attachment for at least 5 minutes total to ensure a smooth texture.
Common Causes
- Your dough isn't properly hydrated.
- You haven't pressed your dough together firmly enough.
How to Fix It
- You may need to add more water to your dough so it can come together. Start by sprinkling ice water over the dough with your fingers and gently work it in until it comes together. If your dough gets too warm, chill until it becomes easier to work with.
- Pie dough often looks crumbly right until it comes together. To make the process easier, sprinkle the mixture onto a large sheet of plastic wrap or parchment paper. Use the plastic or parchment to press the dough into a disk.
Common Causes
- Your dough might be too cold.
- Your dough may not have been properly hydrated.
How to Fix It
- Allow it to sit on the counter for a few minutes so it warms just enough to become malleable. Don’t let it get too warm, or your crust won’t be flaky! It should be no warmer than 67°F.
- You may not have added sufficient water to the dough before letting it chill. If it's cracking to the level you can't roll it out, it may be better to start over and consider this a lesson you won't soon forget!
Common Causes
- Your pie wasn't baked long enough.
- Your oven may have been too cold.
- Your bottom crust may not have gotten enough heat.
- Your pie crust wasn't blind baked long enough.
- Your filled, unbaked pie may have been refrigerated too long.
- The crust needs a moisture barrier.
How to Fix It
- Most pie recipes should develop a very deep golden brown before removing from the oven. For fruit pies, this ensures the filling will be set AND the bottom crust won't get soggy.
- Pie crust needs enough heat early to set the butter and seal the structure. Make sure your oven is fully preheated and at the correct temperature before baking.
- Add a baking stone, steel, or baking pan to the lower rack of your oven. Preheat your oven with the stone inside. Place your pie pan directly on the stone when it's time to bake to ensure it gets nice and browned and crisp.
- For recipes that call for blind baking before filling, make sure the bottom of the pie crust looks totally dry and lightly golden before removing from the oven.
- Completely assembled pies should only be refrigerated for a few hours before baking, otherwise the moisture in the filling with create a soggy texture.
- If soggy bottoms are a common problem for you, try brushing the bottom crust with an egg wash or sprinkling with a thin layer of almond flour or breadcrumbs before filling.
Common Causes
- Dough was overworked.
- Dough wasn't properly rested.
- Dough was stretched to fit the pan.
How to Fix It
- Handle the dough as little as possible to prevent excess gluten formation.
- Let the dough rest to allow the gluten to relax:
- After mixing it — wrap it in plastic and refrigerate for at least 30 minutes.
- After rolling it out — let it rest on the counter for 5 minutes before placing it into your pie tin.
- After filling it — refrigerate the assembled pie for 10 minutes before baking it.
- Avoid stretching the dough to make it fit inside your pan. Instead, roll it a little thinner then gently lift and ease it into the pan, allowing it to settle into the edges.
Common Causes
- Too much water was added.
- The dough was overworked.
- Too much flour during rolling.
How to Fix It
- Only add enough water for the dough to just come together. It will continue to hydrate as it rests.
- Over-mixing the dough can increase gluten formation, creating a tough or rubbery texture. Treat it gently. For me, I achieve a more tender texture when I mix my pie dough with a food processor.
- Excess flour when handling the dough can make it dense and tough. Brush off any excess flour after rolling. Keep the dough moving with a bench scraper to avoid it sticking.
Common Causes
- The pie wasn't baked long enough.
- Not enough thickener was used.
- The pie was sliced too soon.
How to Fix It
- Fruit pies should bake until the filling is actively bubbling to allow the filling to reach about 203°F, which is when thickeners like cornstarch are activated.
- Don't reduce the cornstarch or thickener called for in the recipe. Also, don't substitute frozen fruit for fresh fruit unless the recipe says it's okay.
- Let fruit pies cool completely before slicing so the filling can properly set.
Common Causes
- Reduce or eliminate any added sugar in your pie dough recipe if your crust tends to brown too quickly.
- Use a pie shield or foil to cover the edges once they've reached your preferred level or brownness.
Common Causes
- Inactive yeast
- Liquid was too hot
- Dough was too cold
How to Fix It
- Check the expiration date of your yeast. Store opened containers of yeast in the fridge or freezer. To test for freshness, combine 1 teaspoon of granulated sugar with 1/2 cup of lukewarm water. Add in 2 1/4 teaspoons yeast and stir. After ten minutes, the yeast mixture should be very foamy. If not, it's expired and should be discarded.
- If the liquid added to the yeast exceeded 130°F, it may have killed the yeast. If it's too hot for you to comfortably touch, it's too hot for the yeast.
- Dough rises best around 75-80°F. If your kitchen is much colder than that, it will stunt the dough's rising.
Common Causes
- Not enough kneading
- Not enough rising time
- Too much extra flour added
How to Fix It
- Knead until the dough becomes smooth and elastic and passes the windowpane test.
- Allow the dough to rise until doubled in size, not just until a specific time has passed. Dough will rise differently depending on the warmth of its rising environment and the warmth of the added liquid.
- Adding excess flour can make the finished bread dense and heavy instead of soft and fluffy. Err on the side of a sticky dough at the start. It will become far less sticky after the first rise.
Common Causes
- A glass or ceramic baking pan was used.
- The brownies weren't baked for long enough.
- The brownies weren't cooled before serving.
How to Fix It
- A metal pan is far more effective at baking brownies through the center than glass or ceramic. If that's all you have, you'll likely need to increase the baking time by 5-15 minutes because glass and ceramic take longer to cook.
- Brownies can be difficult to tell when done baking if they contain chocolate chips or chunks. Generally, a toothpick inserted into the center should come out with moist crumbs, but not raw batter. Bake for longer next time. Chill the underdone brownies to solidify if you still plan to serve them.
- If brownies are too hot when sliced and served, they won't have had the time to set fully.
Common Causes
- The brownies were overbaked.
- Too much flour or cocoa powder was added.
- The pan was too large.
How to Fix It
- Brownies should be cooked until a toothpick inserted into the center comes out with moist crumbs, not dry crumbs. Overbaking will dry the brownies out.
- Measure flour and cocoa powder by weight, not volume, to avoid compacting extra into the measuring cup.
- All of my brownie recipes are baked in an 8x8-inch pan. If you bake a recipe in a 9x9-inch pan, there won't be as much batter for the added volume, which will cause the brownies to bake faster and dry out.
Common Causes
- Too much flour was added.
- The brownies were overbaked.
How to Fix It
- Accidental extra flour creates a cakier crumb. Be sure to measure using the spoon-and-level method or better yet, with a digital scale.
- Avoid overbaking, which can cause brownies to lose moisture and become more cakey and dry.
Common Causes
- The sugar didn't dissolve into the batter well enough.
- Chocolate chips called for in the recipe were omitted.
How to Fix It
- Once the eggs and sugar are added to the batter, whisk it very well to encourage the sugar to dissolve.
- Chocolate chips help encourage that shiny crust on top.
Common Causes
- The batter was overmixed.
- Too much flour was added.
- There wasn't enough fat in the recipe.
How to Fix It
- Once the flour is added to the batter, mix gently just until combined. A few lumps or small streaks of flour are fine. This prevents excess gluten formation, which can cause dense, tough, or rubbery muffins.
- Measure your flour using the spoon-and-level method, or preferably by weight. Accidentally adding too much flour creates heavy muffins.
- Fat is necessary to keep most muffins moist and tender. Don't skimp or replace with applesauce or you risk a rubbery texture.

Common Causes
- The leavening was expired.
- The oven temperature was too low.
- The muffin tin was underfilled.
- Muffin liners weren't used.
How to Fix It
- Be sure to use fresh, active baking soda and/or baking powder for tall muffins.
- Muffins rise best when baked in a fully preheated oven, often at a higher temperature than many baked goods (400-425°F, depending on the recipe).
- Fill your muffin tin cavities at least 3/4 full. The more you fill them, the larger your muffin tops will grow.
- Muffins need liners, either store-bought or homemade using squares of parchment paper, in order to rise tall.
