


Tessa’s Recipe Rundown
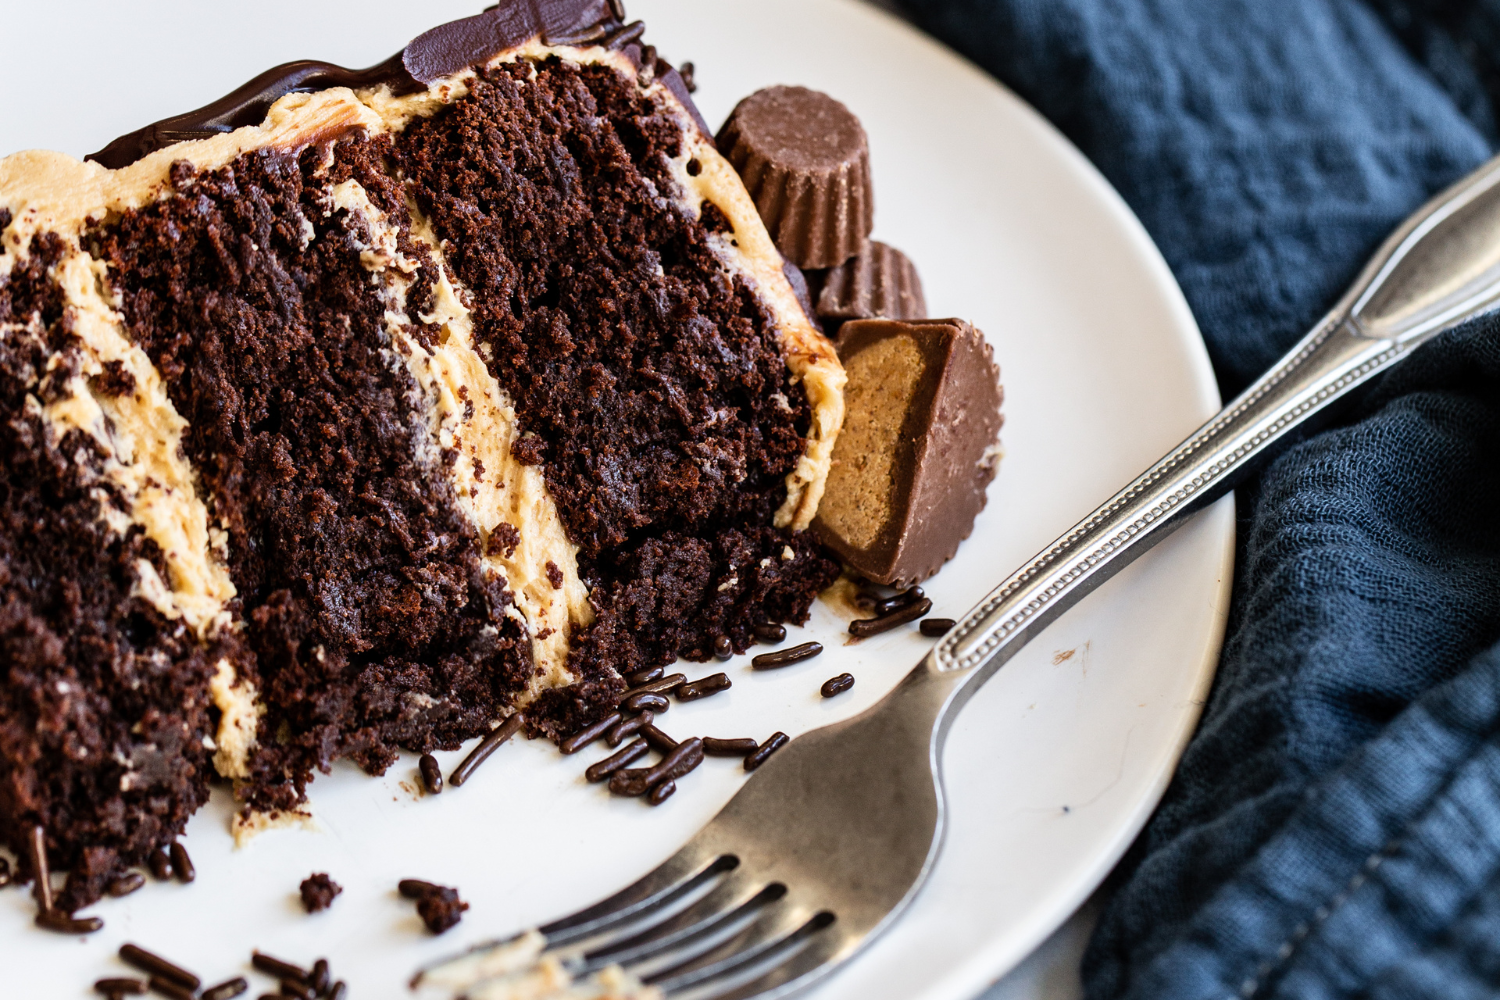
Taste: The cake layers are ultra chocolaty and the frosting is ultra peanut buttery. Dessert bliss!
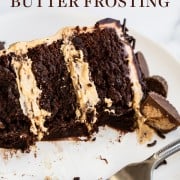
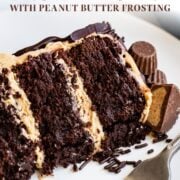
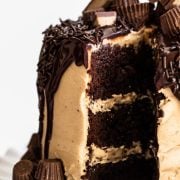
Texture: The brownie cake is super dense, rich, and fudgy but sturdy enough to stack, and the buttercream and chocolate topping are the definition of smooth yet rich.
Ease: Not too difficult, just a little time-consuming. A great weekend project.
Pros: DELICIOUS.
Cons: None, really.
Would I make this again? Yes yes yes!! I want to already.
This post may contain affiliate links. Read our disclosure policy.
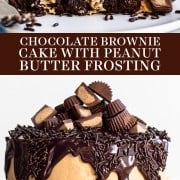
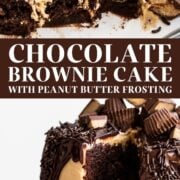
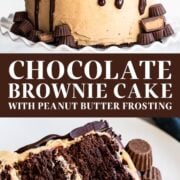
This Chocolate Brownie Cake with Peanut Butter Frosting is the perfect cake for any occasion.
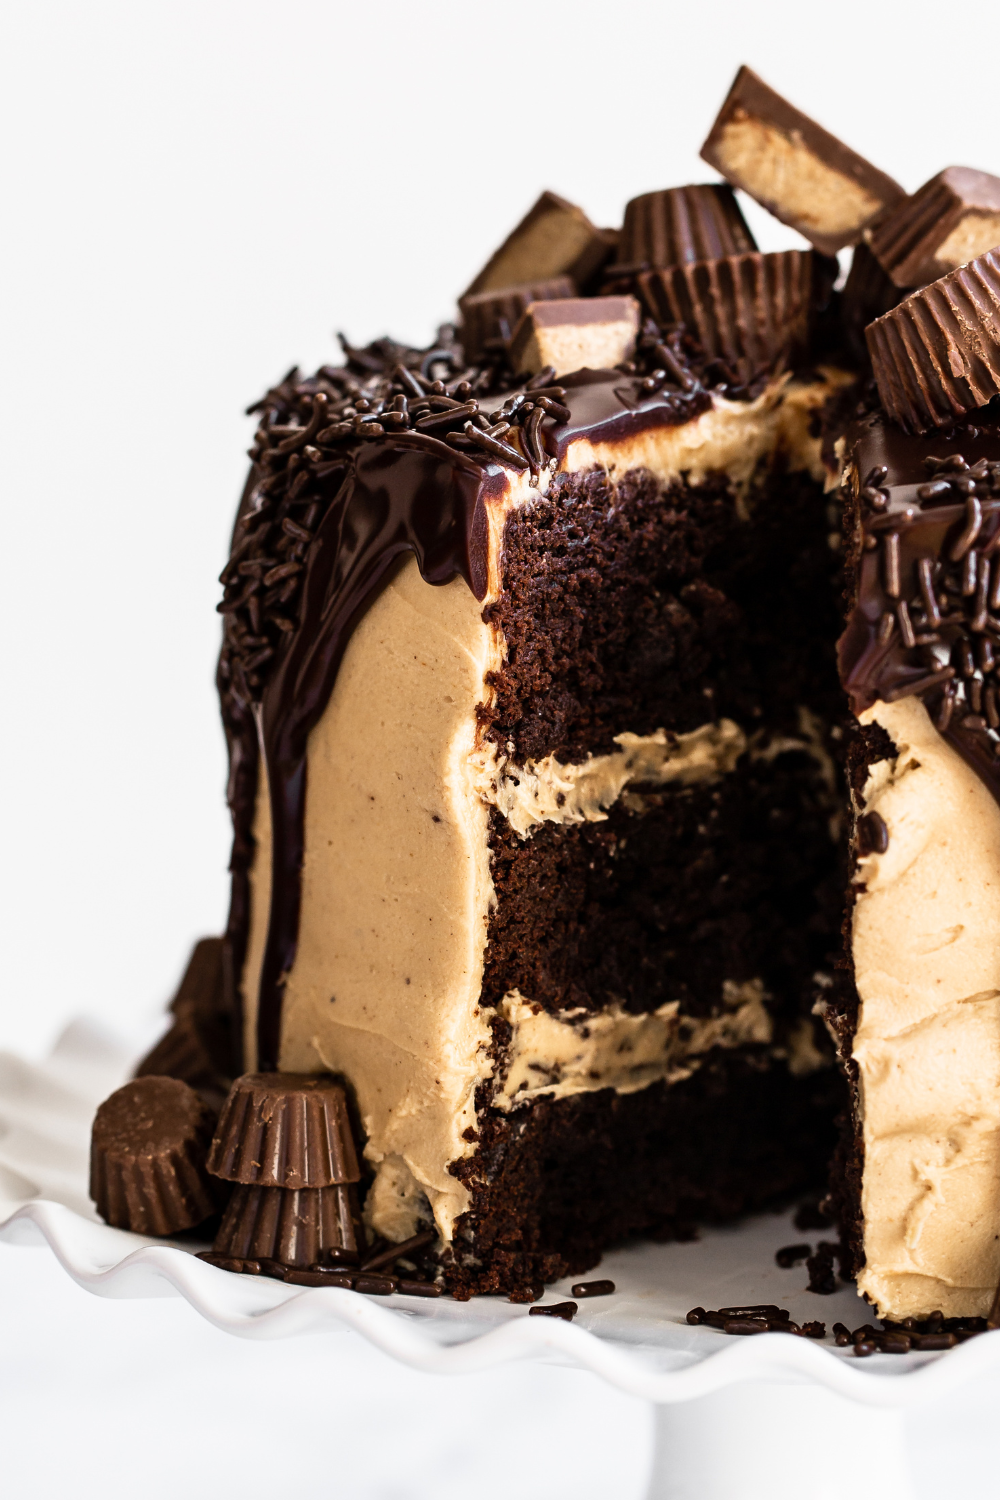
It’s rich. It’s indulgent. It’s deliciously decadent. It truly is all of my dessert dreams come true.
Chocolate and peanut butter are just about the most perfect flavor combination in existence, but when the chocolate comes in the form of a brownie? I’m immediately in!
I created this cake for those occasions when a simple frosting-covered brownie isn’t quite fancy enough, but you still want the richness and fudginess only a brownie can provide.
You could definitely use the brownie cake layers in this recipe with any other thick fillings and frostings, feel free to get creative with flavors!
Let me know what you think of this cake in the comments below!

Sprinkle of Science
How to Make Chocolate Brownie Cake with Peanut Butter Frosting
How to Turn Brownies Into Cake Layers
- The brownie cake recipe is adapted from the ultra-talented Erin of Cloudy Kitchen. She took classic brownies and made them sturdy enough for a layer cake while still remaining rich and fudgy.
- The brownie cake layers use a high amount of both melted semisweet chocolate and cocoa powder, for an intense chocolate flavor. Learn more about Chocolate in Baking here.
- They also use a combination of butter and oil, for the best flavor and moist texture. Learn more about oil and butter in baking here.
- Tons of eggs help add richness and structure, as does the addition of baking powder (which is not included in my traditional brownie recipes).

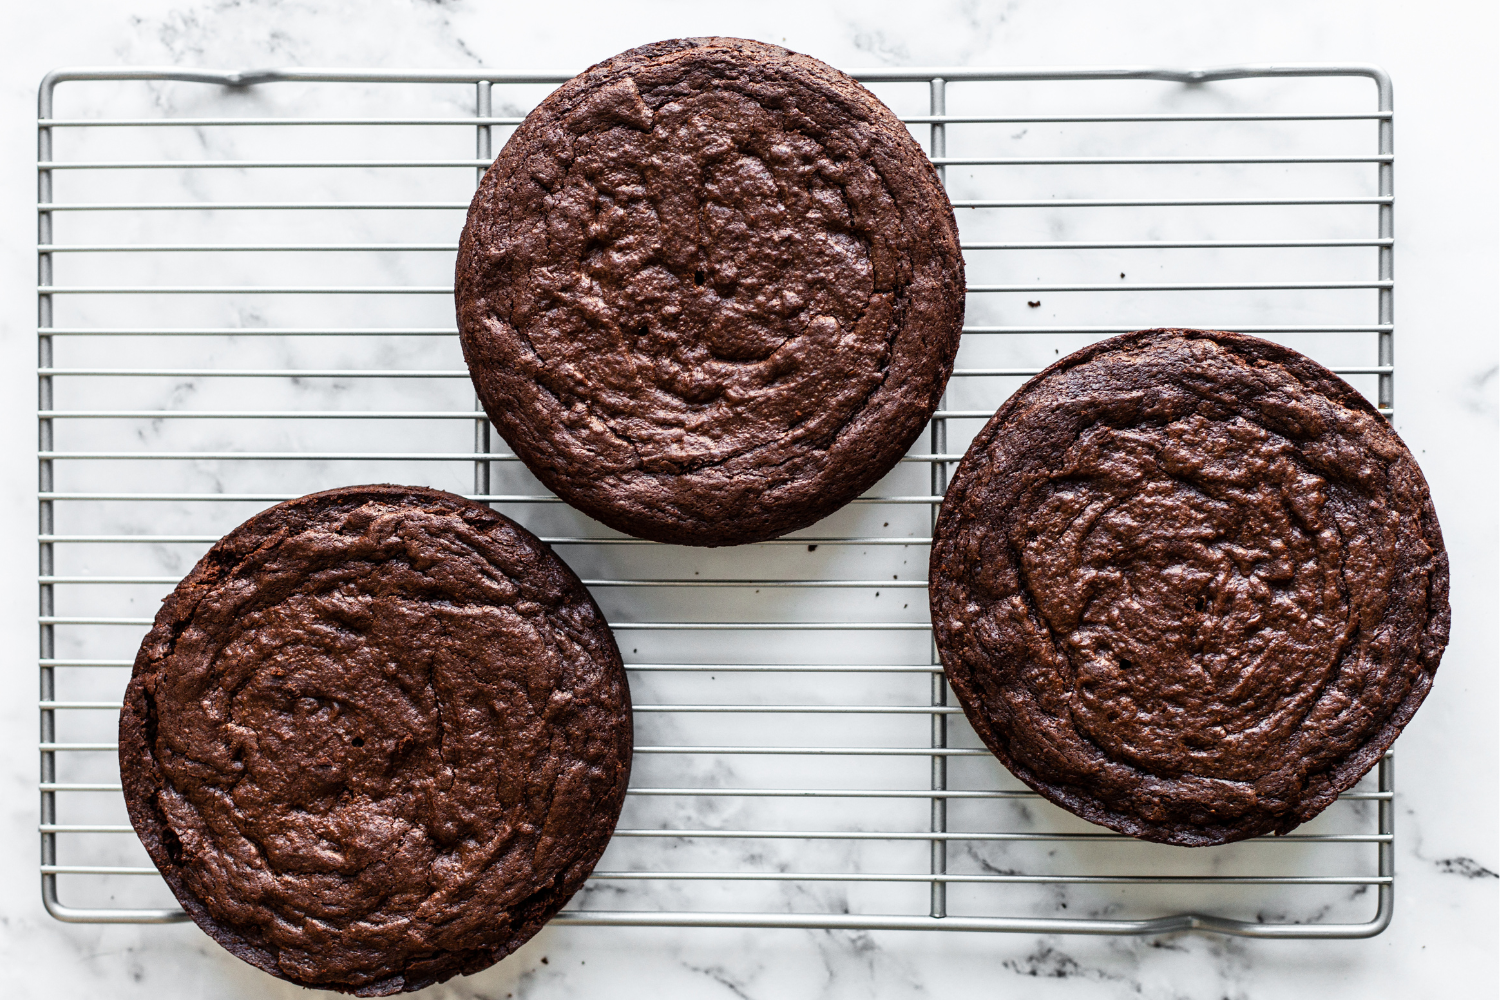
The Cake Pans
- This recipe was designed to use three 6-inch pans, preferably 3-inches in height.
- I love my Fat Daddio anodized aluminum cake pans. They release cakes of all variety easily and don’t dry out the edges.
- Whatever you do, never bake a cake in a dark-colored pan. It’ll likely overbake and be too brown and dry at the edges.
- If only have 8-inch cake pans: I haven’t tested this, but you can try using two 8-inch cake pans and start checking for doneness at 25 minutes. The cake will obviously be much shorter.
- We also have not tried this cake as a 13 by 9-inch sheet cake. Instead, I recommend using my Chewy Brownie recipe and double the recipe to fit a 13 by 9-inch pan. Use this peanut butter frosting recipe on top, once the brownies have completely cooled.
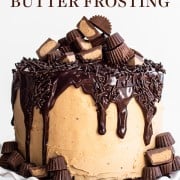
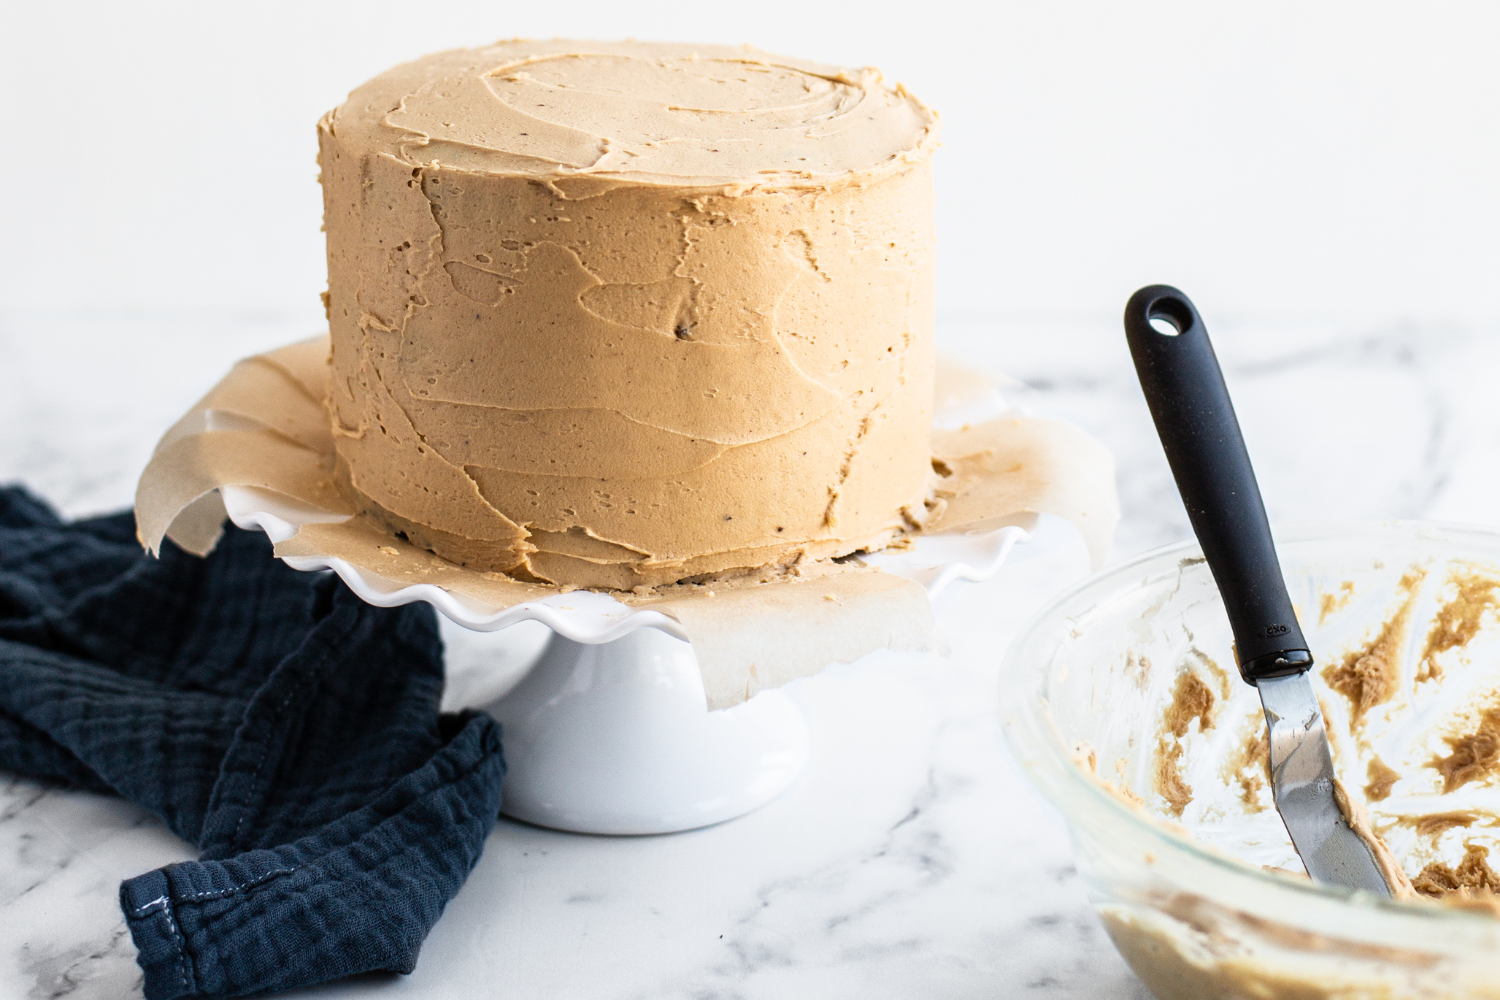
How to Make Creamy Peanut Butter Frosting
- Start with butter that’s softened to room temperature and a whole cup of creamy conventional peanut butter.
- Natural peanut butter that doesn’t contain any added oil isn’t ideal. I like to use Skippy.
- Why? That added oil helps prevent the peanut butter from separating so it stays homogenous which is definitely what we want for buttercream. If you use a natural peanut butter product that only contains ground peanuts then your buttercream may split.
- Make sure to sift your powdered sugar before using, for the smoothest, creamiest buttercream.
- For even creamier buttercream, try using organic powdered sugar with tapioca starch. It dissolves into the frosting better than the traditional cornstarch so you don’t get any grittiness.
- For more buttercream tips check out this post.
How to Assemble & Decorate a Layer Cake
- Place one cake layer on a cake stand or serving plate. Spread with about 1/2 cup of the frosting. Repeat with the remaining two cake layers, leaving the top layer flat side up. This ensures the top of the cake is level, with clean edges.
- Apply a thin layer of crumb coat icing to the entire surface of the cake, scraping away any excess with an offset spatula or bench scraper to create a spackle-like coating. Be sure not to scrape any crumby icing back into your clean bowl of icing. A cake turntable makes easy work of this. Refrigerate the whole cake until solid, about 15 to 20 minutes.
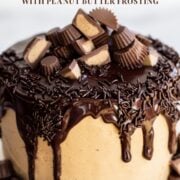
- While the crumb coat is in the fridge, make the chocolate drip. Allow to cool until it has thickened, but is still pourable but not so thin that it runs clear down the sides of the cake. It’s a fine balance! The amount of time it takes for the ganache to cool to this consistency will depend on the temperature of your kitchen and the size and shape of your bowl.
- Don’t place the ganache drip in the fridge to cool. This will create uneven chunks of cooler ganache next to runnier warmer bits. Test the consistency of the drip by pouring a little down the side of a glass. If it’s too thick, microwave for 5 to 10 seconds then stir. If it’s too thin, allow to continue to cool.
Can This Recipe be Made Into Cupcakes?
Almost any cake recipe can be converted into cupcakes. Check out my full guide on how to convert cake to cupcakes (and vice versa!).
How to Make this Cake Ahead of Time
The assembled and frosted cake can be stored, covered, at room temperature for up to 1 day or in the fridge for up to 3 days.
The brownie cake layers can be stored in the fridge, wrapped tightly in plastic wrap, for up to 2 days before assembling.
The frosting can also be stored in the fridge, in an airtight container, for up to 1 week. Allow to come to room temperature before re-whipping with an electric mixer until smooth and creamy again.

Email This Recipe
Enter your email, and we’ll send it to your inbox.
Ingredients
For the brownie cake layers:
- 1 stick (113 grams) unsalted butter
- 8 ounces (227 grams) semisweet baking chocolate, chopped
- 1 cup (200 grams) granulated sugar
- 2/3 cup (133 grams) dark brown sugar
- 3/4 cup (95 grams) all-purpose flour
- 1 cup (85 grams) unsweetened natural cocoa powder
- 3/4 teaspoon baking powder
- 1/2 teaspoon fine sea salt
- 5 large eggs, at room temperature
- 1/2 cup fresh vegetable oil
- 1 teaspoon vanilla extract

For the peanut butter frosting:
- 2 sticks (227 grams) unsalted butter, at room temperature
- 1 cup (270 grams) creamy conventional peanut butter
- 1 teaspoon vanilla extract
- 1/8 teaspoon fine sea salt
- 2 1/2 cups (313 grams) powdered sugar, sifted
For the chocolate drip:
- 4 ounces (113 grams) semisweet or bittersweet chocolate, finely chopped
- 1/2 cup heavy cream
- Chopped peanut butter cups, optional
Instructions
Make the cake layers:
- Preheat the oven to 350°F. Grease and line three 6-inch cake pans with parchment paper.
- In a heat-safe bowl, combine the butter and chocolate and microwave for 45 seconds. Stir and continue to heat in 30-second bursts, stirring between bursts, until melted and smooth. Whisk in the sugars until combined. Let cool.
- In a small bowl, whisk together the flour, cocoa powder, baking powder, and salt.
- To the cooled chocolate mixture whisk in the eggs, one at a time, Whisk vigorously for 30 seconds until very well combined. Add in the oil and vanilla and whisk until combined. Add the dry ingredients and gently fold to combine.
- Divide the batter between the three cake pans, and tap on the counter to prevent air bubbles.
- Bake for 25 to 30 minutes, or until the tops are dry and a cake tester inserted in the middle comes out with a few crumbs attached. Be sure not to overbake, the cakes will continue to cook after being removed from the oven.
- Cool in pans for 10 minutes, then turn out onto a wire rack and allow to cool completely. At this point, the brownie cake layers can be stored in the fridge, wrapped tightly in plastic wrap, for up to 2 days before assembling.
Make the frosting:
- In the bowl of an electric mixer fitted with the paddle attachment, beat the butter and peanut butter on medium-high speed until light and fluffy, scraping down the sides and bottom of the bowl as needed. Add the vanilla, salt, and powdered sugar and continue beating until the frosting is smooth and fluffy, about another 3 minutes.
Assemble the cake:
- Place one cake layer on a cake stand or serving plate. Spread with about 1/2 cup of the frosting. Repeat with the remaining two cake layers, leaving the top layer flat side up.
- Apply a thin layer of crumb coat icing to the entire surface of the cake, scraping away any excess with an offset spatula or bench scraper to create a spackle-like coating. Refrigerate until solid, about 15 to 20 minutes.
- Spread the remaining frosting in an even layer all over the cake. Refrigerate to solidify again while you make the chocolate drip.
Make chocolate drip:
- Place the chopped chocolate in a heatproof bowl. Bring the heavy cream to a simmer, then immediately remove from heat and pour over the chocolate. You can also do this in the microwave. Cover for a few minutes then stir until smooth.
- Allow to cool until ganache has thickened but is still pourable, about 10 minutes. Don’t place ganache in the fridge to cool. Test the consistency of the drip by pouring a little down the side of a glass. If it’s too thick, microwave for 5 to 10 seconds. If it’s too thin, allow to continue to cool. Spread the drip all over the top of the cake and allow it to drip down the sides.
- Allow to set slightly before garnishing with the peanut butter cups, if desired.
- The cake can be stored, covered, at room temperature for up to 1 day or in the fridge for up to 3 days.
Notes
This recipe was created in 2020 and updated with additional tips and recipe notes. Photos by Ashley McLaughlin.


Replacement for egg….. Please
Would love to make one without eggs….. It looks super delicious and yummmm.
Big hit for recent friends birthday, thank you!
I love this recipe and also i love you most Importantly thank you soo much for sharing all your amazing recipes with us. No one really likes to share their recipes with others but your doing it thank you soo much loads and loads love to you and you family from INDIA♥️
We made this for a friend “that doesn’t eat dessert”. Needless to say, he had three servings in one sitting (it was his birthday after all). My daughter and I received so many compliments mostly saying this is the best cake I have ever had. I have a feeling we are going to be making this cake for many more birthdays to come!
This looks amazing! Going to make it for my husband’s birthday! I was just wondering, when you say apply a thin layer of crumb coat icing to the cake… do you mean to use some of the peanut butter frosting? Or a separate icing?
I was looking to lighten it up just a bit so I subbed a devils food cake mix. I made a triple 8″ cake and doubled up the delicious peanut butter frosting! Tips on letting the ganache cool helped me finally get it just right! The cake was gorgeous and so delicious!
1 cup (85 grams) unsweetened natural cocoa powder?? Was this a mistake?
Super excited to try out the recipe! was just curious though the amount of all purpose flour is 3/4 cups that’s less than 1 cup of flour. it seems too little for 3 pans of cake or maybe i’m doing the math wrong? i really want to make this cake today but i’m just confused about that one aspect:)
My family loved this!!! The icing is so light and fluffy with the perfect peanut butter flavor! I used a box chocolate cake mix in 2 8-inch round pans instead and it was the perfect amount of icing!
This cake turned out Amazing! The moist chocolate brownie cake was great just by itself but then add the peanut butter icing it took it to a whole new level! This recipe will be my new go to for special occasions or just the chocolate fix everyone is looking for .
Can I make a 8 inch or 9 inch cake with this
recipe?
I made this for my birthday and it was a huuuge hit. I’m not a big cake person, so brownie cake was perfect for me. Incredibly rich, so make sure to have a big glass of milk with it! 😉