


Tessa's Recipe Rundown
Taste: These are rich and bold, with a deep chocolate flavor. They are easily customizable, too!
Texture: The base chocolate truffle recipe is ultra-smooth, fudgy, and creamy, but there are plenty of options for adding extra crunch.
Ease: They’re a little messy and take a little extra time to finish, but they’re easier than they look!
Why You’ll Love This Recipe: These chocolate truffles are so much tastier than the overly sweet packaged versions at the grocery store.
This post may contain affiliate links. Read our disclosure policy.

Chocolate truffles always seem like a little slice of luxury, but you don’t actually need a fancy bakery or chocolatier to enjoy that rich, fudgy, and melt-in-your-mouth indulgence.
I love making them at home because they’re pretty simple, and I can customize them with flavors and coatings however I like. Whether I’m whipping up a batch for New Year’s, Valentine’s Day, or just because, these truffles always feel like something worth savoring.
I’ve included a ton of truffle-making tips and customization options below for you to get creative, so have some fun with it!
Reader Love
These are delicious, smooth, and wonderfully creamy! I’ve made a lot of truffles, and this recipe is by far my favorite. I love the smooth creaminess of them, and they stayed at a good consistency that I totally loved. I made these for a fancy Valentine’s event, and everybody loved them. I did coat them in tempered chocolate, just because I wanted to go the extra mile. These are definitely my go-to truffle recipe from now on!
–
Ingredients Needed
Every ingredient in these easy chocolate truffles plays a role in creating that rich, creamy, melt-in-your-mouth texture. Here’s what I use and why:
- Chocolate: I always use finely chopped, high-quality baking chocolate. Chocolate chips often contain stabilizers that prevent smooth melting. Semisweet gives the perfect balance of sweetness and deep flavor, but bittersweet works for more intense chocolate.
- Heavy cream: Full-fat cream is essential for that silky, fudgy ganache. Lighter creams or half-and-half just don’t have enough fat, and the truffles can turn out grainy or too loose.
- Butter: I like adding a little butter to the ganache. It enriches the flavor and makes the texture extra smooth and creamy.
- Corn syrup: This isn’t required, but I sometimes add a touch to help the truffles hold their shape and stay soft without becoming hard when chilled.
- Alcohol or flavorings: This is another optional touch. A splash of rum or liqueur adds depth and warmth, but extracts work just as well. The truffles are lovely without alcohol or added flavorings, too, so this is completely up to preference.
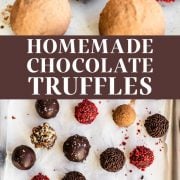
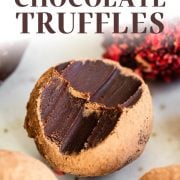
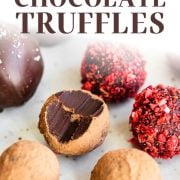
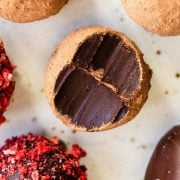
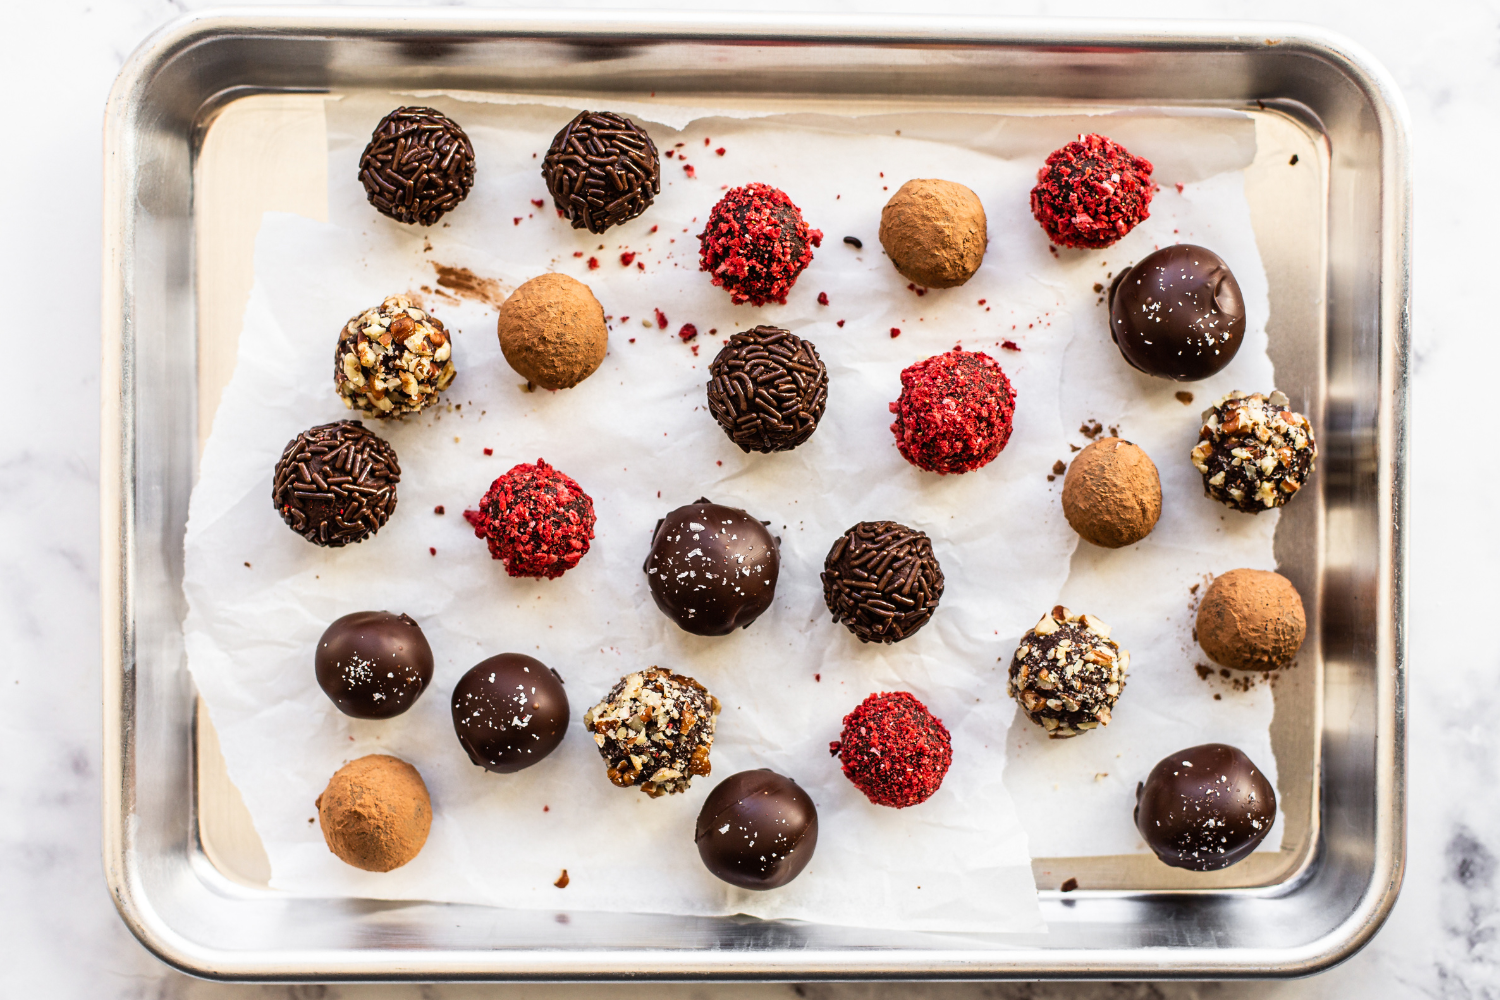
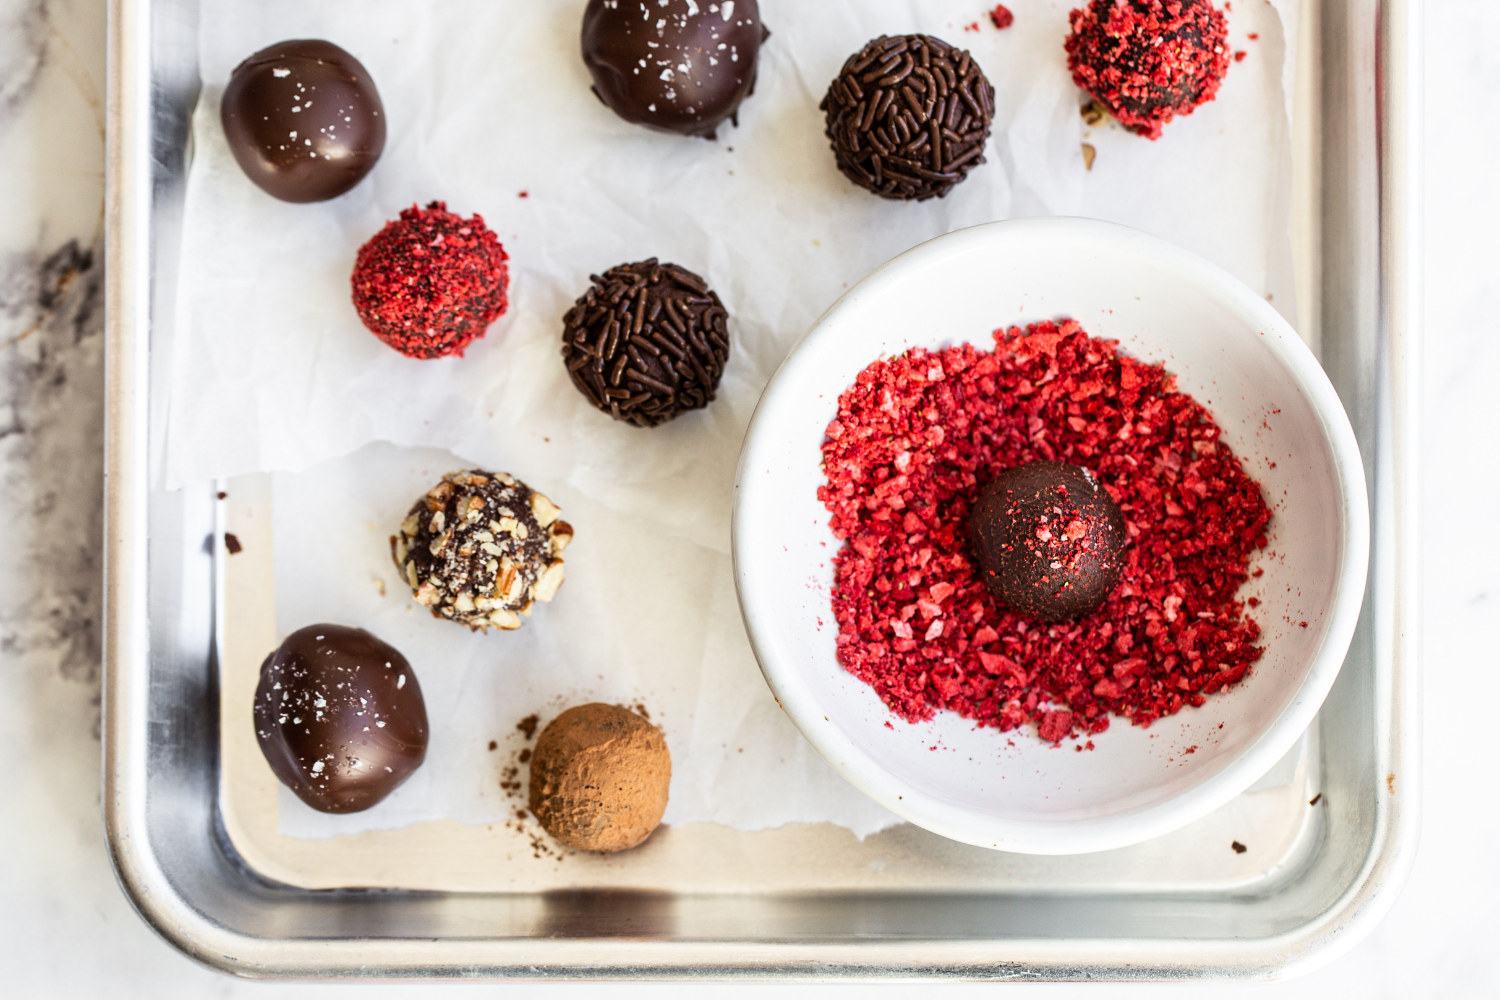
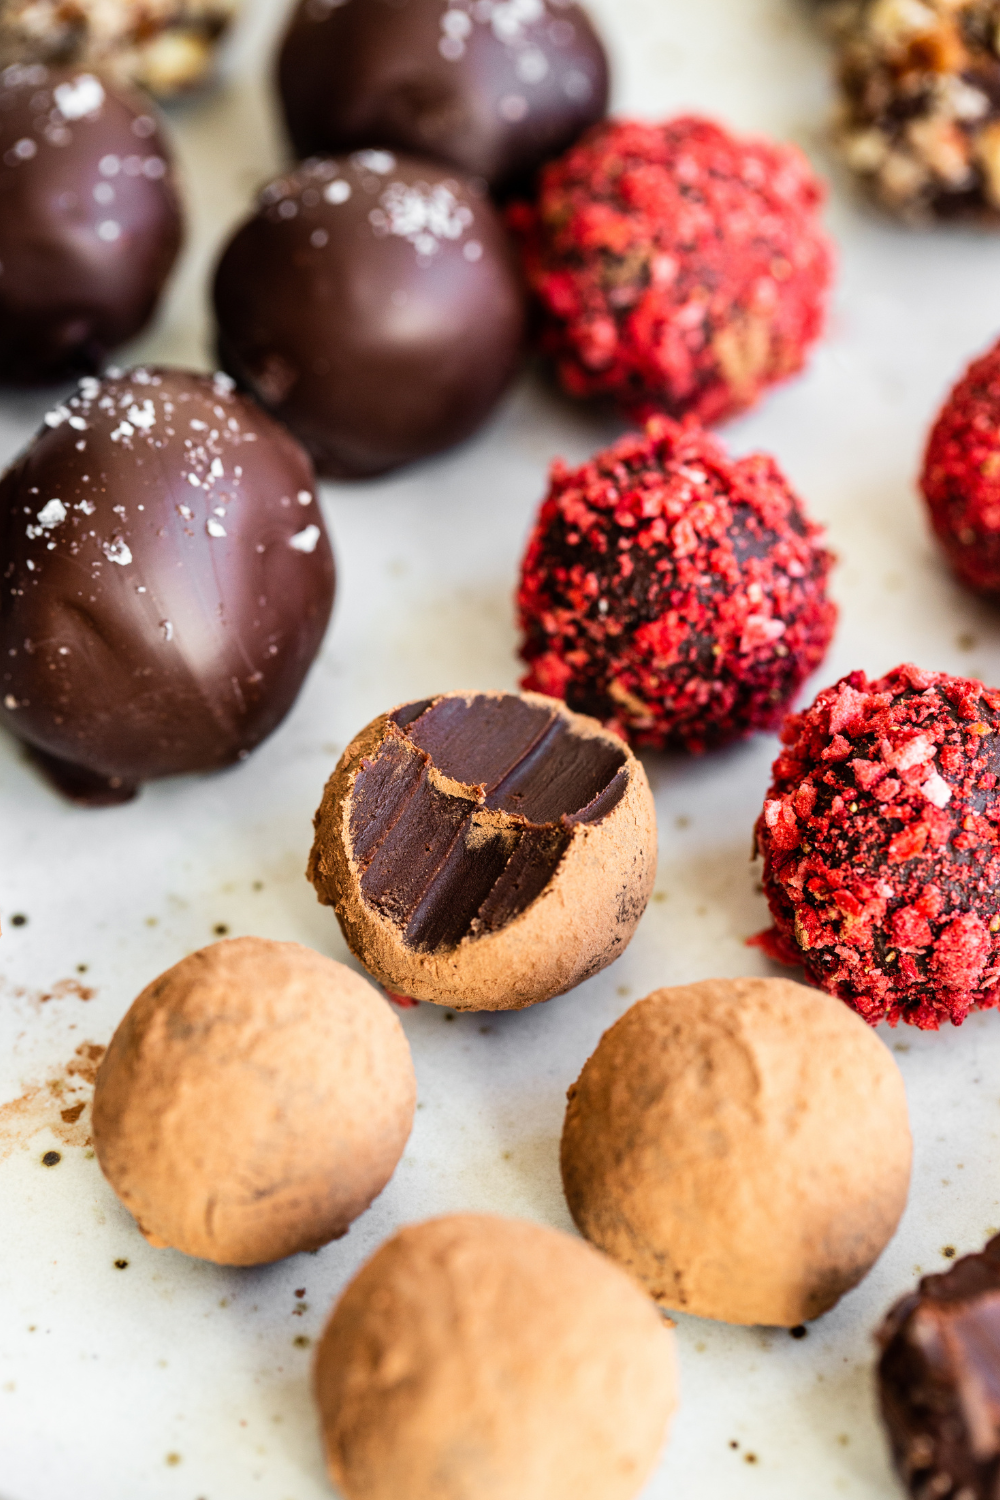
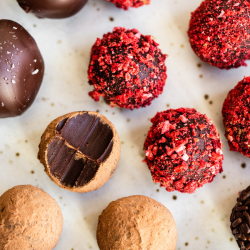
As for coatings, cocoa powder, finely chopped nuts, sprinkles, or toasted coconut all add a different texture and finish. For a glossy, professional look, dip them in tempered chocolate — it’s classic and delicious!
I usually set aside a few truffles for dipping and leave some for rolling in coatings. It’s fun to mix and match! Read more about all of my test runs with chocolate mixtures in my ultimate guide to chocolate truffles.
Use Quality Chocolate
I personally think semisweet chocolate lends the perfect balance of sweetness and rich chocolate flavor in the truffle mixture. Higher cocoa percentages give a deeper, less sweet taste found in dark chocolate truffles, while lower percentages are sweeter and milder.
If you want to splurge, some of my favorite brands are Ghirardelli, Guittard, Scharffen Berger, and Valrhona. Trader Joe’s Pound Plus is a convenient, budget-friendly option that still melts beautifully.
For milk chocolate truffles, reduce the cream by 2 tablespoons, since it’s softer and sweeter. Avoid white chocolate for these truffles. It lacks sufficient cocoa solids and won’t firm up as well.
To make white chocolate truffles, use a modified recipe like my Pumpkin Cookie Butter Truffles to get them to set correctly. Learn more about chocolate in baking! For a chocolate coating, I don’t recommend melting wafers. They’re not real chocolate, and the flavor just isn’t the same. Instead, temper real chocolate for dipping to get that shiny coating that stays firm at room temperature.

Sprinkle of Science
How to Make Chocolate Truffles
Making chocolate truffles might seem like a lot, but it really only comes down to a few key steps. Paying attention to small details will help get smooth, creamy centers and perfectly shaped truffles every time. Here’s my process.
Make the Ganache
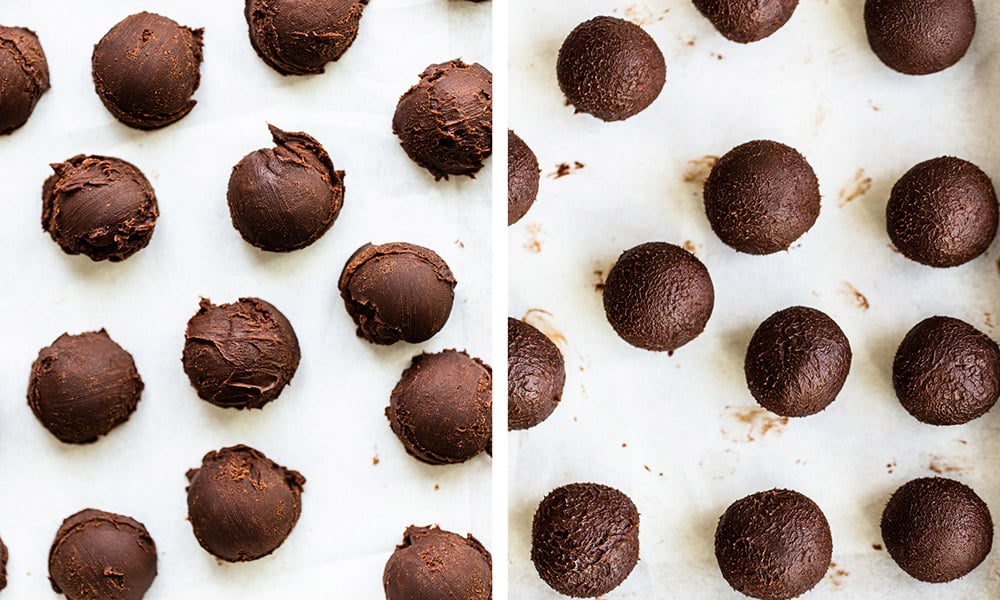
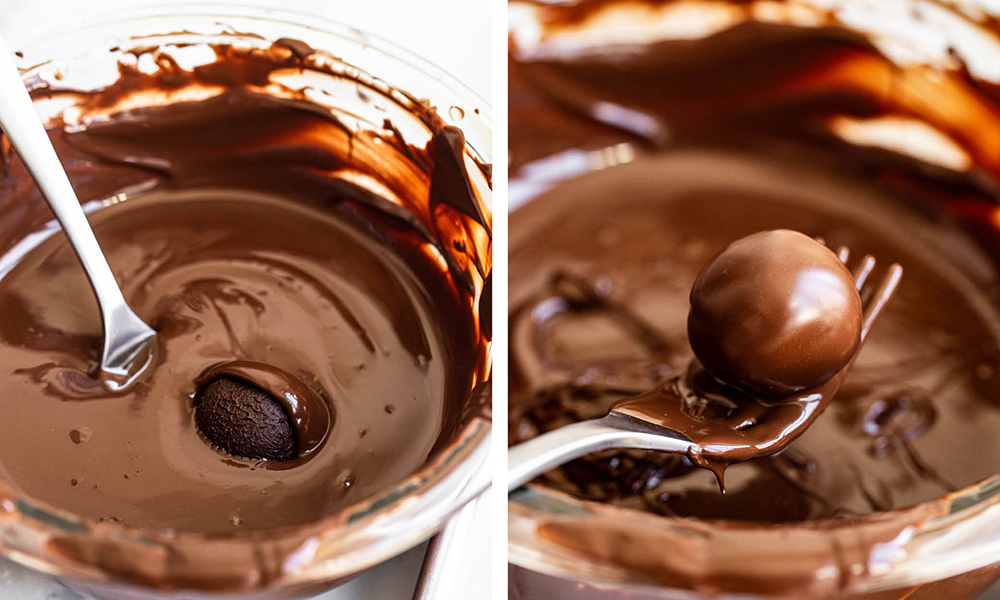
I start by placing the chopped chocolate and butter in a heat-proof bowl, then heating the cream until it just comes to a boil. I pour the hot cream over the chocolate, stir in the corn syrup and any alcohol or flavoring I’m using, and then let everything sit undisturbed for a couple of minutes.
The short rest gives the heat time to melt the chocolate evenly. After that, I whisk until the chocolate ganache turns smooth, glossy, and thick like pudding, with no streaks or lumps. This is the heart of the truffles, so don’t rush it!
Chill Until Set
Refrigerate the ganache for at least 3 hours or overnight to allow it to set. The mixture should feel firm to the touch but soft enough to scoop. Proper chilling makes it so much easier to shape truffles without them melting in your hands.
Scoop and Roll
Use a small spring-loaded scoop for uniform sizing as you portion out the ganache onto a parchment-lined rimmed baking sheet. Refrigerate the scoops for about 15 minutes until slightly firm. To shape chocolate truffles, roll each chilled scoop gently between your palms until it forms a smooth, even ball.
Tessa’s Tip
Wear disposable gloves or dip your hands in ice water to prevent the chocolate from melting too quickly. If the ganache gets too soft, return it to the fridge for a few minutes.
Add Your Coating
Now it’s time to finish the truffles. Dip them in tempered chocolate for glossy, firm chocolate shells, or roll them in cocoa powder, finely chopped nuts, sprinkles, or any preferred coatings. Work with chilled truffles and handle them gently to avoid fingerprints or smudges. A fork or dipping tool makes chocolate coatings easier to manage.
Let Set
After coating, let the truffles fully firm at room temperature or in the fridge before serving or storing. This helps the coating hold its shape and keeps the interior creamy and luscious.
Tips for Shaping and Dipping Truffles
With a few tricks I’ve learned along the way, dipping truffles can actually be really fun. After scooping the truffle mixture, roll each scoop between your palms until smooth and uniform. If the ganache softens too much, pop it back in the fridge for a few minutes.
As far as how to dip truffles in chocolate, read these tips first to get them looking like they came from a chocolatier:
- Chill again before coating. Make sure shaped truffles have chilled for at least 30 minutes before dipping in chocolate. They should be nice and firm.
- Watch the chocolate temperature. The chocolate should be smooth and melted, but not scalding hot. Place the chocolate in a small, but deep, heat-proof bowl. This allows you to reheat the chocolate in the microwave if it gets too cold and hard.
- Dip with care. When dipping in chocolate, use tempered chocolate for a shiny, snappy shell. Plunge the truffle fully, lift with a fork or dipping tool, and gently tap your hand to let excess chocolate drip off. Avoid swirling. It just makes a mess!
- Transfer with a toothpick. Sliding the dipped truffle off the fork with a toothpick helps prevent pooling at the base and keeps truffles looking neat.
Easy Variations and Coating Ideas
I love making truffles at home because it’s so easy to get creative and I can change up flavors, coatings, or both to match the season or the occasion. It’s one of my favorite chocolate dessert recipes because it’s so versatile.
Coating Options
To coat truffles instead of dipping them in chocolate, simply place the chosen coating(s) in separate small bowls.
Place the truffle in and turn to coat completely, pressing it in the coating if needed. If the truffles are too cold and hard, they may not coat easily, so allow them to warm up just slightly.
Below are some of my favorite coating options:
- Finely chopped nuts (like pecans, pistachios, or hazelnuts)
- Unsweetened cocoa powder
- Sprinkles
- Crushed freeze-dried strawberries or raspberries
- Shredded coconut
- Confectioners’ sugar
- Finely chopped crystallized ginger
- Matcha powder
- Crushed peppermint candy canes
For a subtle flavor boost, sprinkle a tiny pinch of flaky sea salt on top of chocolate-dipped truffles before the coating sets!
Love peppermint? Try my Peppermint Oreo Truffles next.
Flavor Variations
Adding alcohol to truffles isn’t necessary, but it can add a punch of flavor. Some of my favorite options are rum, brandy, Irish cream, or coffee liqueur. A black raspberry liqueur like Chambord results in a raspberry truffle with a French twist, and whiskey pairs well with peanut butter!
Here are a few non-alcoholic add-ins to try:
- 1 teaspoon vanilla extract
- 1 teaspoon almond extract
- 1 teaspoon orange extract
- 1 teaspoon coconut extract
- 1/2 teaspoon peppermint extract
- 1 teaspoon ground cinnamon + 1/4 teaspoon cayenne
- 1 teaspoon instant espresso powder
Gifting Truffles
Truffles make such a beautiful gift, especially for the chocolate lovers in your life. For wrapping and gifting chocolate-coated truffles, I highly recommend using tempered chocolate. This way it won’t get soft and melty. Instead, it’ll stay nice and hard, shiny, and snappy.
Placing the truffles inside a small festive gift box makes them look so cute and special. Treat boxes and bags are easily found at Michaels, Hobby Lobby, or on Amazon. Use a plastic egg container for an upcycled option, or a mason jar for a reusable option.
If the coating is a little messy, I highly recommend using mini cupcake liners with each one.
How to Store Them
Truffles can be made ahead of time and stored in an airtight container in the fridge for up to 2 weeks. When storing them at room temperature, make sure it’s a cool, dry spot. If it’s too warm, that can soften the chocolate or cause the coating to sweat.
To freeze, place them in an airtight container and separate layers with parchment paper. To serve, move them to the fridge to thaw first and then bring them to room temperature. This helps prevent condensation from forming on the chocolate.
More Chocolate Recipes to Try:
Email This Recipe
Enter your email, and we’ll send it to your inbox.
Ingredients
For the truffles:
- 8 ounces (227 grams) semisweet baking chocolate, finely chopped
- 2 tablespoons unsalted butter, cubed
- ½ cup heavy cream
- 1 tablespoon light corn syrup (optional)
- 1 tablespoon rum or liqueur (optional)
For the coating:
- 10 ounces
tempered chocolate - Cocoa powder, sifted
- Sprinkles
- Chopped nuts
Instructions
- Place the chocolate and butter in a medium heat-proof bowl.
- In a small saucepan over medium-high heat, bring the cream to a boil.
- Pour the cream over the chocolate and butter.
- Stir in the corn syrup and alcohol (if using).
- Let stand for 2 to 3 minutes before whisking vigorously until melted and smooth like pudding.
- Refrigerate, uncovered, for 3 hours or overnight.
- Use a small one-tablespoon cookie scoop to form mounds of chocolate onto a parchment-lined rimmed baking sheet.
- Refrigerate for 15 minutes.
- Roll the mounds into balls with the palms of your hands. Use disposable gloves to prevent your hands from melting the chocolate, or dip your hands in ice water every few minutes as you roll the truffles.
- Return the truffles to the baking sheet and chill for another 30 minutes, or until firm.
To dip in chocolate:
- Dip the balls in tempered chocolate. For smooth results, use a fork or chocolate dipping tool to completely plunge the ball in chocolate.
- Lift up and tap the hand holding the fork to allow the excess chocolate to drip back into the bowl.
- Use a toothpick to gently slide the dipped truffles onto a parchment-lined baking sheet.
- Sprinkle with any garnishes before the chocolate sets, if desired.
- Repeat with remaining balls, wiping off your fork with a paper towel after every couple of truffles. Let the truffles set completely before serving or storing.
To coat:
- Place cocoa powder, finely chopped nuts, sprinkles, etc., in separate shallow dishes.
- Roll each chilled ball in your desired coating, then place on a parchment-lined baking sheet.
Notes
FAQs
A chocolate truffle is essentially a firm ganache made of melted chocolate, cream, butter, and flavorings, shaped into balls and coated. It’s incredibly simple yet impressive, and so delicious!
High-quality chocolate truffles are pricey because the ingredients themselves aren’t cheap. Making truffles is also labor-intensive. That hands-on process, combined with their small size and rich flavor, is why artisan truffles cost more than commercial products, like Lindt.
All truffles are chocolate balls, but not all chocolate balls are truffles. The main difference comes down to ingredients, texture, and technique. Chocolate truffles are made from a ganache base, then chilled and shaped into balls.
“Chocolate balls” can be any chocolate-covered bite-sized treat. These confections use crushed cookies, cake, or other mixtures combined with chocolate. They might be denser or more crumbly, and they often lack the smooth ganache center that a true truffle has.
You can, but the texture may be slightly grainy or separated. For truffles, it’s best to whisk the thawed cream until smooth before adding it to the chocolate, so the ganache stays creamy.
This post was created in 2020 and has been updated with additional recipe tips and information. Photos by Ashley McLaughlin.


I’m in the process of making custom chocolates, truffles, cake pops & lots of various chocolate covered/dipped/drizzled goodies for my local gift shop/coffee shop. So, my question & potential problem is that in order to sell my edible goodies thru these shops, the contents can’t require refrigeration of any kind – they MUST BE COMPLETELY SHELF STABLE/“NON-POTENTIALLY HAZARDOUS” goods! However, you state in the article that the truffles can be made up to 2 weeks in advance, but only if kept in an airtight container in the fridge.
So, I was wondering if there’s any way to tweak the making process or maybe a slight change of ingredients that might make these chocolate truffles possible to sell, w/out the need of refrigeration, if still properly sealed & packaged to sit on a shelf?!? Sorry for my long-winded question! &, thanks so much in advance for your time & help in this matter!
Hi Hannah! Thanks so much for sharing your question. It sounds like you’re working on an amazing project! Unfortunately, we haven’t tested a version of chocolate truffles that would be completely shelf-stable without refrigeration. For your needs, I’d recommend looking into recipes specifically designed for shelf-stable chocolates or even consulting a chocolatier for advice. Wishing you all the best with your goodies, I’m sure they’ll be a hit!
This recipe turned out great. I actually used semi sweet Ghirardelli chocolate chips to make the truffles and had no issues. They held up perfectly and tasted great. Outside of that i followed the recipe exactly.
Can I use this for piping into candy molds? Would tempering be recommended?
We haven’t tried that, so I can’t say for sure!
Would German’s Sweet Chocolate work for these?
Hi Pam! We haven’t tried these truffles with that brand of chocolate, but I don’t see why it wouldn’t work! Let us know what you think of these truffles once you have given them a try 🙂
These are delicious, smooth, and wonderfully creamy! I’ve made a lot of truffles, and this recipe is by far my favorite. I love the smooth creaminess of them, and they stayed at a good consistency that I totally loved. I made these for a fancy Valentine’s event, and everybody loved them. I did coat them in tempered chocolate, just because I wanted to go the extra mile. These are definitely my go-to truffle recipe from now on!
Can these be frozen?
Hi Jessica! We haven’t tried freezing these truffles, but they’ll keep for about 2 weeks in an airtight container stored in the fridge. I hope that helps! Happy baking 🙂
Can I make half a batch? Only because I want to try different flavorings and coatings. Thank you.
Hi Carol! Yes, simply divide all ingredients in half. Enjoy your experiments! 🙂
What is the crushed red coating on these truffles?
Hi Jane! It’s one of the coating ideas Tessa mentions in the pink Tip Box, above the recipe! They’re crushed freeze dried berries! Be sure to check out all of Tessa’s tips, tricks and info in the tip box before giving it a try for yourself 🙂 Happy baking!
Is there an alternative to tempered chocolate?
I highly recommend using tempered chocolate so your truffles don’t get soft and melty and instead stay nice and hard, shiny, and snappy! If you must, you can try using just melted chocolate as well.
I haven’t tried the recipe yet. But I will do it in the future. It all looks so delicious. I just wanted to quickly wish you a Happy New Year.
K.M.
Thank you so much! Hope you try these truffles out soon! Happy New Year to you as well!
Looks so good!
What brand of rum do like to use in desserts?
I would love to be able yo print the suggestions and recommendations for the truffles to keep with the recipe. When I make these again next year, I won’t have to do a search. Thanks for the recipe and all the great suggestions.
Hi Mary, you should be able to print an entire page! You may need to google how to do so on whichever web browser you are using. Hope that helps!