


This post may contain affiliate links. Read our disclosure policy.
This recipe for whole-grain artisan bread requires no proofing or kneading. The dough can be doubled or halved in size. It can also be stored in the fridge for up to 14 days. This means all you have to do to have a fresh loaf on the dinner table is take a hunk of dough from the fridge, let it rise 90 minutes, and bake it. It’s almost too good to be true.
If this method sounds familiar at all, you’ve probably seen or read Artisan Bread in 5 Minutes a Day or my new favorite, Healthy Bread in 5 Minutes a Day, where this particular recipes comes from. Note that the “5 Minutes a Day” refers to the time actively preparing the dough once it’s been made and refrigerated. The dough in these books is foolproof, it’s nearly impossible to screw up. You may never buy bread at the grocery store again with these books (it’s actually cheaper to make it at home in most cases).The bread once baked and cooled is flavorful, crisp on the outside and soft on the inside. Most days I actually enjoy the whole-grain artisan bread better than the white artisan bread because it has better flavor.
Tips & Notes:
- If you’ve never made “Artisan Bread in 5 Minutes a Day”, this recipe is going to seem strange. Just know that the dough is very low maintenance and trust in the recipe.
- Look for Bob’s Red Mill or Hodgson Mill brands of Vital Wheat Gluten at the grocery store in the same aisle as baking sodas, powders, flours, yeasts, etc.
- You can freeze the dough
- For added flavor, throw in a teaspoon of dried herbs to the dough mixture
- Temperature of water incorporated into dough should not be higher than 100 degrees (just warmer than body heat)
- This recipe calls for special equipment
- A broiler tray to hold water for steam and a baking stone. These ensure a beautiful crisp crust. Do not use a glass broiler tray, it will shatter.
- A pizza peel is also helpful in transferring dough to stone in oven, but any flat surface like a cookie sheet can be used.
- If you are making lots of dough at once to use throughout the week, a large, plastic storage container with a lid is helpful to mix and store dough in.
- A serrated knife is used to slash the dough before baking and again to slice dough after baking
- A scale is extremely helpful (but not necessary) in measuring amounts of ingredients accurately for best results, especially if halving or doubling the recipe
Email This Recipe
Enter your email, and we’ll send it to your inbox.
Ingredients
- 5 1/2 cups (1 pound, 9 ounces/720 grams) whole wheat flour or white whole wheat flour
- 2 cups (10 ounces/270 grams) unbleached all-purpose flour
- 1 1/2 tablespoons (2 packets/.55 ounces/15 grams) granulated yeast
- 1 tablespoon (.55 ounces/15 grams) kosher salt
- 1/4 cup (1 3/8 ounces/35 grams) vital wheat gluten
- 4 cups (2 pounds/900 grams) lukewarm water (about 100 degrees F)
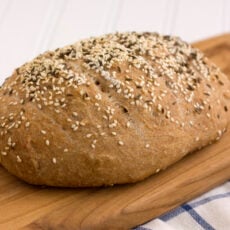
- 1-2 tablespoons seed mixture (sesame, flaxseed, caraway, raw sunflower, poppy, etc.) for sprinkling (optional)

Instructions
To make the dough:
- Whisk together flours, yeast, salt, and vital wheat gluten in a 5-quart bowl or lidded plastic food container (not airtight). Add water, all at once, and mix without kneading using a wooden spoon, 14-cup food processor, or heavy-duty stand mixer fitted with paddle attachment. Mix until everything is evenly moist with no dry patches. The dough will be shaggy, wet, and loose.
- Cover with lid (not airtight) or plastic wrap and allow to rise at room temperature until top of dough flattens, about 2 hours. If desired, let rise overnight. Refrigerate dough (lidded or wrapped in plastic) and use over next 14 days. Note that fully refrigerated dough is less sticky and easier to work with. Refrain from punching dough down.
To bake:
- Prepare a pizza peel by sprinkling liberally with cornmeal or lining with parchment. Dust the surface of your refrigerated dough with flour. Pull up and cut off a 1-pound (grapefruit size) piece of dough.
- With lightly floured hands, gently stretch the surface of the dough around to the bottom on all four sides, rotating a quarter-turn as you form a ball. The bottom may appear uneven but will flatten out during resting and baking. The final shape should be smooth and cohesive. If you prefer a oval-shape, elongate the dough with your hands and taper the ends by rolling them between your palms and pinching. The entire shaping process should only take 20-40 seconds, any longer and your loaf could be dense.
- Allow shaped loaf to rest for 90 minutes (40 minutes if you’re using fresh, unrefrigerated dough). 30 minutes before baking, preheat oven to 450 degrees with a baking stone placed on the middle rack. Place an empty broiler tray for holding water for steam on any other rack that won’t interfere with the rising bread.
- Just before baking, use a pastry brush to paint the top of loaf with water. Sprinkle with seed mixture (if desired). Slash the loaf with 1/4-inch deep parallel cuts across the top using a serrated knife.
- With a quick forward-jerking motion of the wrist, slide the loaf off the pizza peel and onto preheated baking stone. Quickly but carefully pour about 1 cup hot water from the tap into broiler tray and close the oven door to trap the steam. Bake 25-30 minutes, or until the crust is richly browned and firm to the touch. Allow bread to cool completely on a wire rack for best flavor, texture, and slicing. Crust will firm up when cooled.


[…] Sunday: panera copycat broccoli cheddar soup (with chicken and rice added at DH’s request!), artisan bread […]
I’m looking forward to getting this bread started tonight.
You mention that you can freeze the dough, at what stage would i put dough in the freezer? I’m guessing after the initial rise, I should shape the dough and then wrap and put it in the freezer?
Yep! Then you can just proceed with the recipe. It should last 3-4 weeks in the freezer.
Hi,
I love this receipe. I purchased a cast iron ceramic pot with a lid and I cook the dough in there and the lid seals in the moisture, so that you don’t need to add water to the oven. 40 min at 400 with lid on and then 15 min with lid off to make the outside crispy.
I am addicted to the taste, smell and fun of making my own bread. My kids love it. My kids like to add pumpkin, sunflower, or poppy seeds to the outside. This bread actually fills you up.
John
CAn you bake it in a covered baking dish in the oven like the no knead artisan breads call for ?
If I don’t want to leave bread in fridge overnite how long does dough need to be in fridge
The dough should be in the fridge for as long as possible – it makes it more flavorful and easier to work with.
We just made some wonderful bread with that recipe, thank you!
This is a great recipe for whole grain bread!
You asked if we would be interested in hearing about what you are learning in culinary school- I would be very interested! 🙂
That is a gorgeous loaf of bread! Once the weather cools down, I love to bake homemade bread, and this whole grain artisan loaf is right up my alley.
I have all those tools! And it does sound too good to be true that I can just pull dough out of the fridge and have fresh bread that quick. Love love love.
Your loaf looks beautiful! This is my favorite bread recipe. I always have some of this dough ready in the fridge. It's so easy to prepare, and it makes great pizza crust too! I have both of the books, and I love every recipe I have tried. I haven't bought bread in almost two years!
You did fantastic job on this loaf of bread.