
Ultimate Guide to Chocolate Chip Cookies Part 4
This post may contain affiliate links. Read our disclosure policy.
CLICK HERE FOR PARTS ONE, TWO, and THREE!!
I’m doing a happy dance because today I’m sharing PART FOUR of my Ultimate Guide to Chocolate Chip Cookie series. I’ve received a lot of questions and comments about specific baking techniques and products and how they affect chocolate chip cookies. You guys wanted to know how oven temperature, creaming duration, baking surface, and baking pans affect cookies. Some people swear by certain techniques, while others unknowingly have problems with various products and methods. The below experimental batches will hopefully help you in troubleshooting why your cookies end up a certain way, whether that be flat, burned, underbaked, crisp, chewy, or whatever else!
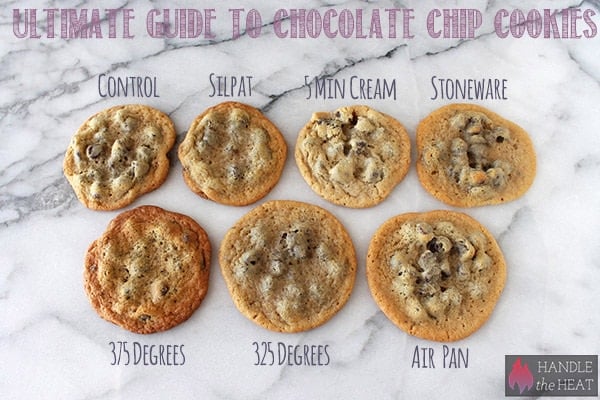
I used an *adapted* version of the Nestle Tollhouse Chocolate Chip Cookie recipe as my control and made small variations among the baking methods and techniques to show you how they affect the cookie. I kept everything else the same in each recipe test so we could observe the differences in the finished cookie, photographing all the results for you. Together we’re on a journey to discover exactly how baking recipes work. See the comparison photos at the end of this post. Hopefully this will help you to discover why your cookies turn out the way they do and how to make YOUR version of the ultimate chocolate chip cookie!
Tools and Ingredients Used (when applicable):
-Spring-Loaded Cookie Scoop (Medium or 1 1/2-Tablespoon size)
–Chicago Metallic sheet pans
–Escali Digital Food Scale
–KitchenAid 5-quart Stand Mixer
–Oven thermometer
–Unbleached parchment paper
-Gold Medal All-Purpose Flour
-Fine sea salt
-Light brown sugar
-Large eggs
-Unsalted butter at a cool room temperature
Ingredients:
1 cup plus 2 tablespoons (142 grams) all-purpose flour
1/2 teaspoon baking soda
1/2 teaspoon salt
1 stick (113 grams) unsalted butter, at room temperature
1/4 cup plus 2 tablespoons (75 grams) granulated sugar
1/4 cup plus 2 tablespoons (75 grams) packed light brown sugar
1/2 teaspoon vanilla
1 large egg
1 cup (170 grams) semi sweet chocolate chips
Directions:
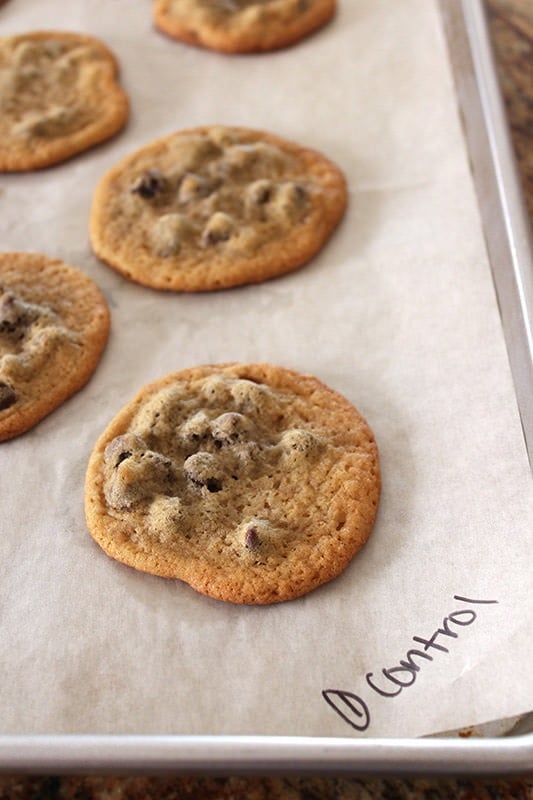
Preheat oven to 350°F. Line baking sheets with nonstick baking mats or parchment paper.
In a medium bowl combine the flour, baking soda, and salt.
In the bowl of an electric mixer beat the butter, granulated sugar, and brown sugar until creamy, about 2 minutes. Add the egg and vanilla, beating well to combine. Gradually beat in the flour mixture. Stir in the chocolate chips. Scoop 1 1/2 tablespoon-sized balls and place onto prepared baking sheets.
Bake for 10 minutes, or until golden brown. Cool for 2 minutes before removing to wire racks to cool completely.
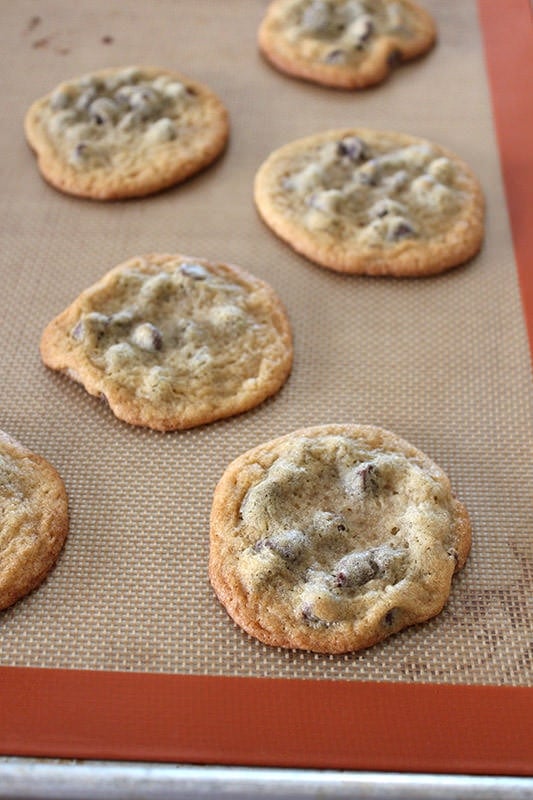
Silpat:
I received a few questions in my first Ultimate Guide to Chocolate Chip Cookies post about the affects of using parchment paper vs. a Silpat nonstick baking mat. Silpats are reusable non-stick baking mats often used in professional kitchens. I love my Silpats and have been baking with them for almost exclusively for so long that I never stopped to think how it might be affecting my baking products. I’ve heard some people claim their baked goods don’t become as browned and caramelized when using a Silpat, so I wanted to see if I experienced the same result in a side-by-side comparison with the control batch baked on standard parchment paper. The differences between the two batches were negligible, if anything the Silpat batch was slightly darker on the bottom and taller with a little less spread. I find these to be pleasant outcomes, so I will absolutely continue using my Silpat!
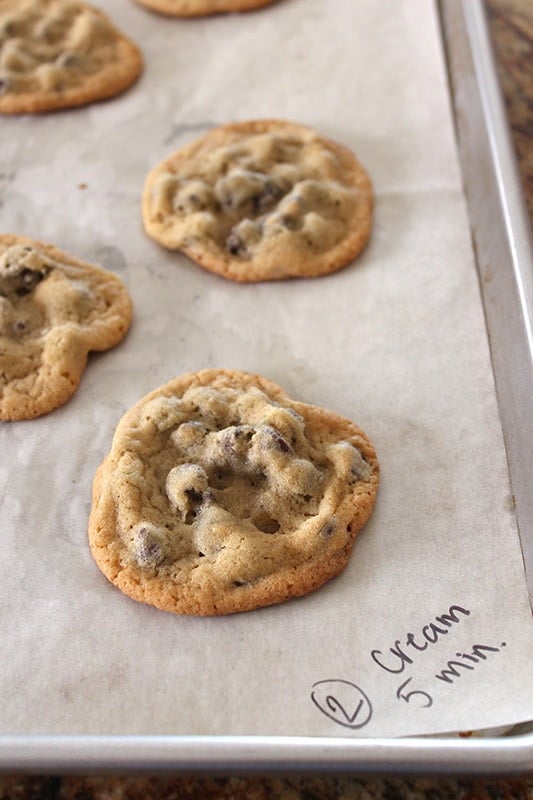
5 Minute Creaming:
This is something I think many people don’t pay attention to when baking cookies. In all my Ultimate Guide posts about chocolate chip cookies, my control recipe called for a specific 2 minutes of creaming. I counted those minutes exactly with a timer to ensure consistency and accuracy. I get a lot of questions from readers about cookies spreading too much in the oven. While many things can cause this, such as butter and/or dough that is too warm, overmixing butter can also lead to similar results.
The purpose for creaming the butter and sugar in a cookie recipe is to dissolve the sugar into the butter in a sense so the dough is homogeneous and bakes evenly. It also incorporates millions of tiny air bubbles into the batter, which in partnership with the leavener (baking soda in this case) helps to create a more airy, lifted texture. This is CRUCIAL when baking cake recipes which are intended to turn a dense batter into an ultra soft, tender, light, airy, and tall cake. Over-beating the butter in a cookie recipe, however, can cause the butter to warm too much and weaken its ability to hold air. Cookies just can’t become super tall and structured, so if the butter and sugar are over-beaten, it tends to spread and fall flat. I almost always call for 2 to 3 minutes of creaming time in an electric mixer on medium-high speed, this is usually enough time to homogenize the dough without risking over-beating. In this test batch I creamed for exactly 5 minutes, an amount of time I felt might be easy for many home bakers to overreach and overcream without realizing. I wanted to see if this was enough creaming to negatively impact the cookies. The impact wasn’t huge, creaming longer would definitely exaggerate things. However these cookies were certainly more pale, flat, soft, and light. They were also more misshapen, as though the butter was warm enough to melt out into whichever direction it wanted.
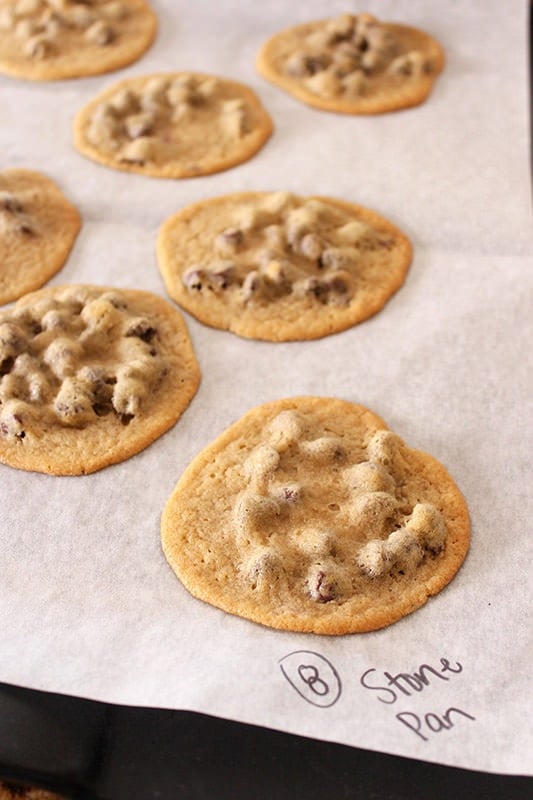
Stoneware:
I have received some comments from folks saying that they prefer to bake their cookies on stoneware. This made sense to me, as stoneware often heats more evenly than many metal baking sheets. I dropped the cookie dough onto parchment on my favorite Emile Henry baking stone which I use religiously for pizza. The stone was at room temperature and I placed it in a 350°F oven. I don’t know what happened, but whatever it was it was not good. The cookies turned into flat puddles with absolutely NO browning. They were completely under-baked, soft, and thin. They basically looked and tasted like melted cookie dough, not baked cookies. They were almost impossible to remove from the stone without having them fall apart. I was fairly shocked. I actually don’t think the tragedy behind these cookies is fully illustrated in the photos. If anything, I feared these cookies would be too brown. I don’t know if it was the dough recipe, the Tollhouse adaption is quite a wet dough, or if it was because I didn’t preheat the stone. Whatever it was I think I’ll avoid using stoneware for cookies altogether. They’re also more of a pain to lug out and to clean. I’d be curious to hear your thoughts on stoneware! Maybe I just used the wrong product or method. Either way, I thought the results might be useful or interesting to some of you.
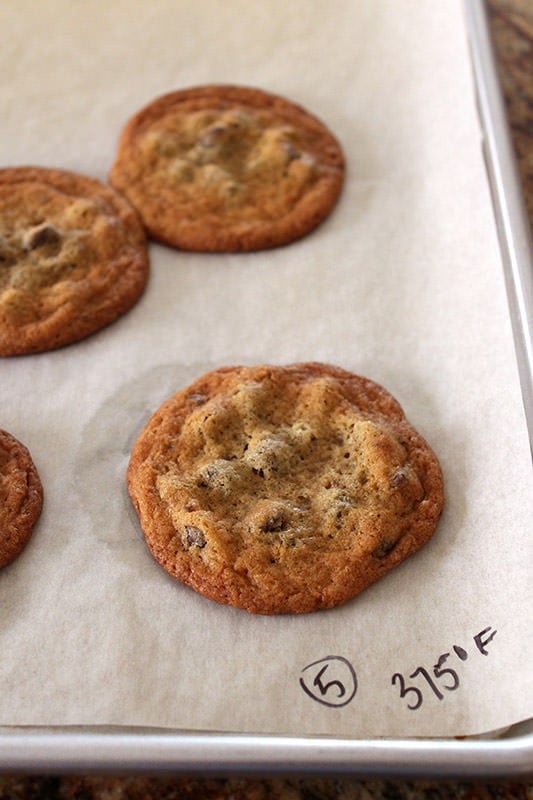
375°F Baking Temperature
The original Nestle Tollhouse recipe is baked at 375°F. For all my Ultimate Guide experiments I switched the oven temperature to a more typical 350°F as my intention was to test out variations on the most average control cookie recipe. A few readers have pointed out this change in temperature, so I set out to test why the Tollhouse recipe would originally call for a higher baking temperature. I closely monitored my oven with an oven thermometer and once it reached 375°F I baked off a batch for exactly 10 minutes, like every other batch. A relatively small variance in temperature resulted in very different cookies. These chocolate chip cookies were much darker with a more crisp, crunchy texture. There was no ooey-gooey center whatsoever, however they did have a lovely depth of caramel-y flavor. I did enjoy these cookies, and I think I’ll bake off cookies at 375°F whenever I’m in the mood for that crisp texture.
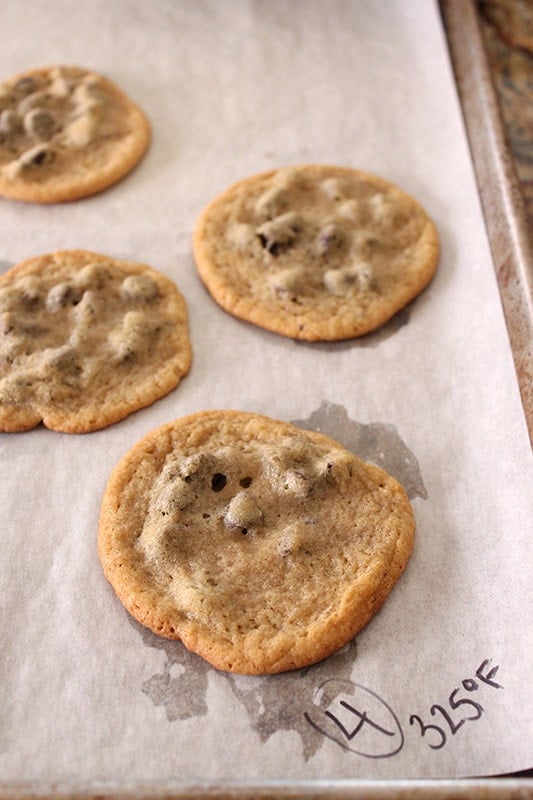
325°F Baking Temperature
On the flip side, I wanted to test out how dropping the oven temperature from 350°F might affect the cookies. Dropping the temperature didn’t produce as different of results as raising the temperature. These cookies were slightly softer with a chewy bite. The one thing they were noticeably lacking was that wonderful butterscotch, caramel-y flavor that chocolate chip cookies usually have. I don’t see why I’d use a lowered baking temperature again with chocolate chip cookies.
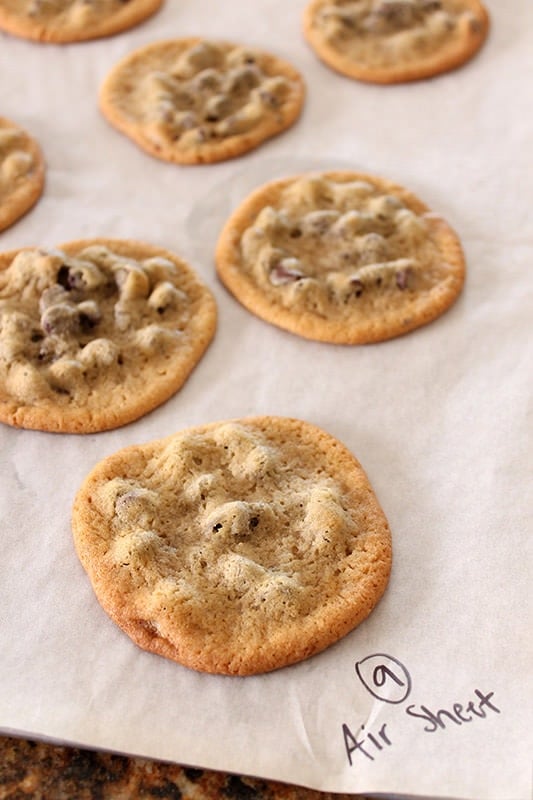
Air Baking Sheet
Another product that people seem to swear by are air baking sheets, baking sheets that are insulated and meant to prevent over-browning or burning. These cookies were flatter, perfectly round, with crisp edges. Unsurprisingly, the bottoms were not as brown as with the control recipe. I baked these for 10 minutes like I baked every other batch, but these cookies could have used another minute or two. I actually prefer more crisp, browned, caramelized cookies so I don’t think I’ll use insulate/airbake sheets in the future.
Final Comparison:
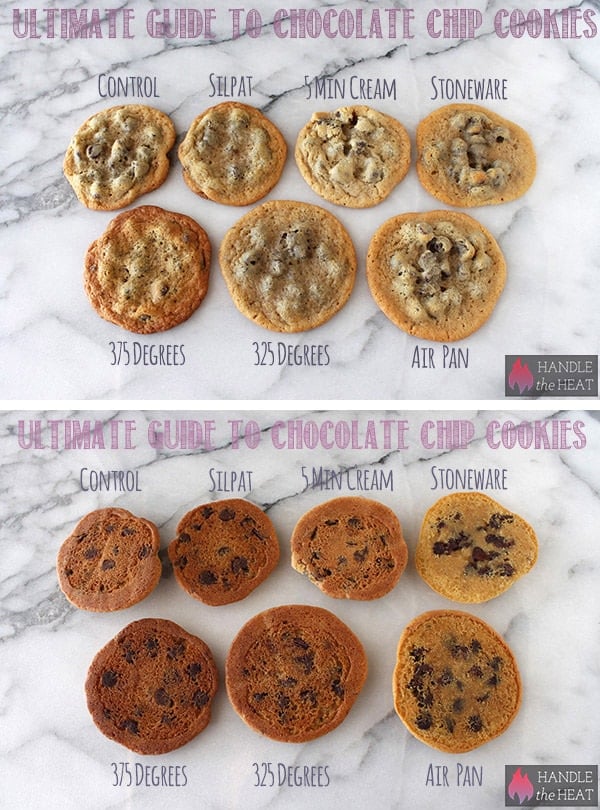
*If you use these images PLEASE give proper credit to me and link back to this post.*
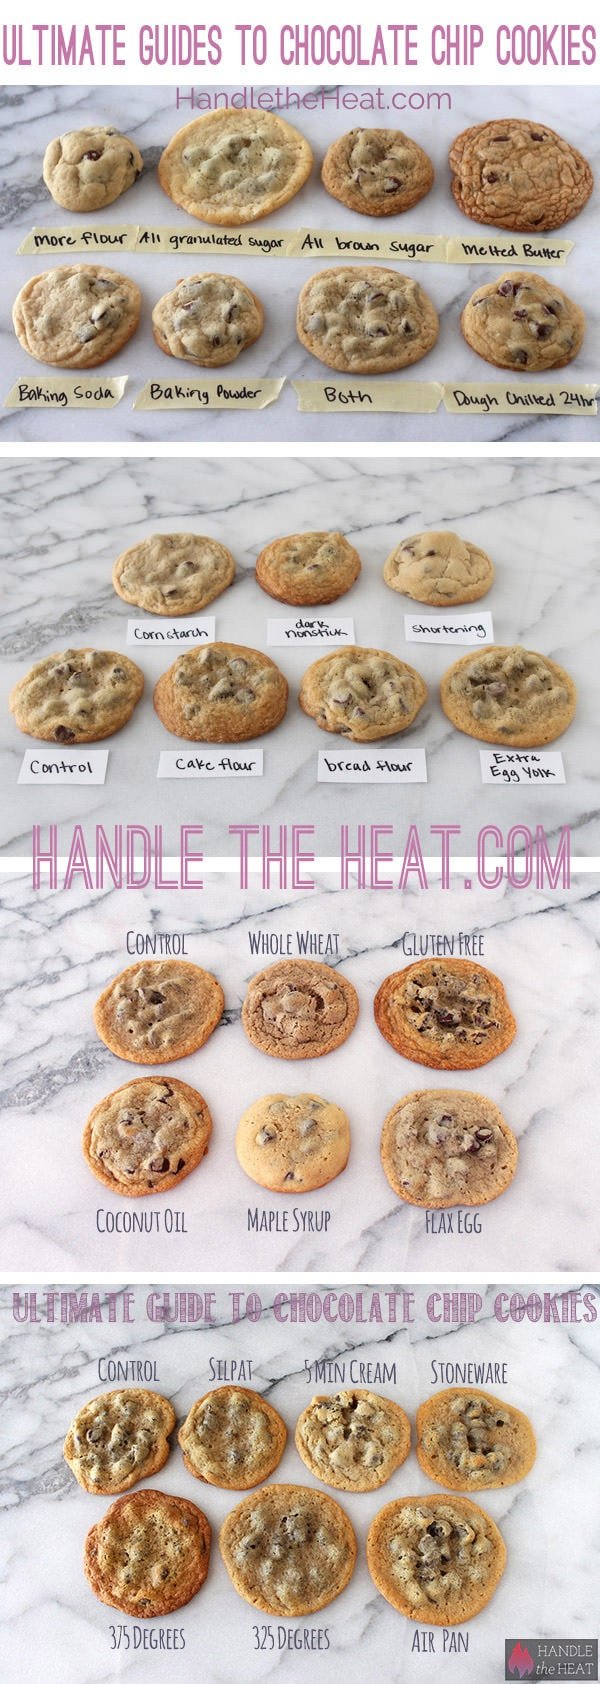
All Four Guides in Comparison:
CLICK HERE FOR PARTS ONE, TWO, and THREE!!
You’ll Also Love
*This post contains affiliate links.

About Tessa...
I share trusted baking recipes your friends will LOVE alongside insights into the science of sweets. I'm a professionally trained chef, cookbook author, and cookie queen. I love to write about all things sweet, carb-y, and homemade. I live in Phoenix, Arizona (hence the blog name!)
Leave a Comment & Rating
Add a Review or Question
© Handle the Heat - handletheheat.com
Join the Handle the Heat Community

Instead of digging through cookbooks and magazines and searching the internet for amazing recipes, subscribe to Handle the Heat to receive new recipe posts delivered straight to your email inbox. You’ll get all the latest recipes, videos, kitchen tips and tricks AND my *free* Cookie Customization Guide (because I am the Cookie Queen)!
This may hae been said already (there are a lot of comments), but my pampered chef stone is meant to be preheated then you are to put the food on it. So you’d preheat your stone while the oven preheats then place your pizza or cookie dough (or whatever elso you’re cooking) on it. I know it makes a huge difference for me when I do pizzas as they turn out much crispier, so I would assume it would make cookies brown more too. Worth a try.
Also, although this has do to with another cookie post, have you attempted using Ener-G Egg Replacer? My cousin is highly allergic to eggs and her mother has always had me use it for any dishes requiring eggs brought to family events. It hasn’t not worked in a recipe yet!
Thanks for doing all these cookie experiments. Having a kiddo who has a milk allergy and now a boyfriend who is gluten intolerant, I’ve loved seeing how the outcomes of some of your experiments without having to mess up my kitchen!
Hello Tessa, I thoroughly enjoyed reading your research & all the work you did in putting together the “Ultimate Chocolate Chip Cookie Guide?” While looking for the best chocolate chip cookie recipe, I “stumbled” on your site. I’ve been pleased with what I’ve seen so far.
Really good job on the cookie tests, much appreciated!
I am wondering if you have more tests in the works? I would love to find a way to make a domed gooey chocolate chip cookie. Not exactly cakey. Not a brownie either. Have you ever seen or eaten one of these? I can’t figure out how to make one though. Would love to hear back if possible.
Hoping you have another test on the way, even if not with a domed, thick cookie in it. Just a great idea
Hi,
I was wondering if you ever use the bake convect option on the oven. I usually use this to bake. This option bakes at 325 and usually takes less time.
Thanks!
I’m curious if you have made chocolate chip cookies with all brown sugar and either baking soda or baking powder or both and refrigerated for 24 hours?
I’m curious why you call it an *adapted* version when it appears to be just halved (nestle toll house is my go-to recipe). By the way I loved reading all four parts to your ultimate cookie guide, I can’t wait to try a few of your variations next time I make chocolate chip cookies, the extra egg yolk in particular! I’ve also downloaded your cookie customization chart.
I adored these 4 “Ultimate Chocolate Chip Cookie” blog posts. I’m wondering how adding peanut butter to a chocolate chip cookie recipe affects the cookie and what needs to be adjusted to compensate? … you’re clearly a pro! Any tips?
Thanks!!
I use stoneware nearly every time I make chocolate chip cookies! I heat the stone and then open the oven and drop rounded cookie dough balls on the hot stone while it is still on the oven rack. The cookies are done in 7-8 minutes. I transfer them directly from the stone onto a cooling rack. They are perfect every time! I would not suggest parchment paper.
I’m trying to make thin, crispy chocolate chip cookies. I’ve made one batch of the “control” recipe and they were soft, and puffy, not crispy, more like the pictures of “more flour” cookies and/or “baking powder” cookies. Then I made your Thin and Crispy recipe with the same result. I thought that with baking soda and no baking powder the cookies would have spread more. The dough was not “loose, sticky and more like batter consistency” as you described. I made one significant change. I used white granulated baking Truvia rather than regular white, granulated sugar using a 1/1 ratio. The brown sugar I kept the same as in the recipe. Also, I used 1 tsp of vanilla rather than 2 because this is Hatian vanilla and has a much more intense flavor. Thank you for any guidance you can offer. Joanne
Hi Joanne, I would refrain from any sugar substitutions until you have a better sense of how the recipe should work. Then you can start experimenting with subs. Also, it sounds as though you may be adding in too much flour. This can be really easy to do accidentally if using measuring cups to measure out the flour. I would check out my measuring guide, specifically the section about flour, to see just what I mean: https://handletheheat.com/ultimate-guide-measuring/
So out of all four of the experiments which ones do you think turned out the best from each test not including the control.
Hi I am on a journey to design my perfect chocolate chip cookie recipe and your article has been so much help! I’ve been toying around with a recipe and changing variables and I’m happy to say I’m almost there! The one ingredient I’m not sure about you didn’t mention in your article. The first recipe I started with called for a few tablespoons of canola oil and now I always add it in but I’m curious to know what it brings to the mix. I’m on a mission to find the softest, cakiest cookies I can but with a bit of a chew right around the crust. I appreciate it a ton!
Hello,
I found your “Ultimate Guide to Chocolate Chip Cookies” really interesting. Your testing was done well. I have been doing this type of experimenting with chocolate chip cookies for years to try to get the perfect cookie and texture. I have been an avid baker for about 40 years now and I’m known in “my world” to have the best chocolate chip cookies. I found a recipe about 15 years ago in an old Betty Crocker cookbook that had the combination I was looking for. Thanks for the article; I’m sure it will be helpful for a lot of bakers.
I think I’ll give it a try. Butter is just so fattening! I’m going to cut my regular recipe in half since I’m just experimenting.It calls for one flax egg.. Would it still work the same if it’s half a “flax egg ” ( so it’s 1/2 tablespoon flax and 1.5 tablespoon water..)? I’m new to baking. Thanks for helping me out!
Hmm… Maybe I’ll try the apple sauce instead. have you ever baked cookies with that? Or have you heard that it leaves an aftertaste?
No weird aftertaste if you use organic unsweetened, but like I said it’s really cakey.
Hey Tessa! So I’m vegan and have perfected the best chocolate chip cookies (did lots of experimenting!) but now I want to see if I can make them healthier by subbing the 1/2 cup of vegan butter (earth balance) with… Maybe a banana? Have you ever made chocolate chip cookies with bananas? Or apple sauce? I’m already using a flax egg so I can’t repeat that ingredient.
Please let me know! I’ve used your pictures while experimenting and they are very helpful! 🙂
Hi Heidi! I haven’t tried a banana, but I’ve heard it yield really awesome results (but with a banana aftertaste which could be a good or bad thing). Applesauce makes for a really cakey cookie. Let me know if you experiment with this and how it turns out 🙂
Man, I am so hungry for cookies right now! Just wondering if you’ve ever experimented with different quantities of butter? A friend in college always cut the amount of butter in the recipe in half. The result was a more mounded cookie (less spreading) that was chewier and a little more cake-y.
Interesting! Were they dry?
Loved this, thanks! I’ve tested many of these modifications myself. I’m most surprised by your stoneware results. I used to make cookies religiously on Silpats until I tried them on stoneware myself (directly on stone, no parchment paper). Now I haven’t used a Silpat for a few years. I do have to increase the cooking time, though, even with a warmed stone, and suspect that longer time is what was missing on your test. Using stoneware, my cookies are the exact same color on top and bottom.
OMGSH… I have been baking for…..12 years now and am just now reading this?! Your article should be mandated!!! Paula and Martha are slacking!!!
Thank you!
Hello,
Your control recipe looks different in some photos. For example, in the photo where you’re using the Silpat and Stoneware, your control cookie flattened with the chocolate chips protruduing. In the photo where you compared the extra flour, melted butter, etc., your control cookie (assume it’s the baking soda) is much thicker and lighter in color.
Why do you think this is?
I started my own experiments yesterday and was surprised at how my cookies looked different than yours. It made me wonder how humidity (I live in Atlanta.) and various ovens affect baking. I’m not sure if you touched on that in any of your blogs, but it seems important to mention.
Suffice it to say, it may be more accurate to call your “ultimate” cookie recipe “my kitchen’s ultimate” cookie recipe. 🙂 I think every kitchen produces a slightly different cookie, and everyone needs to do their own testing to find THEIR perfect recipe.
(Although….this still doesn’t help me figure out why your control cookies look different.)
I’d love for you, or anyone, to chime in!!!
Thanks,
Jennifer
I use stoneware all the time for baking and you aren’t supposed to ever use parchment on them! They still bake different though. You have to leave them on the stoneware to cool before removing. They will set up A LOT. Then they don’t fall apart. Also, they WILL brown on stoneware. I’m thinking your parchment kept that from happening or else you just didn’t bake them long enough. As another person said, it’s best to have two stones to alternate so you always have a cool one.
Wow! I can’t imagine how much time all of your testing takes. I tried two cake recipes this weekend to compare (egg yolks in one, egg whites in the other). I was in the kitchen for four hours. 🙂
You’ve done exactly what I’d like to do. Thanks!
I’m on a mission to find (or, perhaps create) a great choc. chip cookie recipe and a great cake recipe.
Thanks!
Jennifer
I use a Vollrath cookie sheet with Silpat. My cookies seem to turn out even better. Prev., I used a jelly roll pan, but losing the sides of the jelly roll seem to help get nicer cookies. Also, this recipe is delicious. Better than Tollhouse! Not an “eveyday cookie” by any standard. Worth a try.
http://bakerbynature.com/everyday-chocolate-chip-cookies/
This is for Gerry Eaton. Swans Down Cake Four is still being made. I saw it at Walmart today. It was on the shelf with the other flours. Its in a box. The box is shaped like a small, regular size cereal box. Today is Feb. 23, 2015. Just thought you would want to know.
Fab posts! My daughter and her friend started to work their way through the variations and then we lost the link… They’re back on the task now though 😀 Can I ask which variation is your favourite?
WOW! Thank you for these 4 posts! Very informative and helpful. I love the detail you go into on each recipe variation!
Any idea what happens when you use too LITTLE butter? or substitute the butter with vegetable oil?
thanks!
Hi I was wondering if the correct recipe we are trying to achieve is the control recipe or another one.
Also on your charts above you show pictures with baking powder/baking soda do these charts reflect too much too less? Maybe I am not reading correctly however if more detail was available with the photo chart it would be helpful.
Why haven’t you answered my question?
Hello! I would like to make some delicious chocolate chip cookies for my boyfriend’s birthday next week and I would like to use the following adjustments, could you tell me if this would work? :
1/2 butter 1/2coconut oil
1/2 granulated white sugar 1/2 brown sugar
1/2 baking soda 1/2 baking powder
one extra egg yolk
And: butter at room temperature, creaming for max. 2minutes, refrigerate batter for 24-48 hours.
Would all of this work or is this just total overkill haha? Me and my boyfriend love chocolate chip cookies which are gooey, slightly crispy but not too hard.
Thank you so much for your guide, so insightful!
I haven’t made those adjustments all together but I think they’d work! Let me know how the experimenting goes 🙂
I am going to be baking cookies for the first time in a very VERY long time this weekend, and I was inspired by this post.
I would like to use two of your tests together.. bread flour, and baking power AND baking soda… Will that work okay? I am looking for a crispy, but chewy cookie. The description from both of these sound right. But will combining them come up with a totally different kind of cookie?
I enjoyed this post but my question is, now that you have shown me what I have done wrong (melted/too warm/over creamed butter) so I know better what to do next time … Is there a way to fix the already completed batter?
Probably not – there’s really nothing that can be done to fix most problems. The only thing you could do would be to chill the dough which might help with butter that was too warm and *maybe* overcreamed butter. One of the best tips I’ve learned in baking is when you realize you’ve made an critical mistake, it really is better to just start over fresh instead of attempting to salvage.
I forgot to add the butter in my recipe, 2 sticks cream with the sugars. Thank-you Gerry
I’v been making chocolate chip cookies with Swans Down self-rising cake flour , They stop making it. What should do now? Here is my recipe
5oz. white sugar , 9oz brown sugar, 1 Tlbs. van. 2 eggs 14 oz. self-rising cake flour 3/4 tsp baking soda Sift together flour and baking soda chocolate bits . This recipe was handed down from my mother. My kids are upset that I can’t seem to make them any more. I hope you can help me out. THANK- YOU
GERRY
I hope you can help.. I have been baking these cookies for years and now when they come of the oven ..the chocolate morstle is not at all soft or gooy. I know they are supposed to hold its shape but they are dull in color and not at all soft…the morstles.
I’ve tried everything.
Nicole
Whenever I use my baking stone for cookies (rarely), I have to wait for the stone to cool in between batches. It’s really annoying for large batches but whenever I want to make a quick batch for myself (rarely, unfortunately dieting), I use my baking stone because I LOVE the results.
AMAZING! I loved reading your 4 parts. I use stoneware from Pampered chef but cookies are the only things i ever preheat for. I let it cool a bit, but not even close to room temp to make even well baked cookies. I do cook a bit longer on some cookies because my husband likes his cookies very crispy. My cookie sheets are so well seasoned they are black so there is minimal sticking. I too will modify my go to recipe based on your observations. Can’t wait to try!
Wow! What a ton of work you put into all of this! Something that I saw in another recipe that I came across on Pinterest was the addition of powdered sugar to the recipe. The recipe had 1/4 Cup Granulated Sugar, 6 Tablespoons of Brown Sugar, and 2 Tablespoons of Powdered sugar…and this cookie seemed to have a crackled top revealing almost a gooey center…very similar looking to the Paradise Bakery Cookie…it would be really fun to see the results of that sometime! Do you have any thoughts on this at all?
This has been so informative! I just got done baking a full batch with 2 sticks of unsalted butter at 375 degrees – and they spread too much. I even added 2 tbsp. extra flour. They’re soft and chewy but i want light and fluffy. I’ve used butter flavored Crisco in the past (but was out today) – this has its own issues – too crispy unless I add some extra tbsps. of water. Next time I’ll try less white sugar and no baking soda. Thanks so much for all the work you put into this research – i imagine you’re quite tired of chocolate chip cookies for now!
I can tell you why the stoneware one didn’t cook properly – thermal conductivity. The stoneware has a high conductivity to the dough. This means that the bottom of the dough will stay at the temp of the stoneware. Since the stoneware was at room temperature it acted like an insulator from the heat on the bottom. Air has low conductivity, so the air takes a longer time to transfer the heat to the cookies. That is why the cookies basically cooked from the top and the bottom didn’t brown up. If you preheated the stoneware the opposite would happen. The bottom would brown up first while the top was still uncooked. That’s why I use thin nonstick cookie sheets. They heat up very quickly and give a nice brown underside to the cookies.
This 4-part series was insanely helpful – thank you! Been wanting cookies to be puffier and softer but didn’t have much idea what to try other than more flour. Will switch to bread flour and all brown sugar and see how it goes.
Add in a teaspoon or two of cornstarch as well!
I use stoneware exclusively for all of my baking. It just works better. I do not use anything extra and cleaning is never more complicated than wiping it down and rinsing it off. I’ve never had food stick or cookies look like the results you had with using the parchment. One tip when doing multiple batches of cookies, use more than one stone. That way the stone you just removed from the oven has time to cool before being reloaded with food to go back in the oven. I use Pampered Chef stoneware because they are easy to find in multiple sizes and shapes and reasonably priced. Do try it again without the paper, just the food on a well seasoned stone. You won’t regret it.
Loved you cookie r&d articles, and in agreement with the rest if the universe, I’m so happy someone finally did this! I tried out the baking soda / baking powder cookie (Part 1) and I’m treasuring that recipe till death! I have a question: after having read Part 4, I realized I did a total of 9-10min of creaming the butter & sugars. But I baked the cookies 24 hours after, and I thought they were great, if not a bit airy. Does the 24 hour wait affect the airiness of over beating at all?
Thank you! Interesting question. I’d venture to guess that the wait does reduce the affect of creaming, I’m sure the air bubbles created dissipate to some extent. Not to mention the affect of the leaveners is slightly diminished through chilling.
Which recipe would be the best soft chewy chocolate cookie recipe?
I have a recipe for Soft Batch Chocolate Chip Cookies here: https://handletheheat.com/soft-batch-chocolate-chip-cookies/
Wow! Great information! Any advice or experience if using white chocolate and macadamia nuts instead of nestle chips? Just wondering if/how much differences in chocolate types or brands or other additions such as nuts affect outcome?
Thanks Carolyn! You can use any type of nuts or chips you’d like as long as the pieces are about the same size as a chocolate chip and you use the same amount of cups called for in the recipe. I do think the type of chocolate and brand does have a small affect on the outcome – quality ingredients will always taste better!
Great post! Maybe you can help me figure out a mystery. Long time ago, my mom made a batch of chocolate cookies using the recipe on the back of the bag. She forgot an ingredient. We ended up with buttery flat cookies.They spread so much that they completely covered the metal cookie sheet. Difficult to handle, but very good. Any idea what she could have forgotten? I think she said something about salt or baking soda. Thanks for your time!
Sounds like the baking soda was left out, that would have helped leaven the cookies and give them lift and structure! Also, if the butter and/or dough is too warm or too wet (not enough flour) that can cause the cookies to spread more.
great post! Thanks for doing all the experimenting for me!! One thing that I’ve learned the hard way is to use Baking Soda that is FRESH! If I can’t remember the last time I bought any, then I know it’s time to buy some fresh. NO PULLING FROM THE REFRIGERATOR! Fresh baking soda makes a huge difference!
Nice experimenting! Alton Brown has a Good Eats episode from way back on CC cookies. He starts with the Toll House Recipe ang goes through the changes needed to do cakey, chewy, and crispy versions – kind of flour, kind of fat, temp, etc. and why. I think you’d like it:-). Here’s the YouTube chewy excerpt http://m.youtube.com/watch?v=RUkYhPM2Yns
I was wondering if you’ve experimented at all with nonstick cookie sheets WITHOUT a Silpat mat or parchment paper. Right now I’m using this one without anything on it: http://www.amazon.com/gp/product/B000FN9V6G/ref=oh_details_o03_s01_i00?ie=UTF8&psc=1, and my cookies seem to come out fine…most of the time (any problems were probably due to technical issues on my part), and they practically slide right off of the sheet. If it’s already nonstick, is there any reason to use either a Silpat mat or parchment paper in terms of how the cookies will turn out?
Thanks for all your tips! They’ve been very helpful.
just this week, i made the same recipe twice with drastically different results. clearly, i didn’t follow the recipe carefully both times. i remembered seeing a pin from your blog and so i searched for it (and pinned it!) my guess is that i didn’t measure the flour exactly the same both times and when i melted the butter, perhaps it was too warm and mixed with the other ingredients in a different order. i had no idea it would make such a huge difference. now that i have this reference, maybe i can pick one method and be more consistent with it. thanks for all your work!!
It’s pretty crazy how the tiniest difference in ingredients/measurement/techniques can make a humungous difference in the final result. I’m so glad you found this post helpful!
Wow, this is so great! I’m so glad that someone finally did this, it is so useful. I’ve been dying to get the nice, soft, chewy cookies for years, and I think this guide will really help. I want to get into the kitchen right away to try some of these out!
Yay! I hope you have fun experimenting in the kitchen 🙂
I have a FAN Oven (Convection), I notice in a lot of recipes the temperature is decreased for a FAN oven, would you happen to know the best temperature to use when making chocolate chip cookies in this type of oven? Thanks! 🙂
This is cool. I’ve always wanted to do some sort of comparison test like you have done but, never seem to find the time. I don’t know if you’re an Alton Brown fan or not but, years ago he did a Good Eats Episode (I believe it was called ‘Three Chips for Sister Marsha’ or something like that) in which he took the Toll House recipe and changed out certain ingredients to make fluffier cookies, thin-crispy cookies and, of course, normal cookies and explained the how/why they turned out the way they did. Your tests reminded me of that episode but, went deeper.
Anyways, thanks again.
Thank you! I’m an Alton Brown fan and he’s definitely an inspiration for these series 🙂
Wow! This is amazing! Thanks for putting all the work into this! It’s very helpful. I’m a big fan of the good old Toll House recipe. I use a Silpat and airbake cookie sheet and it works great for me! 🙂 I agree on chilling the dough… I have been doing this lately and it keeps them from spreading out too much! Thanks again!
Thanks for reading!
This was so much fun to read! From reading this series, I’ve decided that I want to add baking powder, use more brown sugar, chill the dough 24 hours, use bread flour and possibly some whole wheat flour. I’m curious which of the outcomes you would combine for the perfect Toll House Chocolate Chip Cookie?
Hi Cindy! Thanks so much! I’ve actually created an Ultimate Chocolate Chip Cookie recipe based on the results of these experiments: https://handletheheat.com/2013/10/ultimate-chocolate-chip-cookies.html
Well now I know that it’s the creaming duration that suprises me on occasion with odd cookies. Also I use an insulated pan with silipat everytime. This allows for more time to catch an error compared to a regular pan with parchment. I burn less cookies this way and I like that they spread so uniformly.
Glad you learned a little something! The insulated pans do spread SO uniformly don’t they?
You know I just love these posts! Nicely done!
Thanks Annalise!
Love these posts, now I need a batch of chocolate chip cookies!
I wonder if the problem with baking the cookies on stoneware was using the parchment paper. When I bake cookies on stoneware, I also use a room temperature stone, but I do not use parchment paper. I think the texture of the stoneware will prevent the kind of spread you saw. I think I also bake them a little longer because it takes longer for the stone to heat up than for the metal pans.
Interesting thought! I wanted to keep things consistent since I used parchment paper for each batch (besides the Silpat of course) but I might try to bake directly on the stone the next time I have cookie dough on hand. It did seem like they required a longer baking time. Thanks for your comment!
Wow, this was such a great read. Thanks for putting in all of the hard work and sharing the results.
Thanks for reading! 🙂
I enjoyed reading all four posts regarding chocolate chip cookies and variations. My homemade cookies sometimes turn out with a sponge-like texture. Do you know what would cause this? I follow this recipe, use all purpose flour, and parchment paper or nonstick baking mat on my cookie sheets.
Hmm… is it the same or similar recipes that are resulting in the sponge-like texture? Try using a recipe that calls for baking soda instead of baking powder. Also I would try weighing the flour to ensure it’s being accurately measured. Sometimes too much flour can lead to a more cakey, spongey texture. Lastly, you might try using a recipe that calls for melted butter instead of creaming the butter and sugar together because melted butter often produces a more chewy and crisp texture. Here’s a recipe for a cookie using melted butter: https://handletheheat.com/2013/02/quick-easy-chocolate-chip-cookies.html
Hope that helps!