


Tessa Arias, Chef and Cookbook Author
This post may contain affiliate links. Read our disclosure policy.
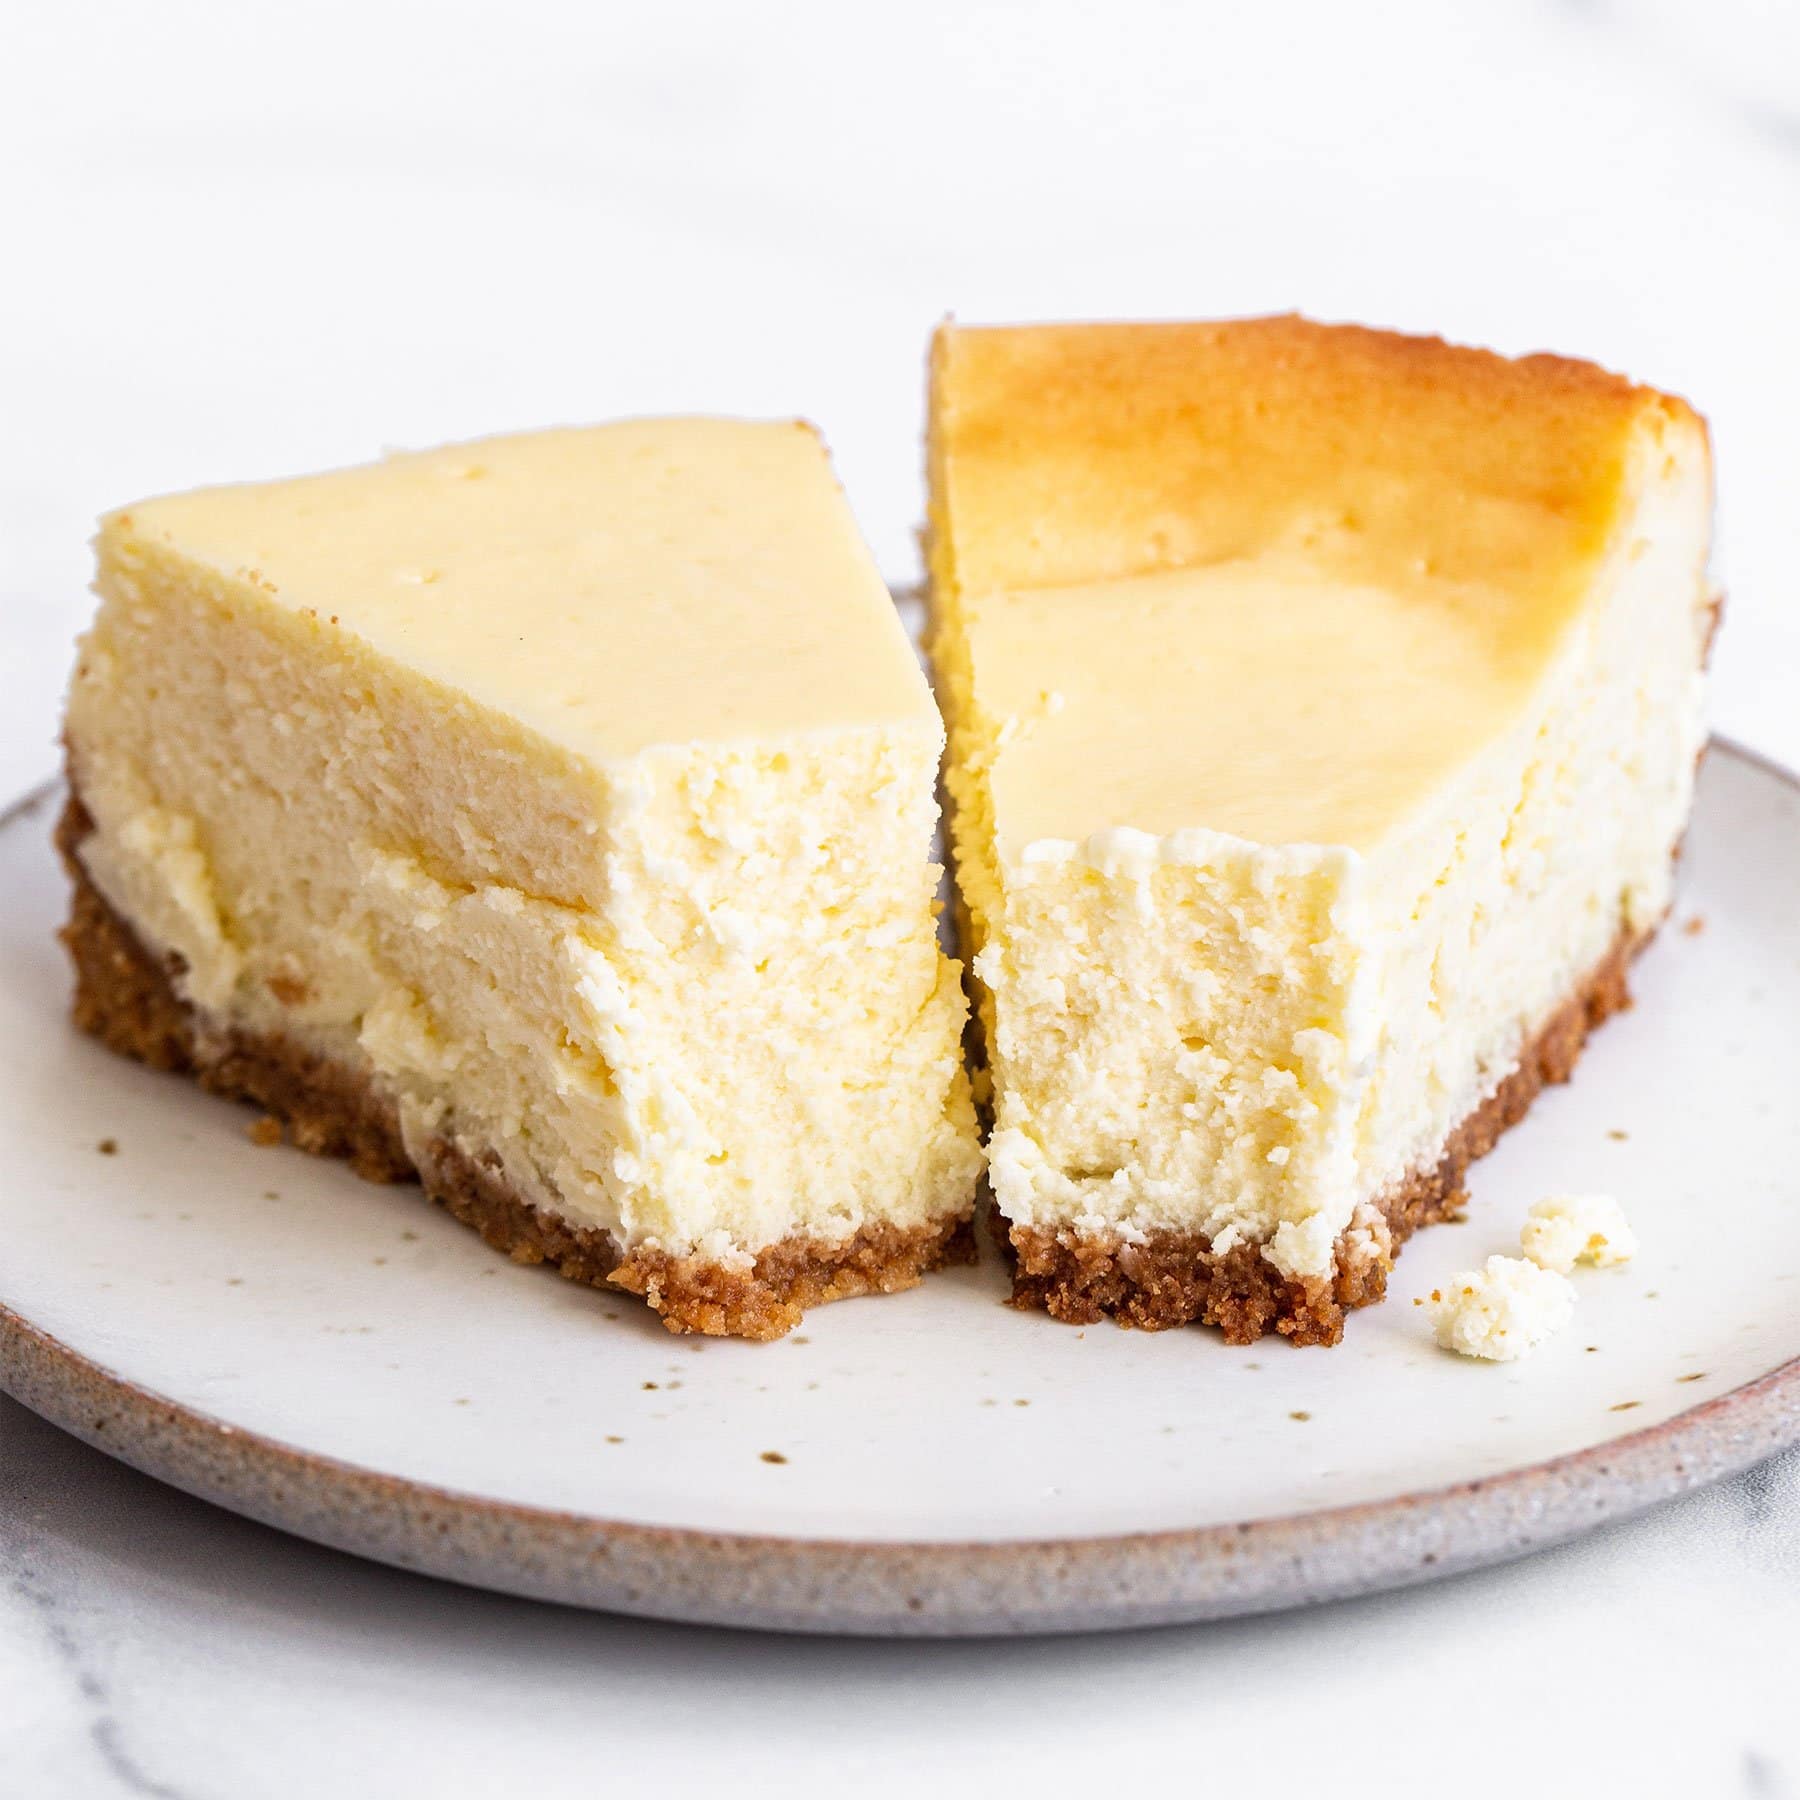
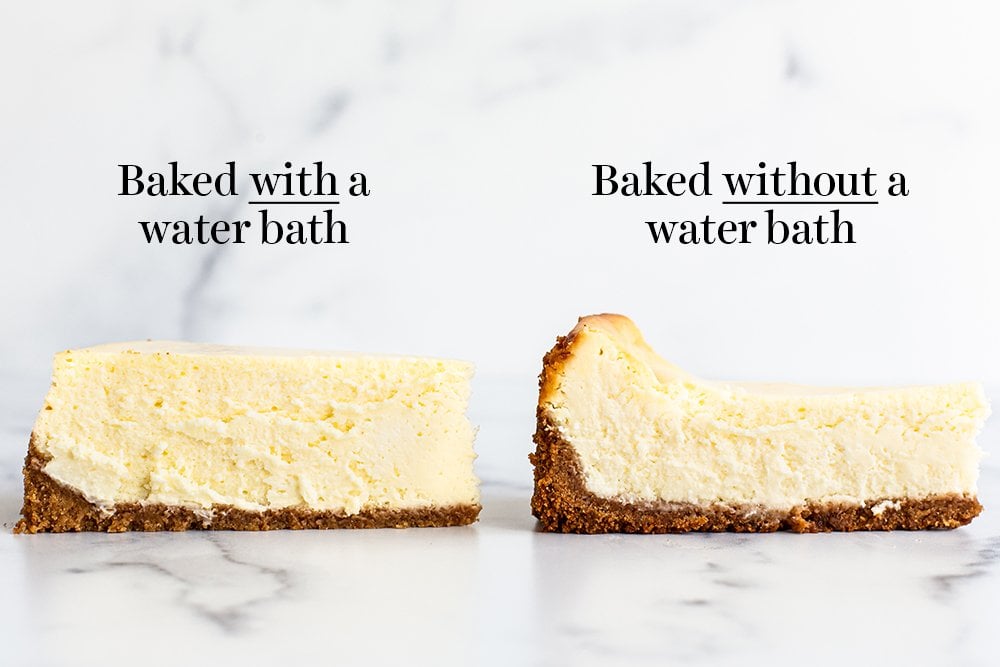
It can be so frustrating to put time and effort into baking a cheesecake, only for it to crack all over while baking. The solution? Baking the cheesecake in a water bath!
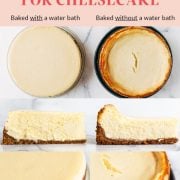
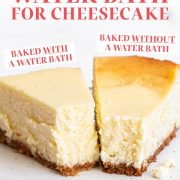
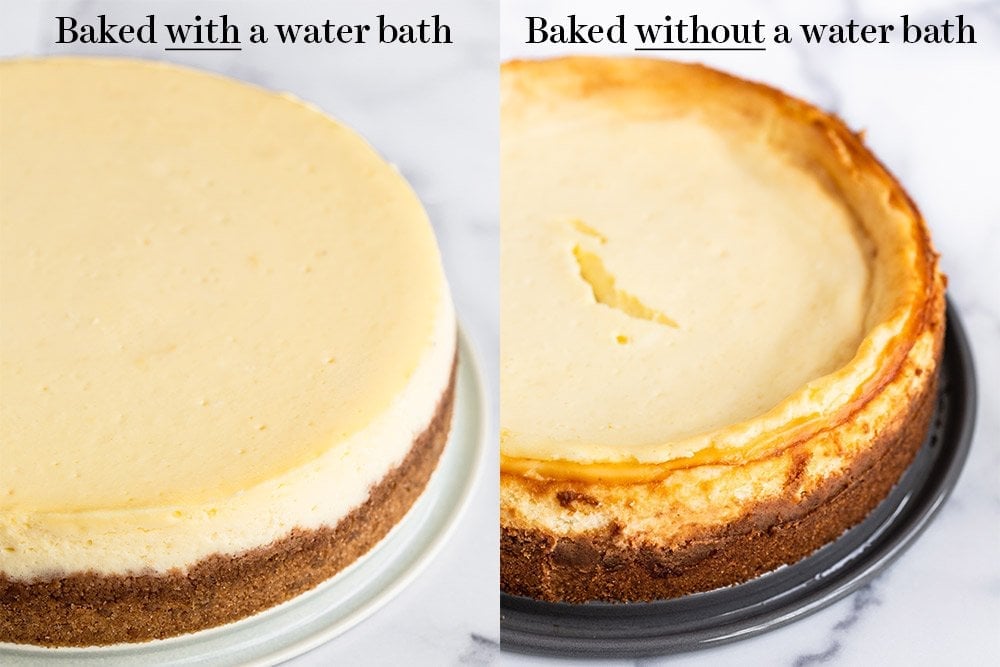
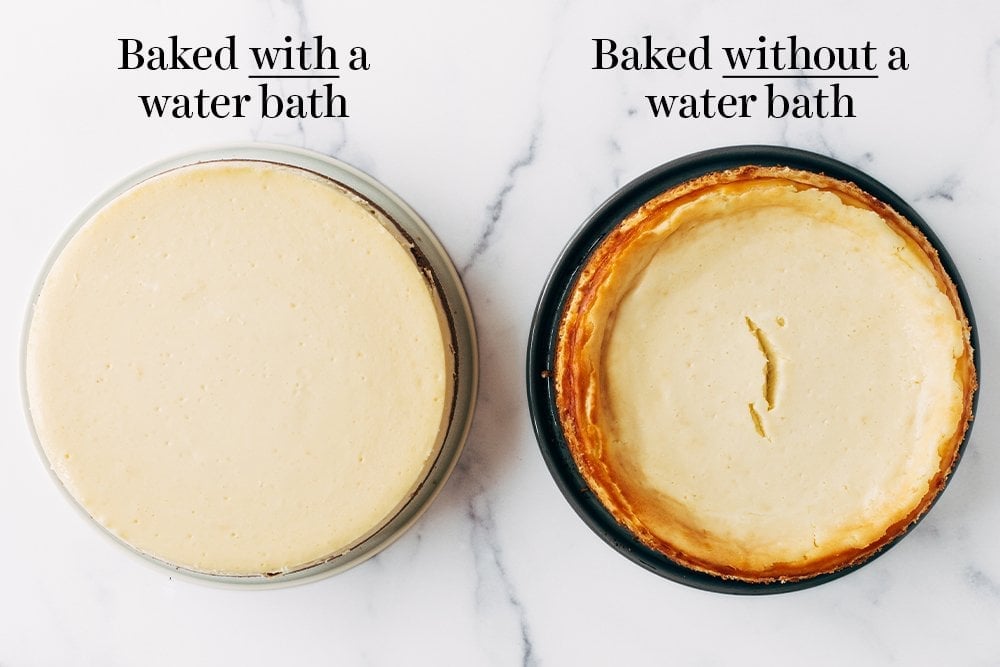
As you’ll see in my side-by-side comparisons below, cheesecake baked in a water bath is SO much smoother and creamier than cheesecake baked without a water bath.
I’ve included step-by-step instructions and all my tips and tricks for making a professional quality water bath, so you can make the perfect cheesecake.
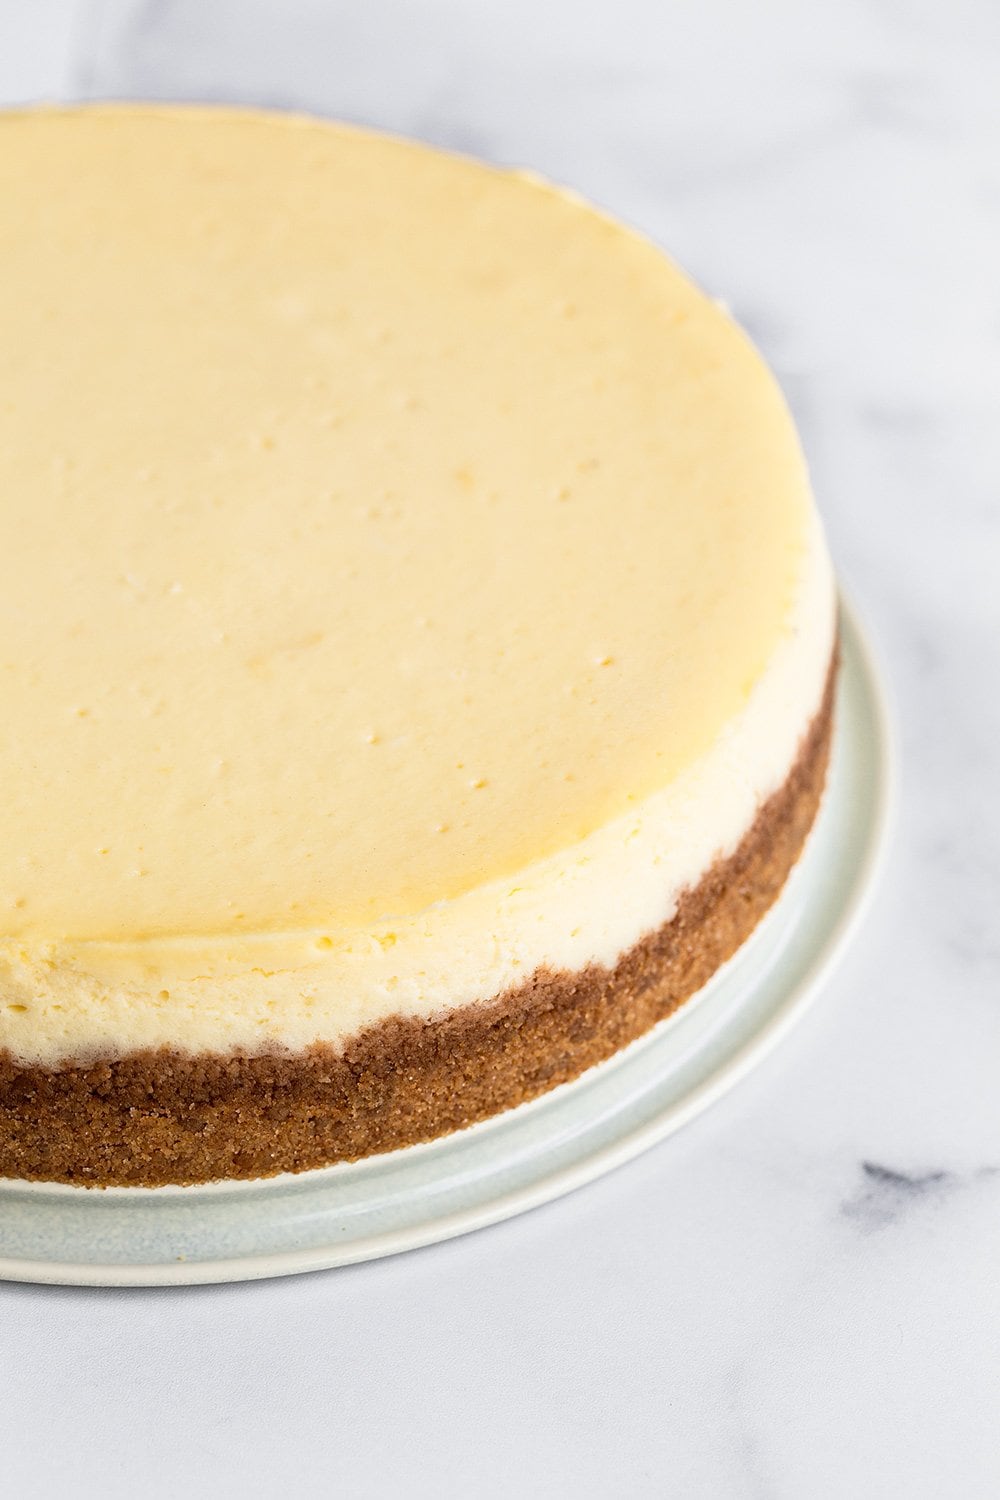
No cracks. No uneven baking. No sunken centers. No water seepage or soggy bottoms. Just a silky-smooth, stunning cheesecake that’s 100 times better than The Cheesecake Factory.

Sprinkle of Science
Tips for Cheesecake Water Baths
What is a Water Bath?
A water bath is a method for gently baking a cheesecake in its pan inside another pan filled with boiling water in the oven. It’s also called a bain marie. It’s used for a lot of custard preparations, such as flan and crème brûlée. Cheesecake is essentially a custard (not a cake!) since it’s so rich with dairy and eggs.
Why is it Important to Bake Cheesecake in a Water Bath?
The number one key to perfectly smooth, luscious, and creamy cheesecake that bakes evenly and without cracks? Low and gentle heat!
A water bath is the best way to ensure this baking environment. Even when you set your oven to 325°F to bake a cheesecake, the temperature inside the water bath generally won’t exceed 200°F.
This low and gentle heat evens out the baking so that the outside of the cheesecake doesn’t become tough, rubbery, burnt, or curdled before the inside can finish baking.

Cheesecake Baked in a Water Bath vs. Cheesecake Baked Without a Water Bath
A water bath is truly the best way to bake a flawless cheesecake. Just take a look at the side-by-side comparison pictures below!
When to Use a Cheesecake Water Bath?
You can use a water bath for any full-size cheesecake recipe. Especially Classic Cheesecake, or any recipe where you really don’t want cracks.
When You Don’t Need a Water Bath
You don’t need one for cheesecake bars, mini cheesecakes, and, of course, no-bake cheesecake recipes. Bars and mini cheesecakes are thinner than a normal cheesecake, so they cook more evenly.
How to Use a Water Bath When the Recipe Doesn’t Call For One
If the recipe doesn’t call for a water bath, you don’t need to use one.
However, if you want all of the amazing benefits listed above, then simply prepare the water bath as directed below. Since the water bath cooks more gently, you’ll likely need to increase the baking time. Generally, you can bake at 325°F for about 1 hour 15 minutes, depending on the volume of cheesecake batter.
Equipment Needed For a Water Bath
- A high-quality springform pan: Even the best springform pans aren’t truly “leakproof,” no matter what their packaging claims. However, it’s important to have one that’s heavy duty and high quality for durability and to avoid rusting.
- Larger baking pan, cake pan, sauté pan, or roasting pan: This is the water bath pan, so it must fit the springform pan comfortably inside. You can also use a large disposable foil pan placed on top of a rimmed sheet pan. If you don’t have a pan big enough, I’ve listed some alternative options at the bottom of this article.
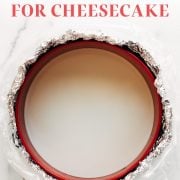
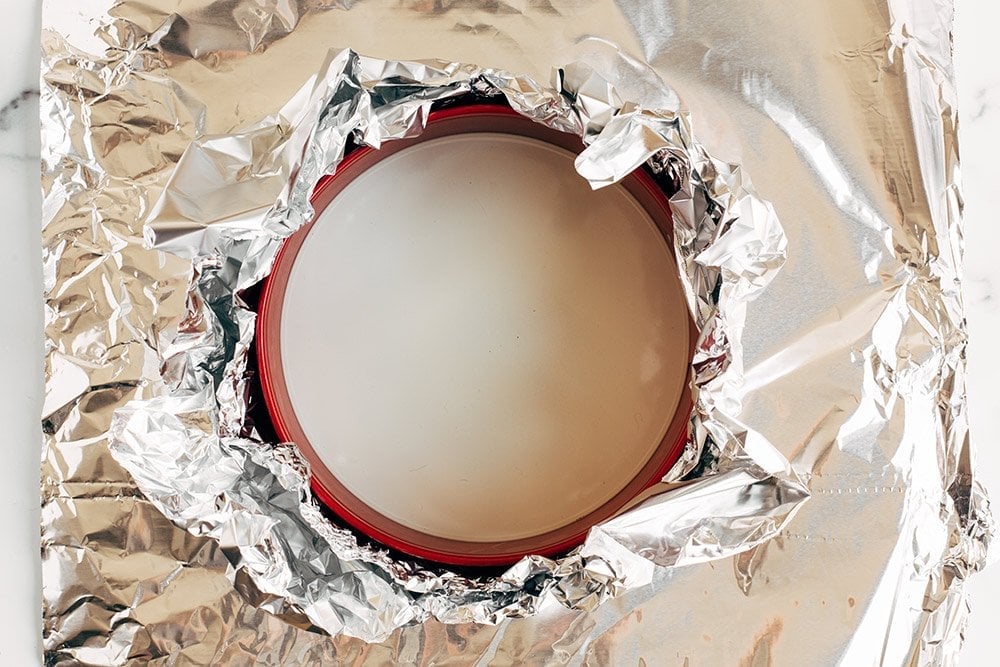
- Wide heavy-duty aluminum foil: This helps prevent leaks. I usually buy this from Costco. It’s important for the foil to be wider than the diameter of the springform pan so water doesn’t seep through the seams and cracks of the foil.
- Heat-safe oven bag or slow cooker bag: This is an optional bonus. Wrapping the springform pan in a heat-safe oven bag really helps ensure no water seeps in! Much more foolproof than foil. I like to use BOTH to truly seal off the water.
- Boiling water: A kettle with a spout is the best way to quickly boil water and safely pour it into the roasting pan without splashing any in the cheesecake batter.
How to Prevent a Water Bath From Leaking
Using a high-quality springform pan, wide heavy-duty aluminum foil, and an oven bag is the best way to all but guarantee you won’t have any leaks!
Alternatives to Using a Cheesecake Water Bath
These methods are perfect if you don’t have a roasting pan large enough to comfortably fit your springform pan inside – just note that they may not produce quite as smooth, crack-free results as using a water bath.
1. Low Heat & Slow Baking Time
Since the effect of the water bath is to cook the cheesecake custard filling slowly and gently, an easy alternative is to bake the cheesecake without the water bath but in a 275°F oven for 1 hour 45 minutes. This technique can be a bit tricky and not always a guarantee against cracks if your oven is older, as shown in the comparison below:
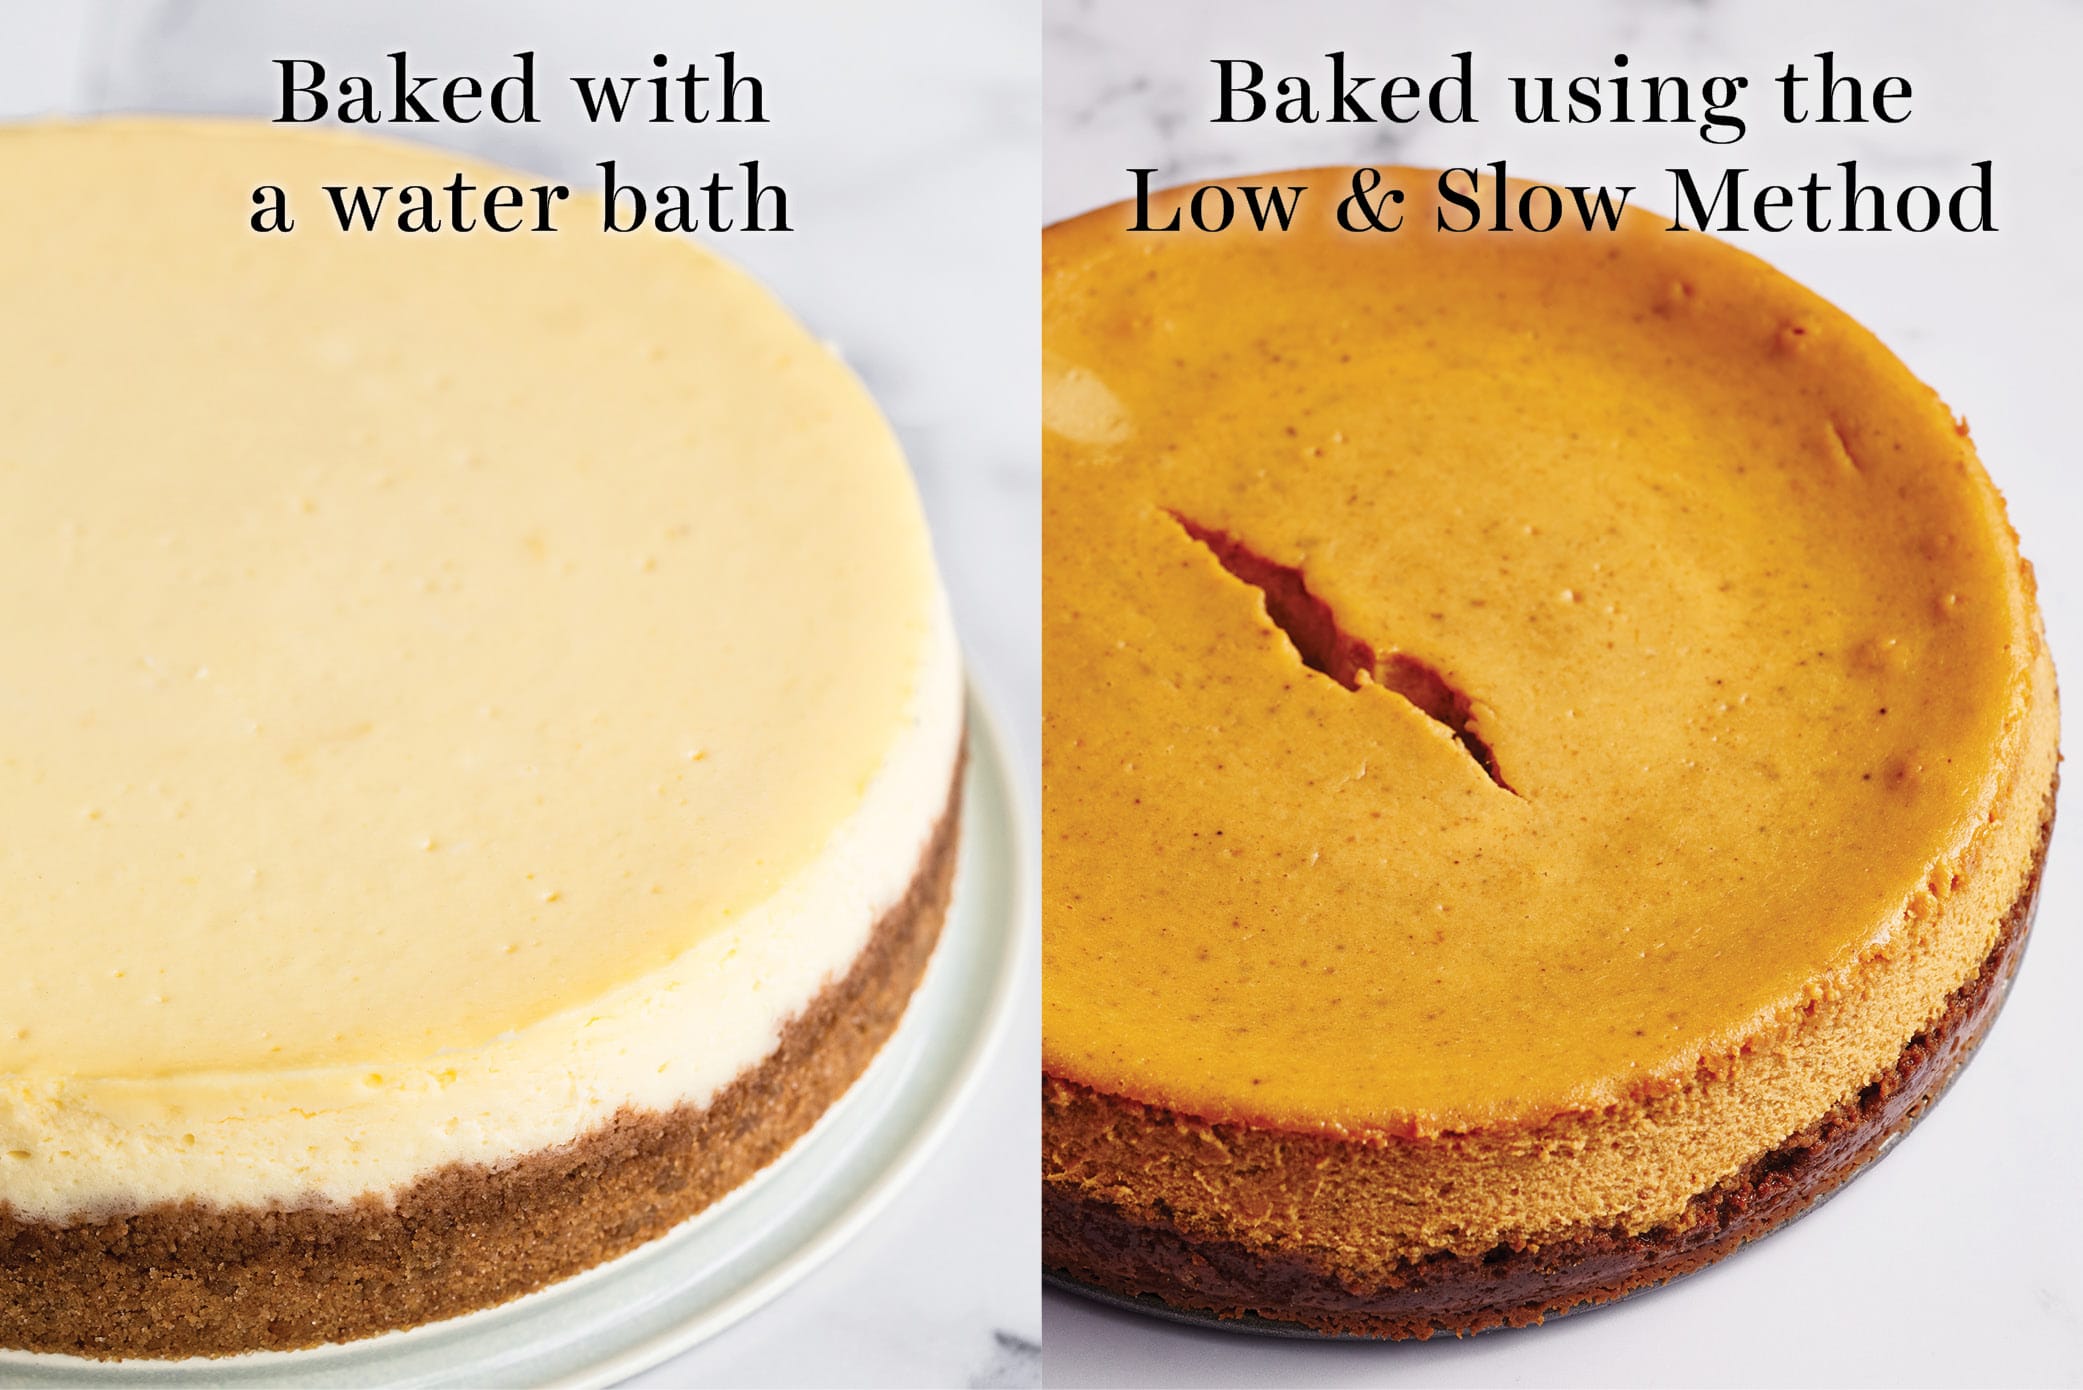
On the left is my Classic Cheesecake recipe baked with a water bath. No cracks. On the right is my Pumpkin Cheesecake recipe baked low and slow. You can see a crack still formed.
Interestingly, when I use the “low and slow” method in my home oven with my 5-year-old electric oven, the crack is usually pretty minimal.
However, when I used this method at my photographer’s house with her older oven, the crack was more pronounced.
So if your oven is old and doesn’t maintain a low temperature consistently and accurately, this may not be the best method for you. However, if you have a newer or more accurate oven then this may be perfect for you!
Not sure how accurately your oven maintains temperature? Check out my Ovens 101 article here.
2. Tray of Water on the Bottom Oven Rack (Beneath the Springform Pan)
This is perfect if you don’t have a large enough pan to act as the water bath vehicle. OR, if you don’t have heavy-duty aluminum foil or oven bags and are worried about water leaking in.
Simply place a tray of boiling hot water on the bottom rack of your oven, beneath the middle rack where your springform pan bakes.
Even though you’re not baking the springform pan directly in water with this method, it’s still a good idea to wrap the pan in foil to help shield it from the oven’s heat.
Delicious Cheesecake Recipes to Try:
- Ultimate Classic Cheesecake – the perfect creamy, classic cheesecake!
- Ultimate Peanut Butter Cheesecake
- Lemon Cheesecake
- Oreo Cheesecake
- Death by Chocolate Cheesecake
- Pumpkin Cheesecake With Biscoff Cookie Crust

Email This Recipe
Enter your email, and we’ll send it to your inbox.
Ingredients
- 1 high-quality springform pan
- 1 larger baking pan, cake pan, sauté pan, or roasting pan
- wide heavy-duty aluminum foil
- heat-safe oven bag or slow cooker bag
- boiling water
Instructions
Bake your graham cracker crust:
- Prepare your crust, press it into your springform pan, and bake as the recipe directs. Let cool completely. You can do this step first if it’s awkward to press the crust into the pan with the foil already wrapped around it. Also, the oven racks can pierce your foil wrapping which defeats their entire purpose.
- Alternatively, you can wrap your pan in foil & bag before pressing in the crust if you don’t want to wait for the pan to cool down completely after baking the crust to prepare the water bath. It’s personal preference, either way will work.
Prepare your springform pan:
- To seal off the springform pan, place a large square of heavy-duty aluminum foil underneath the pan. You want the wide heavy-duty stuff that creates bigger sheets of foil to completely encompass the base of the pan. Gently fold the edges up and around the pan. Repeat twice so there’s three sheets of foil, to ensure a waterproof seal.
- Optional Bonus Step: Place the foil-wrapped springform pan inside an oven bag. Roll down the oven bag and fold the top down so it’s flush with the edge of the pan.
- Bring your kettle of water to a boil.
- A kettle is really the best option since you’ll avoid spills and splashes. If you don’t have one, bring your water to a boil in a pot then pour into a large heatsafe glass measuring cup with a spout.
Prepare your water bath pan:
- Once your crust is cooled and your water is boiling, pour the cheesecake batter into the cooled springform pan. Place the springform pan inside your bigger water bath pan. Place both pans on the middle oven rack into the preheated oven.
- Carefully pour the boiling water into the water bath pan, pouring only halfway up the sides of the springform pan. You want enough water that it won’t evaporate, but not so much that it’ll splash into your batter.
Bake as the recipe directs:
- When baking a cheesecake in a water bath, the directions are generally to bake at 325°F for 1 hour to 1 hour and 15 minutes. The cheesecake is done when the top looks dry but the center still wobbles and jiggles like jello. It should not be liquidy at all.
Turn off the heat and crack the oven door to cool:
- This step is optional, but further helps to prevent cracks from forming. Turn off the oven, crack open the oven door (a wooden spoon can be helpful to keep the oven door open), and allow the cheesecake to cool inside the oven undisturbed for 30 minutes to 1 hour.
Remove the springform pan:
- Carefully remove the springform pan from the water bath. Unwrap the foil and transfer the pan to a cooling rack. Run a thin-bladed flexible knife around the edge of the cake to make sure it's not sticking to the sides (which can cause cracks as it cools).
Cool, then chill:
- Let the cheesecake cool completely to room temperature on the rack before moving to the fridge to chill. Once chilled, remove the springform pan and serve.
Photos by Ashley McLaughlin.


Can you make a cheesecake in a regular pan?
Hi Joy! Generally, cheesecake is made in a springform pan for easy removal of the cheesecake from the pan. You could use a regular pan (as long as it’s the same size as the springform pan listed in the recipe), but it won’t come out as cleanly or look as pretty. We recommend using parchment paper with tabs like these, so you can more easily remove your well-chilled cheesecake from the pan. I hope that helps! Happy baking 🙂
I agree with you COMPLETELY that water bath baking is THE BEST way to make a cheesecake. I too have had those ugly surface cracks occur, then it has to be be topped with fruit or something to cover it up. May I suggest forgetting about wrapping in tin foil and oven bags and just use an Easy Bath Cheesecake Wrap- silicone springform pan protector that will not allow water into the springform pan. Period, end of story!
I’m out of town for a month and my
son in law asked me to make a cheesecake.
I went straight to Handle the Heat
( of course!)
I have NEVER MADE such a perfect cheesecake . I used the water bath method which was easy and in the end was beautiful.
The cake tasted so creamy and the best cheesecake ever!
We are honored you came here first, Karen! So glad the cheesecake turned out so perfect 🙂
What temperature and how long do I bake when I mix cake batter with cheesecake batter?
It worked!!, I followed your instructions to a tee. My cheesecake recipe has 8 ounces more of cream cheese. It required more baking time. No cracks!! Thank you!
So glad to hear this worked for you, Lisa!!
When I make a cheesecake, I never prebake the graham cracker crust. I press the graham cracker crust into the pan and fill with the cheesecake mixture and bake. Won’t the graham cracker crust be overcooked ?
Hi Lisa! It does not get overcooked in our experience, but feel free to skip that if you prefer! Happy baking 🙂
Hi
My oven is a gas conventional oven which have 2 racks only, fire on top & bottom.
If i choose to put another pan with water in rack under cheesecake pan, it mean i must put the cheesecake pan in top rack which close to the fire. The space between fire & rack is very close less than 15 centimeters.
Which fire should i use to bake? Top & bottom?
Could you suggest where can i get the oven heat bag please? Any link of your preference bag? Itsnot available in my country.
Thanks
Hi Ashlee! Just to clarify – the foil-wrapped cheesecake pan goes inside the bag, and all of that goes inside the water bath, so the cheesecake bakes sitting inside the water bath. The foil and bag are there to protect the cheesecake from getting wet while it bakes inside the water bath. I hope that makes sense! I would recommend baking on the bottom rack, if the top is very close to the heating element, and also I would recommend dropping the temperature a little, because convection ovens tend to bake a little higher than regular ovens. Also, here is a link to the bags we are referring to. Please reach out if any of this doesn’t make sense! Good luck 🙂
Hi I tried this method and really surrounded the pan with foil. I didn’t use a roasting bag.
The cheesecake turned out great but the base was soggy . Can’t understand why as it was sealed really well
Hi Lavisha! I wish we could have been there baking along with you so I could say for sure, but is it possible your foil may have gotten punctured? How was the top of your cheesecake, did you notice any large, watery bubbles appearing on the surface or edges while it baked? Also, which way did you pre-bake your crust (baked as directed then wrapped in foil or wrapped the pan in foil prior to baking)?
Hi — thanks for this helpful recipe! I misread the directions and put the oven bag around the springform pan first, and then did the foil. My cheesecake came out perfectly, with no cracks, so no complaints at all.. But there was a lot of liquid in the oven bag. It looked like water rather than leaked batter. Either way, the liquid didn’t get to the crust. But is it likely that the bag wouldn’t have filled with liquid if I’d done it right and used the foil and THEN the oven bag?
Hi David! Hmmm…If I’m reading this correctly, it sounds like there may have been a rip or hole somewhere in your foil/bag. The foil and bag should completely prevent any water from not only reaching the springform pan, but they also shouldn’t fill with water themselves. Reversing and having the bag on the outside will help any leaks as long as there are no holes 🙂 Please let me know if I misunderstood your question. I’m so glad your cheesecake still turned out perfectly!
Do you have a recommendation for a pan for the water bath (the large roasting pan, not the springform pan). Thanks!
Hi Liz! We actually don’t have a specific recommendation for a large pan to use as it can literally be anything! Tessa has used her largest skillet or giant square cake pan (wedding cake size) if that helps 🙂
Hi Tessa
I would like to ask you something, if I have to bake 4 cheesecakes a day in a gas convection pastry oven, can you imagine all the work involved in having to line each pan with aluminum foil, and fill the oven with baking trays with
hot water, and the cost that this has?
Or is it that the water bath process only applies to home ovens?
Hi Luis! Water baths aren’t just for home ovens. The only alternative since you’re using a pro oven is to simply bake at a super low temperature for a longer period of time, but you’ll have to experiment with that.
If I am not using a springform pan, but a normal pan, should I wrap it with aluminum foil as well?
You shouldn’t need to with a normal pan. Springform pans have quite a few areas that water can leak into, unlike a regular pan 🙂 I’d highly recommend getting a springform pan for cheesecake though! It makes it so much easier to slice and serve, reducing the stress of breaking/damaging the cheesecake in the process.
I do own a springform pan. But it is 9 inch wide and I own a portable oven, that holds only a maximum of 10 inch wide dish. So trying to figure out how to fit everything in for a water bath. Thanks for the reply. Love your recipes, especially the lemon pound loaf cake. Greetings from India !
You could always try the suggested alternative of placing a tray of water on the bottom oven rack beneath the springform pan if that would be possible! Good luck! And thank you so much for your kind comment, I’m so happy to hear you love my recipes-I agree, the lemon pound cake is SO GOOD! 🙂
What kind of springform pan do you recommend? I’ve taken your advice on your cookie sheets & now I’ve gotta buy a new springform pan. Thanks
This one! Enjoy! https://rstyle.me/+oZK4A0VL7IuwkNNUbY7KJw