


Tessa’s Recipe Rundown
Taste: The combination of cookies and tangy cheesecake is a near-perfect pairing!
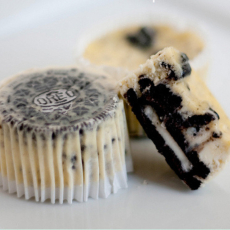
Texture: The slightly crunchy Oreo cookie on the bottom of each cupcake plus the Oreo bits suspended inside the creamy, sweet cheesecake goodness are the best part of this treat.
Ease: Way easier than you might think. Watch the video to see how they’re made!
Why You’ll Love This Recipe: Adorable little cheesecakes that are easy to make and even easier to enjoy!
This post may contain affiliate links. Read our disclosure policy.
Look no further than my Cookies and Cream Cheesecake Cupcakes for your next party!
Featuring a crowd-pleasing combination of luscious, slightly tangy vanilla cheesecake and sweet Oreo cookies, these adorable treats are the perfect combination of nostalgia meets sophistication.
Whether enjoyed at a party or just as a personal indulgence, Cookies and Cream Cheesecakes are creamy, slightly crunchy, and so darn tasty.
These mini cheesecakes are absolutely delicious, simple to make, and a total hit with adults and kids alike. Bonus: they’re super easy to transport, too!
If you’re feeling extra fancy, feel free to top each cheesecake cupcake with a swirl of piped-on homemade whipped cream and a sprinkle of crushed Oreos – but I think they’re super cute even without that.


Sprinkle of Science
How to Make Cookies and Cream Cheesecake Cupcakes
Baking Cookies and Cream Cheesecake Cupcakes
- Yes, 275°F is the right temperature!
- You want to bake these in a cooler oven to avoid having overbaked or cracked cupcakes.
- Bake these for 22 minutes, or until the cheesecake is set.
- If the batter is still slightly jiggly in the middle, that is fine.
- Err on the side of underbaking vs. overbaking.
- However, you may still need to add an extra minute or two of baking time if your oven runs cold.
- Learn more about ovens and why oven temperature is so important here.
Cupcake Liners
I ran out of paper liners in the making of this video, but definitely use them if you have them. The cupcakes will still turn out without them, but they’re much prettier, easier to transport, and easier to clean with them. I like to use these white paper cupcake liners so the Oreo on the bottom peeks through.
Chilling the Cookies and Cream Cheesecake Cupcakes
Allow the cupcakes to come to room temperature before chilling in the fridge for at least 4 hours. I like to chill overnight.
Can I Substitute the Sour Cream?
You can substitute full-fat plain Greek yogurt for the sour cream if you can’t find sour cream where you live. I do prefer the flavor sour cream brings to these cheesecakes, but yogurt will work in a pinch.
What Type of Cream Cheese Should I Use?
- Be sure to use blocks of full-fat, high-quality cream cheese.
- Do not use reduced fat or your mini cheesecakes may be watery, rubbery, or otherwise lackluster.
- Definitely don’t use whipped cream cheese or cream cheese meant for spreading on a bagel.
- Opt for the best brand you can find as some generic brands have too much water content.
How to Store Mini Cookies and Cream Cheesecakes
- Since these are made with cream cheese, they need to be stored in the refrigerator.
- If you plan on bringing them to a party or potluck, that’s fine. Just be aware that they shouldn’t sit at room temperature for an extended period of time.
- Store in an airtight container in the fridge for up to 3 days.
Can I Freeze Mini Cookies and Cream Cheesecakes?
Wrap each cheesecake cupcake well in plastic and store inside an airtight container in the freezer for up to 1 month. Defrost in the fridge overnight before serving.
More Recipes You’ll Love
- Homemade Oreos
- Oreo Cheesecake (full-sized cheesecake!)
- No-Bake S’Mores Mini Cheesecakes
- Cheesecake Bars
Email This Recipe
Enter your email, and we’ll send it to your inbox.
Ingredients
- 21 Oreo cookies, 15 left whole, 6 coarsely chopped
- 1 pound (2 8-ounce packages) cream cheese, softened to room temperature
- 1/2 cup granulated sugar
- 1/2 teaspoon vanilla extract
- 2 large eggs, at room temperature
- 1/2 cup sour cream, at room temperature
- 1/8 teaspoon fine sea salt

Instructions
- Preheat the oven to 275°F. Line 2 standard muffin tins with 15 paper liners. Place 1 whole Oreo cookie in the bottom of each lined cup.
- In a large bowl, use an electric mixer to beat the cream cheese until smooth. Add the sugar and beat until combined. Beat in the vanilla then add the eggs, one at a time, beating until combined. Beat in the sour cream and salt. Do not overmix. Stir in the chopped Oreo cookies.
- Divide the batter among the cookie-lined cups, filling each almost to the top. Bake until the filling is set, about 22 minutes. Transfer to wire racks to cool completely inside the muffin tins. Refrigerate at least 4 hours, or overnight, before serving. These can be stored in an airtight container in the fridge for up to 3 days or in the freezer for up to 1 month. Defrost in the fridge overnight before serving.


crowd pleaser!
Wow! Its yummy.
We have a summer cabin and everyone always wants a little sweet after dinner and these cheese cake bites are just the answer! I make them in the morning or on a rainy day and freeze them. Just before dinner I take a few out of the freezer and by the time we’ve eaten they are just the perfect treat.
I’m experimenting now with other cookies. Sooooo fun!
Absolutely delicious!
I’m no baker but these are so easy to make with most ingredients already on hand.
My family goes crazy for these!! Always asking me to make them.
Thank you so much for sharing your recipe!
I wanted to make something to my bf’s family and they absolute love my cheesecake. Plan on making some more. One question, so once I took it out of the oven they look great. But once I set it at room temperature, the middle part of the cheesecake sank..
These were so good, and so easy to make. Definitely a recipe I will keep and use over and over again.
This recipe was incredibly delicious! I ended up covering them with chocolate ganache and adding a few extra Oreo crumbs on top. They were so hard not to gobble up right away. I know they are super unhealthy but they are so tasty I couldn’t help making them a couple times last month!
This recipe was incredibly delicious! I ended up covering them with chocolate ganache and adding a few extra Oreo crumbs on top. They were so hard not to gobble up right away. I know they are super unhealthy but they are so tasty I couldn’t help making them a couple times last month.
I didn’t make cupcakes but far as the batter itself I’m giving my rate on. I made an entire 9 inch Oreo cheesecake for the first time & it came out amazing so for those who come across this I’ll tell you how to do it if you want an entire cake. Before anything make sure all of your ingredients are room temperature before starting. I had went to the store to get my products right before making this So I just let my eggs, sour cream & cream sit out for 2 hrs or so. I didn’t want to “rush” the process. I used a 9″ round 3″ deep spring form pan and a 10″ inch round silicone pan I believe probably 3″ deep likewise, and a 10″ inch square metal pan or any pan that you can put in the oven & water bath in. Water bath is just putting one pan into another pan of boiling hot water which a lot of people do for cheesecake. The silicone pan makes it more simple then messing with foil. It’s what I had on hand at the time & ended up turning out perfect. 1st preheat your oven at 275 degrees as Tessa stated so you’re oven can be ready while you do all these other steps I’m going to name. Its best that cheesecake cook at a low temp. Put your spring form pan into your round silicone pan. I pulsed 28 whole Oreos with 6 1/2 tablespoons of melted salted butter in a blender. Or you can use unsalted butter & add your own salt. Then pour the blended cookies into the bottom of your spring form pan and push them around the bottom & sides of the pan making sure there’s no cracks in between to make your Oreo base. Then put it in the fridge to harden a bit. Some people heat it in the oven for 10 minutes but I didn’t do that & it came out perfectly. I find that to be an unnecessary step. As your Oreo base is in the fridge boil a small pot of water to prepare for the water bath and then go head & prepare your cheesecake mix. I just doubled all of Tessa’s list of ingredients being she said she halved her original recipe because it was too much for what she needed I figured I should double it being I’m making a full cake so I used four 8-ounce packs of cream cheese, 1 cup of granulated sugar. 1 tablespoon of vanilla extract. 4 large eggs, & 1 cup sour cream, & a pinch of salt. I followed Tessa’s video concerning mixing it together. Then I took my Oreo base out, sat the silicone & spring form pan in my 10″ square pan. At this point your oven should be fully preheated. Pour the cheese cake mix in, sit it on your oven rack & then pour the boiling water in the square pan about halfway up the round pan. You want to put enough water in the pan so that it doesn’t all evaporate by the time you’re done cooking it. I still had a bunch of water left in the pan when it was done cooking which is fine. This water bath process just helps to keep the oven moist so that you don’t have cracks in your cheesecake. It’s a simple process, nothing tedious. Close your oven and let it cook on 275 unbothered for an hour and a half. Then turn off your oven and leave it in the oven closed for at least an hr to cool & finish cooking. Take it out the oven and let it sit out on the stove for about an hour to an hour and a half. I just gently went around it & tugged the cheesecake with my finger to pull it away from the sides of the pan so that it won’t be hard to come out the pan later. Then put it in the fridge covered for at least 8 hrs to get cold and form itself. To get it out the pan I just took a hot knife that I dipped in boiling water and went all the way down to the cookie base and around the sides of spring form pan very gently to make sure there isn’t anything sticking on the sides of the pan. I used a butter knife so I won’t scrape my pan up. Hot knives are good when cutting cheesecake because it gives a more crisp cut. Then I unlatched the little latch that’s attached on the spring form pan and it releases the cheesecake. I decorated it with some caramel toppings & was good to go. Thanks for the guidance Tessa! Hope this helps whoever that wants a full cheesecake. Time consuming but so worth it!
I made these about a year ago and they were a winner. I’d like to make them again using four or eight oz. mason jars, can you advise on how long they should bake?
These are incredible. I’ve been making them for a while and took a break when I got back to your site I realize it’s halved 🙁 I’m really sad the original post is gone and the link doesn’t work. I enjoyed making the large batch so that I can share it with others. Can you please help add it at the bottom or fix the link— pretty please?
If I want mini cuppies like 1 oz how long should I bake them?