


Tessa’s Recipe Rundown
Taste: The plain scones themselves are ultra buttery with a hint of sweet tanginess. Customization & flavor options are endless!
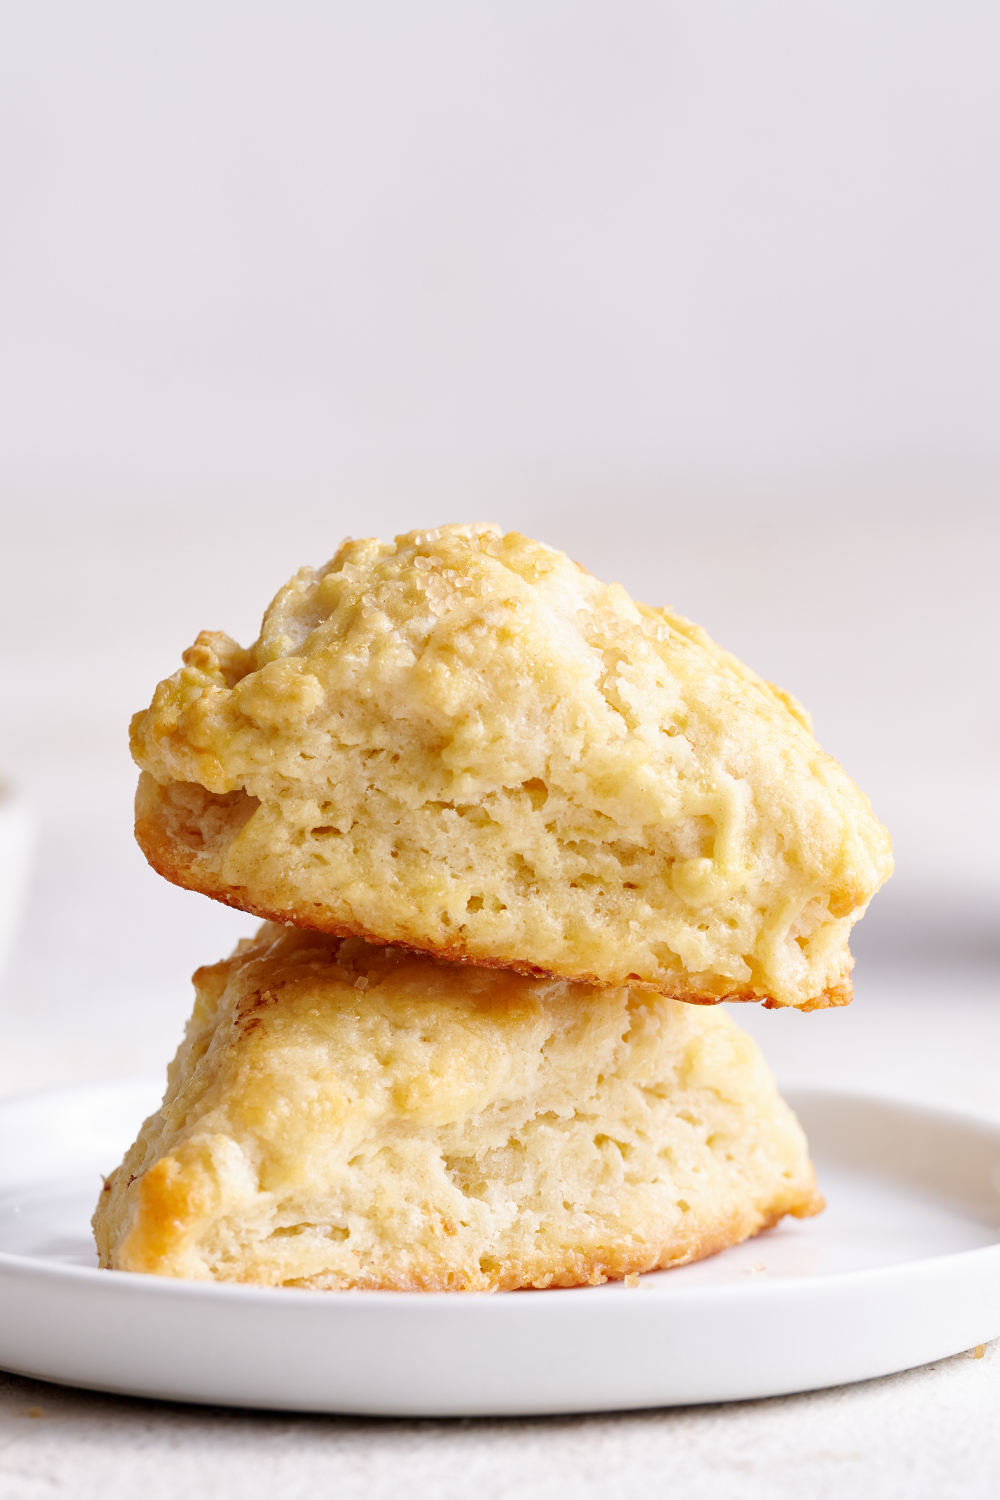
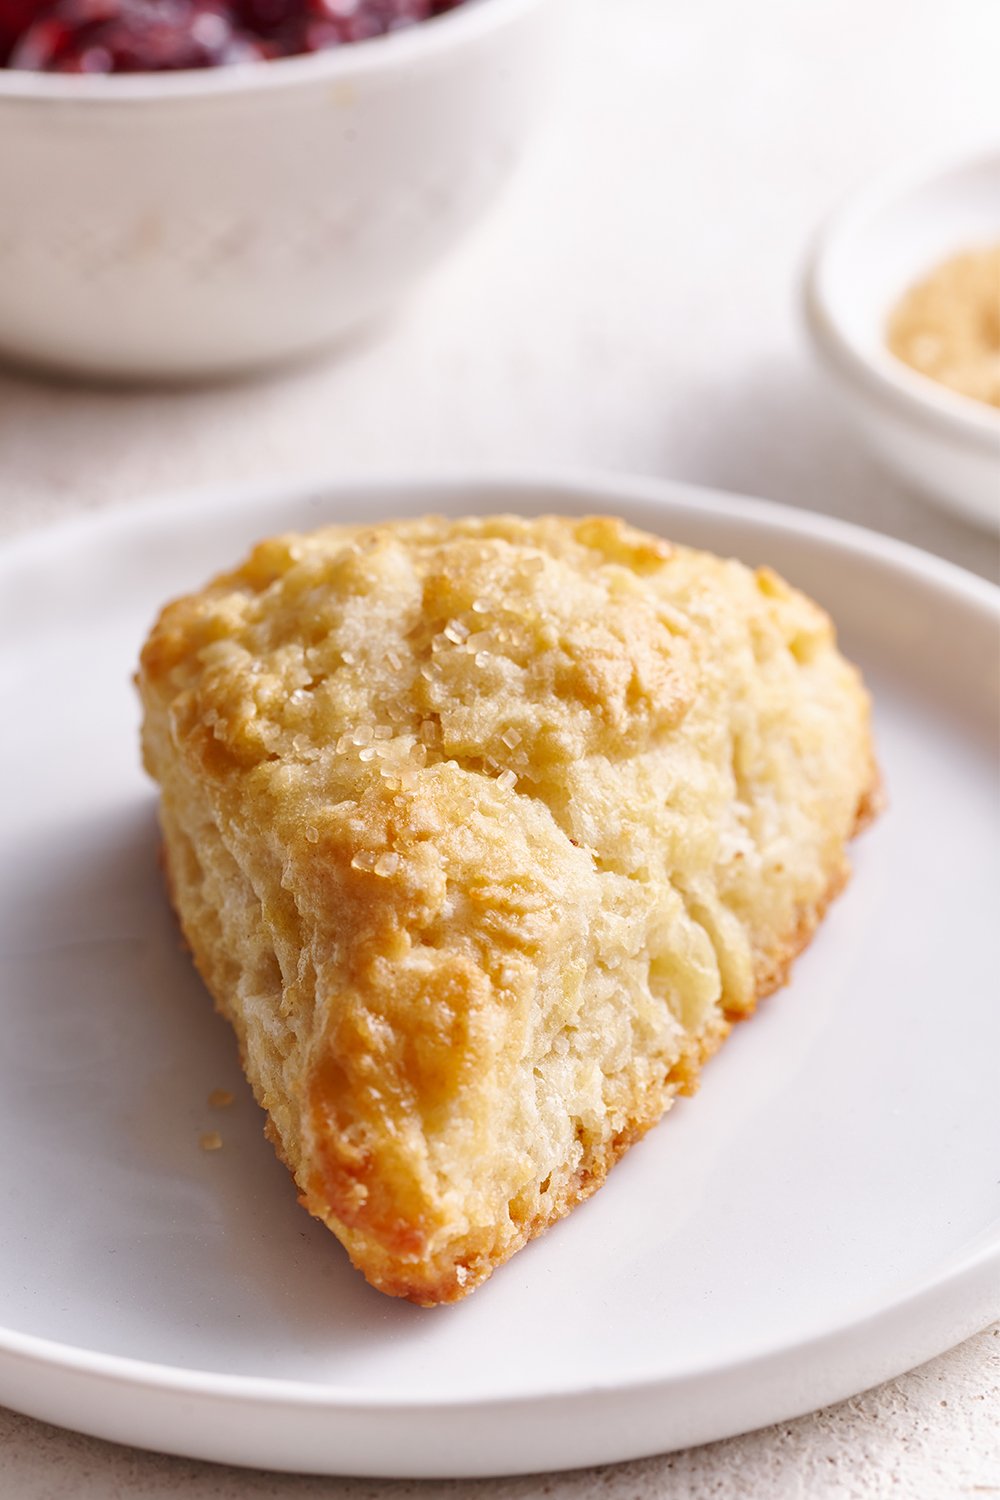
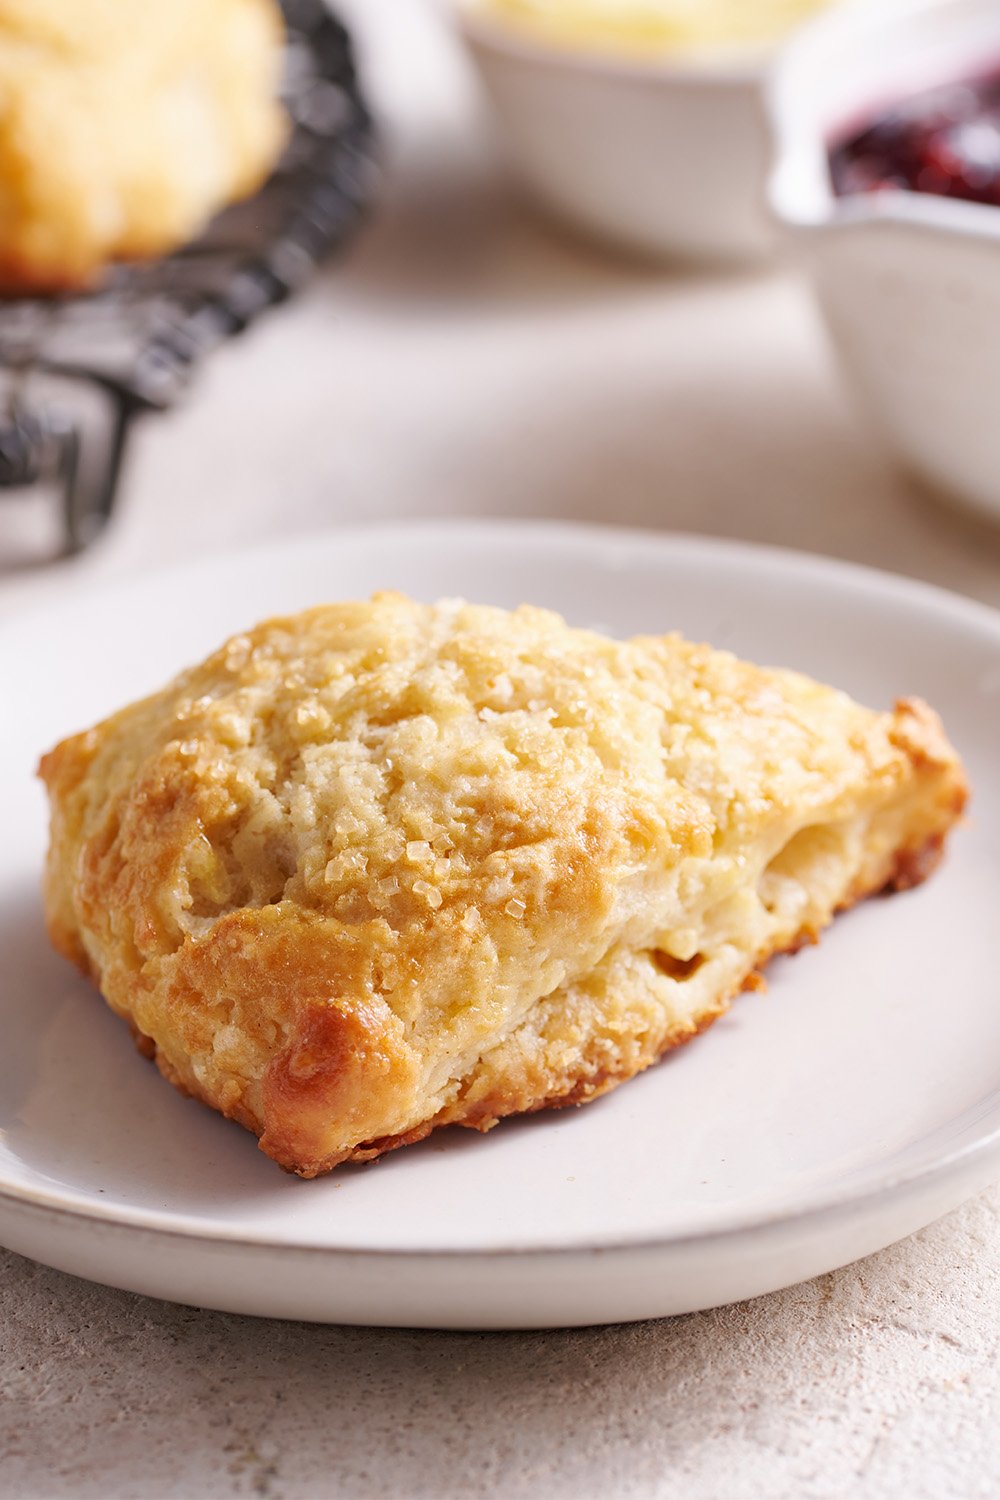
Texture: Extremely tender, flaky, light, and golden brown on top. Every bite is heaven!
Ease: Super easy. Less than 40 minutes from start to finish, plus you can make them ahead of time.
Pros: This is the perfect recipe to have in your back pocket for any special breakfast or brunch.
Cons: None!
Would I make this again? Absolutely, this is a go-to scone recipe!
This post may contain affiliate links. Read our disclosure policy.
I never used to understand the obsession and appeal of scones. Not until I took a bite of a truly great one.
Many scones are bland and dense. Who wants that?
It wasn’t until I perfected my own recipe that I realized how delightful scones can be. They’re sturdier and heartier than biscuits because they contain eggs and more sugar.
What I love most about them (besides all. the. BUTTER.) is that they belong on pretty much any breakfast or brunch table.
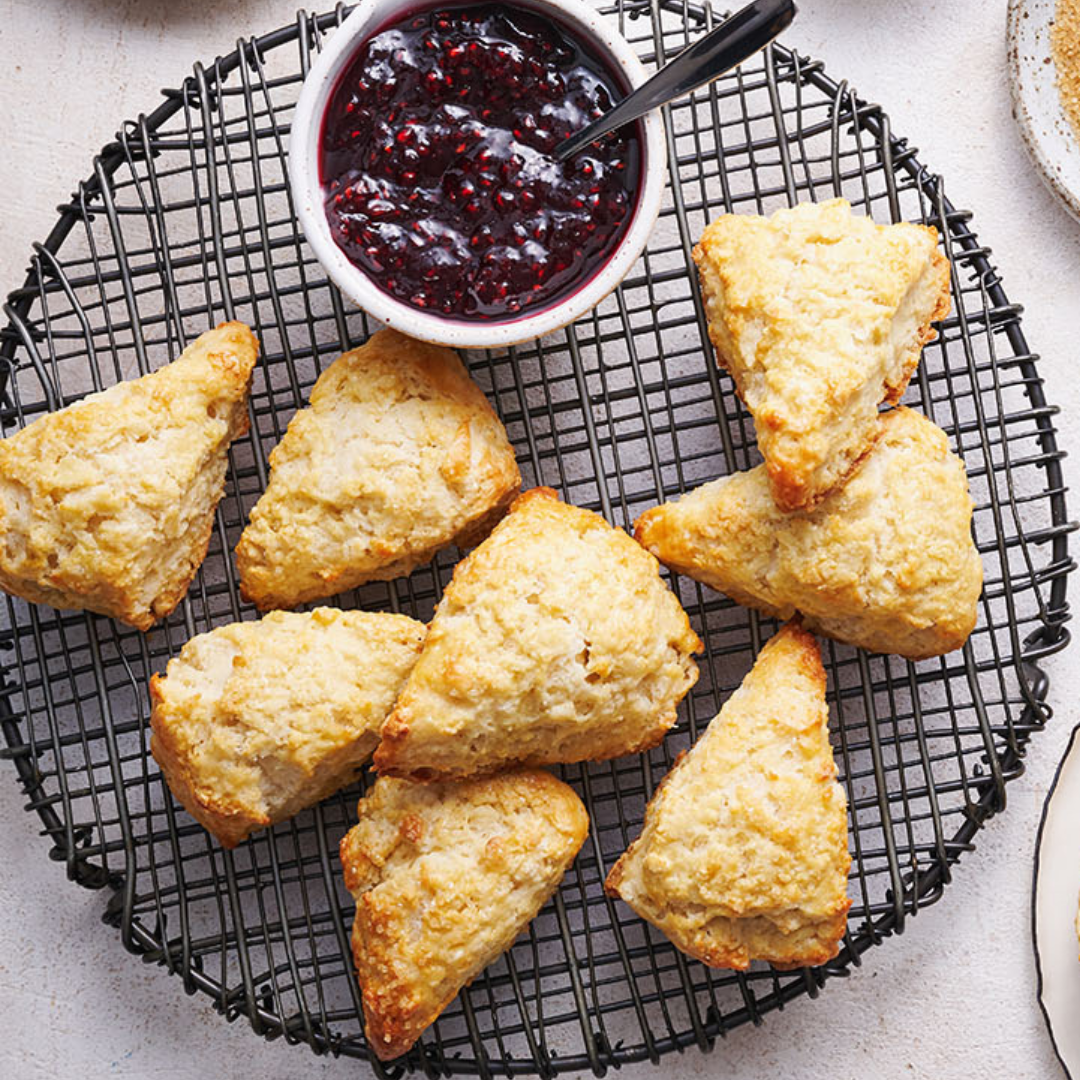
You can dress them up by adding nuts, citrus zest, or chocolate chips. Or simply serve them plain alongside some local jam or homemade flavored butter. Or clotted cream, though this is more of an American scone recipe than British.
Any way you serve these, they’re bound to be perfect if you follow my tips below!

Sprinkle of Science
How to Make Scones
Get Flaky Scones with COLD Butter
- Butter must be COLD from the very start to when the dough enters the oven.
- The cold butter melts upon entering the oven and the water content in butter evaporates in steam.
- As the steam escapes, it bursts up and creates that beautiful tall, flaky, fluffy texture.
- I like to cube then freeze my butter before assembling the dough.
- I also always prefer to use unsalted butter for baking. You can find out why here: Salted vs. Unsalted Butter.
Why is Buttermilk Used in Scones?
This is absolutely the preferred liquid for scones. It will result in tender, taller scones because of how its acidity reacts with the baking powder and tenderizes the dough overall. It also adds a lovely tang to create more depth of flavor.
What if I Don’t Have Buttermilk? Can I Substitute and Still Make Scones?
I would NOT substitute buttermilk with a DIY alternative. If you aren’t able to use buttermilk, you can also use keffir or alternatively, heavy cream. You can learn more about the science of buttermilk here.
Tips for How to Make Scone Dough:
- Whatever you do, do not overmix the flour mixture or dough or allow it to get too warm. This will result in flatter, tougher, and less flaky scones.
- My absolute favorite tool for making biscuits or scone dough quickly and easily by hand (so I don’t have to lug out my food processor) is this OXO bladed pastry blender.
- Use a marble pastry board to help keep the dough cool. If at any point you notice the butter become greasy and melty, pop the dough into the freezer for 10 to 15 minutes before proceeding.
- You can also pop the baking sheet of shaped unbaked scones in the fridge or freezer while the oven preheats, to ensure the butter remains nice and cold.
How to Make Tall, Flaky Scones BONUS tip:
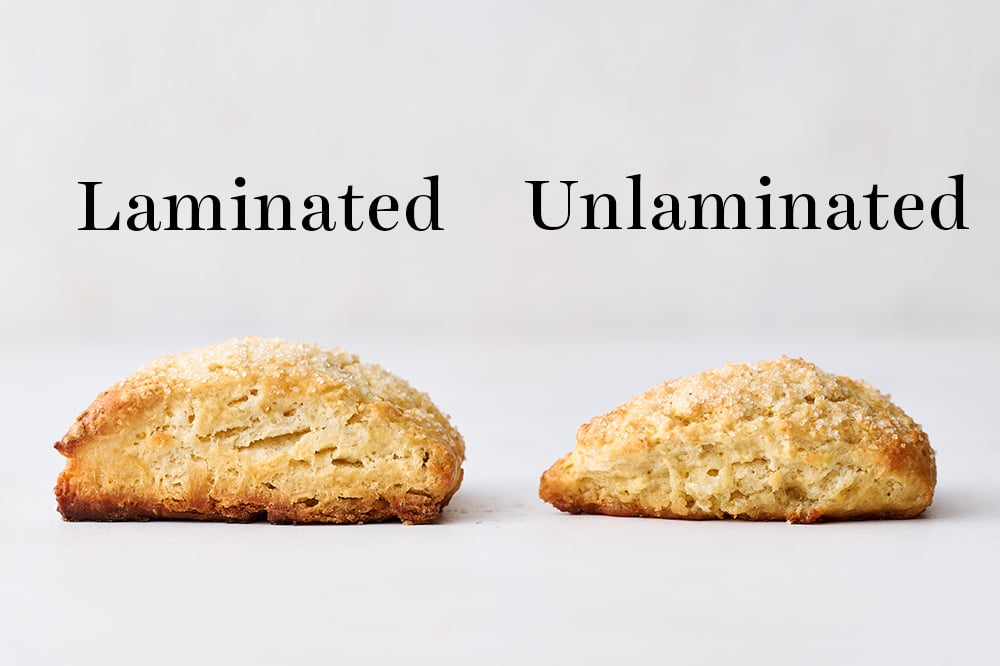
We’re stealing a trick from croissant baking that I use in my Best Ever Pie Crust recipe! A little bit of “lamination” gets the scones to shoot up sky-high with tons of flaky layers. Don’t worry, it sounds more complicated than it actually is. If this seems like way too much work, just skip this step. You’ll still have tasty scones! Check out my How to Make Tall Scones & Biscuits article for more tips.
How to Laminate Your Scone Dough:
- If adding any mix-ins, fold into dough prior to step 2.
- Turn the craggly mass of dough out onto your work surface.
- Shape it into a rectangle.
- Fold the rectangle horizontally in thirds, like you’re folding a piece of paper to go into an envelope.
- Flatten it out into a rectangle again.
- Now fold it in thirds once more, but going the opposite direction. This will also help you to gently ‘knead’ the dough so it comes together into a more cohesive disk without overmixing it. Overmixing leads to rubbery and tough scones and biscuits.
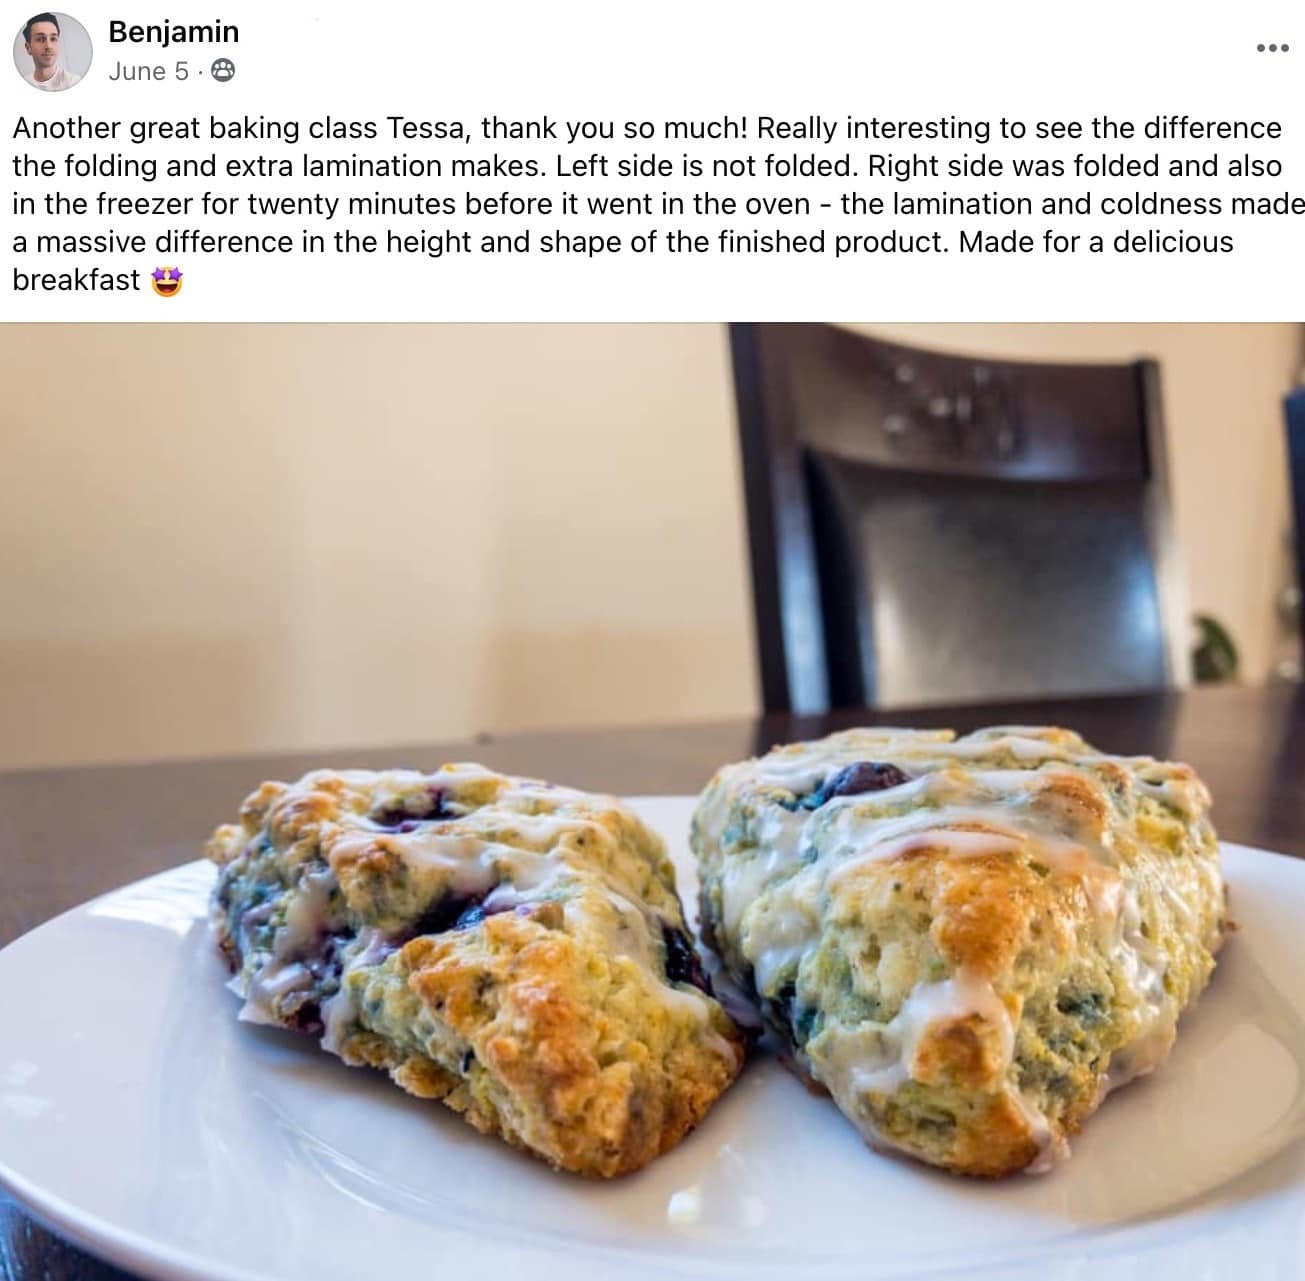
Try to shape half your scone dough using this trick and half without to compare the difference. You’ll be surprised!
I actually demonstrated this during a live Zoom class recently Take a look at Benjamin’s laminated vs. un-laminated scone:
How to Make Scones Ahead of Time:
The shaped unbaked scones can be covered and refrigerated overnight. Bake from the fridge as the recipe directs.
How to Freeze Scones:
Place in an airtight container and freeze for up to 1 month. If baking from frozen, add about 2 minutes to the baking time.
Scone Flavor Variations:
Feel free to get creative with your scone flavorings! Listed below are some ideas with specific ingredient additions. But you can add in about 3/4 cup of dried fruit, chocolate chips, nuts, etc., to the dough. If using fruit, dried fruit or frozen berries such as raspberries work best!
- Cranberry Orange
- Pumpkin
- Blueberry
- Chocolate Chip – Tastes like scones and chocolate chip cookies had a baby!
- Lemon Poppy Seed: Add 3 tablespoons poppy seeds + 2 tablespoons grated lemon zest to the dough.
- Cinnamon Sugar: Mix 3 tablespoons granulated sugar with 1/2 teaspoon ground cinnamon and sprinkle on the egg-coated unbaked scones.
How to Make A Glaze for Scones:
Glaze Ingredients:
- 1 1/2 cups (188 grams) powdered sugar
- 2 tablespoons water, milk, or citrus juice
- 2 tablespoons unsalted butter, melted
- 2 teaspoons vanilla extract, or other extract
- Citrus zest, to taste, if desired
Directions:
Whisk all glaze ingredients together until thick but still pourable. Spread over cooled scones and let stand until set.
More Recipes You’ll Love:
- Shallot, Jalapeno, and Cheddar Scones
- Red Lobster Cheesy Garlic Biscuits
- Quiche Lorraine
- Ultimate Muffin Recipe (customizable!)
- Chocolate Chip Scones
Become a Baking Genius!
Sign up for our free email newsletter for NEW recipes & baking science secrets.

Classic Scones
Ingredients
- 3 cups (381 grams) all-purpose flour
- 1/3 cup (66 grams) granulated sugar
- 1 teaspoon fine sea salt
- 1 tablespoon baking powder
- 1/2 teaspoon baking soda
- 1 1/2 sticks (170 grams) unsalted butter, cold and cubed
- 1 cup (237 grams) buttermilk
- 2 large eggs, divided
- 1 teaspoon vanilla extract
- Coarse sugar
Instructions
- Adjust the oven rack to the center position and preheat to 400°F. Line two baking pans with parchment paper.
- In a large bowl, combine the flour, sugar, salt, baking powder and baking soda.
- Add the butter and cut with a pastry cutter or a fork until the butter is the size of large peas.
- In a separate bowl, whisk together the buttermilk, 1 egg, and vanilla extract.
- Make a well in the middle and add the liquid mixture. Mix until just combined. Don't over mix. If adding in dried fruit, nuts, chocolate, or other flavorings, do so now.
- Transfer the dough to a floured surface. *Optional Step: See Recipe Notes for lamination instructions.
- Divide into 2 equal parts. Lightly knead each into 3/4-inch thick, 6-inch diameter rounds. Cut each round into 8 wedges and place on your prepared baking pans. Space them out about 2 inches apart.
MAKE AHEAD
- At this point the unbaked scones can be refrigerated overnight, or sealed and frozen for up to 1 month. If baking from frozen, add about 2 minutes to the baking time.
- In a small bowl, combine the remaining egg with 1 teaspoon water. Brush over the scones. Sprinkle with the coarse sugar.
- Bake for 12 to 15 minutes or until lightly browned. The scones are best served warm, or within a few hours of baking.
Recipe Notes
This recipe was originally published in May 2017 and was updated in 2023 with new photos and even more baking tips. Photos by Joanie Simon.


So could you use a food processor in place of the pastry cutter/fork? Would all other instructions be the same?
Hi Kristin! We don’t typically use a food processor in making scones as it can be super easy to overmix in the food processor. One of the biggest ‘tricks’ to achieving tender, flaky scones is to avoid overmixing! That being said, as long as you’re very aware of this and stop pulsing before the dough is fully combined, and finish by hand (and then preferably laminate your dough!), that should work just fine. All other instructions would be the same. I hope that helps! Let us know how it goes. Happy baking 🙂
I am so excited to make these wonderful looking scones, but I want to watch your video to see how to laminate them..I cannot get the video to play..it will play only for a second ..Please help..
Hi Brenda! I’m sorry to hear that you’re having trouble viewing this video! It seems to be working on our end? I recommend trying a different browser, an incognito browser, or clearing your cache, and hopefully one of those things will solve your issue – but please note that the recipe video just shows how to make the scones and doesn’t show the lamination process. Let us know what you think of these scones once you have given them a try 🙂
Best scones
After several attempts at homemade scones I have finally succeeded in producing something that wasn’t more like a hockey puck than a pastry. These are delicious, light & look just like the photo!
Best scone recipe I have tried. Easy, fast and delicious. Thanks
I’ve made these scones a few times and I like them so I will carry on making them I’ve made them with raisins also cheese and dried onions
I tried this recipe and loved it! For some reason, once I’ve combined all of the ingredients together, and transfer it to a floured surface, the dough is very sticky and doesn’t take any form. What I’ve been doing is adding in a lot of flour during this step, so I can divide it up(although it’s still a bit sticky). I think I weighed all of the ingredients correctly, so I’m not sure why this is happening. Is this normal, or should I increase the amount of flour I weigh at the beginning? I’ve been measuring the ingredients in grams.Thank you in advance!
Hi Alexandra! I’m glad you enjoyed your scones! Was your butter super cold while mixing? Typically, scone doughs will become sticky as the butter heats up – which is just one of the reasons why we want to keep it as cold as possible. If you haven’t already, I encourage you to check out the pink tip box (above the recipe) where Tessa talks more about this, along with loads of other great tips. You can always pop the dough back in the fridge, if you butter starts to heat up, and this will help reduce the stickiness and eliminate the need for so much excess flour. Also, did you substitute any ingredients? Even seemingly small substitutions can have a big impact on your results. Finally, perhaps it’s the type of flour you’re using? We recommend all-purpose flour here, and Tessa and our team typically use bleached AP flour (Gold Medal is Tessa’s favorite). Different flours contain differing levels of protein, and bleached vs. unbleached flours also can absorb slightly differing amounts of liquid. I’d recommend trying a different flour, to see if that helps. I hope something here helps, and I hope your next batch of scones are incredible! Happy baking!
I have been making scones for several years using diverse recipes. I had never heard of lamination so I tried it when I made these. I made mini scones to serve 20 – 25 & I put them in the fridge unbaked overnight. I put the trays directly into the oven from the fridge & they turned out wonderful & puffed up perfectly. Super recipe I will use often!
Thanks, Helen Keilman Oro Valley, Az.
For vegans out there I used vegan butter and flax eggs…I used 2 tablespoons by mistake, it made them fluffier…and I made buttermilk with soy milk and vinegar. I added dried sweetened cherries and chocolate chips….they are amazing!! Thanks for the recipe.
These are the best scones! I have tried a lot of different recipes and this is for sure my favorite so far. I just took all of the tips and did what she said and they came out just perfect! I added fresh blueberries to mine and they were yummy. Now I’m going to try some other flavors!
I followed the recipe exactly and it was easy and absolutely delicious. I used the Irish unsalted butter from Costco and topped the scones with sugar in the raw. I will make again and again. Perfection!
Why are my scones cakey?
Hi Carla! Scones can become cakey for a few reasons. Here are the most common reasons why your scones might be cakey:
– Overworking the mixture, and/or letting your butter become too warm, can create dough, dry, or cakey scones. Follow Tessa’s tips in the pink tip box (above the recipe) for more info on this!
– How do you measure your ingredients? By volume (using cups), or by weight (using a digital kitchen scale)? When measuring by volume, it’s so easy to mis-measure ingredients (particularly flour) and throw off the entire chemistry of a recipe, and result in issues like cakey scones. Check out Tessa’s article here, where she talks about how to best measure ingredients to ensure accuracy every time.
– How old are your leavening agents? If your baking soda/powder are not fresh, they won’t do their jobs and your baked goods can not rise properly, spread strangely, and much more. Tessa talks about the science behind leavening agents, and how to test for leavener freshness, in this article here!
I hope something here helps, Carla! Happy baking!