


This post may contain affiliate links. Read our disclosure policy.
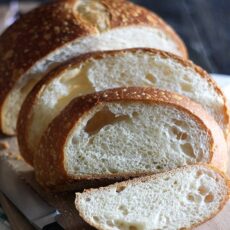
Sourdough can be a beast. Everyone will have slightly different experiences depending on the weather, climate, altitude, local wild yeast, brand of flour, purity of water, and a million other things. HOWEVER, it is doable and if you follow some key steps, you can create beautiful flavorful sourdough bread right in your own kitchen. It’s incredibly satisfying and of course, ultra tasty. The aroma that fills your house alone is worth it!
Below you will find a step-by-step video, every sourdough bread tip and trick I could gather, a sample baking schedule, and a simple recipe. There are many different schools of thought on sourdough, and many different methods and techniques. This is simply what works for me! Making great sourdough does take practice, but I hope everything on this page helps you create your own incredibly sourdough bread!

Sourdough Bread Recipe Tips
If this is your first time making sourdough, reading through the tips below will greatly increase your chances of success! After the tips is the recipe, so scroll down if you just want to get to that!
The Starter
In sourdough bread the starter is the only form of yeast that is used. This means we have to take some extra steps to not only ensure the starter is active and well-fed, but to protect its more delicate and unstable yeast from damage.
- Check out my full post with step-by-step video on how to make a sourdough starter here. You can also use a purchased sourdough starter, such as this one from Amazon.
- Your starter should be ready to use after it has been fed and has doubled in height and looks puffy with lots of bubbles on the surface. It may take two feeds over two days to be ready for baking.
- Test to see if the starter is ready to use by placing a teaspoon of it in a cup of water. If it floats, it’s ready to use! If it sinks, it needs to be fed again.
The Ingredients
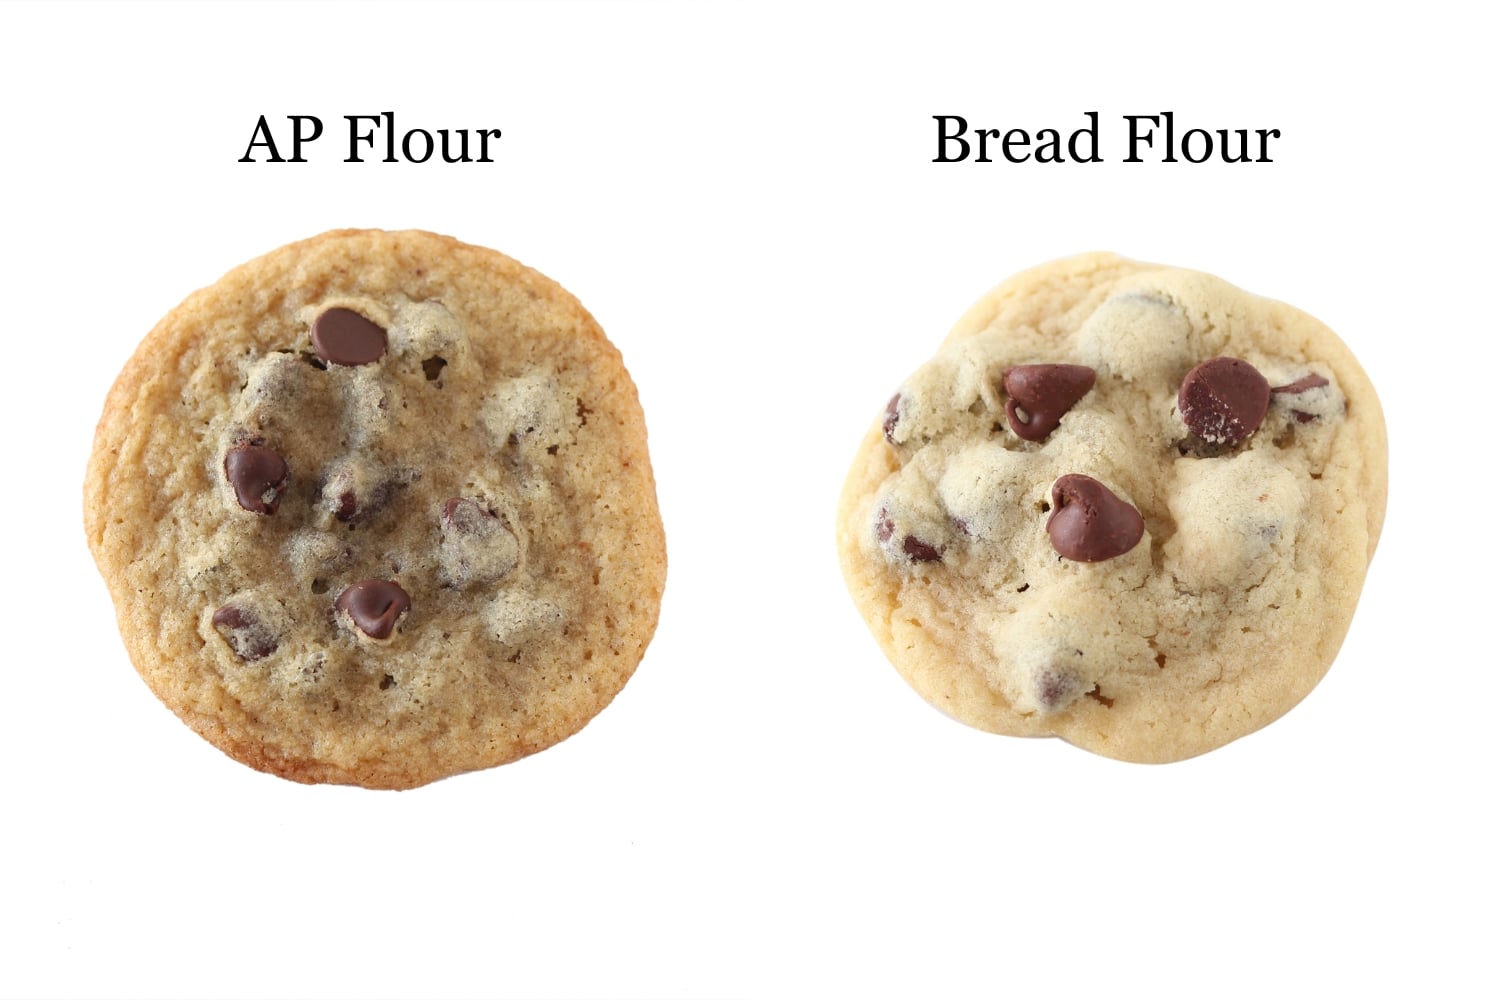
There are just a few simple ingredients in this basic sourdough bread recipe, making each one very important. As a note, I used King Arthur Bread Flour while baking, but this should work with just about any bread flour.
- I get SO many readers will baking frustrations that I can immediately tell are due to mis-measuring of ingredients. That’s why this recipe lists weight only, to ensure your accuracy. I use this kitchen scale with all my baking, doing so will drastically improve your baking immediately!
- This recipe calls for bread flour, which is important because it has more gluten-forming protein than all-purpose flour does to create a stronger structure. Because the sourdough starter is acidic, it can create a loose dough. The bread flour helps counteract this to help the bread rise.
- As with the starer, use bottled water. Most tap water contains chlorine which kills yeast.
Rising
Again, since the only yeast in the recipe is the naturally occurring wild yeast from the starter, it’ll take much longer to fully rise. Check out the schedule below for some ideas on how you can time out your sourdough.
- Allow the dough to rise in an oiled glass bowl to prevent it from getting stuck and therefore not rising. The glass will also allow you to better judge just how much it’s risen.
- The rising times will vary greatly depending on how active your starter is, how warm the temperature is, what kind of climate you’re in, and so on. It’ll take anywhere from 3 to 12 hours, so pay close attention to the size!
- Since sourdough can take so long to rise, you can cheat a little by adding in a 1/8 teaspoon of commercial yeast to your dough after the first resting period.
- The dough is properly risen when you an indentation created with your finger keeps a dent. If it springs back, it needs to rise for longer.
- Be careful not to overproof the dough! Doing so may cause it to collapse and result in pale crust. Err on the side of underproofing if anything.
Baking
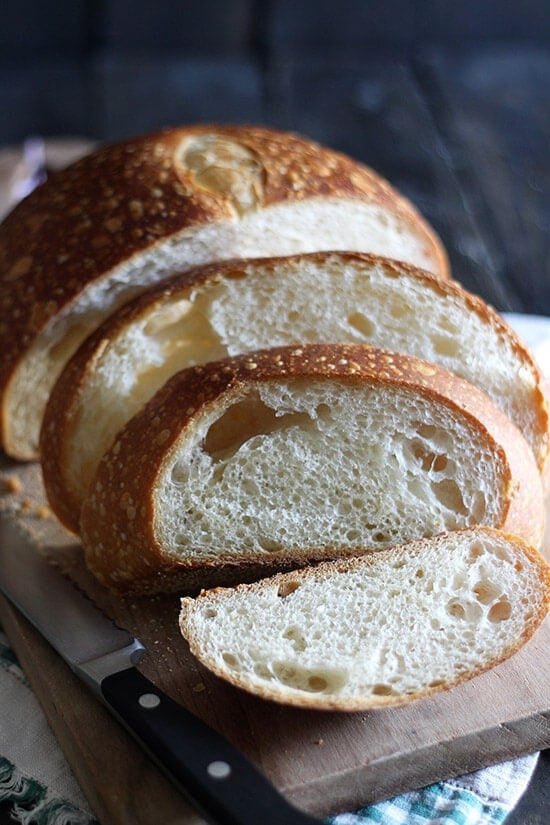
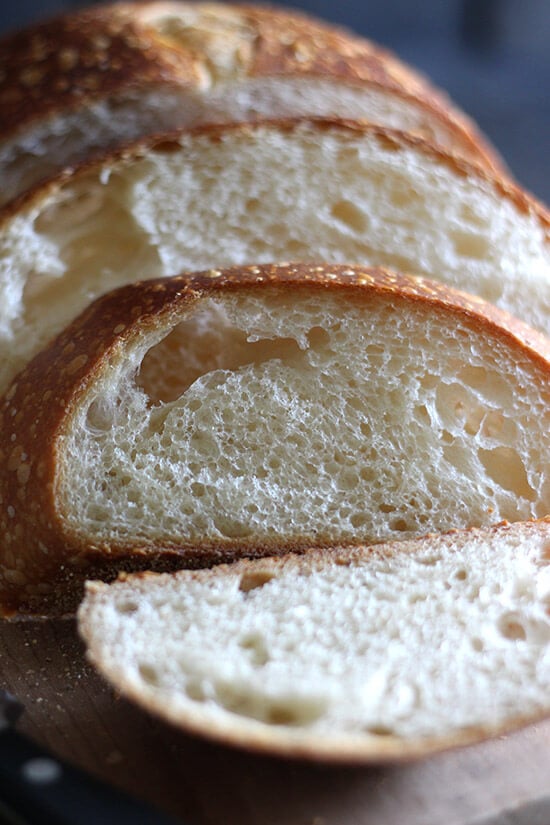
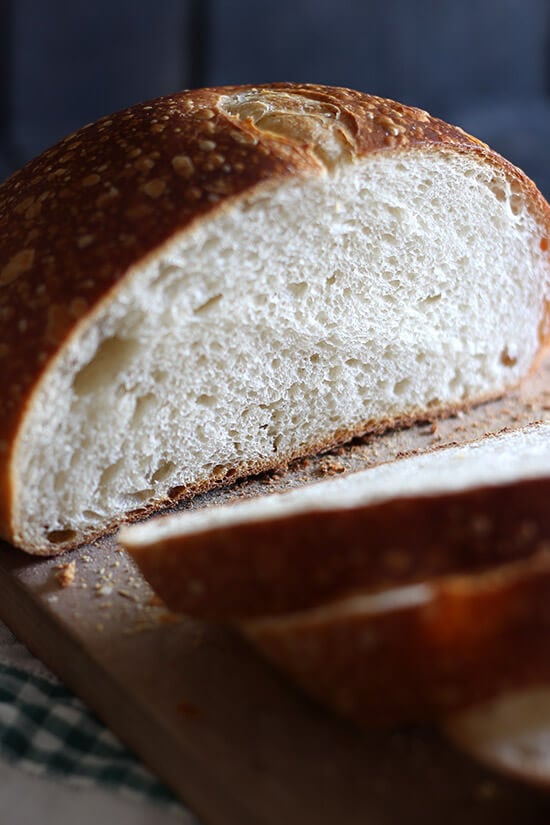
- Using a Dutch oven traps in heat and moisture like nothing else. This creates a beautifully round, crusty, and darkened bread!
- You can also use something like a lidded enameled roasting pan to get the same result.
- Just make sure to coat the bottom in cornmeal to prevent the bread from sticking.
- Blasting the oven temperature then reducing it once the bread goes in, and beginning with the lid on then removing it helps to create a beautiful deep brown, crisp crust with a soft and tender inside.
- For a crisper crust, crack the oven door open during the last few minutes of baking to allow steam to escape. For a super duper crispy crust, remove the entire loaf from the oven and let it bake directly on the oven rack for the last few minutes.
- If you’re unsure if your bread is done baking, using an instant read thermometer to gauge the temperature. It should be about 205°F.
FAQ
Can I make the dough ahead of time?
Yes, after the dough is done kneading cover it and place it in the fridge to rise slowly overnight. Let it sit at room temperature for 30 minutes to 1 hour before shaping and rising for a second time.
Do I have to use a stand mixer?
No, you can almost always knead by hand.
Can I use a bread machine?
Yes! Only use a model that has a programmable dough feature an does not heat the bread during mixing, which could kill the delicate yeast in the sourdough starter.
Sourdough Schedule
These are just some example guidelines, a lot will depend on the activity of your starter and your kitchen’s environment. Unless you are home a lot, baking on the weekend is usually the easiest way to make homemade sourdough!
Day 1:
Remove the starter from the fridge, tear off about a 1/4-cup and place it in a small bowl. Let it stand at room temperature for an hour. Feed it with 60 grams of bread flour and 60 grams of bottled water. If in cool weather, leave it on the counter overnight to ferment. If warm weather, leave it out for a few hours then refrigerate.
Day 2:
Check on the starter. If it’s increased in height, alive, and bubbling, the dough is ready to be made, you can skip to day 3. If not (which is likely), feed it again as described in Day 1.
Day 3:
Make the dough as described in the recipe. You can bake the same day you make the dough, though you may not be able to bake till nighttime. To make ahead: If you’re in cool weather, let it rise overnight on the counter. If in warm weather, let it rise overnight in the fridge.
Day 4:
If you waited to bake, cut the dough in half and shape. Place in the Dutch oven for its second rise. Bake and enjoy!
Email This Recipe
Enter your email, and we’ll send it to your inbox.
Ingredients
- 150 grams active, fed starter
- 250 grams bottled water
- 25 grams olive oil
- 500 grams bread flour
- 10 grams fine sea salt
- Cornmeal, for dusting

Instructions
- In a the bowl of a stand mixer combine the starter, water, olive oil, and bread flour. Mix with your hands until it comes together in a shaggy mass. Let it rest for 30 minutes.
- Attach the dough hook to the mixer and begin kneading the dough on low speed. Add in the salt. Increase the speed to medium and knead for about 5 minutes, or until the dough is smooth and soft.
- Place the dough in a lightly oiled bowl. Cover the bowl with plastic wrap and a clean kitchen towel. Let it rise in a warm place until doubled in volume. In a warm climate, this will take about 3 hours. In a cold climate, this can take up to 12 hours. You can let the dough rise overnight in the fridge.
- Remove the dough from the bowl and place on a lightly floured work surface. Cut the dough in half to make 2 smaller loaves. Cover and store the extra dough in the fridge or freezer until ready to bake.
- Gather the dough, one side at a time, and fold it over into the bottom center. Place the dough seam side down. Use your palms to roll it around into a tight ball. Coat the bottom of a Dutch oven with cornmeal and place the dough inside. Cover and let rise again for 1 to 2 hours, or until puffy.
- Meanwhile, preheat the oven to 450°F. Use a very sharp knife to make a 2-inch long shallow slash in the center of the dough.
- Cover the dough with the Dutch oven lid and place in the oven. Reduce the temperature to 400°F and bake for 20 minutes. Remove the lid and continue to bake uncovered for an additional 40 minutes, or until very golden brown. During the last minute or baking, crack the oven door open just enough to allow moisture to escape for a crisper crust. The sourdough is done when the internal temperature reaches about 205°F.
- Remove the bread from the oven and let cool on a wire rack for an hour before slicing and serving.


Hi Tessa,
If I wanted to put the dough in the freezer/fridge after cutting it in half to make 2 smaller loaves, what is the maximum length of time I can leave them in the fridge/freezer?
Thanks!
Is there never replies to the questions or can I just not see them?????? All my questions have already been asked but I don’t see any rely by the author
Hi Tessa
I used your recipes for both the starter and the sourdough bread. I measured by weight as you suggest. The taste was excellent especially since the starter was in day 8. I did bake in Dutch I’ve, however the bread baked but the shape was a bit flat. The first loaf was a little higher than second loaf, but still a bit flat. I live in SoCal and not sure if climate affected the rise?
This turned out great for me! Thanks so much. 🙂
Could you please put in the cups etc. I know you advocate weighing ingredients. I am not used to weighing things but I am willing to try but I would like to know the cups etc. so I know I am getting close. Thanks a lot Love this site.
I would like to know cup/tbsp measurements as well. I don’t have a scale and I don’t intend to buy one to just make bread. The weight measurements were disappointing.
https://www.kingarthurflour.com/learn/ingredient-weight-chart
How do I get the starter
If you sour dough isn’t as sour as you’d like add 1/8-1/4 tsp of “Sour Salt” (citric acid) to the dough.
I wait 2-3 weeks before using a new starter.
Hi Tessa
Very clear instructions – and I watched the video, too!! My question is the same as Anna’s (4 April, above). I prefer a wholewheat bread (or wholemeal, as we call it here in the UK!) or a mix of the two. I’m guessing it wouldn’t have too much of a detrimental effect on the bake??
Hope to hear from you – will be baking this at the weekend!
Very best wishes,
Penny from Oxford
Can you use whole wheat flour instead of bread flour? I’m brand new to this and I understand that bread flour has more gluten, but I would prefer whole wheat bread. Is there such a thing as whole wheat bread flour?
Love this recipe!!! I make one large load and adjust the temperature accordingly. It’s so easy and delicious. The starter chemistry is just amazing!
At what temperature and for how long did you bake the 1 larger loaf?
Made my first two loaves yesterday and today, and they turned out awesome! I had some trouble getting the starter going (mine took 1 1/2 weeks to get where it needed to be after some troubleshooting), but the actual bread making process was seamless. Both loaves have a great crust, a lovely and mild sourdough flavor, and they’re really nice and light. Great recipe—thank you!
It looks amazing, Tessa! I will need to mentally prepare myself before attempting to bake a loaf myself. Adding the sample schedule was such a great idea and lessens the intimidation for new bread bakers such as myself 🙂
Sourdough is one o my favourites, but I haven’t had the guts to make it myself yet, love your video and that texture looks absolutely perfect!