


This post may contain affiliate links. Read our disclosure policy.


Tessa’s Recipe Rundown
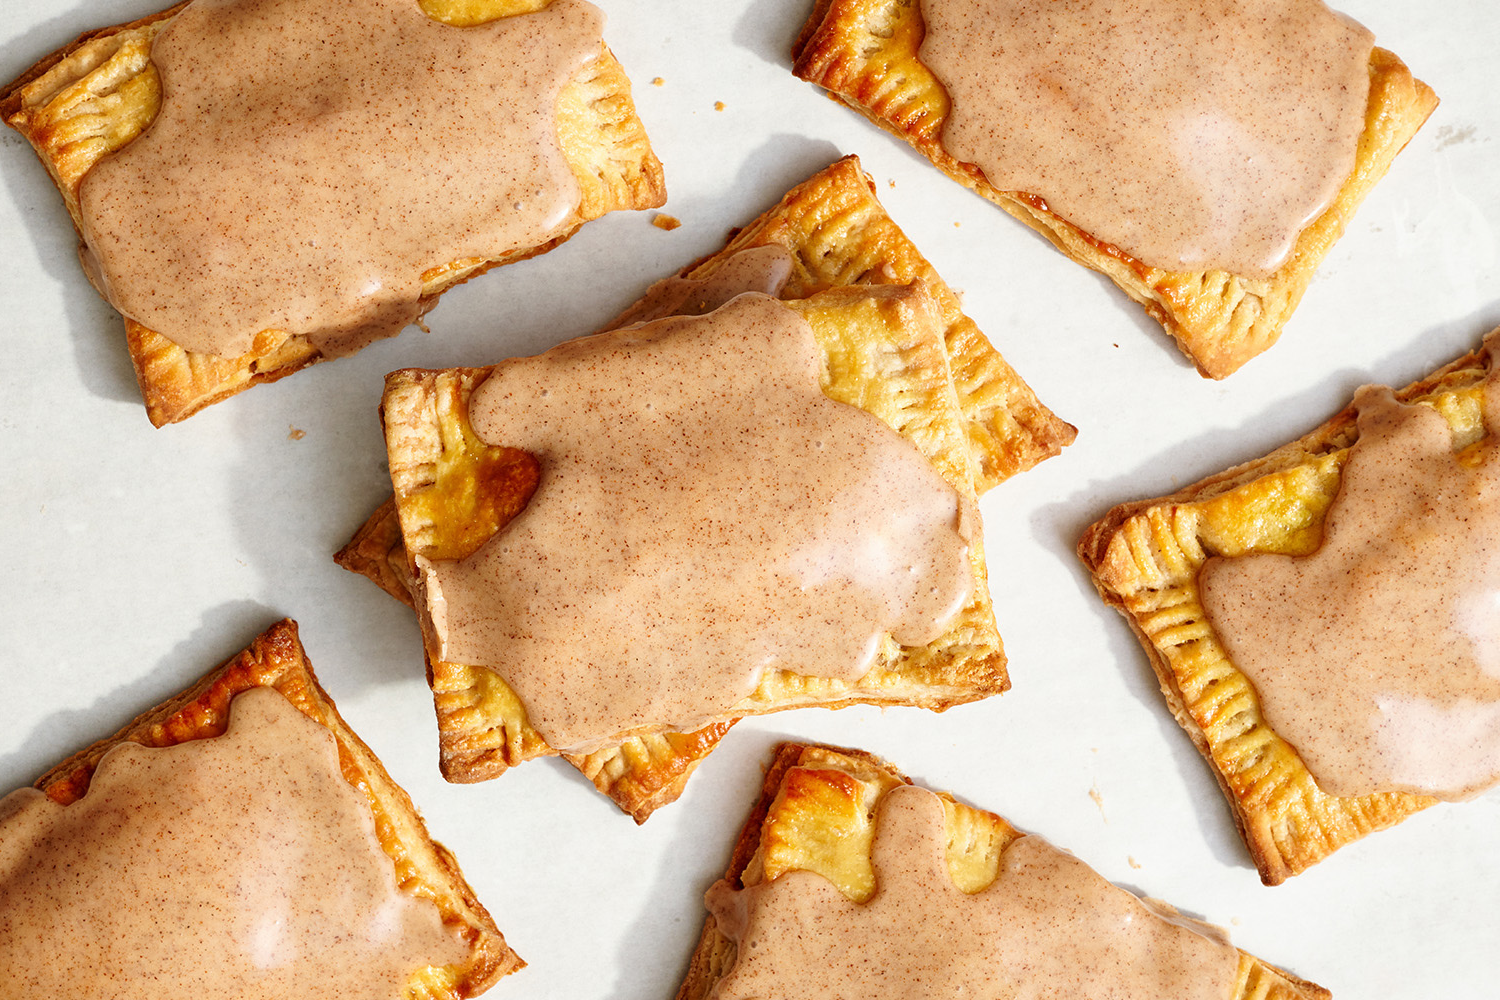
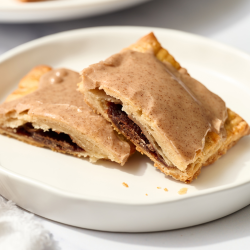
Taste: These aren’t sickly sweet like store-bought Pop Tarts!
Texture: Buttery & flaky with that smooth, shiny glaze on top.
Ease: Rolling out the dough and forming the pop tarts takes a little time, but it’s a fun activity to do with kids!
Why You’ll Love This Recipe: Such a fun baking project.
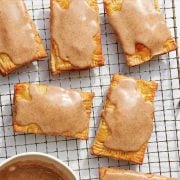
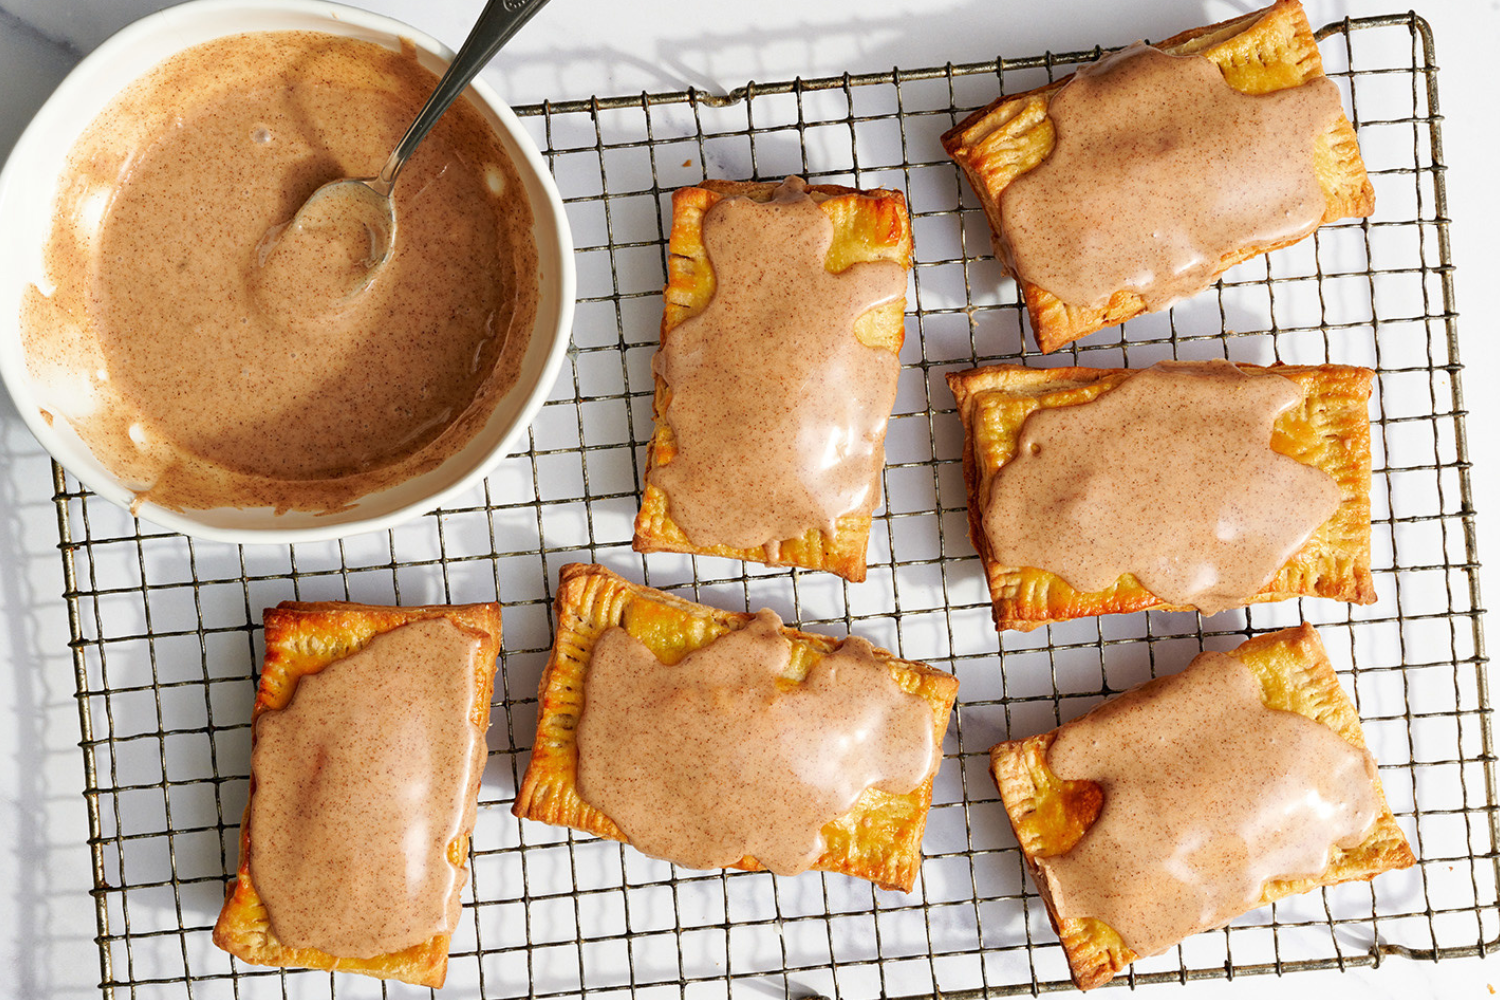
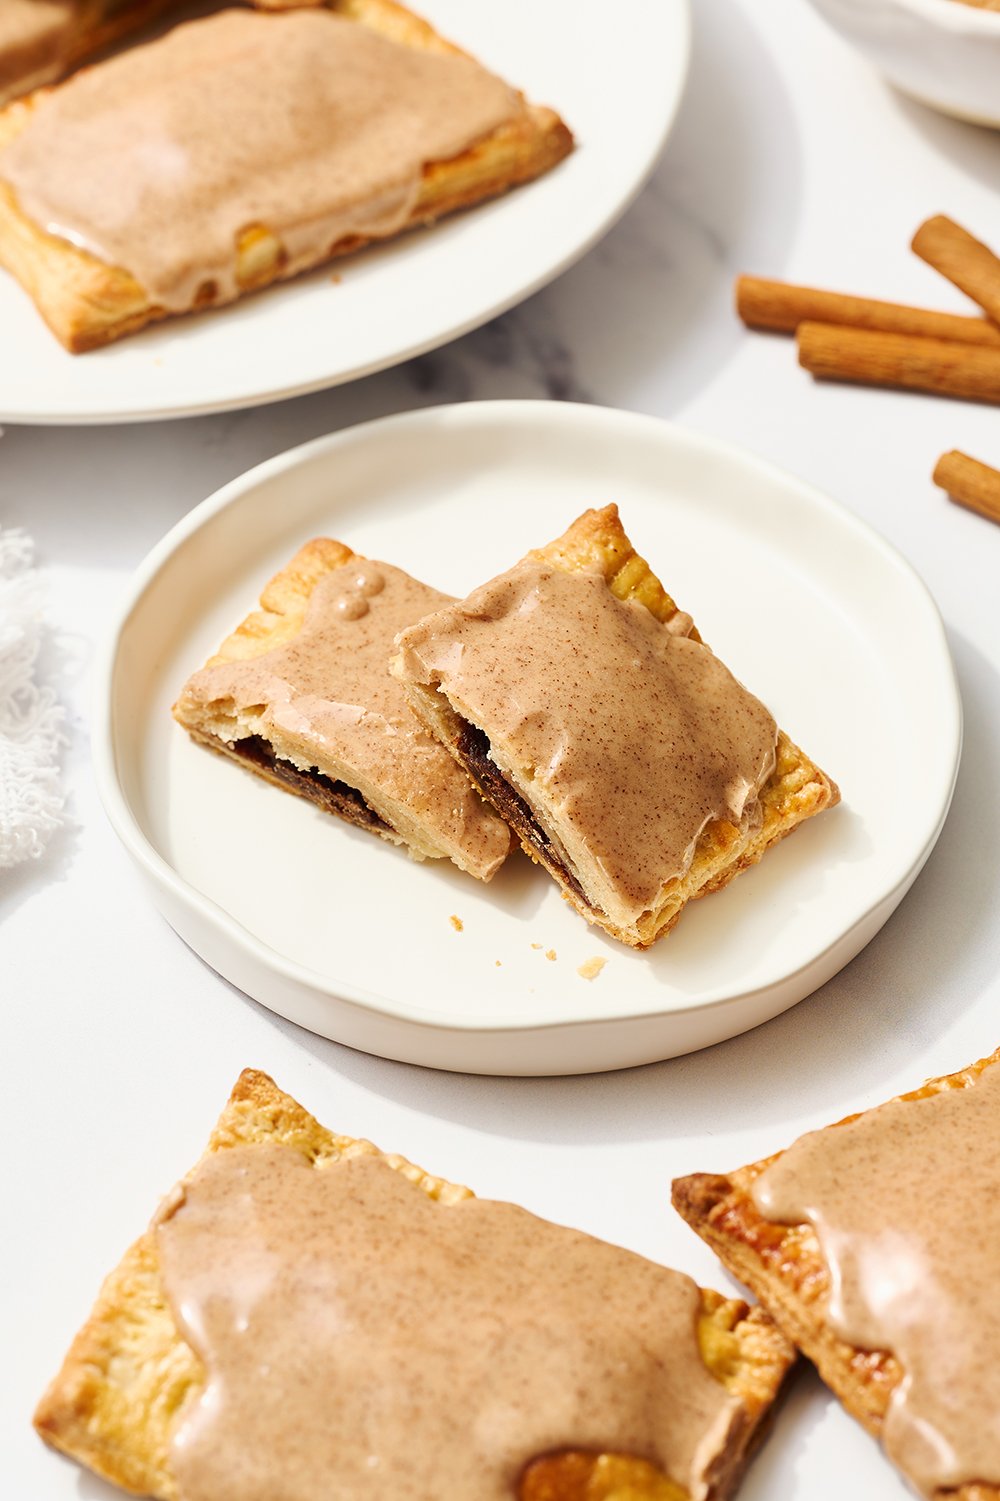
These Frosted Brown Sugar Cinnamon Pop Tarts are probably the best way I can think of to start any day.
Buttery, flaky pastry. Filling made of a tasty combo of brown sugar and cinnamon. Cinnamon glaze on top. The flavor is out of this world. SO much better than store-bought!
The whole family will LOVE this recipe, especially tasty breakfast or after-school treat. Or pack them into your kids’ lunchboxes for a special surprise they’ll adore!
These are SO GOOD!!! Perfectly flaky, with super warm and comforting brown sugar cinnamon. My husband and I ate four each in one day 🫣 They’re the perfect weekend treat.
Homemade vs. Store-Bought Brown Sugar Pop Tarts:
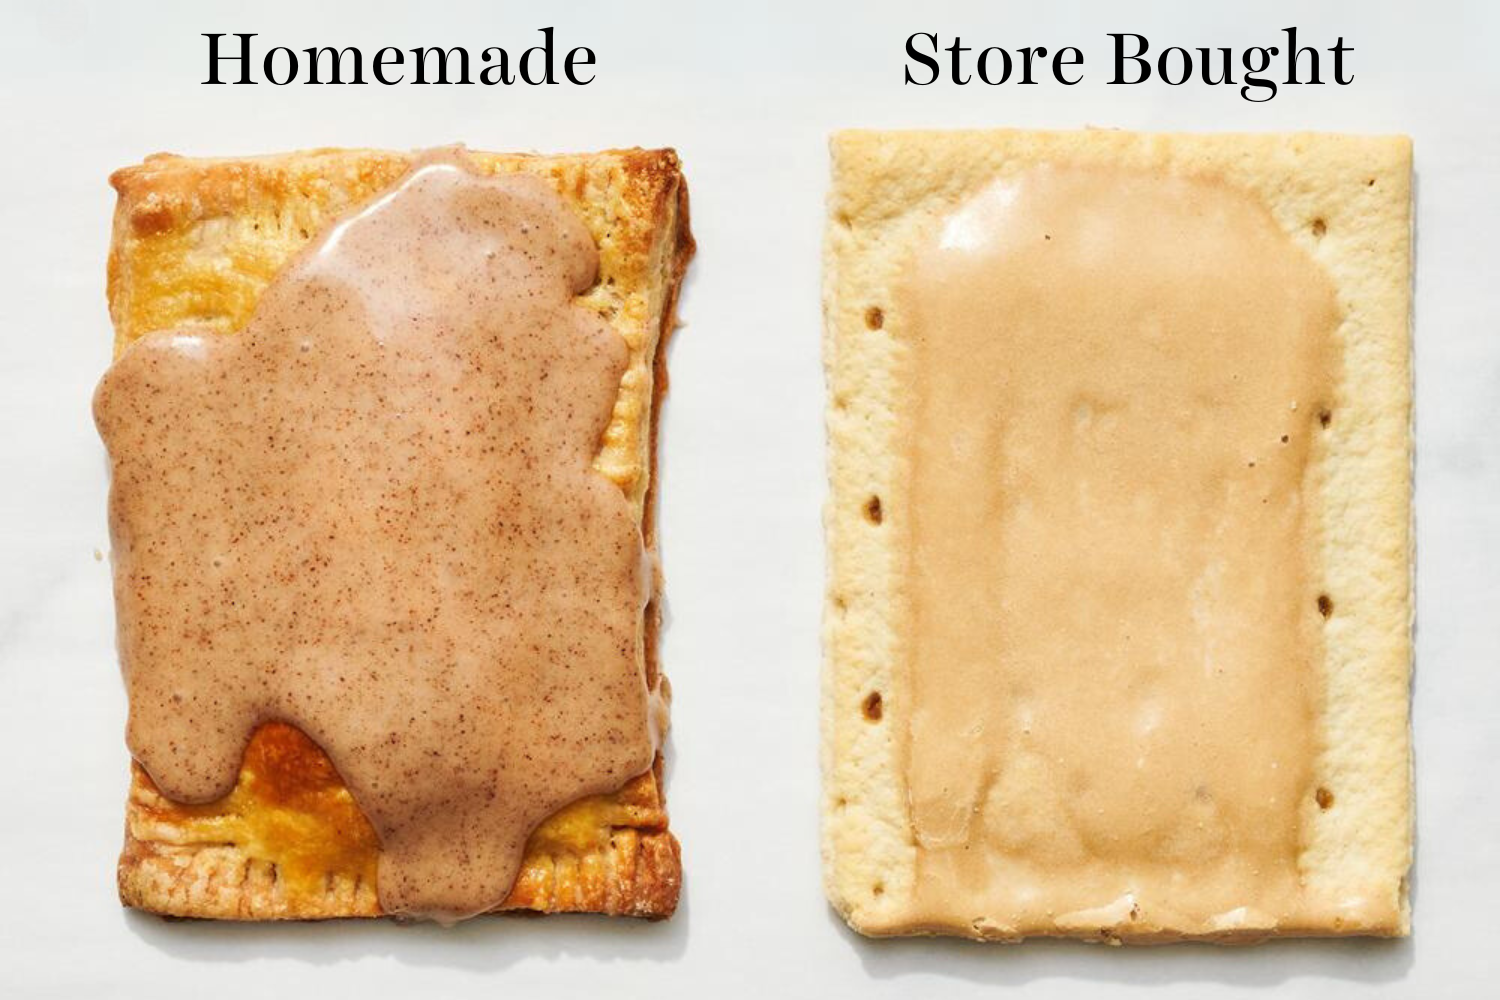
The levels of flavor, flakiness, and frosting simply don’t compare when enjoying a scratch made DIY pop tart vs. a store-bought one. The latter almost looks like cardboard and has such a measly layer of frosting – not to mention, the store-bought variety are so sickly-sweet. For a special treat everyone will go crazy for, homemade is the way to go.
Tips for Homemade Pop Tart Pastry
- Keep Pastry Ingredients Cold: Just like most pie or pastry doughs, temperature is important here. Make sure you’re working with cold butter and water, to prevent the butter from melting and ensure your pastry is nice and flaky once baked.
- Don’t Overmix the Pastry: As with any pastry, be careful not to overmix or overhandle, so your pastry doesn’t end up rubbery or dense!
- Measure Your Flour Correctly: Use a digital kitchen scale, or the spoon and level method if you don’t have a scale. Excess flour can cause rubbery pastry that doesn’t crisp or become flaky. Learn more about measuring ingredients correctly here.
Make Ahead Options
- Prep the dough: You can make the pastry dough up to a day in advance – just store it in the fridge, wrapped well in plastic wrap.
- Assemble the day before:Alternatively, you can fully assemble the Pop Tarts and cover well with plastic wrap, and store in the fridge for up to one day before baking.
- Assemble & freeze: Unbaked, assembled pastries can be frozen on a baking tray until solid, then transferred to a ziptop bag or airtight container for up to a month. Thaw in the fridge for an hour or so before baking.
Storage Instructions
- To Re-warm: I recommend reheating on a baking tray for a few minutes in a 350°F oven. Do not use a traditional toaster.
- Room Temperature: Store in an airtight container for up to three days. They will keep a day or two past that, but they won’t be as flaky and delicious past three days.
- Freeze (Unglazed): In an airtight container or ziptop bag for up to a month. Simply thaw at room temperature for an hour, then reheat in the oven for a few minutes or until crisp again, then cool, glaze and serve! Note, they won’t be as crispy this way.
FAQs
Pop Tarts are sweet pastries, made from two rectangular pastry crusts, sandwiched together and filled with a wide assortment of sweet fillings, and typically finished with a sweet icing glaze on top. They are known for being a favorite quick and sweet breakfast treat. Pop-Tarts are a typical childhood favorite, and can be found in any American supermarket. They are available in some other countries in supermarkets or specialty stores, too.
Yes! The measurements and ingredients will all be the same. Roll the dough into a large even rectangle about 1/4″ thick. Take a ruler and measure approximately where the middle of your dough would be and cut in half. Brush the edges of the dough with water, spread out all of the filling, cover the pastry, crimp the edges and egg wash. Bake until golden brown. When the pastry is cool, top with the glaze and cut into shareable pieces with a knife.
I wouldn’t recommend it! Real Pop-Tarts contain a bunch of artificial ingredients that are designed to keep intact and not melt their way into your toaster; these homemade ones don’t contain those same ingredients. The glaze would definitely make a big mess and probably ruin your toaster! Instead, reheat on a baking tray in a 350°F oven for a few minutes.
I actually have a recipe for Strawberry Pop Tarts, too! Those have the same pastry, with a vanilla glaze recipe (the same as this glaze, but without the cinnamon). Feel free to use that recipe with any sort of jam (store-bought or homemade).
Email This Recipe
Enter your email, and we’ll send it to your inbox.
Ingredients
For the dough:
- 2 ¼ cups (290 grams) all-purpose flour
- ¼ cup + 1 tablespoon (65 grams) granulated sugar
- ½ teaspoon cinnamon
- 1 teaspoon fine sea salt
- 2 sticks (227 grams) unsalted butter, cold and cubed
- ¼ cup + 3 tablespoons (100 grams) cold water
- ½ teaspoon honey

For the filling:
- ½ cup (100 grams) light brown sugar
- 2 teaspoons ground cinnamon
- ½ teaspoon fine sea salt
- 1 tablespoon (8 grams) all-purpose flour
For the egg wash:
- 1 egg
- 2 tsp water
For the glaze:
- 1 1/2 cups (188 grams) powdered sugar, sifted
- 2 tablespoons milk
- 1 tablespoon corn syrup
- 1 teaspoon vanilla extract
- 1 teaspoon cinnamon
Instructions
Make the dough:
- Adjust the oven rack to the center position and preheat to 375°F. Line two baking trays with parchment and set aside.
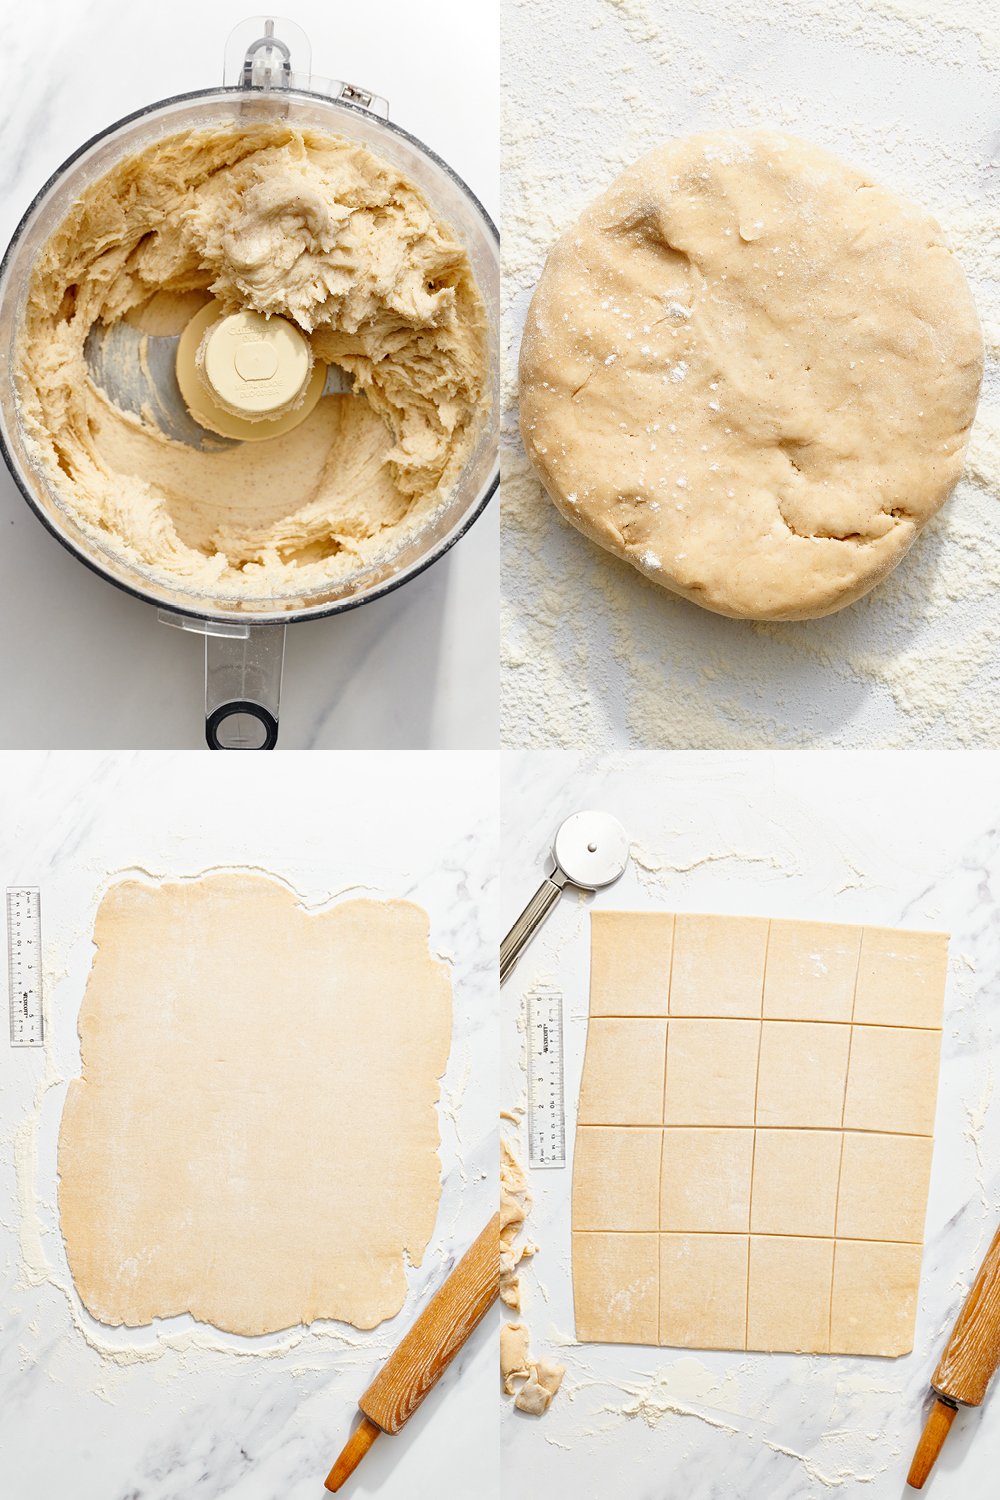
- In a food processor or large mixing bowl, add the flour, sugar, cinnamon and salt. Pulse lightly, or mix with a whisk, until combined. Add the cubed butter all at once and pulse for 10-20 seconds, or if mixing by hand, cut the butter into the dry mixture with a pastry cutter for 5-6 minutes, or until the mixture looks sandy and no large clumps remain. Be careful not to overmix as the butter will get too warm.
- Pour in the water and honey mixture in a steady stream while pulsing the dough mixture in the food processor, or if mixing by hand, pour cold water and honey into the dough mixture and mix, until the mixture comes together and a dough ball has formed. Check the dough to make sure that there are no visible flour or sugar patches, but don’t overmix.
- Remove the dough from the food processor or bowl and place on a lightly floured surface. Fold the dough 2-3 times and shape into a 1-inch thick, 7-inch diameter circle. Wrap the dough and let it rest in the refrigerator for 30 minutes to 1 hour.
Make the filling:
- While the dough is resting, for the filling, whisk together the brown sugar, cinnamon, salt, and flour until combined and set aside.
- Once the dough has cooled and rested, flour your work surface to roll out the dough. Roll the dough into a rectangle, about 3 feet in length, 8 inches in width, and about ⅛ of an inch thick. Using a pastry cutter, pizza cutter, knife or bench scraper, cut the dough into rectangles 3 inches wide x 4 inches in height. You should be able to cut between 18-20 rectangles depending on how thick the dough has been rolled.
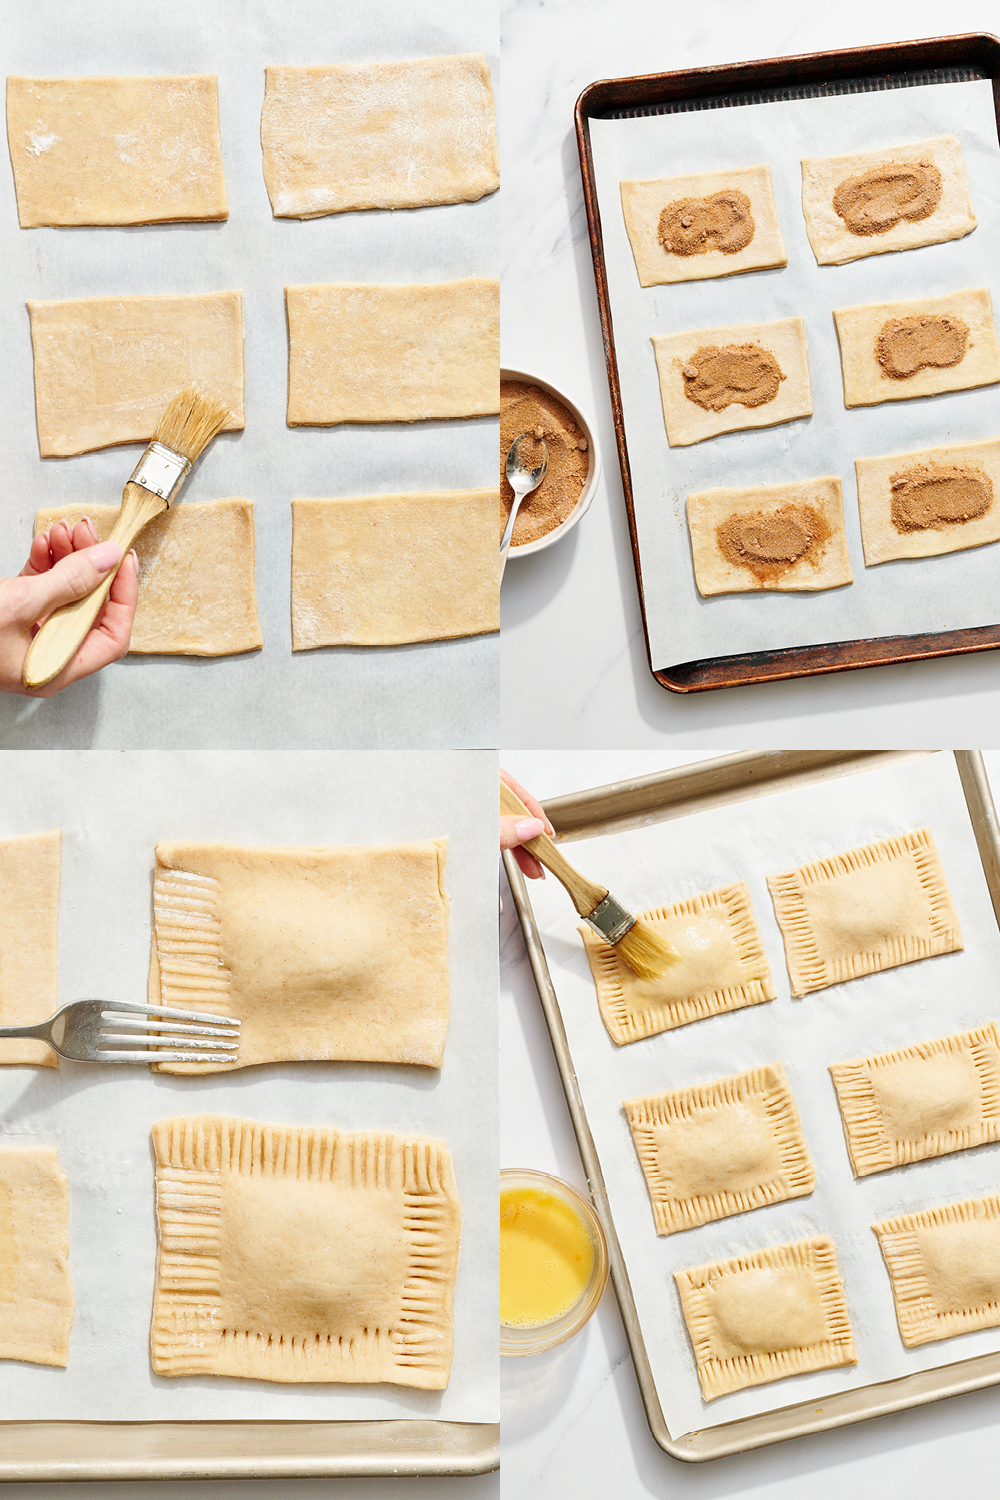
- Lift 8 of the cut rectangles off your work surface with a spatula or bench scraper and place them onto one of the prepared baking sheets. These will be the bottoms of your Pop Tarts. Brush the dough lightly with water, ensuring that the edges get wet; otherwise the top and bottom dough won’t stick together completely when crimped and the filling will leak out. Fill each center with 1 heaping teaspoon of brown sugar filling, leaving about ¼-inch border from filling to the edge of the dough. Cover each filled pastry with a second dough rectangle and crimp the edges together with a fork. Repeat process with any remaining cut rectangles onto second prepared baking sheet.
Make the egg wash:
- In a small bowl, mix together the egg and water.
- Brush each filled rectangle with egg wash and bake for 25-30 minutes, or until golden brown and the pastry is fully baked. Let cool completely before glazing, about 30-45 minutes.
Make the glaze:
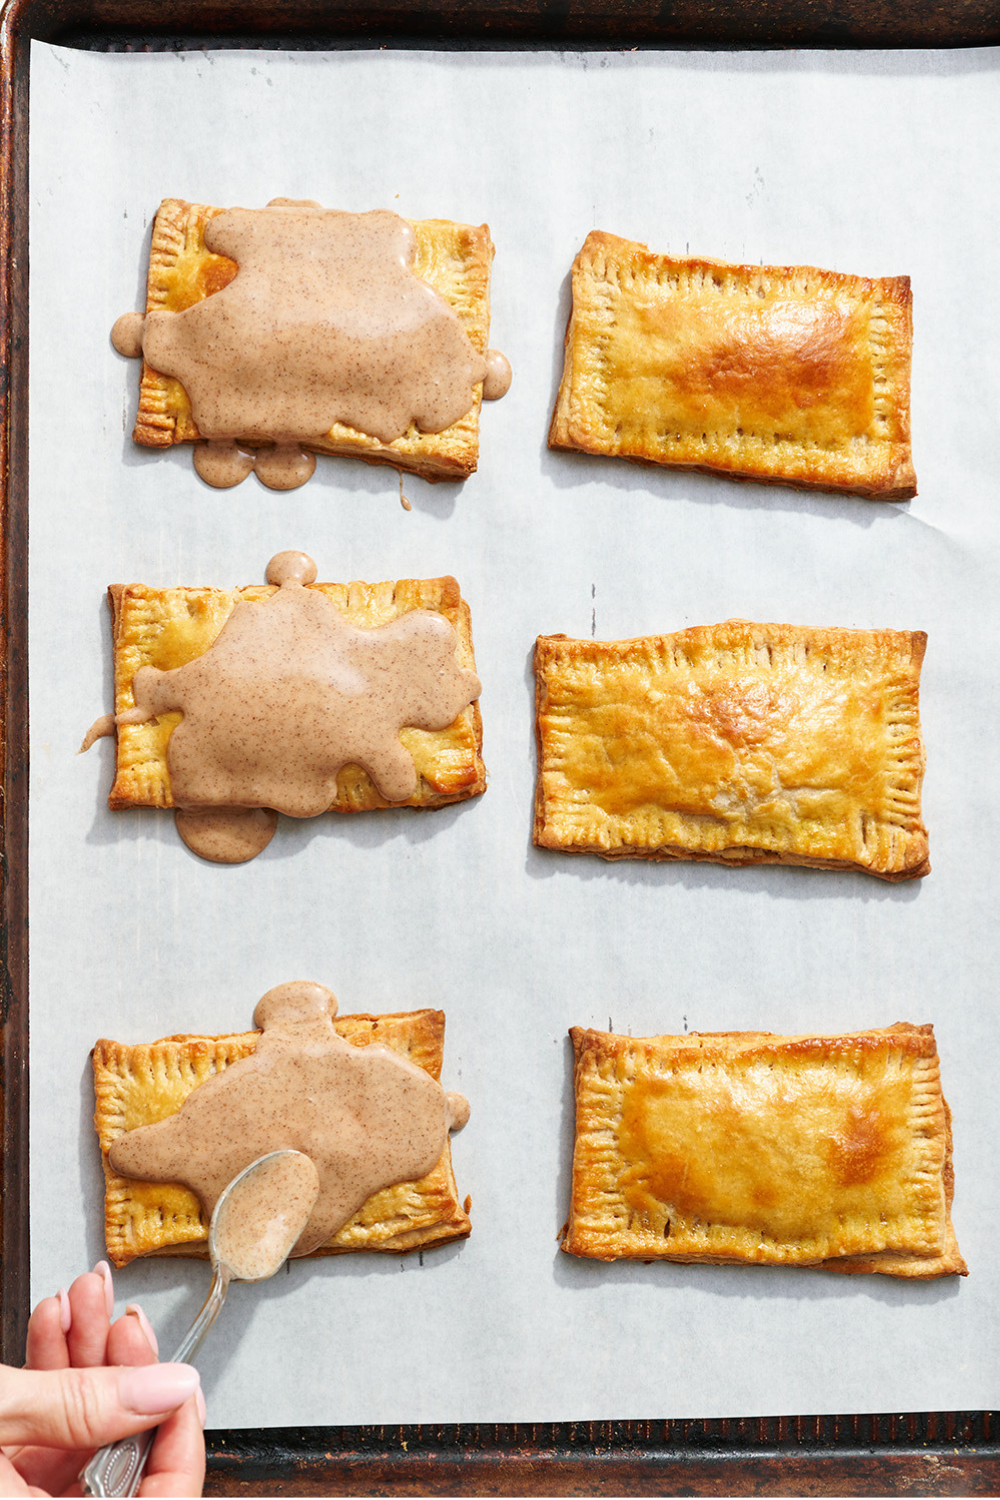
- While the Pop Tarts are baking, in a small bowl, whisk together the sifted powdered sugar, milk, corn syrup, vanilla and cinnamon, mixing until smooth. The glaze should be thick, but not too thick to spread.
- Use a spoon or offset spatula to glaze each cooled Pop Tart. Leave to set for 30 minutes to 1 hour before eating, or at least 3 hours (or until they are dry to the touch – this will depend on your kitchen environment) before stacking on top of each other, to prevent the glaze from getting messed up and smearing, or sticking to the bottom of the Pop Tart placed on top of it.
Notes
More Copycat Recipes You’ll Love:
- Strawberry Pop Tarts
- Cosmic Brownies
- Lofthouse Cookies
- Homemade Oreo Cookies
- Homemade Fudge Rounds
- Brown Butter Rice Crispy Treats
Photos by Joanie Simon.


Hello! Can I use a kitchen aid mixer to make the dough?
Hello! Can I use a kitchen aid mixer??
We haven’t tried that — pastry dough is typically mixed by hand or in a food processor because you can better control how small the cubed butter gets. Using a kitchenaid mixer would cream the butter, which will impact the flakiness of the dough.
Oh ok! Got it. I’ve never made pastry dough before. Good to know. I will try by hand. Thank you!
These are SO GOOD!!! Perfectly flaky, with super warm and comforting brown sugar cinnamon. My husband and I ate four each in one day 🫣 They’re the perfect weekend treat.
Why do you instruct people to “ Roll the dough into a rectangle, about 3 feet in length, 8 inches in width, and about ⅛ of an inch thick”. My 15 year old and 7 year old were making this recipe and struggling to roll the dough to the 3 foot length. Afterwards, I explained that was unnecessary. They could’ve done any shape that would create 3×4 rectangles which is much easier to accomplish instead of a 3’ floured surface on the counter. I didn’t even see in your pics where you had done this. I enjoyed the recipe but my 15 yo said the recipe was much too difficult because of that instruction and felt like there was not enough filling. I just wanted to mention it in hopes you’d consider revising.
I have made these several times at the request of my family. They love them!! I was just asked to make them again and my husband asked if I would make a double batch because he didn’t get any last time!
My food processor says to put in liquid first before dry ingredients because there is a dough setting on it. Should I do that first or just how the recipe calls for?
Pasty dough requires a different technique from most other dough. I almost never say this, but I would recommend ignoring those manufacturer instructions. Instead follow the recipe directions as written. Let us know how your pop tarts turn out!
These turned out awesome!! Thank you for sharing!
Absolutely heavenly!! It became a weekend project that was so worth it. Next up, s’mores pop tarts!!!!
I was wondering if there was a corn syrup substitute for the the glaze. I don’t particularly like using corn syrup but I do want mine to have the same consistency as your glaze. thanks.
Hi Jeannette! Tessa discusses this in the pink tip box above the recipe! Corn syrup helps the glaze set up nicely and dry on top of the pop tart, so it’s not wet to the touch. Corn syrup is unfairly demonized and really just misunderstood. At the end of the day it’s an invert sugar (meaning that it’s a sugar that’s liquid at room temperature). Corn syrup is not the same as high fructose corn syrup. If you prefer to skip it altogether, just note that the glaze will stay pretty wet and won’t dry or harden fully, so you won’t be able to store the pop tarts stacked on top of each other without the glaze smearing. It also won’t be as beautifully shiny – but it will still taste great. I hope that helps! Let us know what you think of these Poptarts once you’ve given them a try!
I have seen some glaze recipes that call for meringue powder to set it instead of corn syrup. Should be easy to find with a search.
I’ve made these twice and they’ve disappeared both times! Truly delicious!
Would gluten free 1-1 flour work in this recipe? Thanks for all your amazing recipes!
Hi Kerri! I’m sorry, but we don’t test our recipes with gluten free substitutions, so we can’t really say!
Just curious, why an exact 7-inch circle of dough for chilling? Wouldn’t a rectangle make more sense, since it will get rolled into a rectangle? Or is it the 1-inch height that is important? Rolling circles of dough into rectangles isn’t something that I usually do very well, so I would rather chill the dough in a shape that will make it easier for me to roll out. (I once threw a rolling pin across the room. I’m getting better, but rolling out crusts isn’t my strong point.)
Hi Julie! This was just an approximate size that worked well when we tested this recipe. You’re right – it’s more important that the dough is 1-inch thick, just so it chills appropriately in the given time. You can absolutely roll it into a square/rectangle if you prefer – it won’t make any difference to the end result! Let us know how it goes!! 🙂