


Tessa Arias, Chef and Cookbook Author
This post may contain affiliate links. Read our disclosure policy.
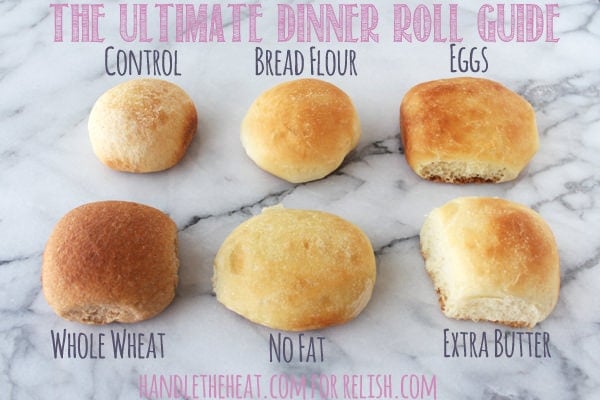
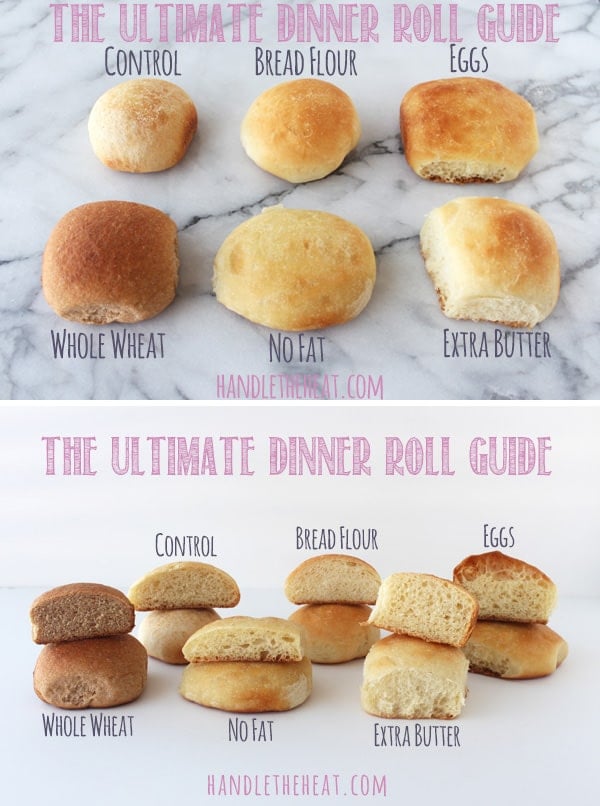
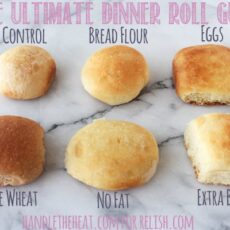
Often times the dishes that become family favorites during the holidays are the side dishes. After all, the side dishes are the best part of Thanksgiving anyways! Whether you are making dinner rolls for Thanksgiving or a typical Sunday dinner, homemade bread is a welcomed addition to any dinner table. Yet most people forgo homemade bread for the often bland and lifeless store-bought or frozen varieties. Dinner rolls don’t have to be intimidating or even very time consuming. In fact, I find bread making to be quite a relaxing and satisfying experience. If anything, the aroma of freshly baked bread is enough to embark on a bread-making journey. I made six batches of dinner rolls to break down the specific ingredients that can make dinner rolls crusty, chewy, soft, fluffy, buttery, or dense so you can make your version of the ultimate dinner roll for your family.
The control recipe I started with is very basic and straightforward. It really doesn’t take all day, just a few hours at most. This is because this control dough recipe relies on the “straight dough” method, which means there are no starters or pre-fermentation periods. All you need to do is mix all the ingredients together, knead the dough, and let it rise. Even with a basic method like this, there are still small ingredient changes that can make big differences in the final baked rolls. I maintained the same ingredients, kneading times, rising times, and oven temperatures when applicable to keep the results consistent. Keep reading to find out how bread flour, eggs, whole-wheat flour, no fat, or extra butter can significantly change the dough and the final texture and flavor of the rolls.
Control:
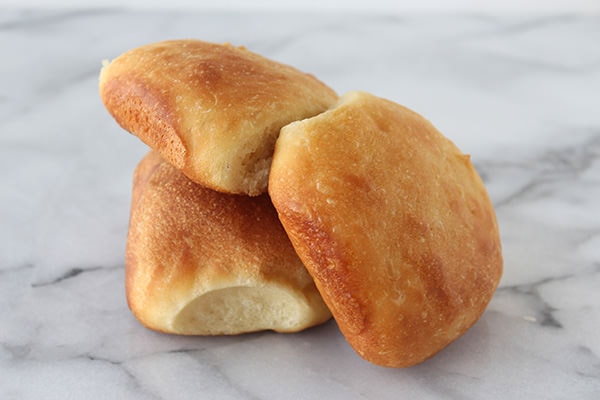
Bread Flour
For this basic experimental batch, I substituted all 3 1/2 cups (15.43 ounces) of all-purpose flour in the control recipe with 3 1/2 cups (15.68 ounces) of bread flour, keeping everything else the same. The dough itself turned out smooth and soft and was very easy to work with. This is likely because bread flour is higher in gluten-forming proteins than all-purpose flour, making for ideal dough. The unbaked rolls raised a significant amount to perfect round balls and looked beautifully golden brown when baked. The baked rolls were somewhat soft yet also chewy. They were a favorite out of all the batches of dough baked. I would definitely use bread flour in the future for bread rolls when I want a slight chew and a round and sturdy roll.
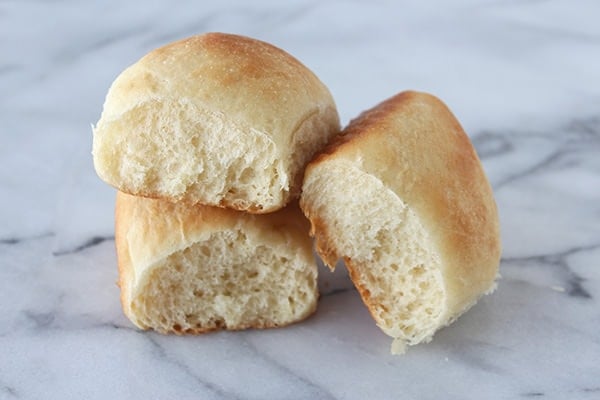
Eggs
Knowing that eggs can lend flavor, richness, and a soft texture to baked goods, I added 2 whole eggs to the control recipe to see how they would affect the bread rolls. Since the eggs added lots of extra moisture to the dough, I compensated by adding an additional 1/2 cup all-purpose flour, for a total of 4 cups. Even after adding more flour, the dough was still pretty sticky. Once I formed the dough into balls, I was surprised by how much they rose. Like the bread flour batch, this batch rose significantly, which was probably due to the extra protein added by the eggs. In fact, these were the largest rolls in this entire experiment. The rolls themselves were soft, rich, and fluffy with a bit of a crusty bite. They had a light and open crumb but were nice and sturdy. I enjoyed these rolls.
No Fat
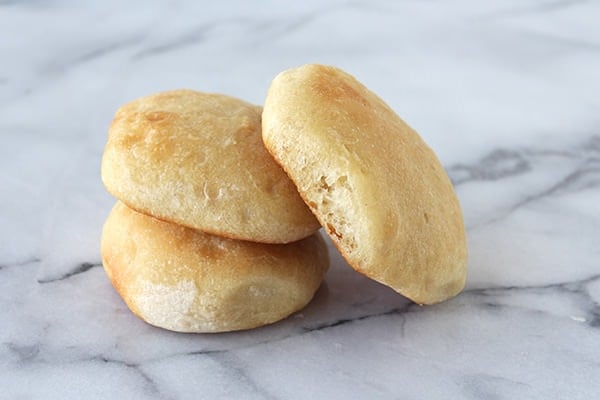
The control recipe calls for fat in the form of 1 cup of milk and 1 tablespoon of butter inside the dough and another tablespoon brushed on the rolls before baking. Since fat is a tenderizer, I wanted to see if I could produce a crusty bread roll by removing the milk and replacing it with additional water, for a total of 1 1/4 cups warm water. I then omitted the butter entirely from this batch. The dough was very wet and sticky, as expected since most crusty bread recipes are on the wet side. This batch of dough raised the least in the times called for in the recipe and the resulting bread rolls were actually quite flat, probably because there wasn’t much protein. These rolls also didn’t brown much while baking which concerned me. I was happily surprised, however, when the baked rolls turned out crusty and chewy with a light, airy interior texture reminiscent of a baguette.
Extra Butter
In this test I set out to see if adding more butter would make a big difference on the texture of the rolls. I added 3 tablespoons of butter to this dough, up from the original 1 tablespoon called for in the control recipe. I also maintained the 1 tablespoon of melted butter to brush on the rolls prior to baking, for a grand total of 4 tablespoons of butter in this experiment, double the amount compared to the control recipe. The dough itself was slightly more tacky than the control but the formed dough balls rose nicely. In fact, they rose so much that they each touched each other in the pan when baked. The baked rolls were ultra soft and fluffy. The look and feel of these rolls reminded me of the soft butter dinner rolls you buy at the grocery store bakery. If you enjoy this texture, adding extra butter is an easy way to accomplish that.
Whole Wheat
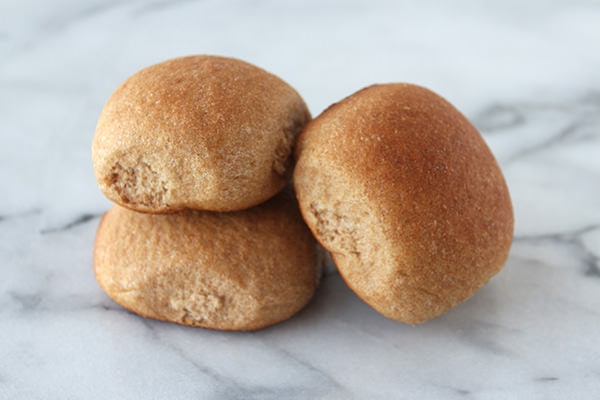
In an effort to make dinner rolls an everyday healthier fare, I set out to see if using 100% whole-wheat flour could still produce tasty rolls. I substituted all 3 1/2 cups (15.43 ounces) all-purpose flour with 3 1/2 cups (14.82 ounces) whole-wheat flour. The dough turned out really firm and not remotely sticky due to the high protein content. The formed rolls stayed nice and round but didn’t rise as much as some of the other batches. The baked rolls formed a nice crusty exterior but the interior was fairly dense and slightly dry, as I feared it would be. If you want to incorporate whole wheat flour into your bread rolls, you may want to start with a 50/50 whole wheat to all-purpose flour ratio to make the rolls lighter and fluffier.
Comparison:
The article The Ultimate Dinner Roll Guide was originally posted at Relish.com.
Check out my Ultimate Dinner Roll recipe created from these experiments!
Also be sure to check out these ultimate guide posts:
The Ultimate Guide to Chocolate Chip Cookies
The Ultimate Guide to Chocolate Chip Cookies Part II
The Ultimate Brownie Guide
The Ultimate Cupcake Guide
The Ultimate Pie Crust Guide
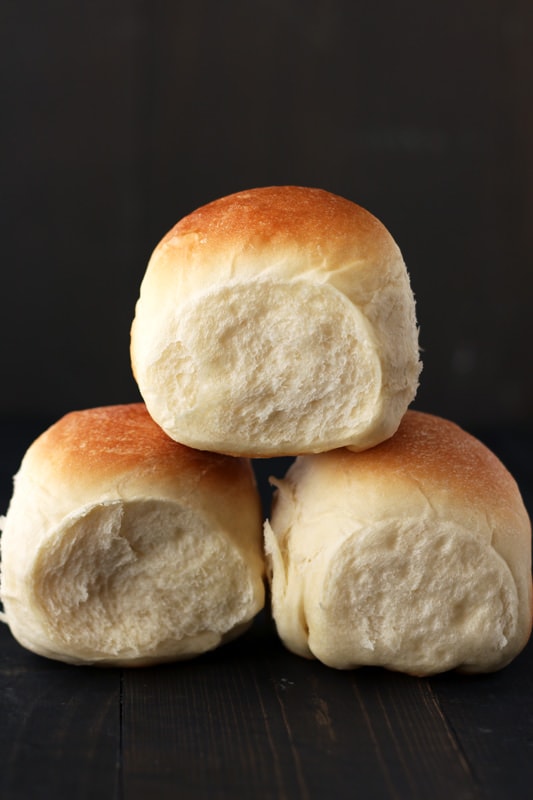
Ultimate Dinner Rolls
Email This Recipe
Enter your email, and we’ll send it to your inbox.
Ingredients
- 1/4 cup lukewarm water
- 1 cup warm milk (100 – 110°F)
- 2 tablespoons unsalted butter, at room temperature, divided
- 2 tablespoons granulated sugar
- 1 1/2 teaspoons fine sea salt
- 2 1/4 teaspoons (1 packet) instant yeast
- 3 1/2 cups (15.43 ounces) unbleached all purpose flour


Instructions
- Combine the water, milk, 1 tablespoon of the butter, sugar, salt and yeast in the bowl of a stand mixer.
- Add 2 cups of flour and stir with a wooden spoon until the dough forms a rough, shaggy mass. Attach the dough hook to the mixer, turn to low speed, and gradually add the remaining flour, kneading until a mass of dough begins to forms. Continue kneading on medium-high speed for 4 to 5 minutes until a soft, smooth ball of dough is formed. The dough should feel elastic and slightly tacky to the touch.
- Lightly spray a large clean bowl with cooking spray and place the dough in the bowl. Cover the bowl lightly with plastic wrap. Let rise for about 45 minutes to 1 hour at room temperature or until the dough is big, puffy, and about doubled in size.
- Spray a 13×9-inch baking pan with cooking spray. Gently deflate the dough. Use a bench scraper, knife, or pizza wheel to divide the dough into 15 equal pieces. Shape each piece into a ball and place in the prepared pan. Melt the remaining 1 tablespoon of butter. Brush the dough with the melted butter. Lightly cover the dough with plastic wrap and let the rolls rise for 30 minutes, or until about doubled in size.
- Preheat the oven to 375°F.
- Bake the rolls for 15 to 20 minutes, or until golden brown. Serve warm. Store leftovers in a plastic bag for up to 3 days.


Thanks. I’m on a quest to make Martin’s potato rolls. This helped a lot, I didn’t realize eggs made the dough rise so much.
Sarting to make my own bread and I find your article very helpful. Nevertheless I seem to have a problem understanding your control recipe instructions. You do not mention any water in the list of ingredients yet you instructions start by saying “Mix water, milk”… Would you please specify how much water? I looked carefully and did not see it mention anywhere! Thanx
Want to make but cannot find amount of water to add.please answer the question.
I made these rolls successfully using only milk. I took the the instructions to mean water OR milk.
Good luck!
I’ve made this recipe several times, and everyone loves it. I had a question though, pertaining to salt content. What would the effect be, on yeast rolls such as these, if you were to double or even triple the salt content? Will the salt take up arms against my precious yeast, or will the two co-habitate peacefully?
The text says to combine water in the first step, but never specifies the amount of water. Should there be water in the dough? I attempted this dough without and it seems very dry.
I just made the recipe using bread flour! I’m looking forward to turning this into pepperoni rolls! Here’s the problem, how much water? No where in the list of ingredients is the amount to use. I hope that should have said water OR milk, cause that’s what I did.
Please let me know how much water should have been included.
Thanks!
PS: I only rated it 3 stars because I haven’t baked or tasted it yet. I’ll be changing it later, I’m sure.
Thanks for doing this, it’s proved a useful reference point when starting out. I’m in the UK, where the default tends to be bread flour for bread and rolls, but I tend to swap the butter roughly weight for weight with olive oil, mainly for the added flavour (which I love!), but also for the softer crust and better keeping qualities. I’m also fond of adding about 20 percent cornmeal for the rich flavour.
Again thanks!
Emma
Oh my goodness. Ive made these about 4 times now Today, again. They are perfect rolls! you can also use them for sandwiches. I love love these rolls You won’t be disappointed, Give em a try.
Just found your website and I am in LOVE!!!
my question is a bit late now since you have probably forgotten after 5 years, but I wonder what the control bread rolls were like – you made them but you do not seem to have a description of how they turned out. Would have helped to have a description of the control bread rolls so that we know what all the others are being compared to.
Anyway it is interesting what the changes do. I’m trying to copy some awesome bread rolls from a particular bakery and I will try these ideas.
I’ve been baking my own bread since the Summer of 2015 and I’ve also learned a few things (some of which I’ve had to learn after moving overseas!):
1) For whole wheat flour, which absorbs a LOT of liquid (doesn’t matter which!), it helps to add 1/4 cup of whatever liquid you’re using, or plain water. The “extra” parts of the flour that are absent from the white flours are what absorb the liquid.
2) All purpose flour can become bread flour if you add vital wheat gluten to it. No one has a standard amount to add but I tend to use a tsp of vital gluten per cup of plain, or all purpose, flour. If you’re weighing your ingredients: 1 oz of vwg to 10 oz of plain flour. One important caveat: check the protein content of your plain flour BEFORE adding the vwg. The reason is that if your plain flour has a higher content, say 13 g or more, your bread will be too chewy. Think rubber!
On the other hand, if it’s too light in protein, about 8g or lower, then that tsp of vwg will be too little. I’d adjust it to 1 1/2 tsp in this case.
You might have to make a cpl of batches of bread until you find what works with your AP flour.
3) If you’re using AP flour to make bread, even if you’re going to knead it, letting the dough proof overnight in your fridge will allow the gluten that IS in it to develop. Let it come to room temp before kneading it.
Finally:
4) Most bread recipes will tolerate being frozen AFTER the first proofing, and before the last rise. Just shape your rolls or loaf, allow them to freeze on a tray in your freezer, THEN place in a freezer bag until at least 2 hours before baking them as usual. For a crisper crust, brush with just plain water before baking them.
Lovely site, btw, Tessa! Just wanted to share my love of baking!!
Can I make these up ahead of time and freeze them to serve later.