


Tessa’s Recipe Rundown
Taste: So much rich, delicious chocolate flavor.
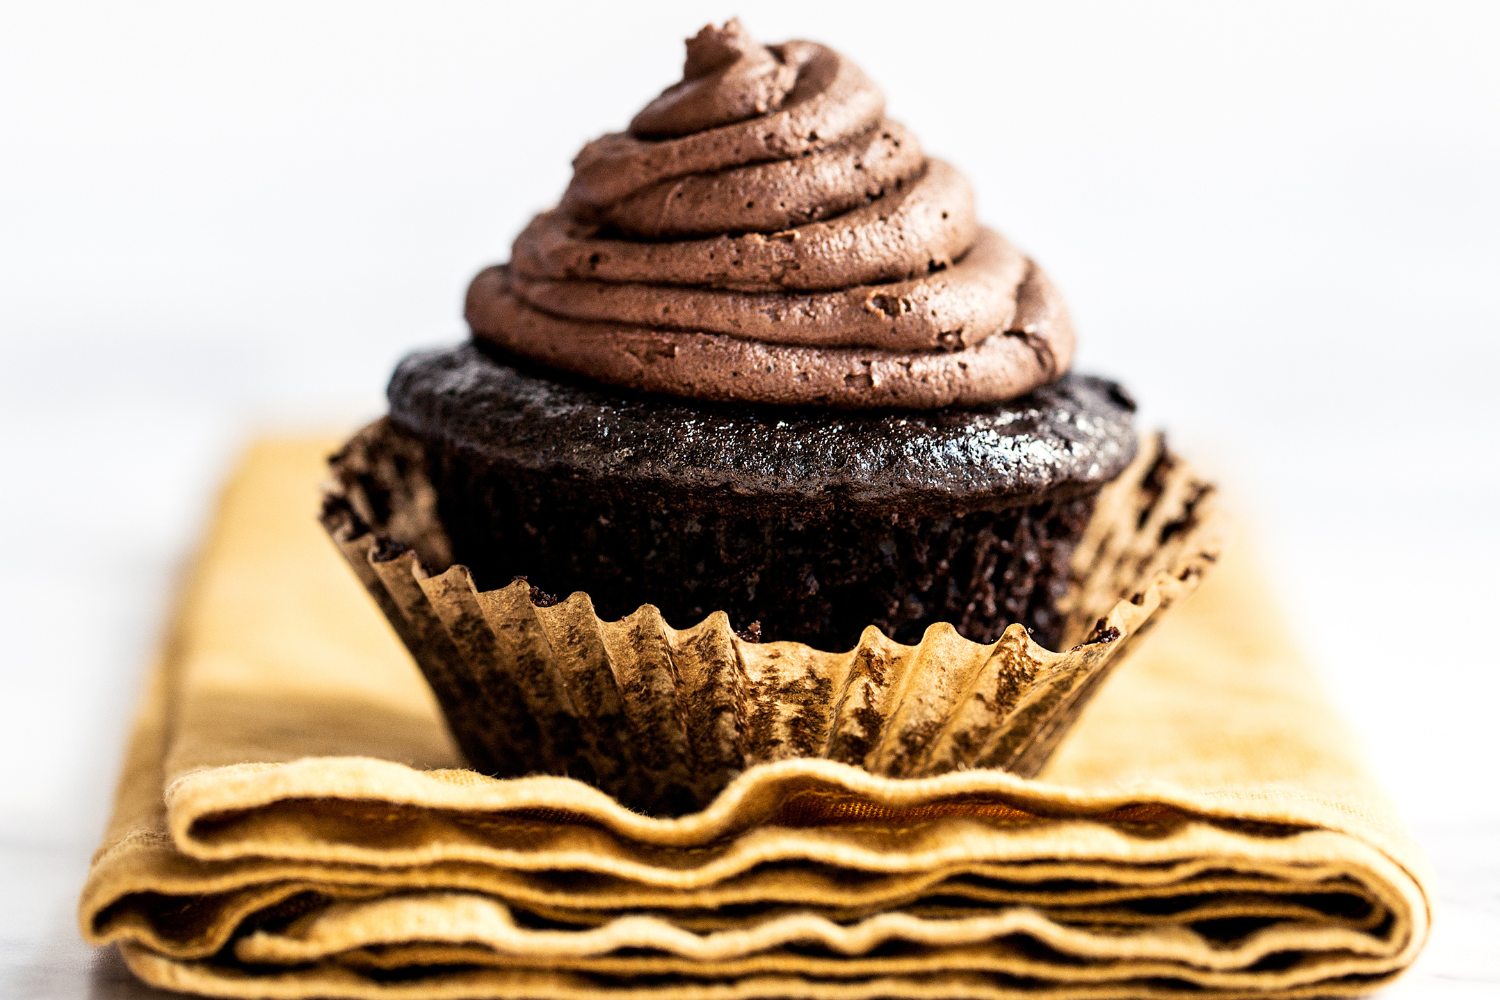
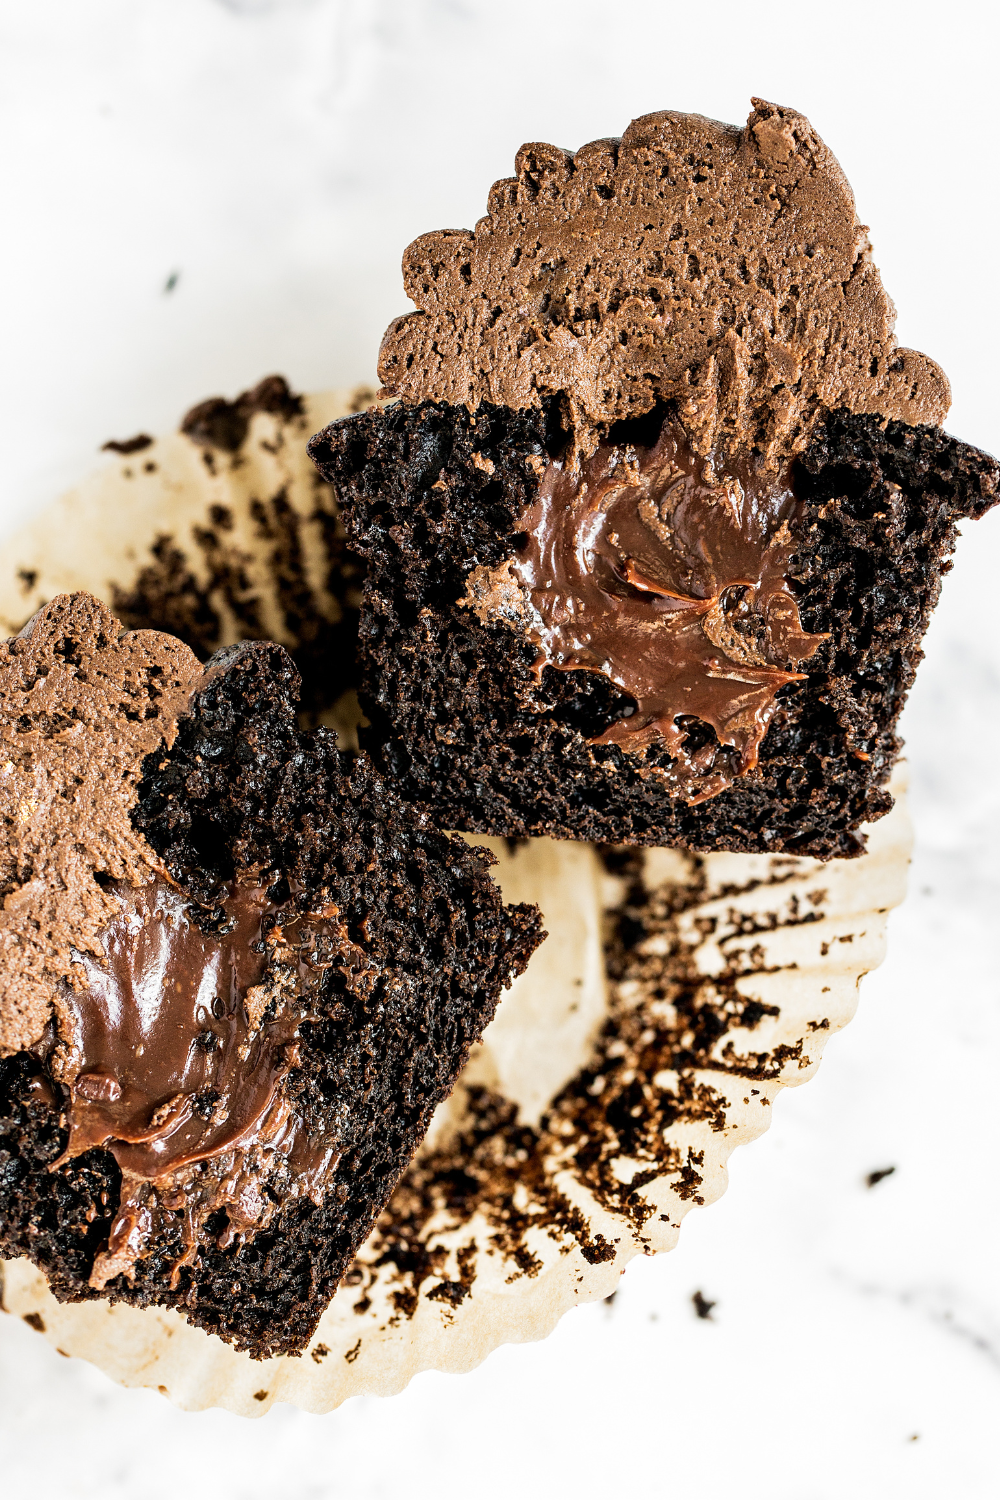
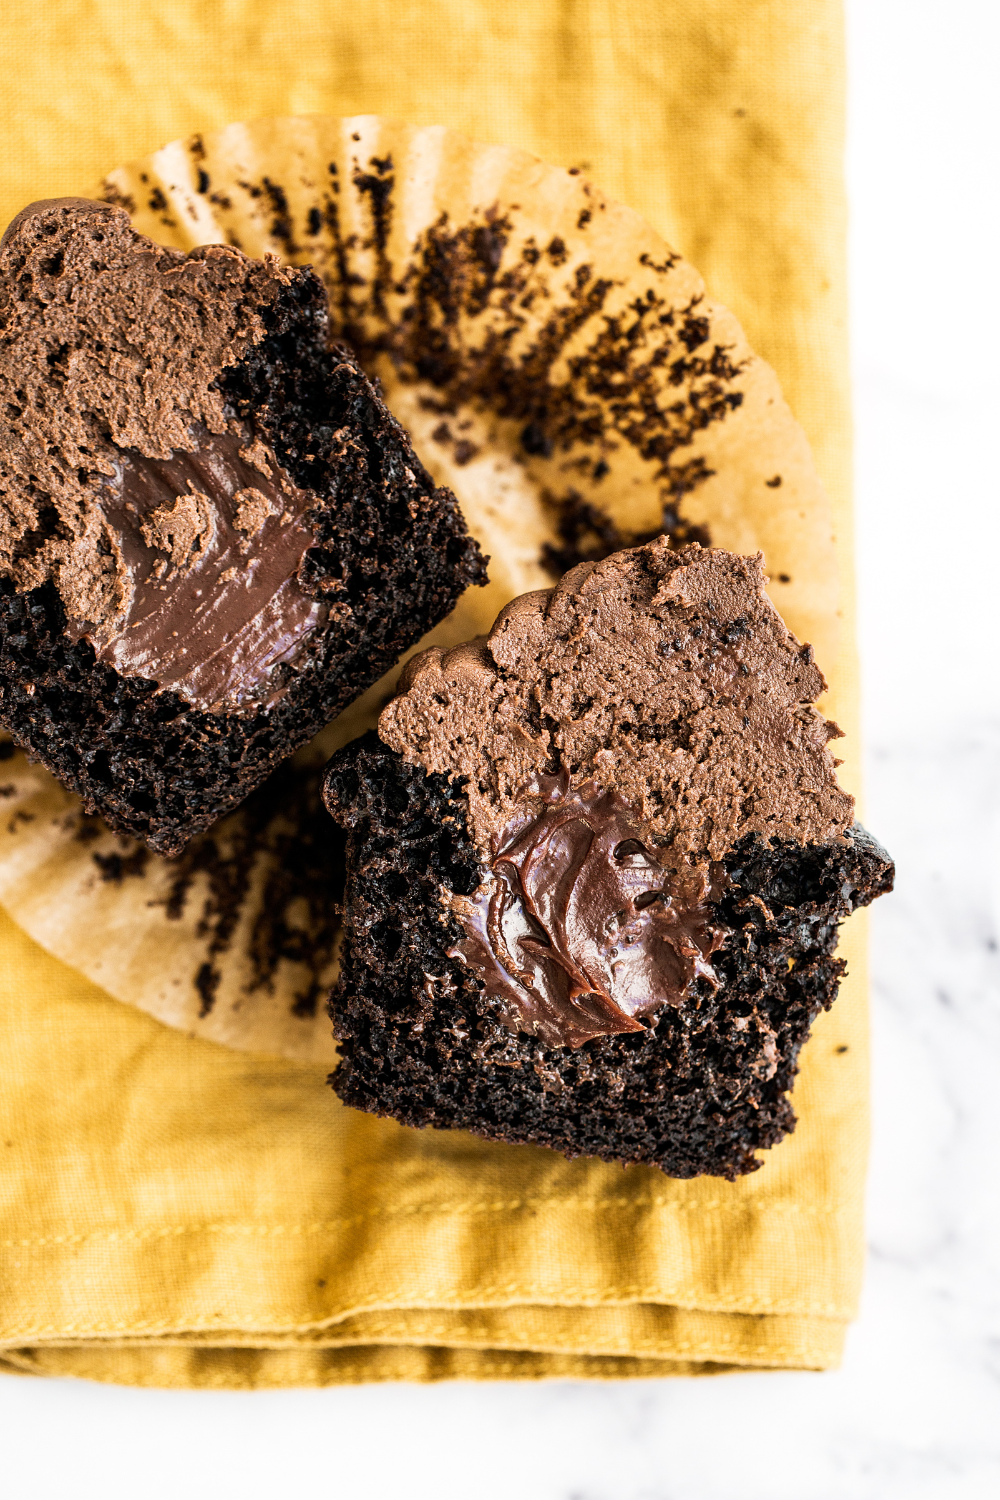
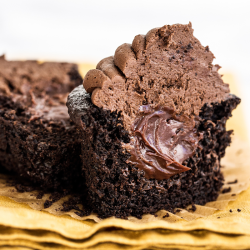
Texture: The cupcake is moist and tender, the ganache filling is slightly fudgy, and the buttercream on top is thick and creamy. Heaven in every bite!
Ease: Fairly easy, but a little messy.
Why You’ll Love This Recipe: Perfect cupcake for any chocolate lover.
This post may contain affiliate links. Read our disclosure policy.
Chocolate Blackout Cupcakes are what chocoholics’ dreams are made of.
As a total chocoholic myself, recipes that contain chocolate in any form are generally what excite me the most – let alone a recipe that contains chocolate in this many forms!
The chocolate in these Chocolate Blackout Cupcakes hits you immediately. Especially if you take a big enough bite to reach the chocolate ganache filling right off the bat. There’s so much goodness in both taste and texture happening here that I encourage you to fully savor every moment.
These cupcakes are perfect for Halloween (especially if you add some white chocolate spiderwebs on top!) or Valentine’s Day (the perfect dessert for you and your chocolate-loving Valentine!).

Sprinkle of Science
How to Make Chocolate Blackout Cupcakes
How to Make Moist Chocolate Cupcakes:
- Weigh your ingredients. I highly recommend using a digital kitchen scale to weigh your ingredients. Without a scale, it’s so easy to accidentally add too much of your dry ingredients, especially flour and cocoa, resulting in dry, dense cupcakes. Learn more about how to measure ingredients here.
- Oil. Oil creates an ultra-moist texture and open, slightly spongy crumb which is perfect for chocolate cupcakes. Since oil is liquid at room temperature, it gives the palate a sensation of moisture even though it contains no water! Give your vegetable oil a sniff before using to make sure it’s fresh. Feel free to use melted coconut oil instead of vegetable oil. Learn more about Oil vs. Butter in Baking here.
- Dutch-processed cocoa powder, eggs, and vinegar. More on these ingredients just below.

What Type of Cocoa Powder Do I Need?
For the best rich chocolate cupcakes, use Dutch Processed Cocoa Powder to achieve a deeper color, and because it will typically contain more cocoa fat (learn more about cocoa powder here), resulting in more moist and tender cupcakes.
You can find Dutched cocoa in some specialty kitchen stores, or online here. I haven’t tried using black cocoa, but that should work just fine too. If you must use natural cocoa powder, that will work as well, but your cupcakes might not be as dark in color or as rich in flavor.
Why Are Eggs Used in Cupcakes?
The more whole eggs a cake or cupcake recipe has, the richer it’ll be. For this recipe, I added an extra egg yolk. This adds a touch more richness, chewiness, and structure, so the cupcake can stand up to a generous amount of frosting.
Why is There Vinegar in This Recipe?
This may seem like a strange ingredient, but I promise you won’t taste it in the final result. It simply helps to activate the baking soda to create tall, fluffy cupcakes.

Preventing Cupcake Liners from Sticking
It’s important to use high-quality liners to prevent sticking. These are my favorite cupcake liners that basically never stick. If liners sticking to your cupcakes are a common problem for you, check out my How to Prevent Cupcake Liners from Sticking post.
How to Fill Chocolate Blackout Cupcakes
Possibly the best part of this recipe, Chocolate Blackout Cupcakes are filled with a hidden pocket of rich and fudgy chocolate ganache. Filling cupcakes is made easy with one simple tool: an apple corer. Use the corer to evenly remove the center of each cupcake. Bonus: little cupcake scrap pieces for you to enjoy while finishing up in the kitchen 😉
How to Store Chocolate Blackout Cupcakes
Store Chocolate Blackout Cupcakes covered at room temperature for up to 1 day, or in an airtight container in the fridge for up to 3 days.
Dark Chocolate Buttercream
This buttercream has a LOT of chocolate in it, both in the form of melted chocolate and cocoa powder, so it’s thick, rich, and decadent. Feel free to play around with adding in more cream to thin it out, or more powdered sugar to thicken it up.
Interested in Learning More About the Science of Baking?
Check out my online baking class, The Magic of Baking! All of the video lessons, downloads, and side-by-side comparison photos are ready and waiting for you right now. It’ll show you how and why baking recipes work so you can bake with complete confidence.
More Chocolate Recipes:
Email This Recipe
Enter your email, and we’ll send it to your inbox.
Ingredients
For the ganache filling:
- 2 ounces (57 grams) semisweet chocolate
- 1/4 cup (59 grams) heavy cream
For the cupcakes:
- 4 ounces (113 grams) bittersweet chocolate, finely chopped
- 1/3 cup (28 grams)
dark Dutch-processed cocoa powder - 1/2 cup (119 grams) boiling water
- 3/4 cup (95 grams) all-purpose flour
- 1/2 cup (100 grams) granulated sugar
- 1/4 cup (50 grams) packed light brown sugar
- 1/2 teaspoon fine sea salt
- 1/2 teaspoon baking soda
- 1/2 cup (113 grams) sour cream or plain yogurt, at room temperature
- 1/4 cup (56 grams) vegetable oil
- 2 large eggs plus one egg yolk, at room temperature
- 2 teaspoons white vinegar
- 1 teaspoon vanilla extract

For the frosting:
- 8 ounces (227 grams) bittersweet chocolate, melted and cooled
- 3 cups (375 grams) powdered sugar, sifted
- 1/4 cup (21 grams) dark cocoa powder, sifted
- 8 ounces (227 grams) unsalted butter, at room temperature
- 1/4 teaspoon fine sea salt
- 2 teaspoons pure vanilla extract
- 2 tablespoons heavy cream
Instructions
Make the filling:
- Place the chocolate and cream in a medium microwave-safe bowl and microwave until mixture is warmed, about 30 seconds. Whisk until smooth. Place mixture in refrigerator until just chilled and firmed, no longer than 30 minutes.
Make the cupcakes:
- Meanwhile, preheat oven to 350°F.
- In a medium heatproof bowl, add the chocolate and cocoa. Pour hot water over mixture. Cover and let stand for 5 minutes. Whisk mixture gently until smooth then set aside to cool.
- Line a standard 12-cup muffin tin with high-quality cupcake liners.
- In a small bowl, whisk together the flour, sugar, salt, and baking soda. Set aside.
- Whisk sour cream, oil, eggs, egg yolk, vinegar, and vanilla into the cooled chocolate mixture until smooth. Stir in the flour mixture until smooth, being careful not to overmix.
- Using a spring-loaded scoop, divide the batter evenly among prepared muffin cups. Bake until cupcakes are set and firm to the touch, about 17 to 20 minutes. Let cupcakes cool in pan on a wire rack for 10 minutes before removing from pan to cool completely, about 1 hour. Cupcakes can be stored in an airtight container at room temperature for up to 1 day.
Fill the cupcakes:
- Using an apple corer or pairing knife, slice a small section of the center of the cupcake, being careful not to slice through the bottom. Fill each hole with 1 heaping teaspoon of the firmed ganache.
Make the buttercream:
- In the bowl of a stand mixer fitted with the paddle attachment, mix together the sugar, cocoa powder, and butter. Mix on low speed until well blended and then increase the speed to medium and beat for another 3 minutes. Scrape down the bottom and sides of the bowl, as well as the mixer attachment. Add the salt, vanilla, cream, and cooled melted chocolate and beat on medium for 2 minutes, or until light and fluffy.
- Spread or pipe evenly over the filled cupcakes. Serve or store covered at room temperature for up to 1 day, or covered in the fridge for up to 3 days.
This post was published in 2018 and has been updated with additional baking tips and baking science information. Photos by Ashley McLaughlin.


I made them yesterday. Everyone loved them. One comment on what to put 2 extra cupcakes in to store till the next day was: “just put them on a plate because I doubt they will make it till tomorrow” 🙂 🙂 🙂
The recipe is added to favorites and I will definitely make it again. Thanks!
Hi Tessa, I have your cupcake recipe in the oven now. Can’t wait to taste them!
I looked up Hershey’s Special Dark Cocoa and found this:
“Response from The Hershey Company:
HERSHEY’S · Consumer Relations · 5 months ago
We really our sorry for the disappointment in the new formula. While we made the decision to change this product to a 100% dutch-processed cocoa to maximize the milder flavor that alkalizing brings to cocoa, we will be sure to pass your comments on to our Marketing Department so they can look into this further. We appreciate the feedback.” https://www.hersheyland.com/products/hersheys-cocoa-special-dark-100-cacao-cocoa-8-oz-can.html
I thought you would want to know. I didn’t know what to do for your recipe so I put 50% of Hershey’s Unsweetened Cocoa (non-alkalized) and 50% of Valrhona Cocoa. What will you do?
Thanks much. I think this is going to be excellent. The batter tastes incredible! 🙂
Hi Suzanne! Thank you so much for bringing this to our attention – we really appreciate it!! I hope you enjoyed your cupcakes!
I’ve made these twice so far! They are SO good! I can’t wait to try more recipes from you and hopefully become a better baker. Thank you for posting this and making it so easy to follow!
This is so wonderful to hear, Elizabeth! Thanks so much for the comment 🙂
This recipe is superb! A chocolate lover’s dream. The cake was super moist. The frosting was velvety smooth, with a hint of salt flavor that nicely offset the chocolate sweetness. The ganache in the center was a perfect consistency as well. Will definitely make again.
So thrilled to hear that these cupcakes were so delicious, Suzanne!
So chocolatey! All the chocolate lovers in my life love me a lil more after this. Lol
I used cashew yogurt and it worked great.
I made the cupcakes two days ahead, and the buttercream the night before. I stored the cupcakes at room temp and the frosting in the fridge. I let it come to room temp in a room temp water bath and re-whipped it before topping them.
I also topped them with finishing salt
Sounds wonderful! So happy you and your friends enjoyed this recipe so much!! 🙂
So moist! I topped them off with either sprinkles or dark chocolate chips. I didn’t have time to make the ganche filling but I got a lot of compliments about these cupcakes! Even from a guy who doesn’t like cupcakes, he said this was the best he’s ever had 😀
Hi Linda! Thank you so much for letting us know! I’m so excited you loved these cupcakes! It’s always so great to win over a non-cupcake-lover with a recipe, isn’t it!? 🙂
I made these for VDay gifts for teachers this year.
Since I made 3 regular batches and 1 GF batch, I opted to not fill them, but instead added mini chocolate chips in the batter.
I also made melting chocolate hearts for the top.. ..
They’re amazing!!!
Sounds so delicious! So kind of you to make delicious cupcakes for everyone 🙂
The icing is so amazing! Can it be frozen? I don’t want to waste it!!
Sure! You can store it in an airtight container in the freezer for up to 3 months. Let come to room temperature and re-whip in the stand mixer until light and fluffy again. Add a tablespoon or 2 of powdered sugar if it needs to thicken 🙂
I know you are ABSOLUTELY NOT into gluten free/ dairy free baking…. I have a grandaughter who medically needs to be gf/df. I know you can’t advise me on that. However, since you do live in the baking world, can you direct me to a blogger/baker that has easy, tasty recipes that I can make for my granddaughter. I have learned so much from you. I just would like to be able to also bake something for my granddaughter when the rest of us are enjoying your tasty recipes.
Thanks fo any help in steering me in the right direction.
Hi,
Can I skip the eggs? Or, is there any substitute for eggs?
No, the eggs are essential to this recipe! We haven’t experimented with any substitutes, sorry!
ITS SO GOOD!!!!!!!!!!!!!!!
🙂
These are the best chocolate cupcakes I have ever made!!! Tastes like a Hershey’s bar in a cupcake. The icing is perfect in taste and consistency.
Wonderful! So happy you enjoyed this recipe, Ayden!
can i use a handheld mixer for the frosting?
Hi Kayla! Yes, if you don’t have a stand mixer, you can absolutely use a handheld electric mixer for this recipe. Just make sure to scrape down the sides of the bowl frequently enough that everything is evenly incorporated. Let us know what you think once you have made them! 🙂