This post may contain affiliate links. Read our disclosure policy.
Although cupcakes are certainly easier to make than cakes, there’s still a lot that can go wrong. I get asked so many questions about making perfectly moist, flavorful, and beautiful cupcakes that it was about time I wrote this How to Make Perfect Cupcakes guide for you. I have so many resources, images, tips, tricks, and videos to share I figured bringing them all into one massive post would make it super helpful. Let’s jump right in because there’s a lot to cover. I hope you enjoy!
My Ultimate Cupcake Guide
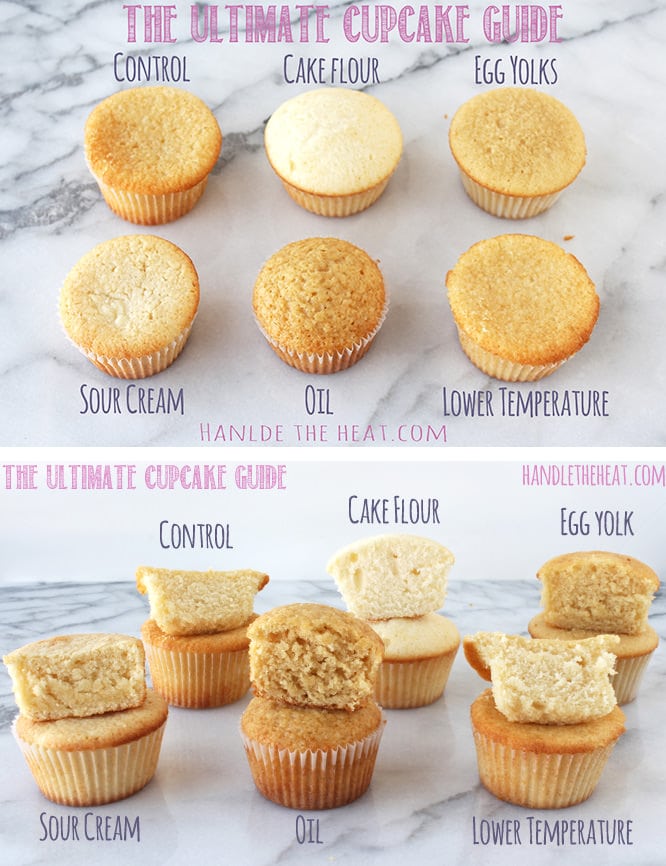
A couple years ago I did something a little crazy. I actually made 6 batches of cupcakes in one day, tweaking just one small thing at a time to gauge how different tweaks affected the final result. You can read the full Ultimate Cupcake Guide here to learn the exact differences, but the photo below is pretty explanatory as are the customization suggestions I’ve made.
Customize Your Cupcakes
Use the following ingredients to tweak your favorite cupcake recipe, or search for a recipe that follows your favorite kind of cake as described below.
Soft Cupcakes
Substitute half of the all-purpose flour with cake flour (not ‘homemade’ cake flour – the real stuff). Anything more than half tends to be dry and crumbly.
Moist and Rich
Add an egg yolk along with the other eggs called for in the recipe to achieve slightly chewy yet soft, ultra moist, and rich cupcakes that stand up to a thick and generous frosting.
Extra Flavorful
Swap out the milk called for in the recipe with buttermilk or sour cream for a slight tang to achieve a nice depth of flavor. Using sour cream may also yield slightly denser and chewier cupcakes, which is great if you like a lotta frosting.
Bake Beautiful Tall Domed Cupcakes
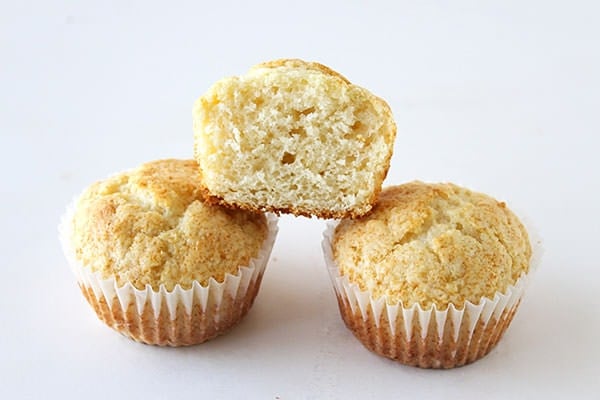
A problem MANY home bakers have with cupcakes is that they end up flat, or worse, caved in. Sometimes it’s just the fault of the recipe. There’s a fine line between being perfectly moist, and being so moist that the cupcakes just collapse due to the weight of that moisture. There’s a trick I learned while writing my Ultimate Guide to Muffins for getting beautiful domed cupcakes, as pictured above.
Here’s what you do:
Basically, you’ll start with a high temperature and drop to a lower temperature. Try starting at 400°F for 5 minutes, then reduce to 350°F for another 10 to 15 minutes, or until the cupcakes are done according to the recipe directions. You’ll also want to be sure to fill your cupcake tins 3/4 full with batter. This takes a little experimenting with and will depend on the recipe you’re using, but it’s a good trick to know!
Baking Tips You NEED to Follow!
1. Measure your ingredients properly. Weight is the most accurate, so I highly encourage you to use a kitchen scale and my handy Ultimate Measuring Guide.
If you ever have dry cupcakes, it’s likely due to an over-measurement of flour which is surprisingly easy to do. If you must use volume measurements (cups vs. weight), then be sure you’re fluffing up your container of flour, spooning it into your measuring cup, then scraping off the excess with a straight edge.
2. Temperature is EVERYTHING. Ingredients like butter and eggs should typically be at a cool room temperature. Track your oven’s temperature with an oven thermometer, because most ovens are fairly inaccurate and can ruin delicate food like cakes.
3. Follow the recipe! The first time you make a new recipe, follow it exactly. Recipe writers (reputable bloggers included!) spend a lot of time perfecting recipes and every step and ingredient is included for a specific reason. Making a bunch of changes or substitutions isn’t always a good idea. If you’re already familiar with a recipe, try changing ONE major thing at a time so you can track the results more clearly.
4. Ensure your ingredients are fresh. ESPECIALLY leaveners like baking soda and baking powder. Learn about Baking Soda vs. Baking Powder HERE.
Baking Cupcakes
I love to use my large OXO Good Grips spring scoop to fill a Wilton Muffin Tin with the cupcake batter. If you’re using an oven thermometer as mentioned above, then baking shouldn’t present too many issues. Still, there’s a lot of factors that can change the amount of time YOUR cupcakes need to bake to perfection. Start checking on them soon rather than later.
Sticky Liners?
There’s nothing worse than baking beautiful cupcakes only to have them stick to the cupcake liners. OR when pretty decorative liners end up looking completely transparent after baking. Use high quality or professional level greaseproof baking liners and spray them lightly with nonstick cooking spray to help prevent the cupcakes from getting stuck. ALSO, be sure to remove the cupcakes within minutes of them coming out of the oven. The steam created by the residual heat can build up and cause the liners to attach to the cupcakes.
Buttercream Frosting
I’ve included two full step-by-step videos showing you how to make two of the best buttercream frostings you’ll ever taste. One is the easier American-style buttercream, the other is the more involved (but creamier and less sweet) Swiss meringue buttercream. Feel free to click on the full posts for more details, including the printable recipes.
Butter vs. Shortening?
This video demonstrates the differences between the two in all baking, in case you’re interested! Here’s a quick rundown for frostings:
Butter: By far the best flavor (butter-flavored shortening just can’t compare) but also requires cooler temperatures to avoid melting. Additionally, you’ll never get a pure white color with a butter based frosting.
Shortening: By far the best in holding its shape and not melting. However, flavor is seriously lacking and leaves a filmy greasy residue on the palate due to the higher melting temperature.

Salted vs. Unsalted Butter
Another full-fledged video explaining the differences because it’s something I’m asked about so often. Bottom line is that I ALWAYS use unsalted butter. However, if you only have salted you can omit all or most of the salt called for in the recipe.

Decorating Cupcakes
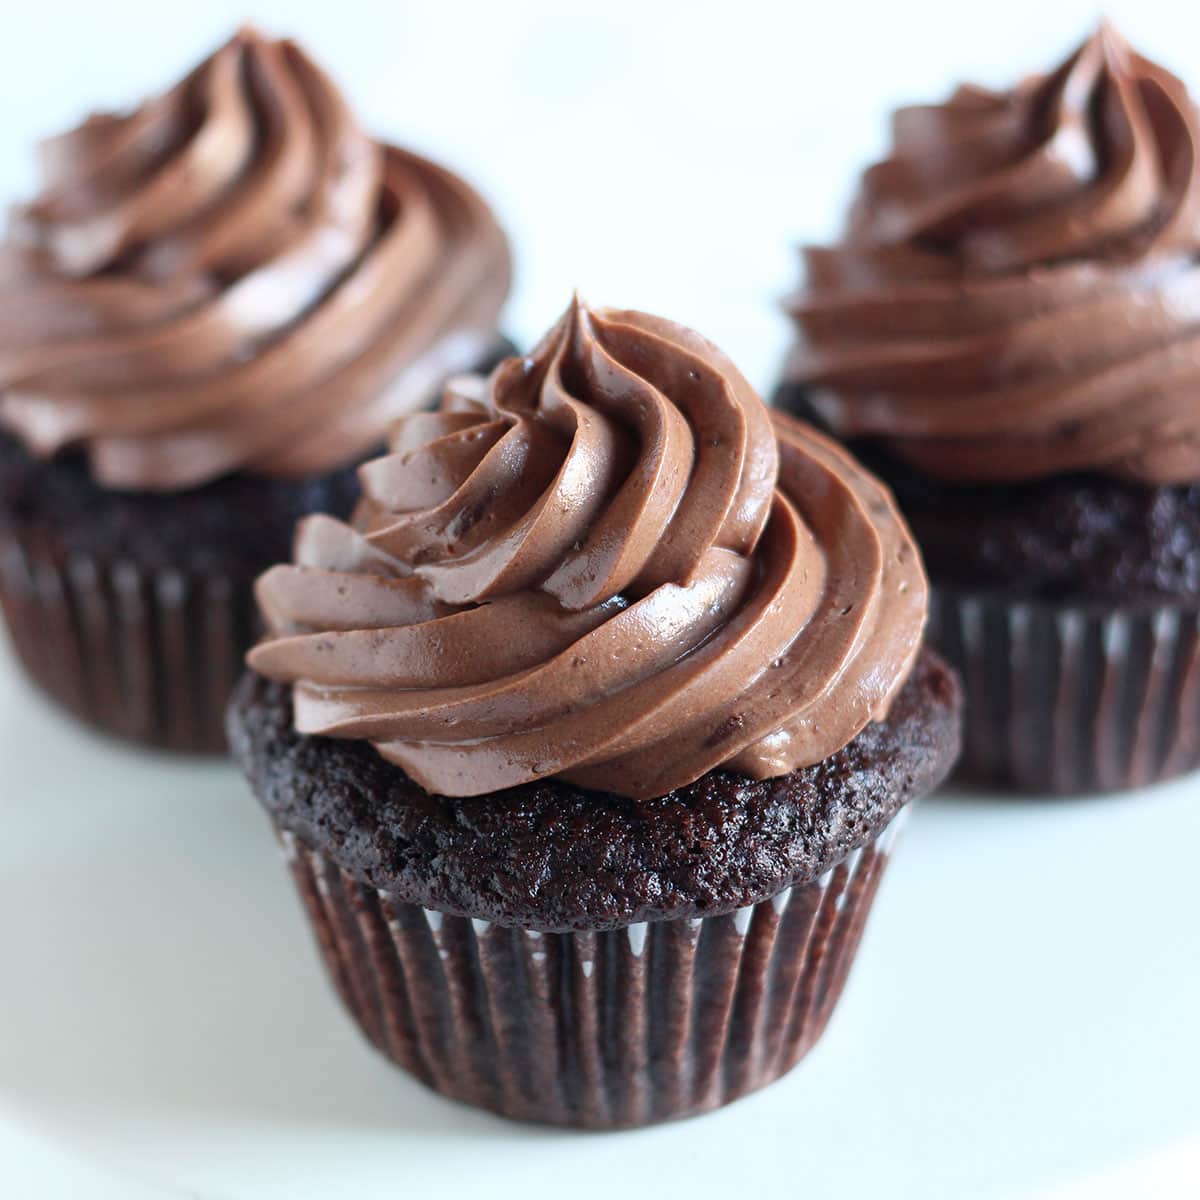
Beautiful bakery-quality cupcakes don’t need to be difficult or intimidating. Hopefully the tips in this section help you to create gorgeous cupcakes! My biggest tip for piping frosting is first to make sure the frosting is a perfect piping consistency. It should be light and fluffy and flow through your piping bag with ease. It shouldn’t be so thin that it can’t completely hold its shape.
Newbie Tip:
If you’re new to piping or just aren’t very good, practice on a clean plate or piece of parchment paper. You can just scrape the frosting back into your bowl and then back into the piping bag afterwards! Having good piping tips makes all the difference.
Which piping tip to use?
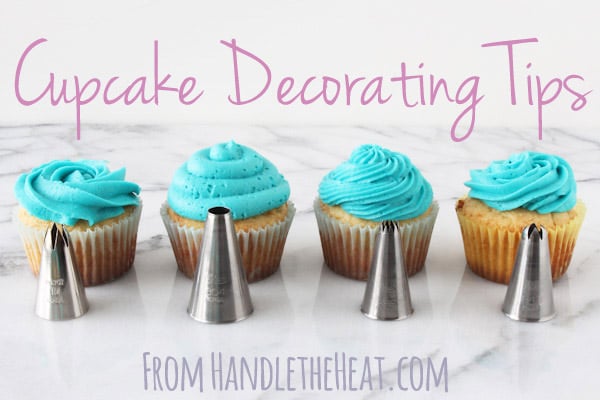
Here are my favorite piping tips. From left to right: Wilton 1M, Ateco 804, Ateco 863, Ateco 843
Do I need a coupler?
A couple is a little two-part plastic tool that allows you to change out your piping tip without having to change the entire bag. You only need a coupler if you plan on using more than one piping tip for the same batch of frosting. If you’re using some of the cupcake decorating tips I mentioned above, you’ll need a LARGE coupler.
Food Coloring
I don’t use the stuff often but when I do it’s typically Wilton gel coloring. I start off by adding a little bit at a time with a 1/4 teaspoon and increase the amount until I get my desired color.
Decorating with Chocolate
Making beautiful chocolate decorations to top your cupcakes with is much easier than you probably think. And it’s not just for Valentine’s Day!

Serving & Storage
I get asked frequently about how long cupcakes will stay good, and if frosted cupcakes can be kept at room temperature or not.
Room Temperature
Unfrosted cupcakes can be kept in an airtight container at room temperature for 2 to 3 days. Some cupcake recipes will last longer than others.
Storing frosted cupcakes can be a little tricker. Some would argue that the sugar in buttercream helps prohibit bacteria growth so buttercream is fine left at room temperature for an extended period. It’s up to you and what you feel safe doing. I typically keep frosted cupcakes at a cool room temperature for the majority of the day. Then I refrigerate. If you’re using shortening then you can keep it at room temperature for longer.
Fridge
Unfrosted cupcakes can be stored in an airtight container in the fridge for up to 1 week. Let come to room temperature before frosting and serving.
Frosted cupcakes can be stored in an airtight container in the fridge for for up to 2 to 4 days, though they’ll begin to dry out the longer they’re stored.
Frosting on its own can be stored in an airtight container in the fridge for up to 1 week. Let come to room temperature and re-whip in the stand mixer until light and fluffy again.
Freezer
Unfrosted cupcakes can be kept in an airtight container in the freezer for up to 2 months. Ensure the cupcakes maintain their quality by wrapping each one in plastic wrap and then storing in an airtight container. Thaw the frozen cupcakes in the fridge overnight. Cupcakes thawed at room temperature may go mushy.
Frosted cupcakes should not be frozen, however you can freeze the frosting on its own. Store in an airtight container in the freezer for for up to 3 months. Let come to room temperature and re-whip in the stand mixer until light and fluffy again. Add a tablespoon or 2 of powdered sugar if it needs to thicken.
My Favorite Cupcake Tools
Here are some of my favorite products and tools for baking cupcakes, in addition to what I mentioned above. Please note these are affiliate links, meaning I may earn a commission off your purchase which helps me continue to publish posts just like this one 🙂
Small Offset Spatula – perfectly sized for frosting cupcakes!
Ateco Pastry Tube Set – absolutely wonderful for cupcakes (except for one) and what I usually use. Use with large couplers.
Plain Cupcake Liners – I order this giant pack on Amazon because it’s such a great value!
Disposable Piping Bags – this giant roll of generously sized piping bags makes cleanup an absolute breeze.
OXO Large Scoop – what I use every single time to fill my cupcake tin evenly with batter.
Le Creuset Spatulas – I love these because you can remove the silicone part from the handle and throw it in the dishwasher.
Wilton Nonstick Muffin Tin – my favorite tin so far and I’ve tried a few.
Apple Corer – this is a strange one but it works brilliantly for removing the center of a cupcake to fill (with Nutella, caramel, jam, etc.)
Beater Blade – KitchenAid attachment that scrapes the sides of the bowl so you don’t have to (make sure to get the right size for your model).
KitchenAid Stand Mixer – makes whipping up the batter AND frosting a breeze! Love this machine.
Cupcake Carrier – great for transporting your cupcakes without stress.







Hi Tessa. Can you please make this guide printable?
Thank you!
Candy
Should I put fan in the oven while baking?
Hi!! What is control in the picture?
Hi Tessa,
Your website has amazing information.
Can we use icing sugar instead of powdered sugar for butter cream frosting?
Thank you
Hello Tessa, i have some non stick silicone cupcake liners and i wonder if the silicone affects the baking with some way. I love them and cupcakes never stick on them but i think that the shape of cupcakes isn’t perfect.
how can i put liquid chocolate inside muffin or cup cake?