


Tessa’s Recipe Rundown
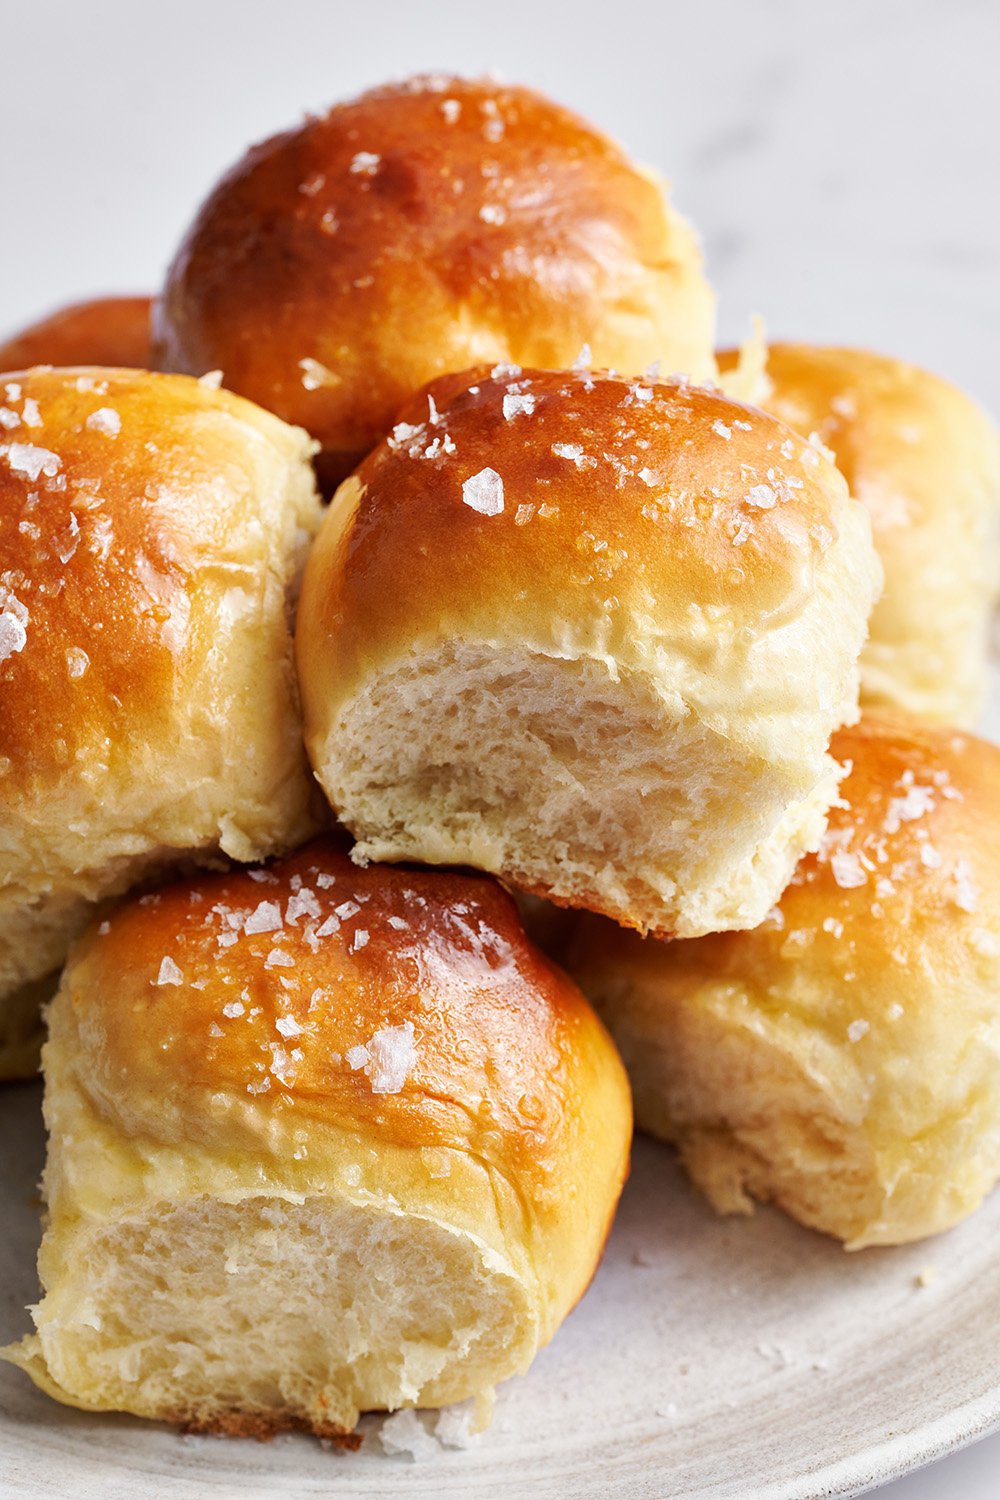
Taste: My homemade dinner rolls are super buttery with the perfect balance of sweetness and saltiness.
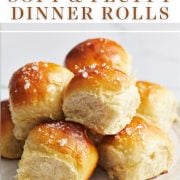
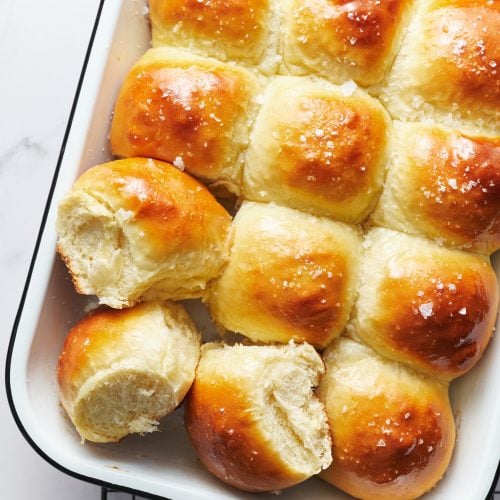
Texture: These are fluffy, soft dinner rolls with a golden brown exterior.
Ease: If it’s your first time trying out homemade bread recipes, these dinner rolls are a great place to start!
Why You’ll Love This Recipe: This recipe is easy, relatively quick to make, and yields delicious dinner rolls perfect for Thanksgiving or any special occasion.
This post may contain affiliate links. Read our disclosure policy.
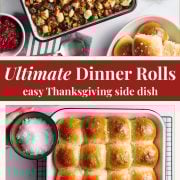
Soft, golden, and buttery — these homemade dinner rolls turn any meal into something special, especially around the holidays. I love them at Thanksgiving, but whether I serve them with a holiday turkey or a weeknight roast, they disappear quick.
If you’ve ever felt nervous about baking with yeast, I promise this recipe will change that. With my step-by-step tips, make-ahead instructions, and an easy shaping video, you’ll have pillowy, bakery-style rolls that’ll impress your family (and yourself)!
Reader Love
These were delicious! I tested these side-by-side with two other highly rated dinner roll recipes. In my opinions, these had the best, buttery, yeasty flavor. Although they rose very tall and were very flaky and fluffy, they are chewy and satisfying. Even more, they look beautiful and shiny.
–
Ingredients Needed
Every ingredient in this recipe plays a key role in creating soft, fluffy, and buttery homemade dinner rolls. Here’s why each one matters:
- Water: Lukewarm water activates the yeast, which is essential for helping the dough rise. If it’s too hot, it kills the yeast and prevents the dough from rising. Too cold, and the dough will take forever to rise. I make sure it’s around 100-110°F.
- Milk: Whole milk adds richness and tenderness. The fat in the milk helps soften the rolls while giving them a slightly sweet flavor that balances the butter and sugar. The milk should also be warmed to 100-110°F so the yeast is properly activated.
- Butter: Melted butter adds flavor, moisture, and a tender crumb. I also use a little for greasing the bowl and pan to prevent sticking and enhance browning.
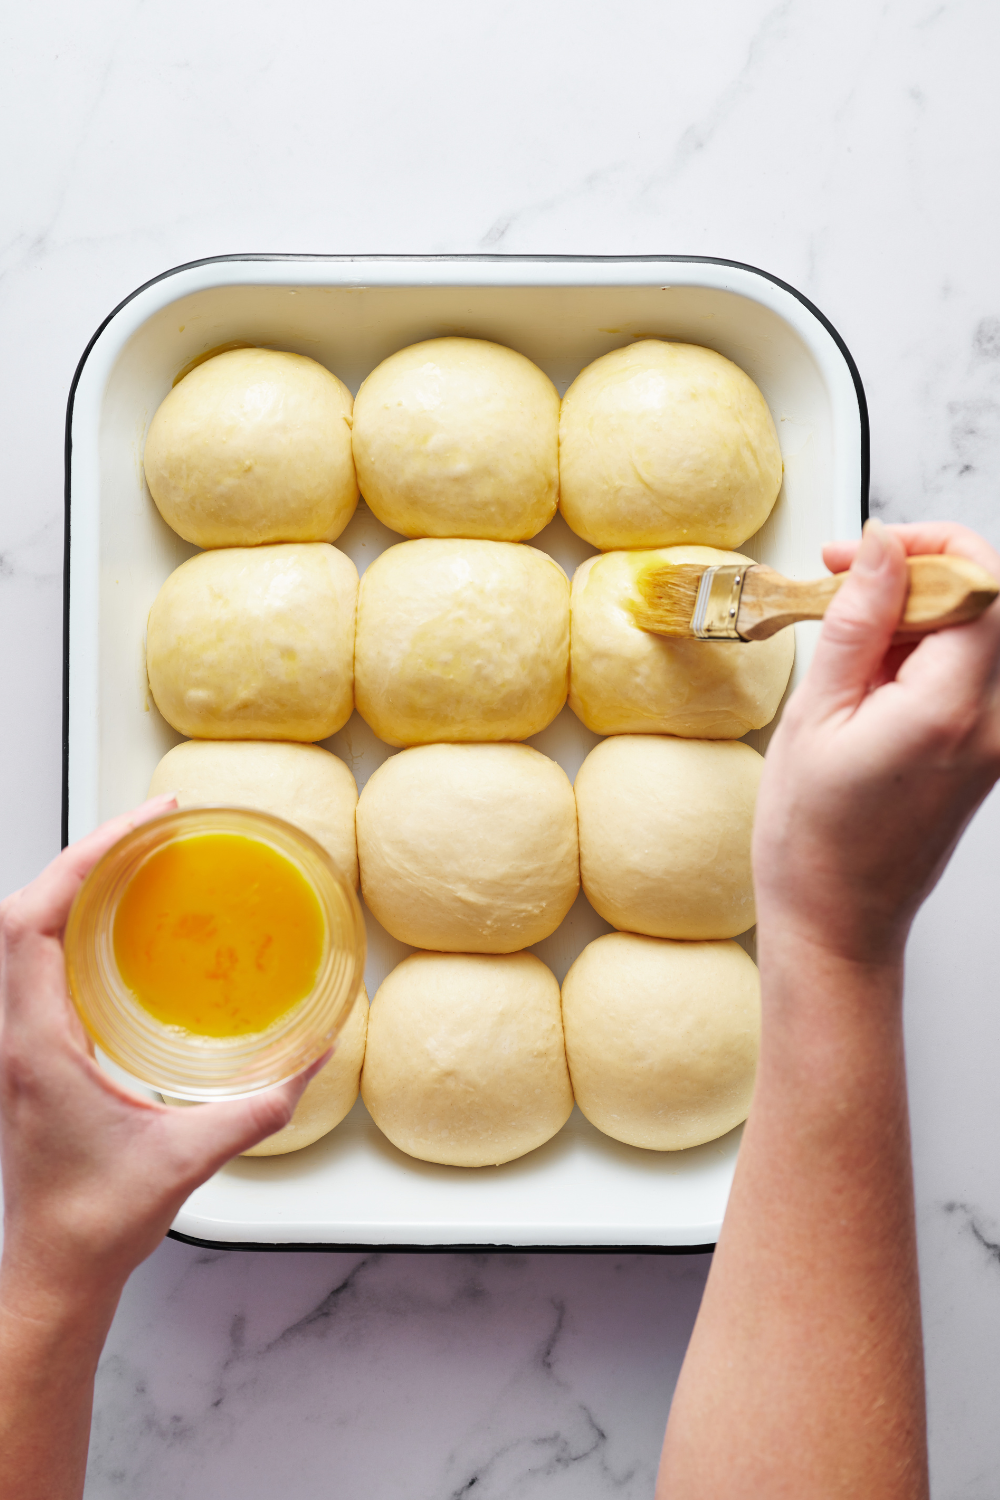
- Eggs: Eggs enrich the dough and contribute to structure and flavor. I lightly beat them before adding to ensure they mix evenly. I also use an egg wash before baking to give the rolls a shiny, golden-brown finish.
- Granulated Sugar: Don’t skip this one! There’s just a touch in these dinner rolls to help make them tender and golden brown. I wrote a whole guide to sugar’s role in baking, as it does SO much more than simply sweetening!
- Salt: Fine sea salt enhances flavor and balances the sweetness. I sometimes sprinkle flaky sea salt on top for an extra layer of flavor.
- Instant Yeast: I use instant yeast to simplify the process and skip proofing. It ensures a consistent rise and fluffy texture, but you can also use active dry yeast. Add it to the dry ingredients, like you would with instant yeast. Just know the dough will take about 20% more time to rise.
- Bread Flour: Bread flour has more protein than all-purpose, which gives the rolls structure while keeping them soft and chewy. You can swap with the same amount of all-purpose flour, but the rolls may take longer to knead and rise, and be less chewy.
Recommended Equipment
I use a stand mixer with a dough hook for these Thanksgiving rolls because it makes kneading the enriched, slightly sticky dough much easier and faster.
That said, you can absolutely knead it by hand. Make sure to knead until the dough is smooth and elastic so the rolls hold their shape and bake up soft and fluffy. If you’re not using a stand mixer, see my full tutorial on how to knead dough.
For baking, I generally use a 9×13-inch pan. I usually prefer metal because it conducts heat efficiently and helps the rolls bake evenly. I also love ceramic or glass for holiday presentations. Either works beautifully, but keep an eye on the bake time

Sprinkle of Science
How to Make the Ultimate Dinner Rolls
I tested and tweaked this recipe until every batch came out perfectly soft, fluffy, and golden. The steps are approachable, even for beginners. My bonus tips will help your rolls turn out beautifully every time.
1. Mix the Dough
Start by combining warm water and milk (100–110°F), melted butter, eggs, sugar, salt, and yeast in a stand mixer bowl. Add 2 cups of flour first to form a rough dough, then gradually knead in the remaining flour using the dough hook.
Expert tip: When you measure out your flour, I highly recommend using a digital kitchen scale for accuracy. If you don’t have one, use the spoon and level method to ensure you’re not accidentally compacting too much flour in your measuring cups.
The dough should feel soft, slightly tacky, and elastic. If it’s sticky, dampen your hands with water rather than adding extra flour, which could make the rolls too dense. I use a stand mixer to save my arms, but you can also knead by hand until the dough is smooth and elastic.
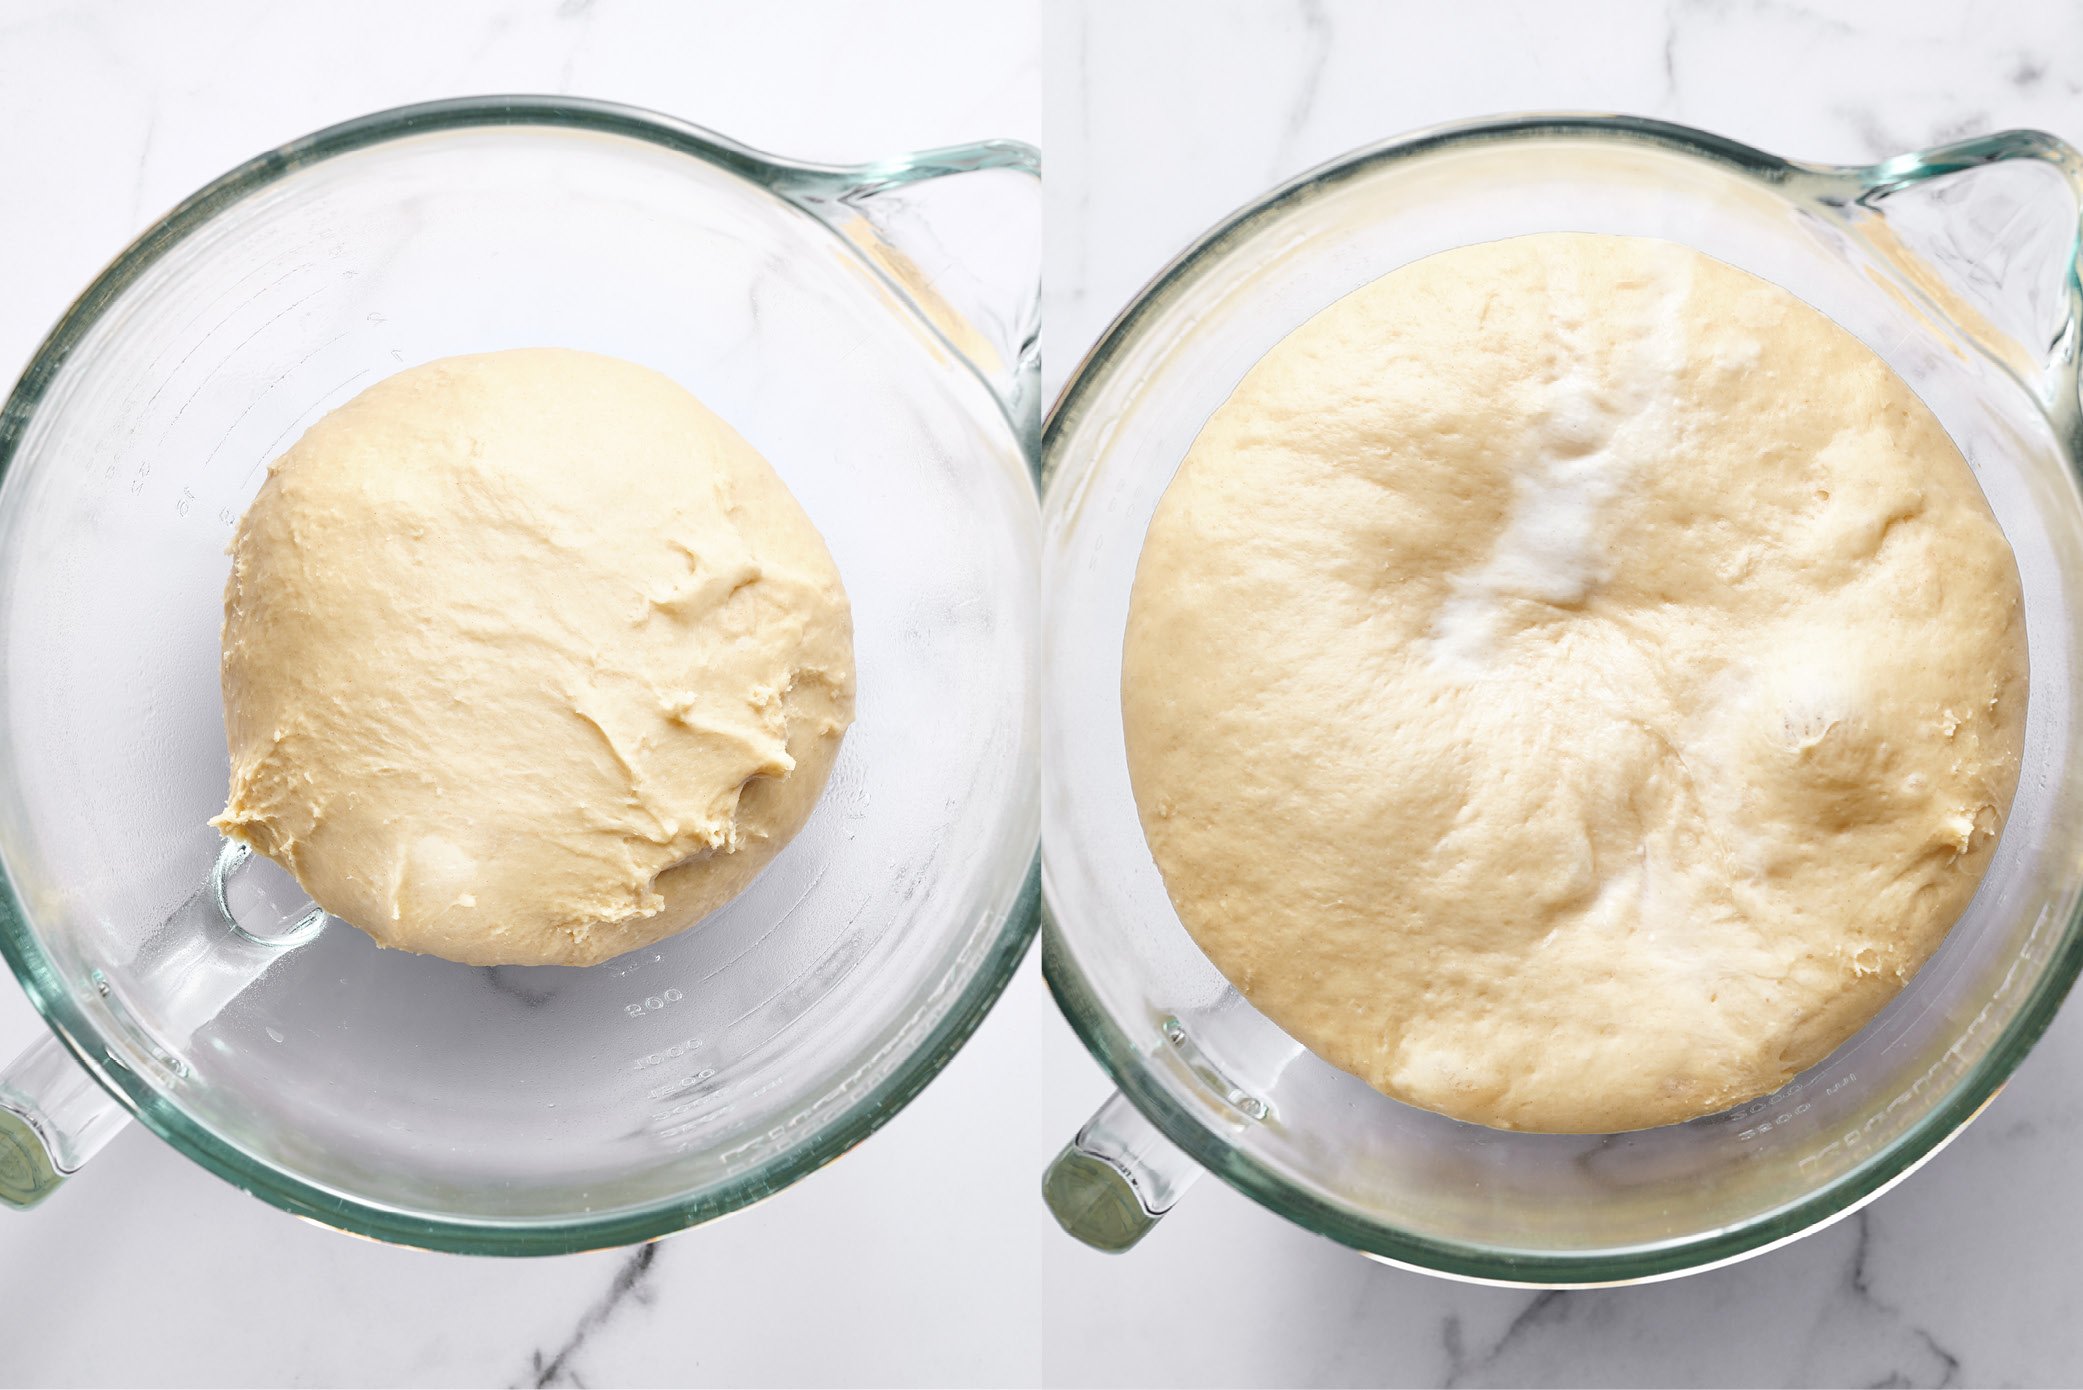
2. First Rise
Lightly grease a large mixing bowl and place the dough inside, turning it to coat the top with oil so it doesn’t dry out. Cover the greased bowl loosely and let it rise in a warm, draft-free spot until it roughly doubles in size. That process usually takes about 60-90 minutes.
I check readiness with the “ripe” finger test: if my fingers leave a lasting indentation, the dough is ready. If not, I give it a little more time.
3. Shape the Rolls
Once the dough has risen, gently deflate it and transfer it to a clean, unfloured surface. Divide the dough into 12 equal pieces using a bench scraper or knife. Then pinch and roll each piece into a tight ball to create the rolls.
Don’t flour your work surface when shaping the rolls; you want some resistance to form them into taut balls. My video on shaping dinner rolls is a great visual guide to see my technique in action.
You can also get creative with shaping your dough! Check out my guide for 5 ways to shape bread rolls.
4. Second Rise
Place the shaped rolls in a greased 9×13-inch pan and lightly cover them. Let them rise again until they double in size. If I plan to bake later, I’ll refrigerate the shaped rolls for up to 24 hours. The slower rise actually helps the flavor develop. Let the rolls come to room temperature before baking.
You can use the same finger test here. Here’s what my dough looked like before and after rising:
5. Bake and Finish
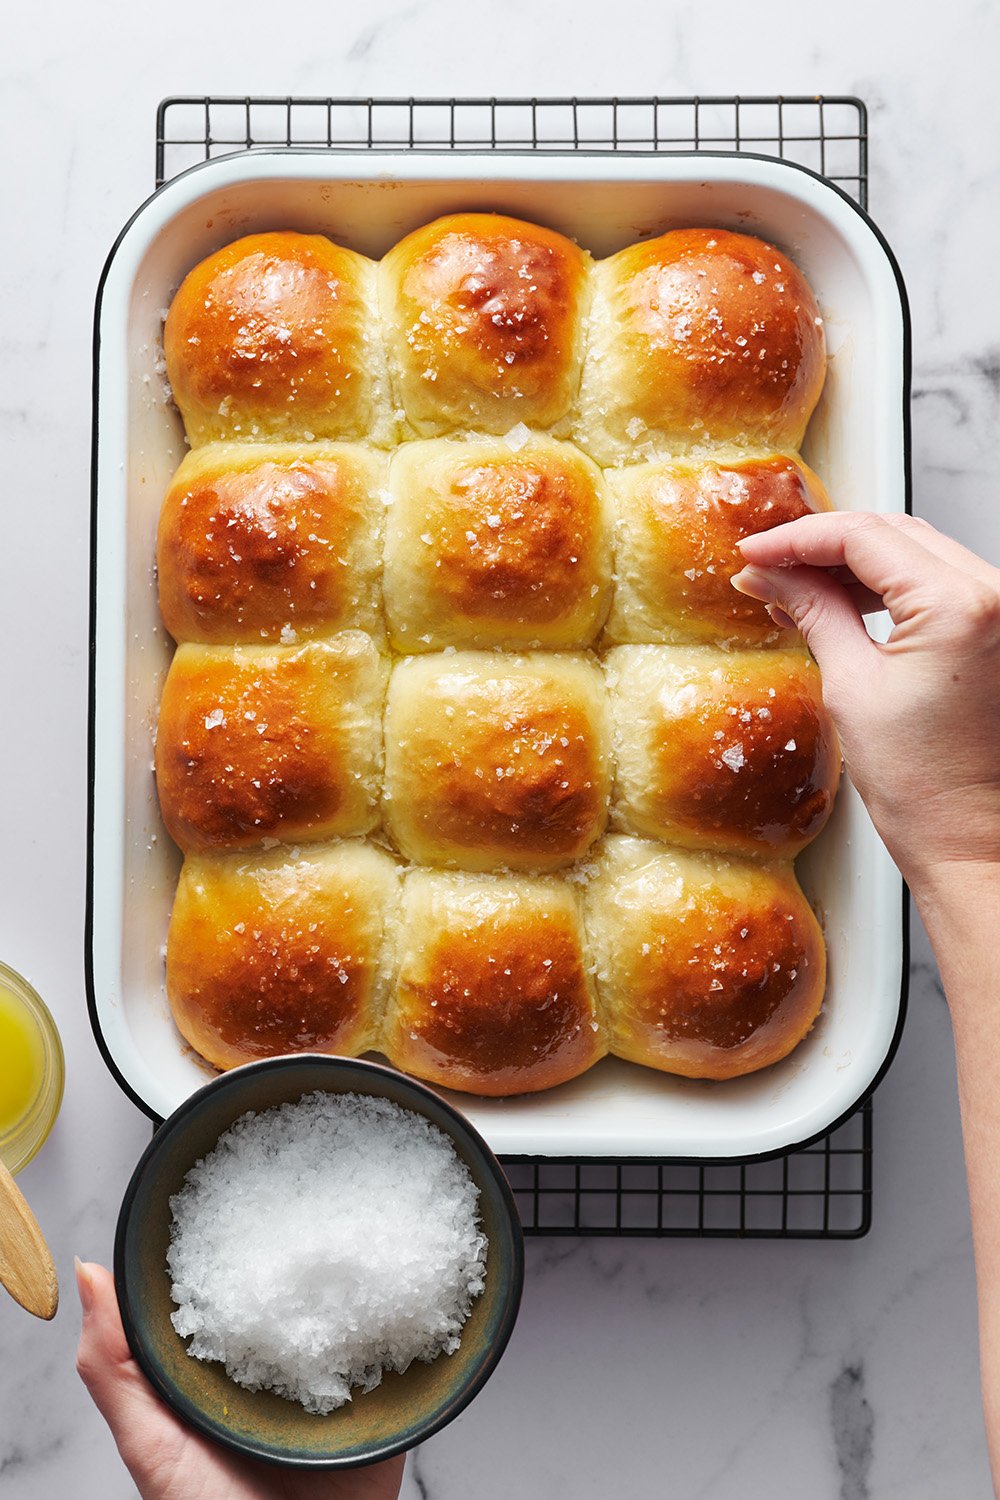
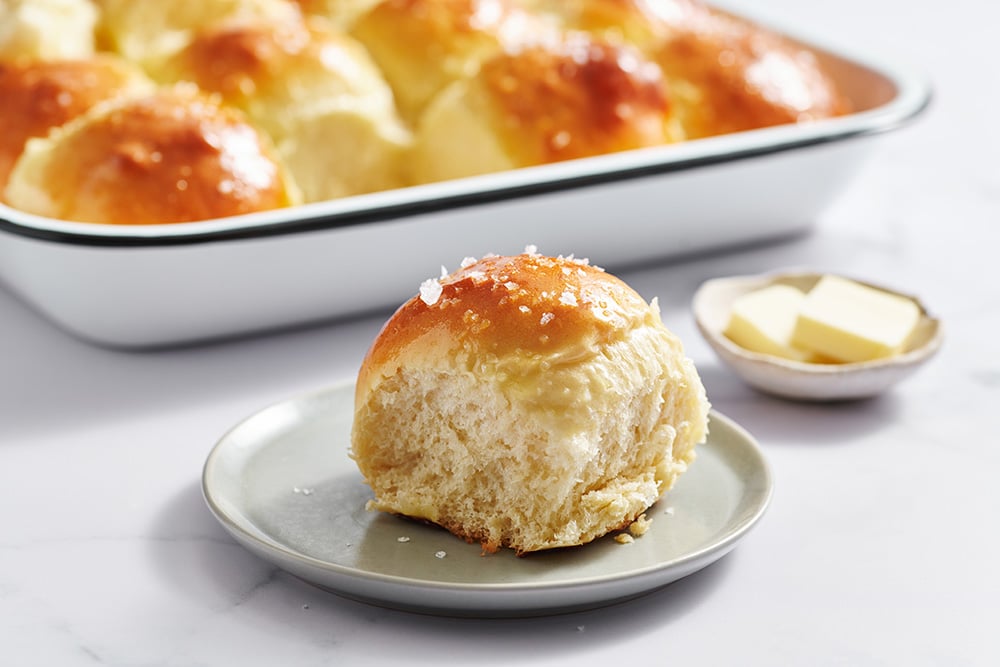
Brush the rolls with a lightly beaten egg for a glossy golden finish, then bake at 375°F for about 20 minutes until golden brown. Once out of the oven, brush with melted butter and sprinkle with flaky sea salt.
Flavor Twists and Variations
I put in quite a few hours of testing to come up with the best dinner rolls, but once you’ve got the basics down, you can play with flavors. Try these variations:
- Brush the tops with melted butter mixed with minced garlic and chopped fresh herbs like rosemary, thyme, or parsley for a garlic butter version.
- Sprinkle shredded cheese over the tops right before baking for a savory twist.
- You can also add a touch more sugar and a pinch of cinnamon to the dough for breakfast-style rolls that aren’t as sweet as cinnamon rolls.
And if you’re craving more, check out a few of my favorite roll recipes:
- Garlic, Herb, and Cheese Rolls
- Garlic Knot Rolls
- Homemade Hawaiian Bread Rolls
- Soft Butter Rolls
- Sweet Potato Dinner Rolls
Serving Suggestions
These soft, buttery rolls are the kind of side that works with just about anything. I love serving them as an easy Thanksgiving dish or alongside Christmas ham. They’re just as good with cozy soups, stews, or a simple roast chicken.
They also make great leftovers when re-heated or toasted. Slice them in half for sliders, breakfast sandwiches, or even mini pulled pork buns. For an easy appetizer, you can serve them with flavored butters, like honey butter or garlic herb butter, to make them feel extra special.
Make-Ahead, Storing, and Freezing Tips
You can make most yeast mixtures ahead of time, and this recipe is no exception. I like to mix the dough, let it rise once, and shape the rolls. Then I cover the pan tightly with plastic wrap and refrigerate for up to 24 hours. Chilling slows the rise and allows more flavor to develop overnight.
When it’s time to bake, I bring the rolls to room temperature as the oven preheats. If they haven’t quite doubled in size yet, I just give them a little more time before baking.
The rolls are best freshly baked, but leftovers reheat beautifully. Warm them in a 300°F oven or toaster oven until just heated through. Store in an airtight container or zip-top bag for up to 3 days.
To freeze unbaked rolls, shape the dough after the first rise and place them in a baking dish. Cover tightly with plastic wrap and freeze flat for up to 2 months. When you’re ready to bake, thaw them to room temperature, let them rise until an indentation stays when pressed, and bake as directed.
You can also freeze baked dinner rolls. Once cooled, store them in an airtight container for up to a month. Thaw to room temperature before reheating and serving.
More Side Dishes You’ll Love:
- Apple and Sausage Stuffing
- Cheesy Green Bean Casserole
- Crispy Parmesan-Rosemary Roasted Potatoes
- Crowd-Pleasing Sweet Potato Casserole
- Homemade Cranberry Sauce
FAQs
How are dinner rolls different from bread?
Dinner rolls are small, soft, and often slightly sweetened breads meant to accompany a meal. They come baked in individual portions, so they’re perfect for sharing at the table. Think of them as mini loaves designed to elevate your meal, especially at Thanksgiving.
Why aren’t my yeast rolls fluffy?
If your yeast rolls aren’t coming out fluffy, it’s usually because the dough didn’t get enough time to rise, was over-floured, or wasn’t kneaded enough. I always make sure my dough doubles in size and resist the urge to add extra flour to sticky dough. It’s also important for the liquids to be around 100-110°F so the yeast can do its job.
How do you keep dinner rolls soft and fresh?
To keep dinner rolls soft and fresh, store any leftovers in an airtight container or zip-top bag at room temperature for up to 3 days. Reheat them for a few minutes in a 300°F oven or toaster oven until they’re warmed through to refresh before serving.
Ultimate Dinner Rolls

Email This Recipe
Enter your email, and we’ll send it to your inbox.
Ingredients
- ¼ cup (59 grams) lukewarm water (100 to 110°F)
- 1 cup (237 grams) warm milk (100 to 110°F)
- 1 tablespoon (14 grams) unsalted butter, melted, plus more for greasing
- 2 large eggs, lightly beaten
- 2 tablespoons (25 grams) granulated sugar
- 1 ½ teaspoons fine sea salt
- 2 ¼ teaspoons (1 packet) instant yeast
- 4 ½ cups (572 grams) bread flour
For egg wash & finishing
- 1 egg, lightly beaten
- Melted butter
- Flaky sea salt, for sprinkling
Instructions
- Combine the water, milk, 1 tablespoon of the melted butter, eggs, sugar, salt, and yeast in the bowl of a stand mixer.
- Add 2 cups (254 grams) of the flour and stir with a wooden spoon until the dough forms a rough, shaggy mass.
- Attach the dough hook to the mixer, turn to medium-low speed, and gradually add the remaining flour, kneading until a mass of dough begins to form.
- Continue kneading on medium-high speed for 4 to 5 minutes until a soft, smooth ball of dough is formed. The dough ball should feel elastic and slightly tacky to the touch.
- Lightly spray a large bowl with cooking spray and place the dough in the bowl. Cover the bowl lightly with plastic wrap or a kitchen towel.
- Let dough rise for about 1 hour to 90 minutes at room temperature or until the dough is big, puffy, and about doubled in size.
- Grease a 9×13-inch or similarly shaped baking pan with butter. Gently deflate the dough.
- Use a bench scraper, knife, or pizza wheel to divide the dough into 12 equal pieces. Shape each piece into a ball and place it in the prepared pan.
- Lightly cover the dough with plastic wrap and let the rolls rise for about 1 hour, or until about doubled in size.
- Preheat the oven to 375°F.
- Brush the rolls gently with the beaten egg. Bake for 20 minutes or until golden brown.
- Brush with melted butter and sprinkle with flaky salt. Serve warm. Store leftovers in an airtight container or zip-top bag for up to 3 days.
Recipe Notes

The Ultimate Cookie Handbook
Learn the sweet SCIENCE of cookie baking in a fun, visual way to customize your own recipes frustration-free. Plus, my best 50+ homemade cookies!
This recipe was originally published in 2013 and has been updated with new photos and more baking tips. Photos by Joanie Simon.


I am 74 years old and have tried many times to make rolls and years ago gave up because the texture just was not right ..and I’m very picky about texture in rolls… well I came up on your recipe yesterday and decided I would try it. I tried it today . I made half the recipe because I was fearful that these too would go into trash ..but much to my amazement they turned out absolutely perfect ..perfect …the texture is beautiful.. they’re so good I can’t believe I’ve actually made a homemade roll and can enjoy it . I will certainly be making many more… and by the way I have a bread maker in which I made my dough in and then just took it out and made my rolls ..thank you so much for the recipe and for the encouragement from other comments to give it a try ..I’m so glad I did. thank you ..what a beautiful thing!!!
Hi!
Sorry this is my third comment, but I’ve seen other similar recipes call for kosher or coarse salt on top of the dinner rolls; would those be a good fit instead if I don’t have any flaky?
Thank you so much!
No problem, Zoe – yes, you can use a little kosher salt, or skip the salt topping if you prefer! 🙂
I used a scale and followed all measurements to a T, however the dough was still quite sticky, so I had to add a bit more flour. Why would this be?
Thank you!
On a side note:
I tried this recipe around a week ago and it was wonderful. Tall, fluffy, perfect! Just this time we had to add a bit more flour to make it not stick to our hands and I was just wondering why. I’m sure they’ll turn out perfect this time too 😀
Hi Zoe! I’m happy to hear that you enjoy these rolls! There are several reasons why yeasted doughs can become overly sticky. The first is environment; if the weather is humid, or your kitchen is humid, that will immediately contribute to your dough’s stickiness. Your dough can also become sticky when you add too much water, or if using the wrong kind of flour. Over proofing or under-kneading the dough can also result in sticky dough. Even if the dough is a bit sticky, as you mentioned, a tiny bit more flour on your workbench will help counteract this, and help you shape the dough! I hope that helps! Happy baking 🙂
Hi!
I don’t have flaky salt and can’t seem to find it anywhere, what should I do?
Thank you!!!
Hi Zoe! The flaky sea salt for topping is optional, so if you cannot find it, simply leave it off 🙂 You can use fine sea salt or table salt for the actual dough. Let us know what you think of these rolls once you have given them a try!
where are the make ahead directions?
Hi Victoria! The make-ahead instructions can be found in the pink tip box, above the recipe! Happy baking 🙂
I made these a few days ago and they were perfect. My first time making dinner rolls – thank you so much for the great recipe. I have now volunteered to make them for our family Christmas dinner. When I made them the first time (it was a test run ) I made the dozen as the recipe indicated. I’m thinking I might like to make them slightly smaller – maybe measure out 15 or so. Do you think baking time would need to be adjusted, or since they all join together anyhow, will the timing not be impacted that much?
P.S. wish I could share a photo on here to show just how beautiful they were – I was so proud!
Hi Kendra! We are so glad to hear that your rolls were such a success! Unfortunately we haven’t tried baking more, smaller rolls before, but I don’t see why it wouldn’t work – you’ll just have to watch them closely as they will possibly bake for less time – but again, we haven’t tried this, so I can’t say for sure. Happy baking 🙂
Your step by step instructions (and the promise they’d turn out good) gave me the confidence to make these. I followed every detail and they turned out great! Thank you.
Yay! So glad to hear this, Minki!
First time baking with yeast and this recipe was fantastic! The rolls were light & fluffy, so delicious. Thank you for giving me the confidence to do this.
You rock! My family loved them and I was happy to see how beautifully they turned out. I will bake these again.
Hooray!! So thrilled these were such a winner for you, Lisa! 🙂
Looks delish and I can’t wait to make these rolls! y question, since I’e gone down the rabbit hole of glass vs metal pans, what type of 9×13 pan should be used? What is the type of pan that she used for the rolls in this post. It is soooo beautiful! Thank you!
Hi Cynthia! Any light-colored metal pan (darker colored metal pans tend to brown the bottoms too quickly) will work, but this is Tessa’s favorite 9×13-inch pan here 🙂 Tessa used this pan when originally photographing the recipe, but non-metal pans are less ideal for baking – find out why here! Happy baking!
Can these be made ahead of time? If so, please elaborate. I would like to make today the pur in the oven tomorrow. I hope I get an answer this late on Turkey Day eve! I’m a terribly good procrastinator!
I’m attempting this recipe now. I have tried other recipes maybe 6 or 7 different times before to absolutely zero success. I was so ashamed of my terrible creations no one ever saw them. Straight to ths bottom of the trash can they went, with garbage on top to make sure no one else saw my feeble attempts & waste of ingredients! I have bought 3 pack packets of yeast over a dozen different times over the years only to chicken out & let it expire because I was afraid of the failure I just knew would come. I’ve watched countless videos & Googled “Yeast Rolls for Beginner’s” time after time. They all made it look so VERY effortlessly easy… and fun. What came out of my oven could be used as weapons! My dough never rose like the videos, nor did I seem to ever get the correct texture. Well, this time I stepped it up & bought the good high protein bread flour by ‘King Authur’. I alsi got digtal scales & weighed my flour instad of hand measuring. I was surprised to see I had nearly 1/2 a cup over when weighing! That will surely mess up a recipe! My stand mixer is broken so I had to use my hand held one, but I quickly notice a big difference! It’s covered & rising now. I’m almost scared to look. My husband & I are going to my sisters home for Thanksgiving (tomorrow, since it’s already Wed. morning, it’s 1:20 a.m.). What a hit I would be to bring beautiful & delicious homemade yeast rolls! No can cressent rolls this year! Oh, dare I dream!?? I’ll hopefully be back with pics and good news. Then pray I can do it again to take to Sissy’s!
Hi Barbie! I really hope you have success with this recipe and gain some confidence in the bread arena! You can absolutely make these rolls today, as Tessa talks about in the Tip Box above the recipe. As she says in the Tip Box, make the dough all the way through to rising once and shape the rolls. Once the rolls are shaped, cover them well with plastic wrap and place in the refrigerator for up to 24 hours. Bring to room temperature as the oven preheats before baking as the recipe directs. If the rolls haven’t doubled in size yet, allow to sit at room temperature until they do. If this makes you too nervous, you can always just make the rolls entirely today, and just reheat briefly tomorrow before serving – totally up to you! Be sure to read through everything Tessa has in the Tip Box above the recipe, to arm yourself with all the information you need before starting your roll adventure today! Good luck, and let us know how it goes 🙂 Happy Thanksgiving!
Fantastic and easy!
This was my 3rd recipe I tried and the easiest. I tried two other recipes from other people but did not like the taste of the roll itself. This was the tasted i was looking for! Love the recipe and want to make it for Thanksgiving. These are so easy to make the day before and they rose in the fridge wonderfully. My only issue was how big they were for the Thanksgiving table. I made 12 in a glass pyrex pan. I just want them to be slightly smaller since everyone will be eating a big meal and these are quite filling. If I make 15 in a 9 x 13 pan would they still be a good size. What do you think the bake time should be?
Hi Linda! I’m so happy to hear that these rolls were winners for you! You probably can make the rolls smaller, but because we haven’t tried this ourselves, I can’t tell you exactly how long to bake them for, sorry. I would just recommend starting at a few minutes less than the recommended bake time, and remove from the oven once they’re golden brown. Let us know how it goes!
where’s the recipe?
Made these last year for Thanksgiving and everyone loved them!
Question – can the rolls be made a smaller size to get more servings?
Hi Lilly! So glad these were a hit last year! To answer your question, I don’t see why not – but because we haven’t tried this ourselves, I can’t tell you exactly how long to bake them for. I would just recommend shaving a few minutes off the recommended bake time, and remove from the oven once they’re golden brown. Let us know how it goes! Happy Thanksgiving 🙂
Yes, I divided them into 15 rolls, 5 X 3 rows in a 9×13 pan. Still plenty big enough.