


Tessa’s Recipe Rundown
Taste: Full of sweet butterscotch & chocolate flavors, exactly how a chocolate chip cookie should taste!
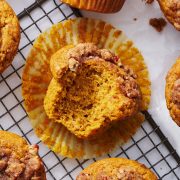
Texture: Thick and chock full of gooey chocolate with slightly crisp edges.
Ease: Super easy 30-minute recipe.
Why You’ll Love This Recipe: Easy, delightful chocolate chip cookie recipe. I’ve made this recipe probably 100 times always have the dough in my freezer for when the craving strikes.
This post may contain affiliate links. Read our disclosure policy.
My favorite type of recipe to bake is absolutely COOKIES. They’re so fun and simple and can teach us SO much about the science of baking.
The Ultimate Guide to Chocolate Chip Cookies is still one of my most popular posts, visited by over three million people!
That post inspired the creation of my second cookbook, The Ultimate Cookie Handbook. And since THOUSANDS of you have purchased that cookbook, I think it’s clear that we’re all obsessed with cookies here.

What Makes Cookies Chewy, Crisp, or Cakey?
My free guide reveals the ingredients and tweaks that matter.
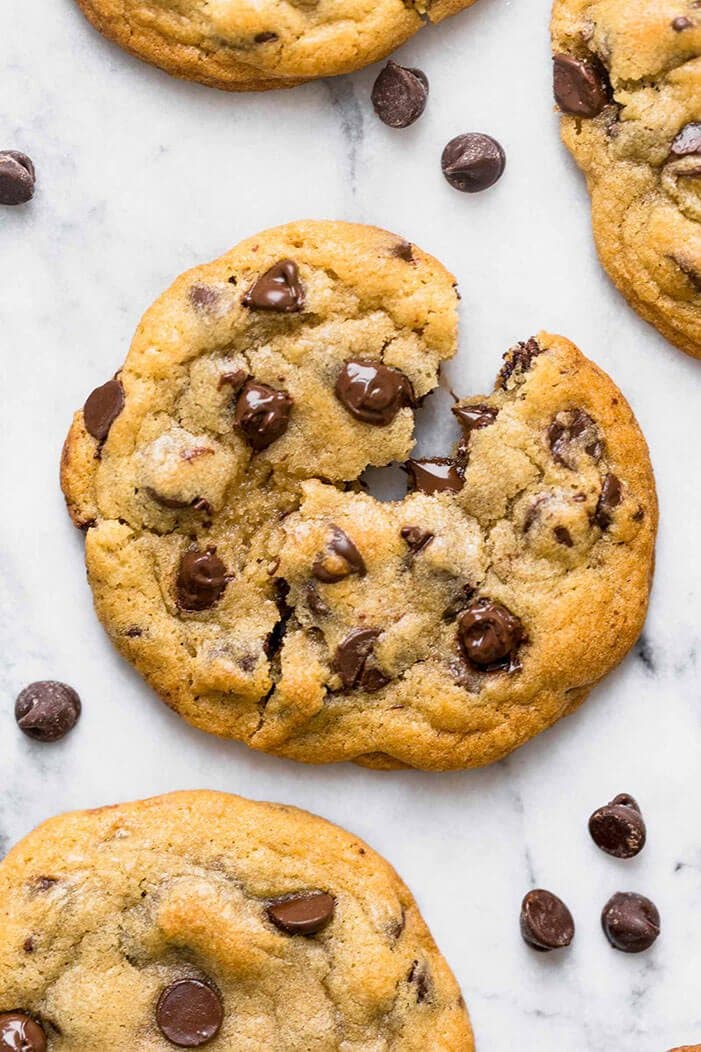
That’s why I’m SO thrilled to share this Bakery Style Chocolate Chip Cookie recipe with you today. In my opinion, it’s the perfect easy everyday chocolate chip cookie recipe. This homemade recipe is simple to make and yields thick, beautiful golden brown cookies, crisp at the edges and gooey at the center.
Watch the video below to step into my kitchen and see exactly how to bake these delicious cookies with me. I give tons of tips and tricks for getting perfectly thick cookies with chocolate chunks, and you can see what every step of this recipe should look like!
I love this time-lapse video of these cookies cooling right after I took them out of the oven. You can see that they hardly shrink or deflate as they cool. If you only beat the butter and sugar for 2 to 3 minutes max, your cookies shouldn’t deflate!


Sprinkle of Science
How to Make The Best Bakery Style Chocolate Chip Cookies
How to Make Soft Chocolate Chip Cookies
The key to the best soft, Bakery Style Chocolate Chip Cookies is to take the chocolate chip cookies out of the oven just before they look like they’re done baking. They should still appear slightly wet in the very center. The residual heat of the oven and pan will finish cooking the cookies through to soft perfection once you allow them to cool completely.
Also, measure your flour correctly to improve your baking forever. Too much flour will lead to dry, dense, or crumbly chocolate chip cookies that barely spread.
Why Are My Chocolate Chip Cookies Flat?
When making cookies, be sure your butter is at a cool room temperature before beating with your sugar. It shouldn’t be greasy or overly soft otherwise it’ll melt and spread the cookies too much.
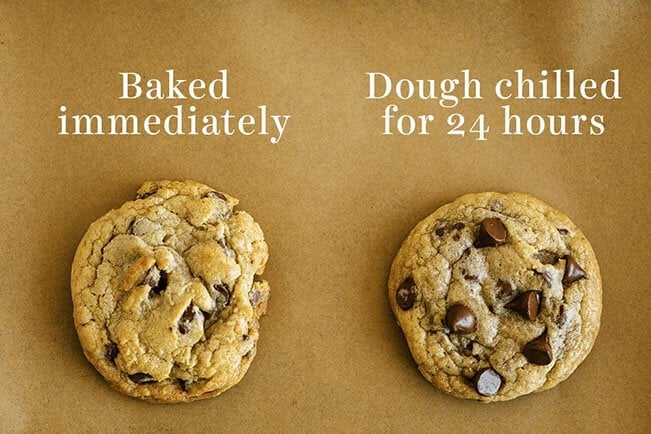
The warmer your chocolate chip cookie dough is when it enters the oven, the thinner and flatter your cookies will be. To prevent flat cookies, try freezing your balls of cookie dough while your oven preheats. Learn more about how to bake THICK cookies here.
Better yet, refrigerate your chocolate chip cookie dough for 24 to 48 hours. This ‘marination’ process will transform your chocolate chip cookies by making them thicker, chewier, and more flavorful! Plus, this is a perfect way to make your delicious cookies ahead of time. Read more about the magic of chilling your cookie dough here. NOTE: chilling is OPTIONAL for this recipe but using chilled dough will enhance your cookies!
How to Make CHEWY Chocolate Chip Cookies
One of the keys to CHEWY chocolate chip cookies is to use more brown sugar than granulated sugar. The molasses in the brown sugar draws in more moisture, making the cookies thicker, softer, and chewier.
For extra chewy cookies, try adding an extra egg yolk to this recipe. You can also replace half or all of the all-purpose flour in this recipe with bread flour for an ultra-chewy bite.
How to Bake Chocolate Chip Cookies
For the BEST Bakery Style Chocolate Chip Cookies, make the recipe below keeping these top tips in mind:
- Use a kitchen scale to measure your ingredients for the BEST most consistent results.
- Make the recipe exactly as written, without substitutions, at least the first time you bake it.
Use the correct baking pan and a spring-loaded cookie scoop for bakery-quality cookies at home. More on that below!
Why Use a Cookie Scoop?
Using a stainless steel spring-loaded cookie scoop when portioning out cookie dough is one of the KEYS to beautifully uniform, evenly-shaped, evenly-baked cookies. My cookie scoop is one of my most frequently used kitchen gadgets. A spring-loaded scoop saves you *so much time* in forming the balls of dough. When using a scoop, you ensure each ball is evenly sized so the cookies bake evenly, meaning you don’t have any small overbaked cookies or large underbaked cookies. Learn more about Cookie Scoops and how to use them here!
What’s the Difference Between Baking Soda and Baking Powder?
Baking powder and baking soda are both chemical leaveners that work to create light textures in baked goods.
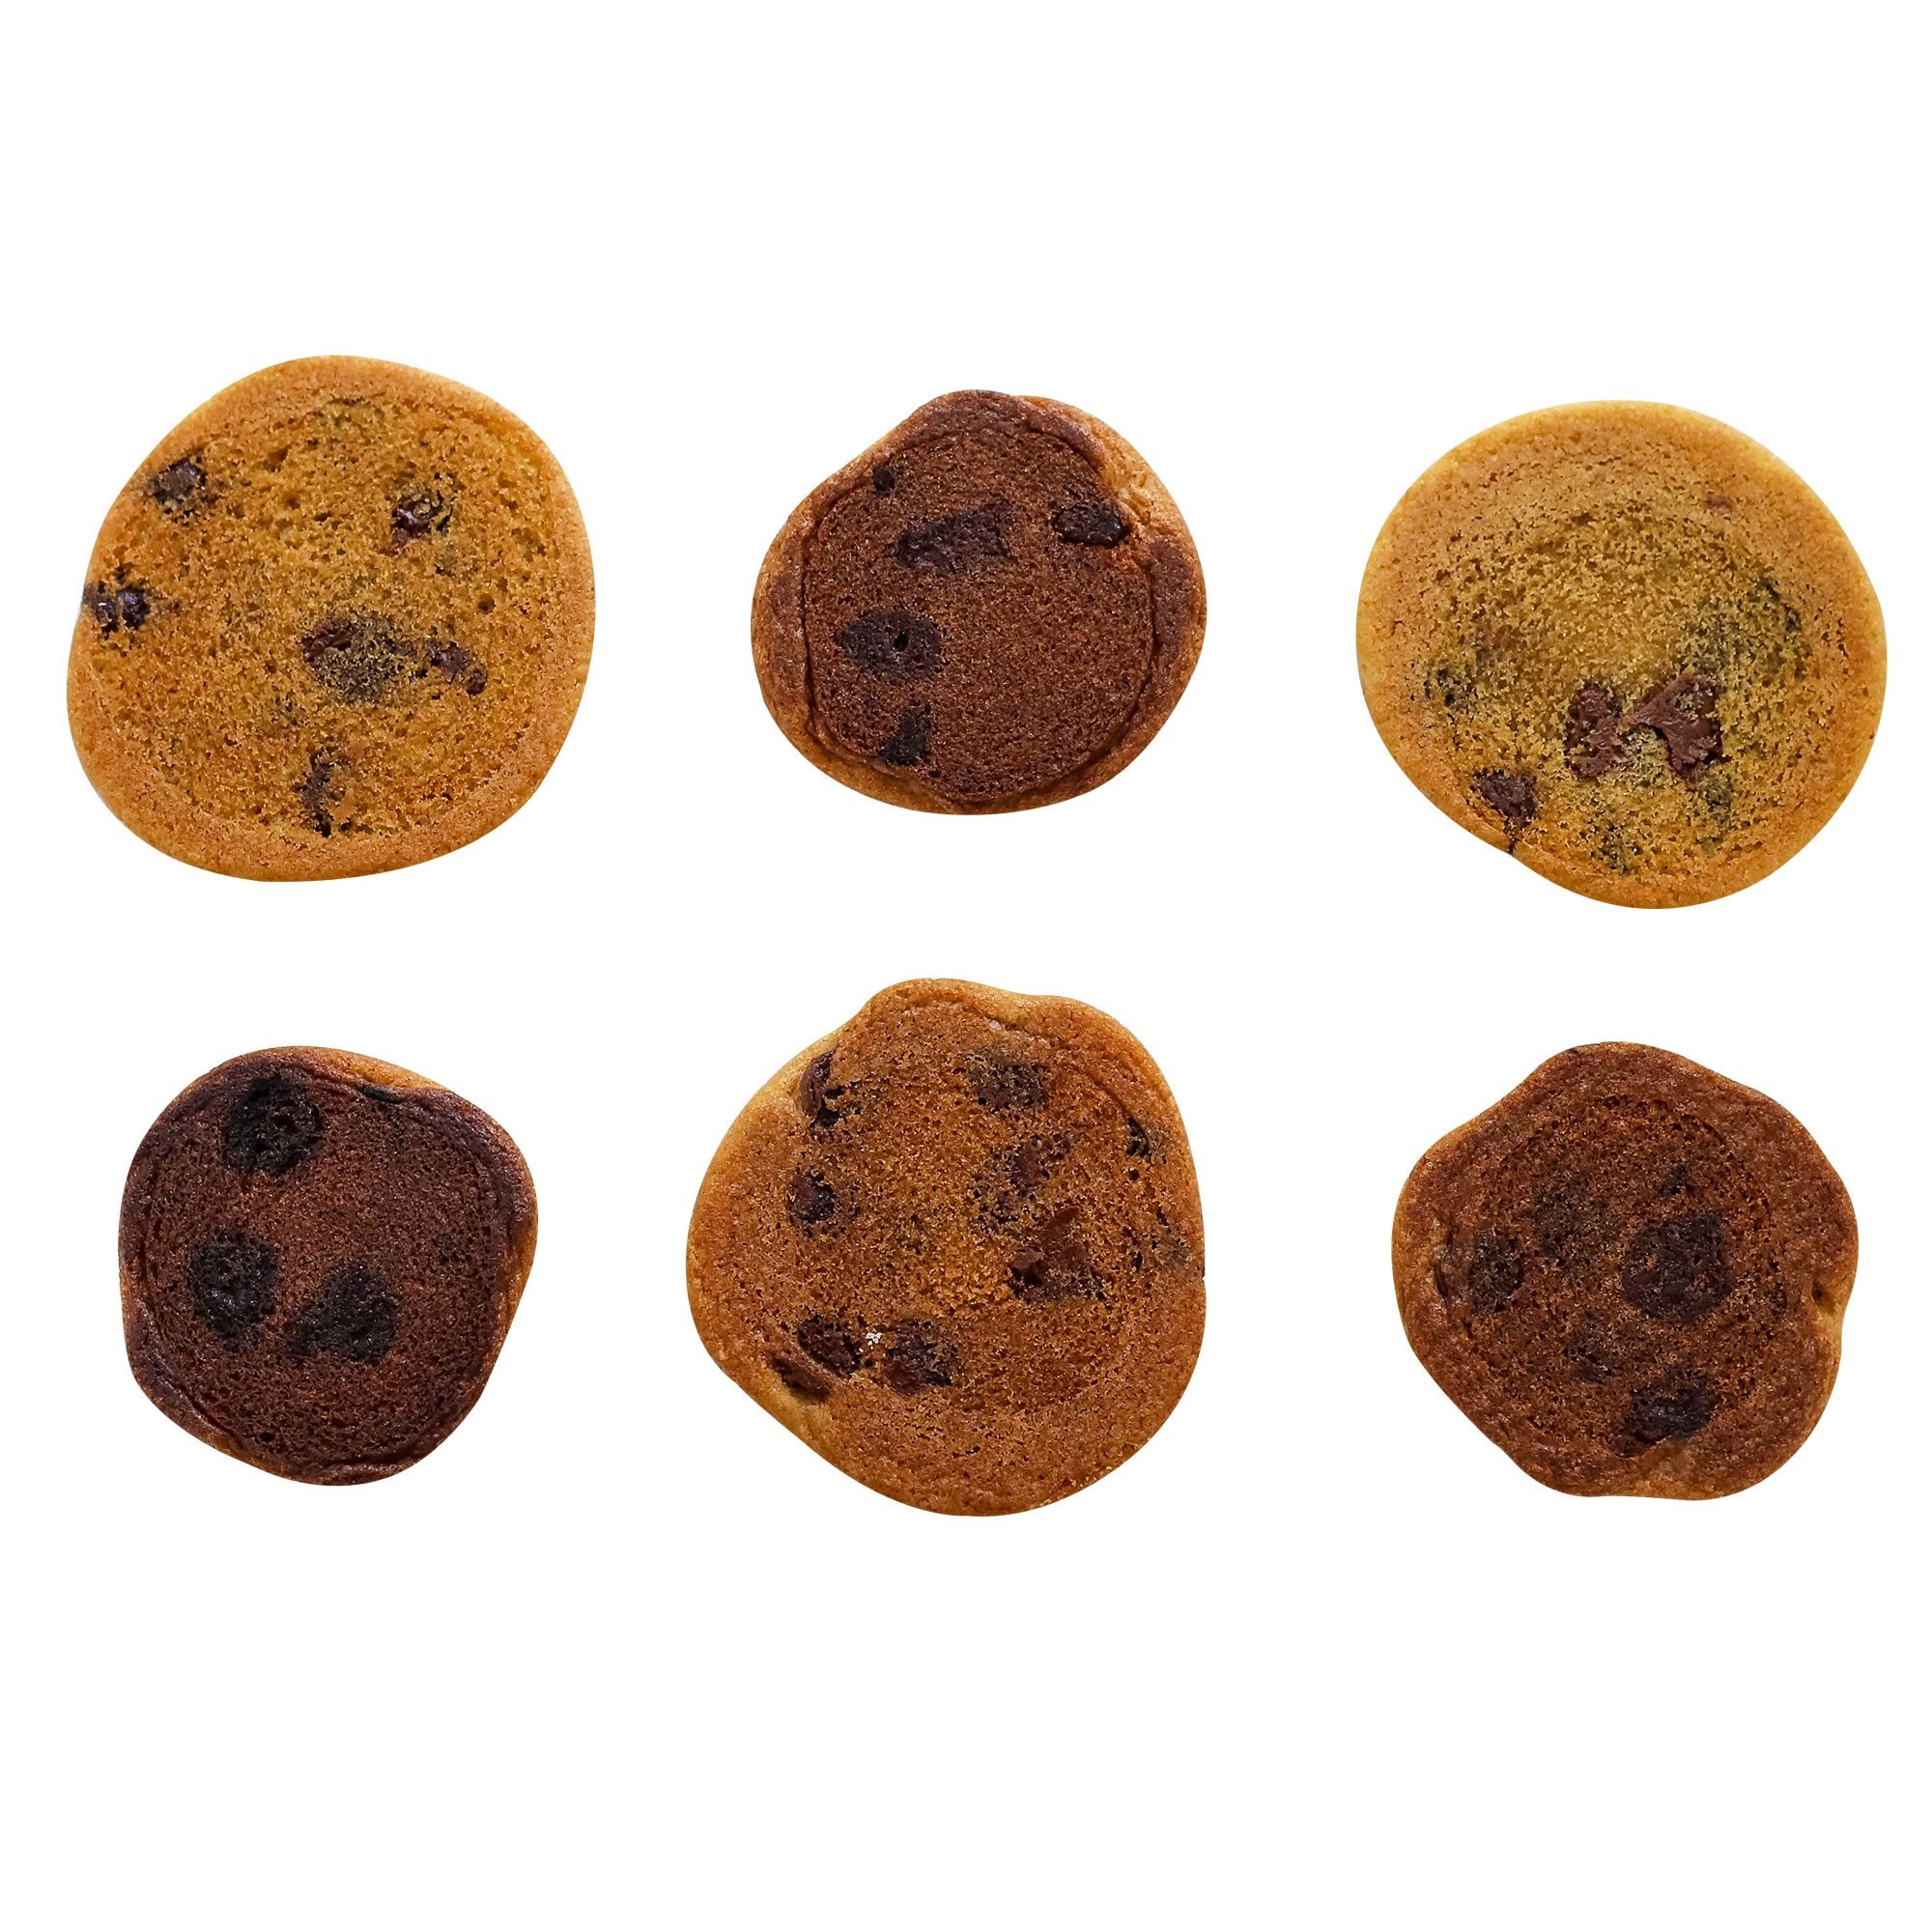
Although baking powder actually contains baking soda, the two leaveners are very different. Baking powder and baking soda are not interchangeable – just take a look at the impact the type of leavener used had on each of the cookies below, and find out more in my Baking Soda vs. Baking Powder article here.

Which Baking Pan is Best for Cookies?
Take a look at the chocolate chip cookies below. These cookies are all the same batch of cookie dough, baked at the same temperature of 350°F, baked for the same amount of time of 12 minutes. The only difference? The type of baking pan used!
Check out my Best (and WORST) Baking Pans article here for more details on the science of baking pans.
How to Keep Chocolate Chip Cookies Fresh
The best cookies are the freshest, there’s no magical way around that. However, here are a few tricks to keeping them fresh and soft for as long as possible!
Can You Freeze Chocolate Chip Cookies?
I love the taste of cookies straight from the oven the best. I always keep pre-scooped balls of chocolate chip cookie dough in a resealable bag in my freezer, so I can bake cookies off and have them warm from the oven in a matter of minutes whenever I want. Here are more tips for freezing cookie dough.
But for those times when you need to keep already-baked cookies soft, see below for my tips. First of all, most cookies can be stored in an airtight container at room temp for up to 5 days. Be sure they are completely cooled before storing.
How to Keep Cookies Soft
To keep your baked chocolate chip cookies soft, you can add an apple wedge, piece of bread, or a tortilla on the top and bottom of the cookies to the container a day or two after baking them, or whenever you find the texture starting to harden. The moisture from the bread or apple will migrate to your cookies, making them soft and chewy again.
A tortilla is a favorite of mine because it takes up much less room than a slice of bread, and doesn’t transfer any flavors or aromas like an apple wedge. Not to mention, it fits into a round cookie tin pretty perfectly.
How to Refresh Stored Cookies
What I like to do is reheat and refresh the cookies in a 350°F oven for 3-5 minutes. Your toaster oven should work just fine. This improves the texture and there’s nothing like a warm chocolate chip cookie!

Tessa’s Favorite Tools for This Recipe:
- Large 3-tablespoon size cookie scoop for that bakery-style texture
- Or use a medium 1.5-tablespoon size cookie scoop and bake only for about 10-12 minutes instead
- Nordic Ware Natural Aluminum Baker’s Half Sheet won our side-by-side comparison of the best baking pans
- 12″x16″ non-stick parchment paper for the best bake and easiest cleanup!
- The Ultimate Cookie Handbook: Your Guide to Baking Perfect Cookies Every Time by Tessa Arias
More Chocolate Chip Cookie Recipes:
- Ultimate Chocolate Chip Cookies (these are CHEWIER than this recipe)
- Coconut Oil Chocolate Chip Cookies (dairy-free)
- Browned Butter Toffee Chocolate Chip Cookies (ultra flavorful!)
- Marbled Chocolate Chip Cookies (classic and double chocolate chip cookie dough in one cookie!)
- Peanut Butter Chocolate Chip Cookies (for serious PB lovers only!)
See ALL of my types of cookie recipes & cookie baking tips here!

Bakery Style Chocolate Chip Cookies

Email This Recipe
Enter your email, and we’ll send it to your inbox.
Ingredients
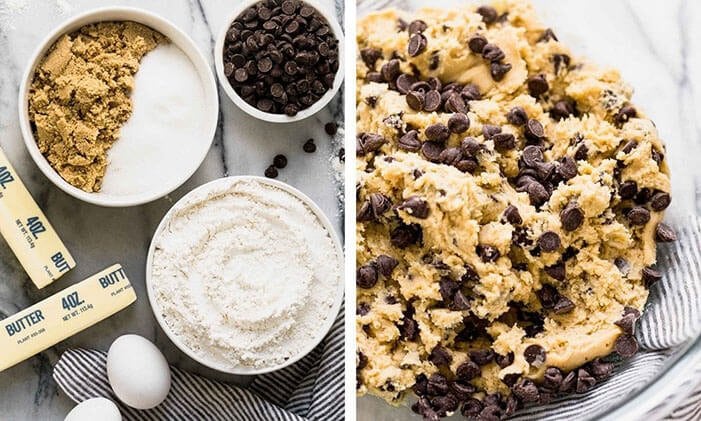
- 3 cups (380 grams) all-purpose flour**
- 1 teaspoon baking soda
- 1 teaspoon fine sea salt
- 2 sticks (227 grams) unsalted butter, at cool room temperature (67°F)
- 1/2 cup (100 grams) granulated sugar
- 1 1/4 cups (247 grams) lightly packed light brown sugar
- 2 teaspoons vanilla
- 2 large eggs, at room temperature
- 2 cups (340 grams) semisweet chocolate chips
Instructions
- Preheat oven to 350ºF. Line baking sheets with parchment paper.
- In a medium bowl, combine the flour, baking soda, and salt.
- In the bowl of an electric mixer, beat the butter, granulated sugar, and brown sugar until creamy, about 2 minutes. Scrape down the sides and bottom of the mixing bowl. Add the vanilla and eggs and beat until combined, scraping the bowl down as needed. Gradually beat in the flour mixture. Stir in the chocolate chips.
- If time permits, wrap dough in plastic wrap and refrigerate for at least 24 hours but no more than 72 hours. This allows the dough to “marinate” and makes the cookies thicker, chewier, and more flavorful. Let dough sit at room temperature just until it is soft enough to scoop.
- Divide the dough into 3-tablespoon sized balls using a large cookie scoop and drop onto prepared baking sheets.
- Bake for 11-13 minutes, or until golden brown. Cool for 5 minutes before removing to wire racks to cool completely.
- Although I prefer cookies fresh from the oven, these can be stored in an airtight container for up to 3 days. See post for storage tips.

Recipe Notes

The Ultimate Cookie Handbook
Learn the sweet SCIENCE of cookie baking in a fun, visual way to customize your own recipes frustration-free. Plus, my best 50+ homemade cookies!
Photos by Jess Larson.


These are the most perfect cookies I’ve ever made! I followed the recipe and used half bread flour and half all purpose. They’re gorgeous and delicious. Thank you for this recipe!
This is officially my go to recipe for chocolate chip cookies. They turned out thick, soft and chewy just as described. I halved the recipe thinking we won’t eat that many cookies but I couldn’t have been more wrong!
I have made this recipe so many times. It’s the best. The time in the refrigerator I think is key.
Tried the recipe and the first batch I made came out good! Rested in fridge for over an hour and they were nice and soft. I did run across two issues though.
They would hardly brown! I have a gas oven, baked on 350 with a ceramic pan for 15 minutes and they were really under cooked. I even had to throw them back in the oven for 3 more minutes after they had cooled for 30 minutes because they were unpleasantly under baked in the center.
I made the rest of the batch after 24 hours of resting in the fridge. I used the Nordic pan this time. They still hardly brown and when the cooled this time, they were hard as a brick. I think I cooked them about 18 minutes this time, checking ever 3 minutes after the first 12 minutes of baking.
I measured the flour by weight but the recipe didn’t specify if it before or after sifting so I used weight without sifting.
Any tips would be appreciated as the flavor of these cookies was really good and I would like to try again.
Hi T! I’m glad you enjoyed these cookies, even if they didn’t turn out exactly as they should! A few things:
– Try refrigerating the dough for 24-72 hours before baking. Here at Handle the Heat, we advise you chill pretty much all cookie doughs for 24 – 72 hours to maximize the flavor! Think of it like marinating meats, but for cookies! All that depth of flavor happens while the dough rests.
– You mentioned you measured the flour by weight (and there is no sifting needed for this recipe – or most cookie recipes! Just finer baked goods like cakes, generally speaking, will need sifted flour – and even then, not always!). Did you measure the other ingredients by weight too? Is it possible you accidentally missed an item?
– I also want to mention your leavening agent. If your baking/soda powder are not fresh, they won’t do their jobs and your baked goods can not rise properly, won’t spread properly, and won’t brown properly. Tessa talks about the science behind leavening agents, and how to test for leavener freshness, in this article here!
– Your oven temperature could be off. Did you know that most ovens are not accurately reflecting their real temperature? Check out Tessa’s article here about ovens, full of tips!! If you don’t have an oven thermometer to ensure your oven is at the temperature it says it is, invest in one now! They are inexpensive and really help your baking so much! This oven thermometer is one of Tessa’s favorites.
– Lastly, you mentioned a couple of different baking pans. I realize that’s not entirely the issue here, because neither batch baked well, but ceramic pans aren’t ideal for baking cookies. Different materials of pans conduct heat differently, so some will cook the bottom too quickly, and not leave the cookie appropriate time to spread out gently and evenly – or not quickly enough, and allow the cookie to spread far too much. Tessa discusses and shows the differences between a variety of baking pans in this article here!
Hopefully something here helped! Feel free to reach back out to us with any further questions – we are always happy to help!! 🙂
Do you have the chill the dough ?
Hi Kellie! It’s not entirely crucial that you chill this dough, but there are SO many wonderful benefits to chilling the dough for 24-72 hours. Check out all the wonderful tips about this and so much more, in the pink tip box above the recipe! 🙂
These were fantastic. I have made plenty of nice looking chocolate chip cookies over the last year but not any that TASTED this good. The flavor was great. I was really impressed. Texture was exactly as described and really perfect.
Can you do a mix of half semi-sweet chocolate chips and half semi-sweet chocolate chunks?
Hi Chloe! Yes, that will work just fine 🙂
can I use an egg substitute? My granddaughter is allergic to eggs.
Hi Carol! Unfortunately, we don’t test our recipes with substitutes, so we don’t know if anything exists that will adequately replace all the things an egg does in baking! Best of luck in your search! 🙂
I don’t know where I went wrong. I followed the recipe exactly. My cookies came out more cake like than gooey. Any suggestions? Thanks
Hi Charleyn! I’m sorry to hear that your cookies didn’t turn out as you’d hoped! It sounds like perhaps you accidentally added too much flour. How do you measure your ingredients? By volume (using cups), or by weight (using a digital kitchen scale)? When measuring by volume, it’s so easy to mis-measure flour/sugar/etc and throw off the entire chemistry of a recipe. Tessa talks about how to best measure ingredients to ensure accuracy every time, in this article here! I hope that helps, and I hope you give these cookies another try sometime! 🙂
I’ve made these cookies several times and freeze most of the dough to bake in small batches. I follow the recipe exactly. So good!
Can regular salt be substituted for the sea salt?
Hi Becky! Yes, absolutely – Tessa just prefers the flavor of sea salt, but you can use any type of salt. Learn more about salts here!
Thanks very much. Just getting ready to make the dough .
Can you clarify the size of each cookie for me? The recipe reads to divide the dough into 3-tablespoon-sized balls using a large cookie scoop. Is one cookie 3 tablespoons of dough? I can’t wait to make these.
Hi Rachel! Yes, each cookie is 3T-Tablespoons. You can make them smaller if you wish (and bake for less time), but we find the best results are at the 3-Tablespoon size. I hope that helps! Let us know what you think of these cookies once you have tried them 🙂
Thank you so much for your response. The 3 tablespoons came out gooey in the middle, so I switched to 2 tablespoons. However, the gooey cookies cooled down sufficiently after a while and tasted perfect. I guess I just needed to trust the process. These are the BEST chocolate chip cookies. I packed them for coworkers as Christmas gifts, and they loved them!
So glad to hear that you and your coworkers enjoyed the cookies, Rachel 🙂
Hi there! Could I freeze the dough for a few hours (instead of fridge overnight) and have similar results? I didn’t want to wait overnight lol!
Hi Kylene! No, you can’t speed the process up by putting the dough in the freezer, unfortunately. You want to chill your dough for 24-72 hours, and then bake or freeze. The magic happens in the fridge. Once you put the dough in the freezer, the moisture in the dough will actually freeze; it’s like the dough is in suspended-animation and the flour/starch won’t be able to absorb moisture because the moisture is frozen. Tessa goes into this in more detail about the science behind this, in this article here! If you don’t want to wait, just bake off a couple cookies right away, to satisfy the craving, and then let the rest of the dough chill for a day or two for all the benefits. Let us know what you think once you’ve given it a try 🙂