


Tessa’s Recipe Rundown
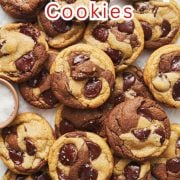
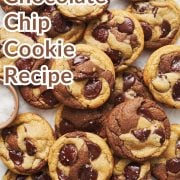
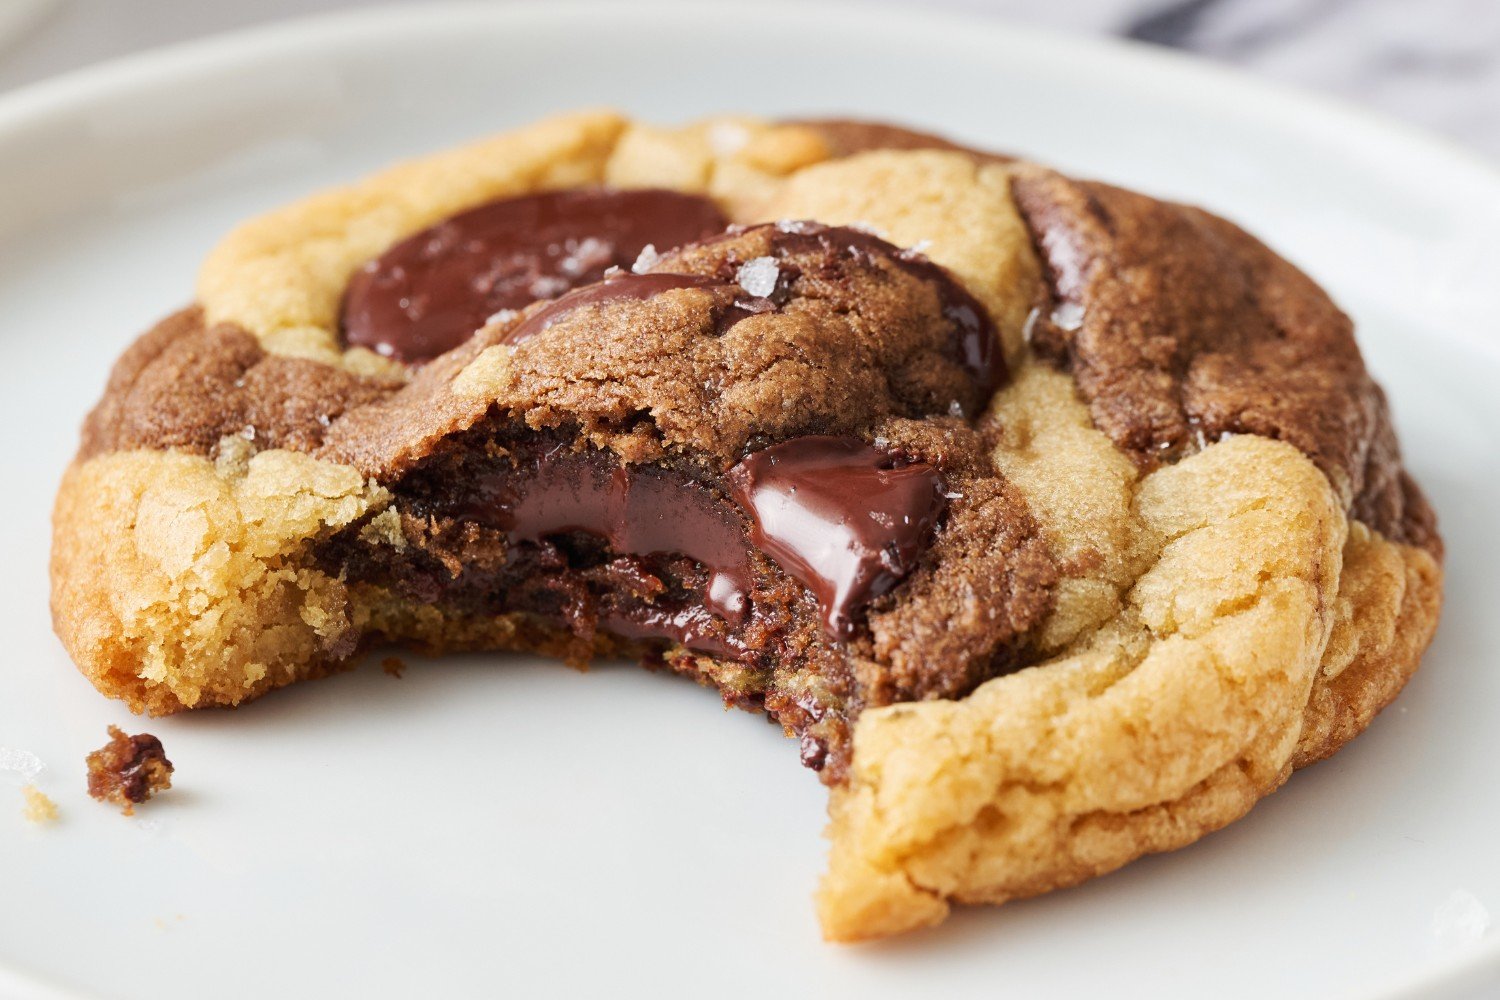
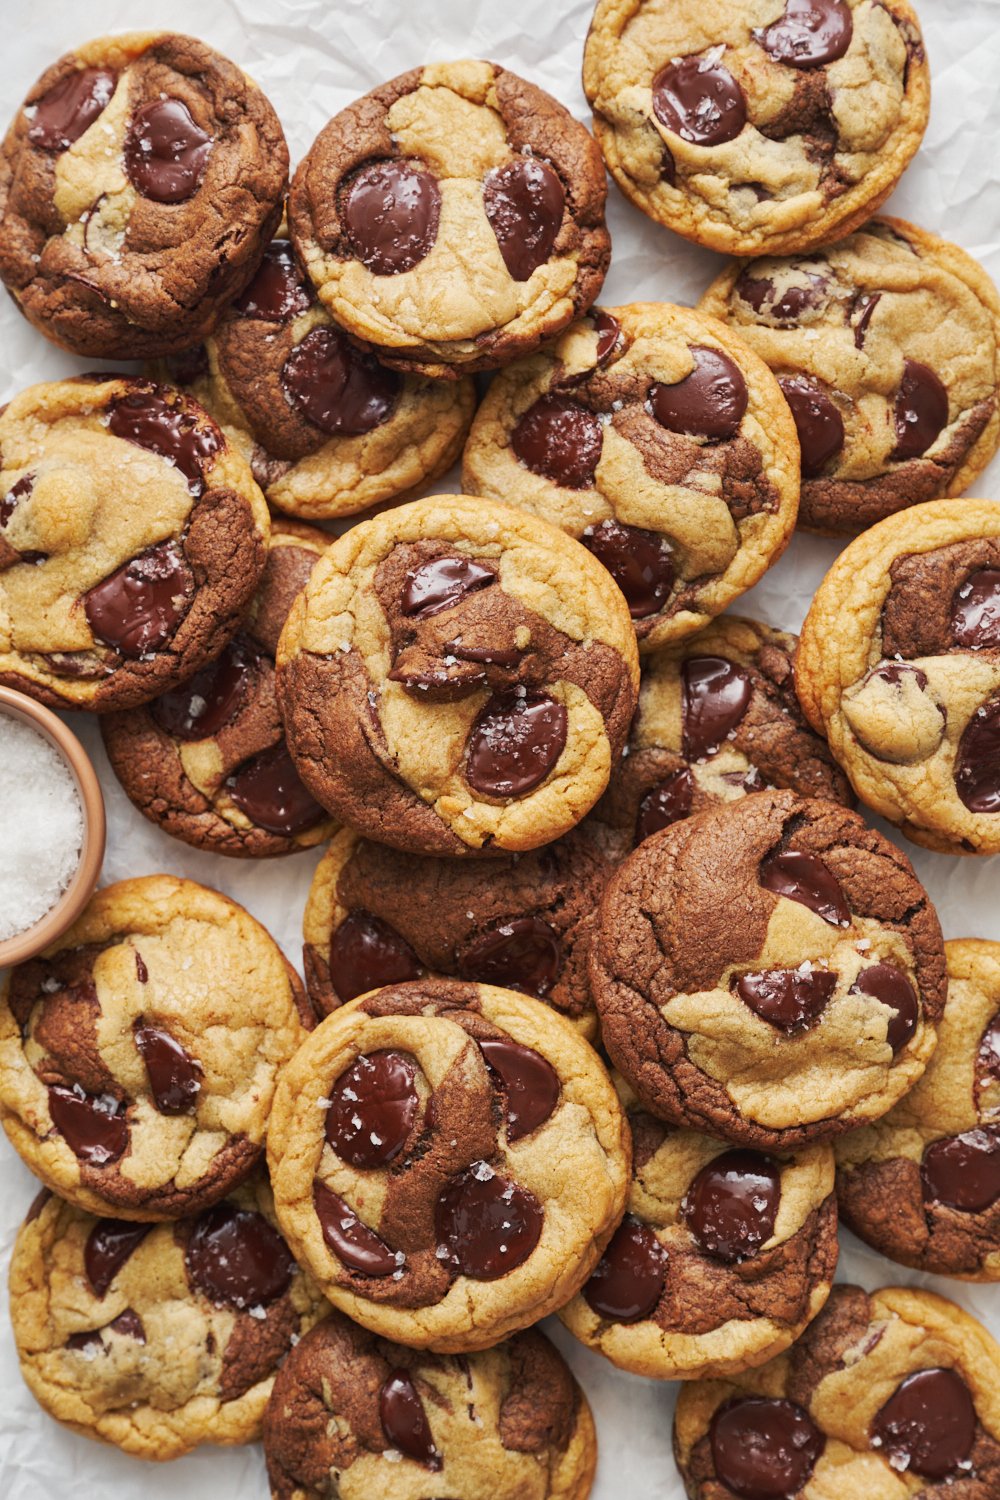
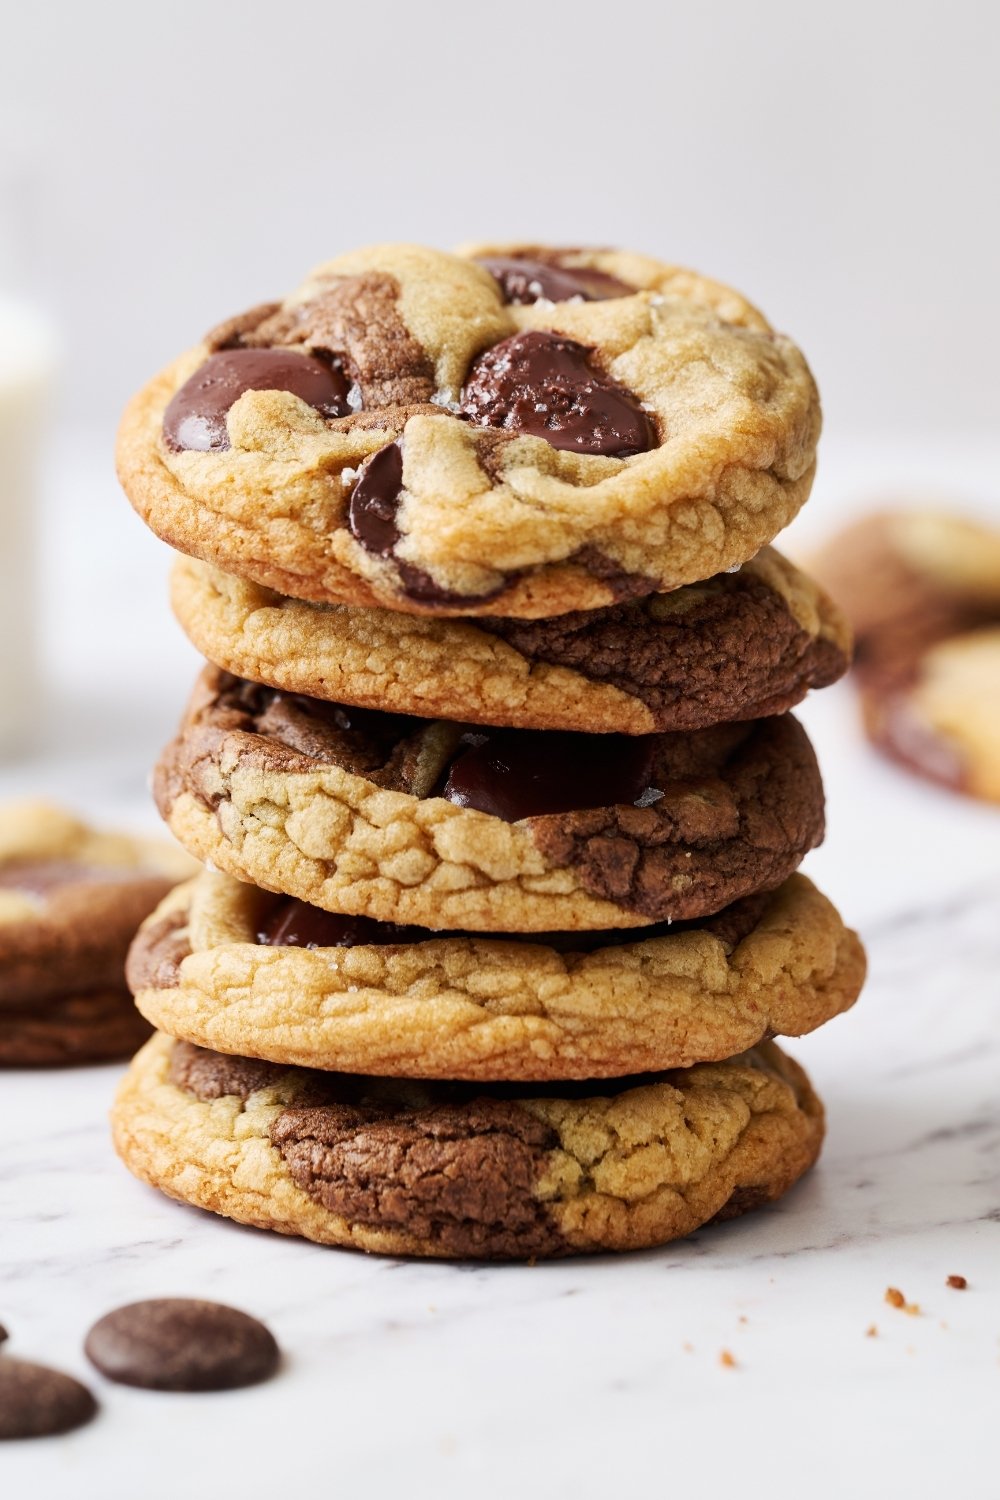
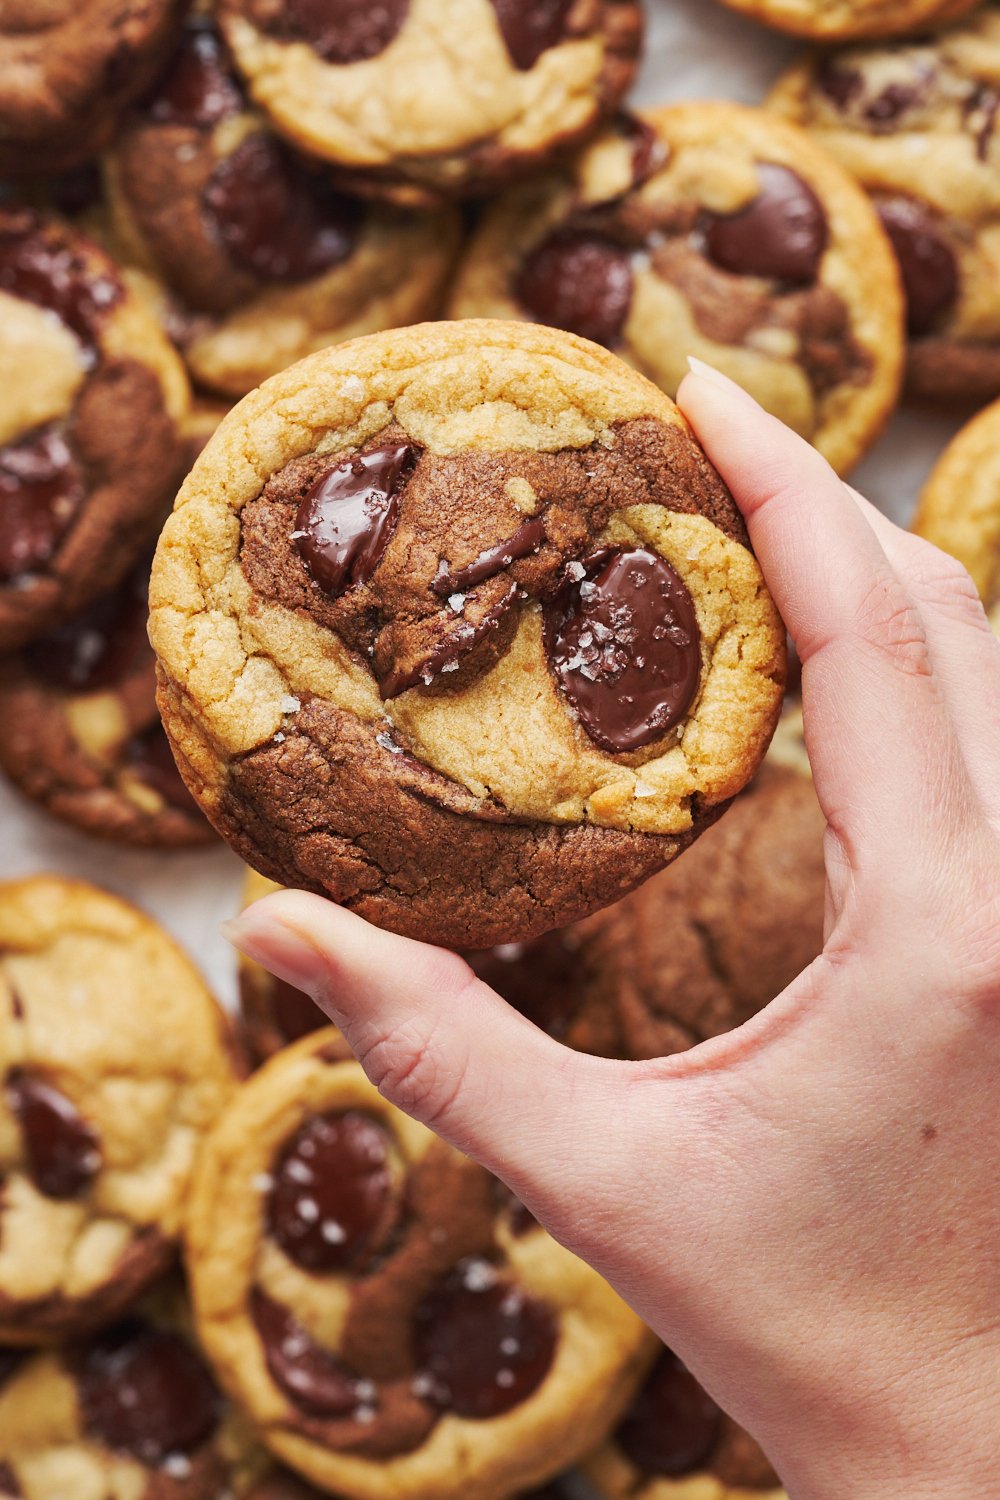
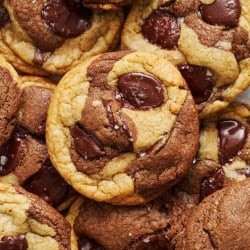
TASTE: The perfect combination of butterscotch-forward cookie dough, rich cocoa dough, and big, gooey puddles of semisweet chocolate throughout.
TEXTURE: Thick, chewy, and oh-so gooey.
EASE: Slightly more complicated than a typical cookie dough, but combining and rolling the two doughs together is fun and almost therapeutic! Kids will love helping out.
PROS: The prettiest chocolate chip cookies ever.
CONS: None.
WOULD I MAKE THIS AGAIN? I’ve already made these cookies many times!
This post may contain affiliate links. Read our disclosure policy.


I came up with this recipe in a dream. That’s how often I think about chocolate. I truly have put my culinary school degree to good use!
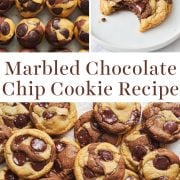
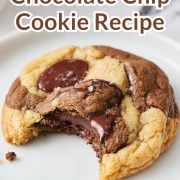
These cookies take a bit of extra time to assemble, but they’re pretty enough to serve at a party or to add to your Christmas cookie box.
If you’ve been around Handle the Heat, you know I have a big soft spot for really good chocolate chip cookies. In fact, I have over 30 chocolate chip cookie recipes on my site! From my popular Bakery Style Chocolate Chip Cookies to the flavor-packed Brown Butter Toffee Chocolate Chip Cookies and my thick Peanut Butter Chocolate Chip Cookies, there’s something for every cookie lover.
I even wrote a cookbook about cookies… with an entire chapter dedicated to chocolate chip cookies!
But there was one thing missing… a cookie that swirls two incredible doughs into one heavenly bite.
Until now.
These unique marbled cookies are super easy to make and come together in no time. Everyone will think you went to an expensive bakery. They’re perfect for when that cookie craving strikes!

Sprinkle of Science
How to Make Marbled Chocolate Chip Cookies
How to Make Thick, Chewy Cookies (and Avoid Dry Cookies)
- Measure your flour correctly – To avoid dry, hard, cakey, or bland cookies, I highly recommend using a digital kitchen scale to measure your flour and cocoa powder. If you don’t have one, use the spoon and level method.
- Don’t reduce the sugar – Sugar actually does so much in baking beyond providing sweetness. Reducing the sugar here will also impact the texture, height, and shelf life of your cookies. Learn more about sugar in baking here.
- Don’t overbake – For perfectly soft cookies, pull them from the oven when they’re just set at the edges and look ever so slightly moist on top. Using a high-quality baking pan also helps – learn more about which baking pans I recommend (and don’t!) here.
- Chill your dough – Though not a requirement for this recipe, this will help create thicker, chewier cookies with an even better flavor. Learn more about why chilling cookie dough matters here.
The Chocolate
- This recipe was designed to use chocolate baking wafers or chocolate feves to create drool-worthy puddles of decadent chocolate throughout each cookie.
- As the chocolate is the star of the show here, I recommend splurging for high-quality chocolate, if possible.
- I recommend Valrhona Semisweet Chocolate Feves or Guittard Semisweet Baking Wafers. I find the latter online, or at Whole Foods or Sprouts.
- Alternatively, feel free to use large baking chips, chopped baking chocolate, or chocolate chips. Your cookies won’t be quite as loaded with chocolate puddles, but they’ll still taste amazing.
- Just use the same amount of chocolate by weight as listed in the recipe below.
Do I Have to Use Semisweet Chocolate?
I recommend sticking with semisweet chocolate for the best balance of sweetness, but you can use any type of chocolate you like. Just keep in mind that milk or white chocolate will make the cookies sweeter, while bittersweet chocolate will add a more intense chocolate flavor and make the cookies slightly less sweet.
What Type of Cocoa Powder for Marbled Chocolate Chip Cookies?
- I recommend using unsweetened natural cocoa powder here.
- We tested this recipe using Ghirardelli Unsweetened Cocoa Powder. Its flavor is more bitter than Dutch-processed and perfectly complements the butterscotch flavors from the classic chocolate chip cookie dough.
- Dutch-processed cocoa powder works differently on a chemical level, so stick with natural cocoa here.
- Learn more about Natural Cocoa vs. Dutch Process Cocoa Powder here.

Do I Have to Use Espresso Powder?
No. Espresso powder just enhances the chocolate flavor in the cocoa dough. You can’t taste any coffee flavor, but feel free to skip it entirely if preferred.
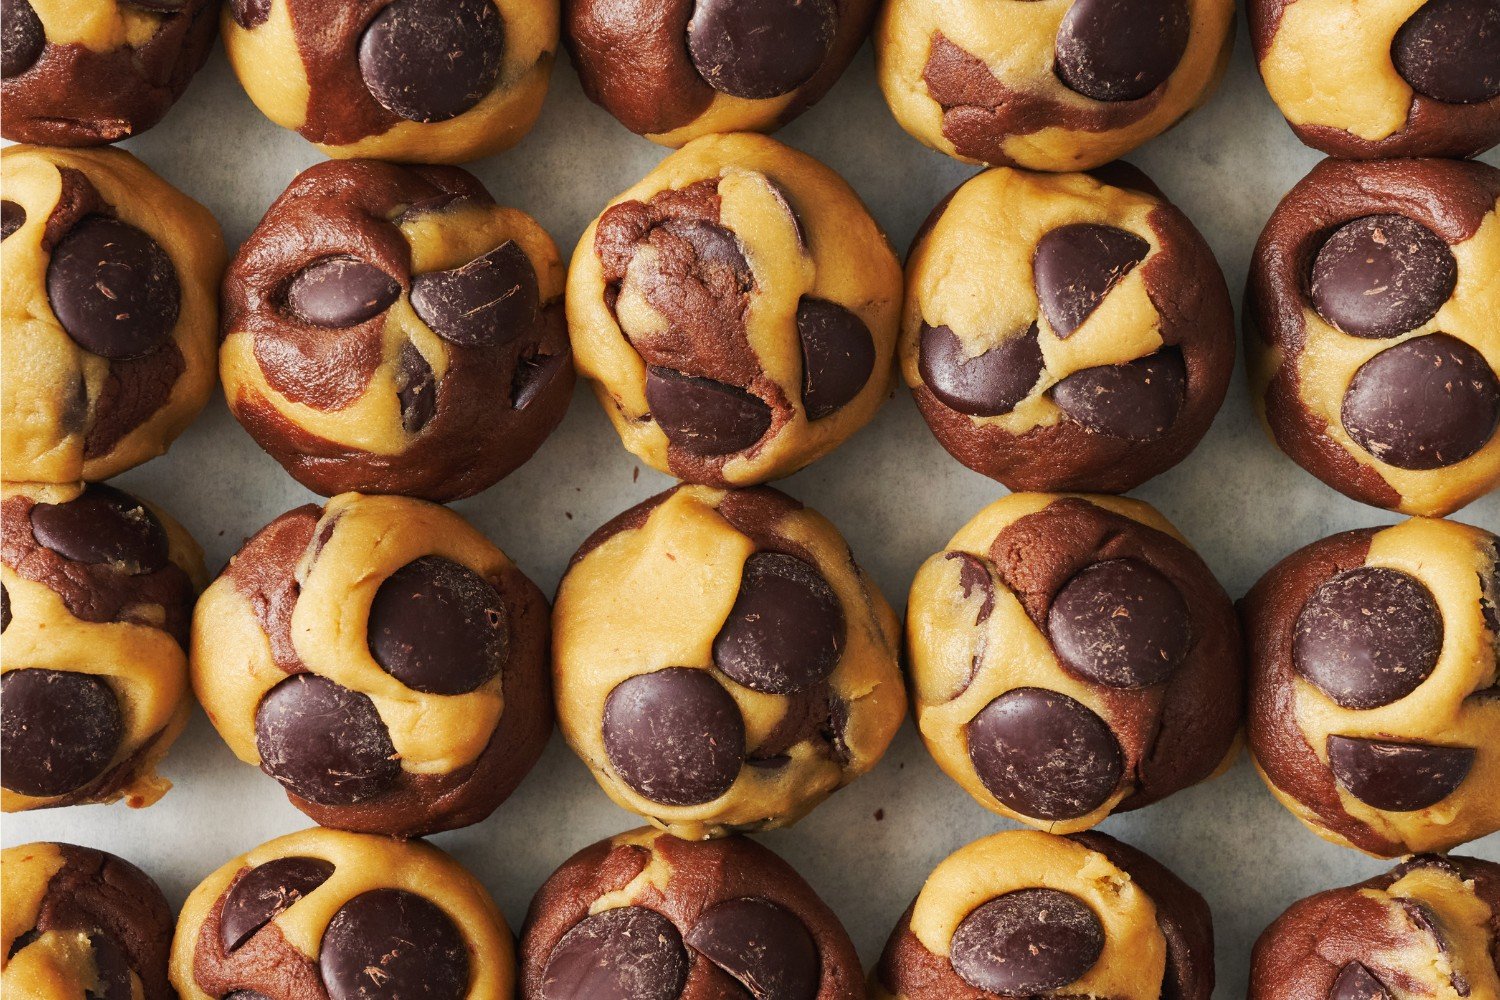
How to Shape Marbled Chocolate Chip Cookies?
1. Prepare the base dough and divide it in two before adding any dry ingredients.
2. Add the dry ingredients to each portion of dough, as instructed in the recipe below.
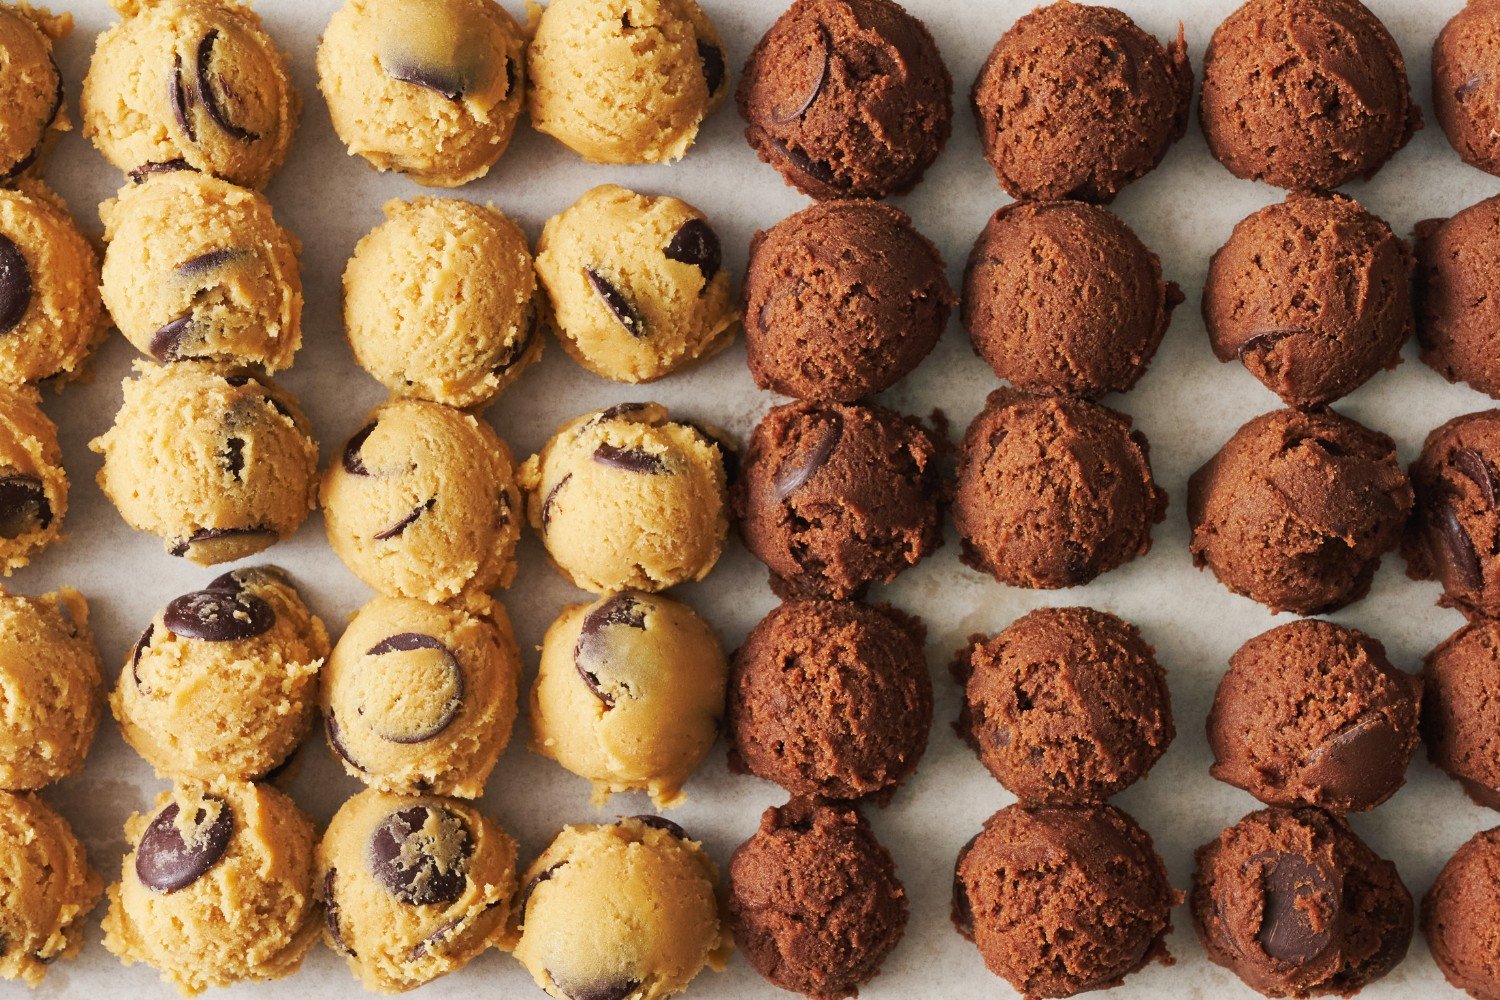
3. Use a 1 1/2-tablespoon medium cookie scoop to portion out both doughs.
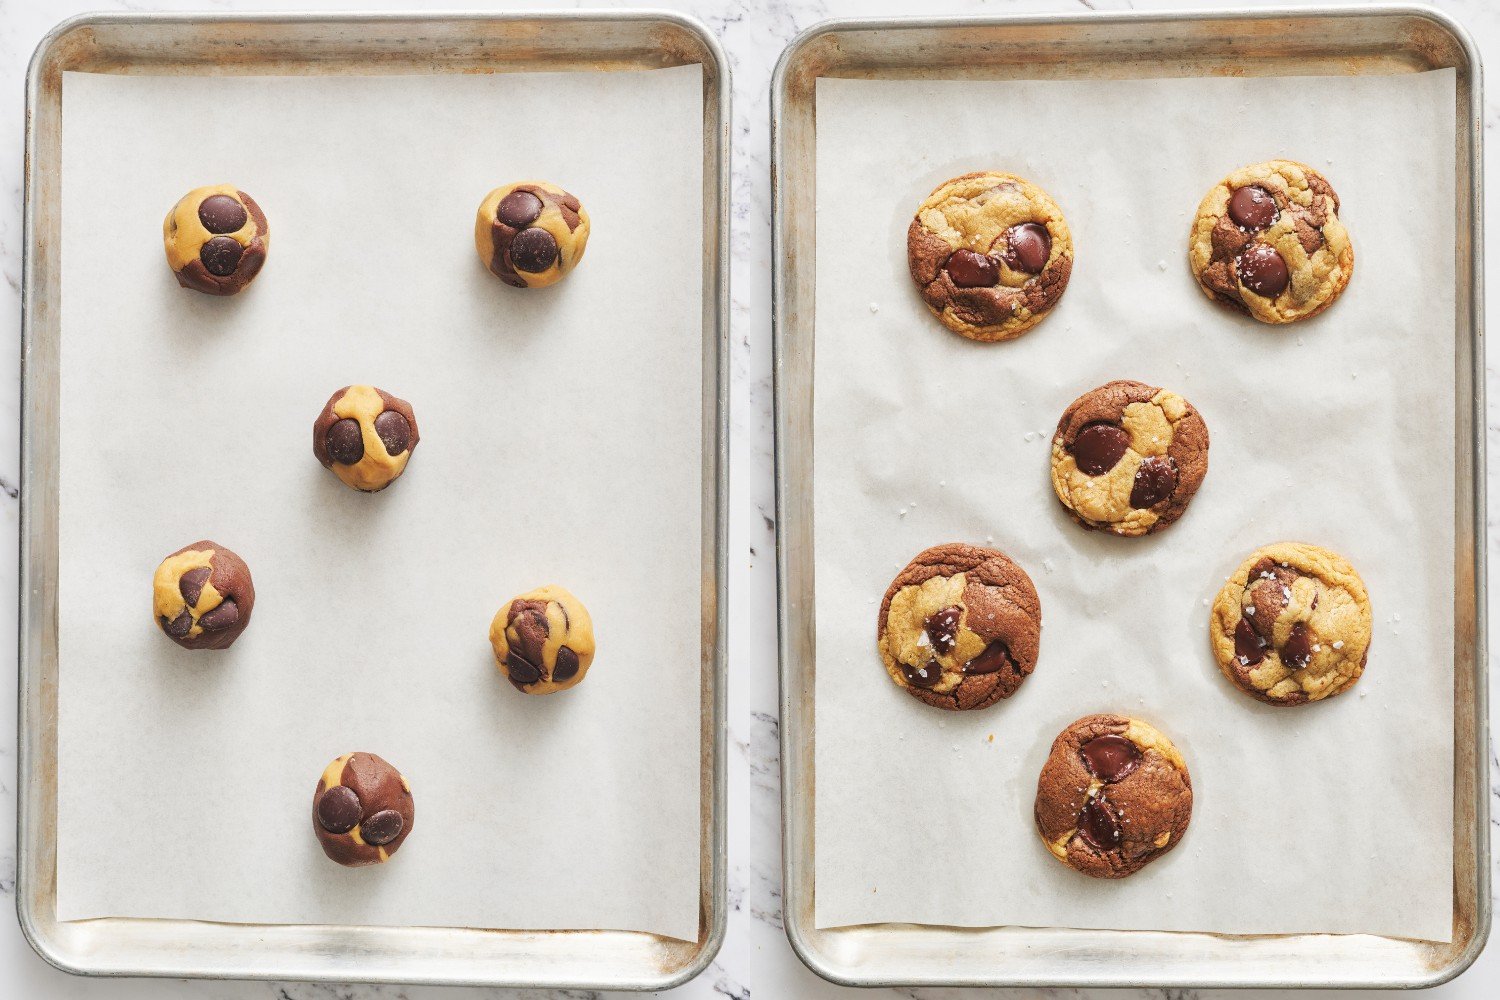
4. Take one ball of cocoa dough and tear it in half. Place each half on either side of a ball of classic cookie dough.

5. Roll the dough into a smooth ball and top with a few extra chocolate wafers, chunks, or chips.
6. Repeat with the remaining dough balls.
7. Feel free to mix up the patterns by swapping the dough types–sandwiching cocoa dough with classic dough and vice versa! If you want more swirls, break the dough into four pieces instead of just two when combining dough balls.
Can I Halve This Recipe? Can I Double This Recipe?
Yes! Simply divide all the ingredients in half to yield approximately 10-11 cookies, or double all ingredients to yield approximately 42 cookies. No other modifications needed.
Tip for Picture-Perfect Cookies
As soon as you pull your cookies from the oven, take a large cookie cutter (slightly larger than the size of the baked cookies) and swirl it around the edges of each baked cookie. This pulls the edges of the cookies in for a perfectly round cookie – and, bonus, it also makes them even thicker!
How to Store Marble Cookies?
Marbled Chocolate Chip Cookies will keep in an airtight container stored at room temperature for about 4 to 5 days. Be sure they are completely cooled before storing. Store with a tortilla to keep your cookies softer for even longer!
Can You Freeze Marbled Chocolate Chip Cookies?
Yes! Follow the recipe to prepare and shape the dough. Cover it in plastic wrap and chill for 24-72 hours. After the chilling period, place the balls of dough on a parchment-lined rimmed baking sheet and freeze for about an hour, or until firm. Then, transfer the dough balls to a freezer bag or airtight container and store them in the freezer for up to two months.
To bake, thaw overnight in the fridge before baking as directed below. You can also bake directly from the freezer – learn how to bake cookies from frozen here.
Email This Recipe
Enter your email, and we’ll send it to your inbox.
Ingredients
For the base:
- 2 sticks (227 grams) unsalted butter, at cool room temperature (67°F)
- 1/2 cup (100 grams) granulated sugar
- 1 1/4 cups (247 grams) lightly packed light brown sugar
- 2 teaspoons vanilla
- 2 large eggs, at room temperature
For the chocolate chip dough:
- 1 1/2 cups (190 grams) all-purpose flour
- 1/2 teaspoon baking soda
- 1/2 teaspoon fine sea salt
- 3/4 cup (128 grams) semisweet chocolate wafers or feves*


For the cocoa dough:
- 1 1/4 cups plus 2 tablespoons (175 grams) all-purpose flour
- ¼ cup (21 grams) unsweetened natural cocoa powder
- 1/2 teaspoon baking soda
- 1/2 teaspoon fine sea salt
- ¼ teaspoon instant espresso powder, optional
- 3/4 cup (128 grams) semisweet chocolate wafers or feves*
- Flaky sea salt, for finishing, if desired
Instructions
- Preheat oven to 350ºF. Line baking sheets with parchment paper.
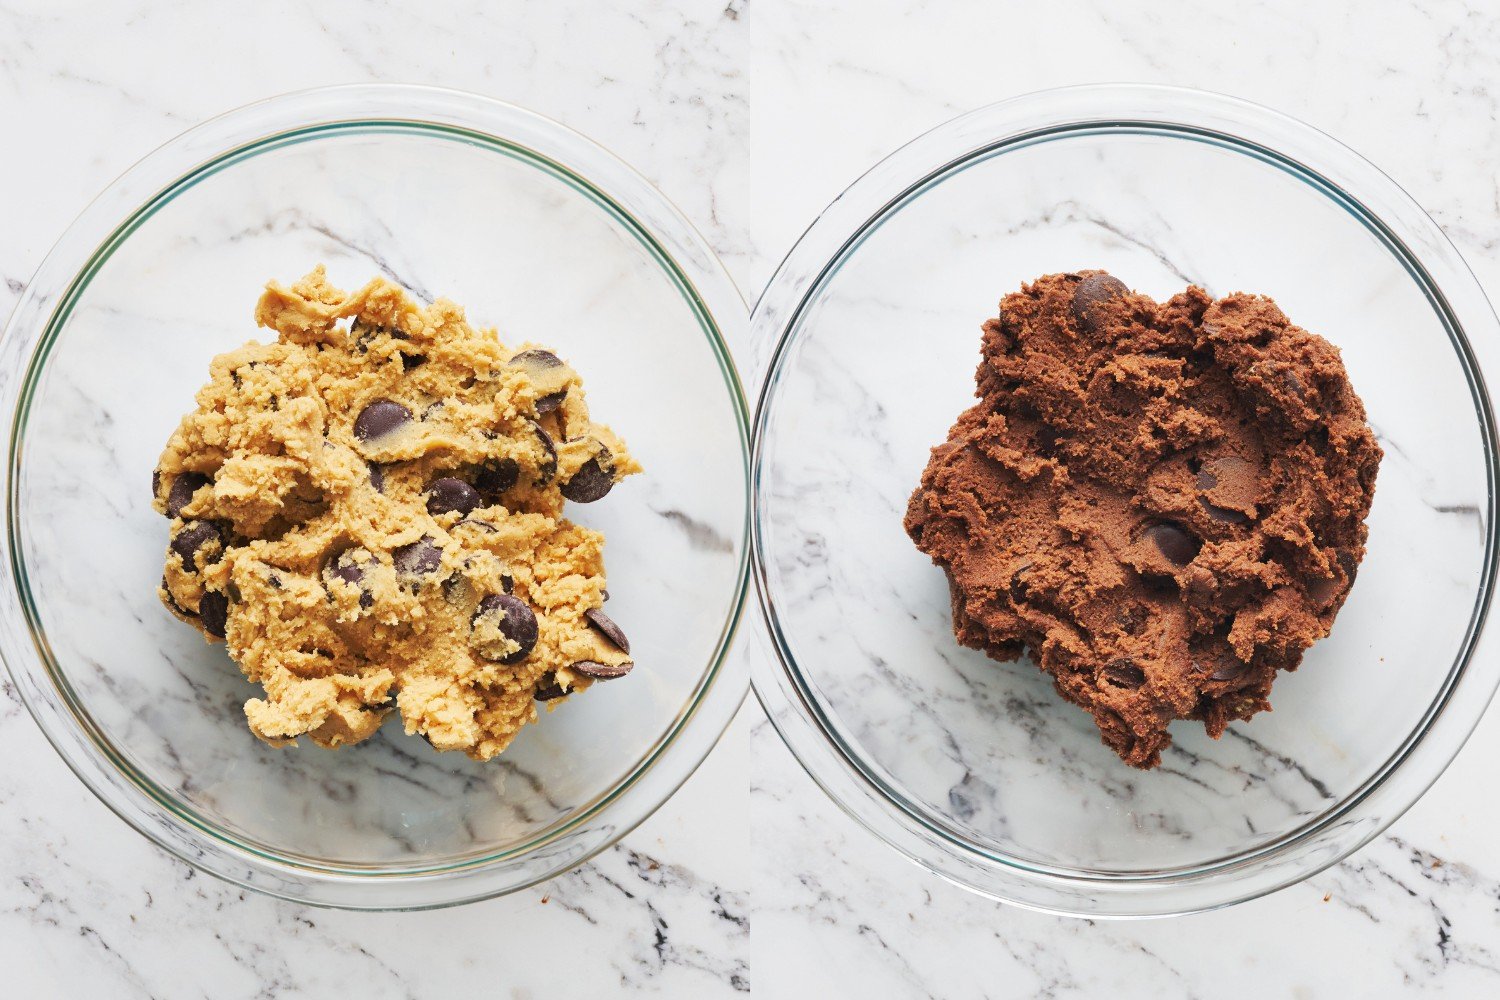
- In the bowl of an electric mixer, beat the butter, granulated sugar, and brown sugar until creamy, about 3 minutes. Scrape down the sides and bottom of the mixing bowl. Add the vanilla and eggs and beat until combined, scraping the bowl down as needed.
- In a separate bowl, whisk together the chocolate chip dough dry ingredients (all-purpose flour, baking soda, and salt). Add half of the creamed butter and sugar mixture (it should weigh about 330 grams). Stir with a rubber spatula into a cohesive dough. Mix in the chocolate wafers, reserving some for garnish.
- To the remaining butter and sugar mixture, add in the flour, cocoa powder, baking soda, and salt. Beat on low speed to combine. Mix in the chocolate wafers, reserving some for garnish.
- Using a medium 1 1/2-tablespoon cookie scoop, scoop portions of both doughs. Tear one ball of classic dough in half and sandwich the cocoa dough ball, or vice versa. Roll between your palms. Place on the prepared baking sheet, dotting the top with additional chocolate wafers. Repeat with all dough balls.
- If time permits, wrap the shaped dough tightly in plastic wrap and refrigerate for at least 24 hours but no more than 72 hours. This allows the dough to “marinate” and makes the cookies thicker, chewier, and more flavorful.
- Bake for 11-13 minutes, or until golden brown at the edges. Sprinkle with flaky sea salt, if desired. Cool for 5 minutes before removing to wire racks to cool completely.
Notes
Photos by Joanie Simon.


as a non-reviewer usually, always a fan of handle the heat, wow i have to say these r pretty much the best cookies ever! they really fulfilled my wildest dreams of cookie texture and flavor!
Love hearing that 🙂 Thanks so much for the 5-star review!
I’m gonna be honest, I didn’t 100% trust this recipe. First of all, I accidentally put too much sugar, which is my fault. It turn out good, but still my fault. The entire base dough and adding to the base dough experience had me in severe doubt, but I kept on. The second the cookies came out the oven though? Oh. My. Gosh. Did the heavens finally sing? Was I finally going to meet my grandmother and give her this sweet delight? Why is this recipe so good? I don’t know if it was me, the recipe, or a combination of two geniuses, because this healed my perception of my ability to follow cookie recipes. They didn’t last a week on my house. It was so bas my mom called me to tell me to stop baking. Anyways, don’t doubt a recipe because the instructions are odd, it’s probably the best thing you’ll ever eat. This was amazing.
By “it was so bad,” I mean the situation was bad, lol. Recipe is fantastic
I think these are one of my favorite cookies on your site. My go-to is usually the toffee brown butter choc chip, but these are seriously amazing with the espresso powder adding a beautiful touch to the chocolate portion. It’s a little messy to make but the results are definitely worth it!! I pre-portioned each dough and then it made making the marble part much easier. No matter what side it baked on, it was beautiful. My friends all had WIDE eyes as soon as they took a bite. That’s definitely a good sign!! I think it’s the perfect balance of chew, sweetness, saltiness (from the salt), and depth of flavor from the espresso powder. Thank you Tessa for posting this!!!
So happy to hear they were such a hit, Nancy 🙂 Thanks for sharing!
Hi I do not have a cookie scoop , I wold be great if u can share with me the weight of 1 cookie !
What kind of chocolate wafers you use? Ghirardelli?
Hi Jackie! Tessa included her recommendations above the recipe here. Excited for you to give these cookies a try, they’re a team favorite! 🙂
I can’t tell you how many compliments I got on these cookies! They are ABSOLUTELY DELICIOUS!!
My daughter and I made these cookies for Christmas and they were amazing!! We refrigerated dough for about 24 hours and the cookies were the perfect texture. I froze some of the baked cookies for about a week and they were just as delicious once thawed. These are a new favorite and we will be making them again and again!
Great cookie combo of chocolate and original accessories. Chewy, thick center, crispy edges. Buttery, chocolaty and fun to bake!
These cookies are wonderful! They look like they took a lot of time but they are actually very easy to make.
These were easy and delicious. I only had chocolate chips, I think the disks or chunks would have been better. I guess I need to make them again!