


Tessa’s Recipe Rundown
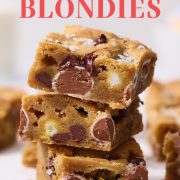
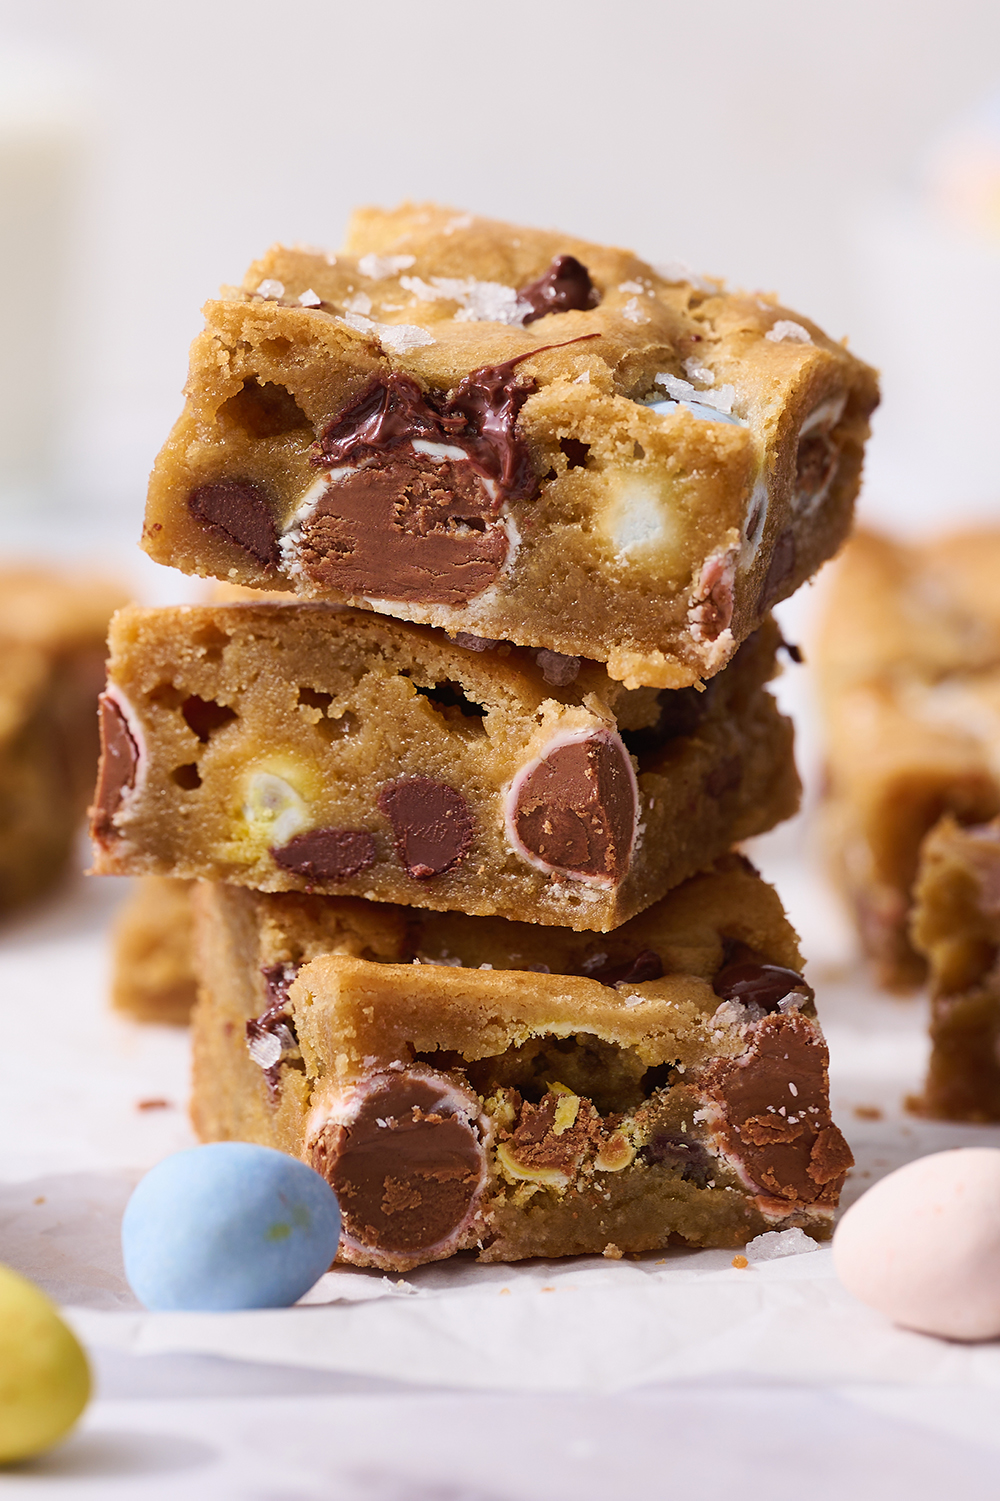
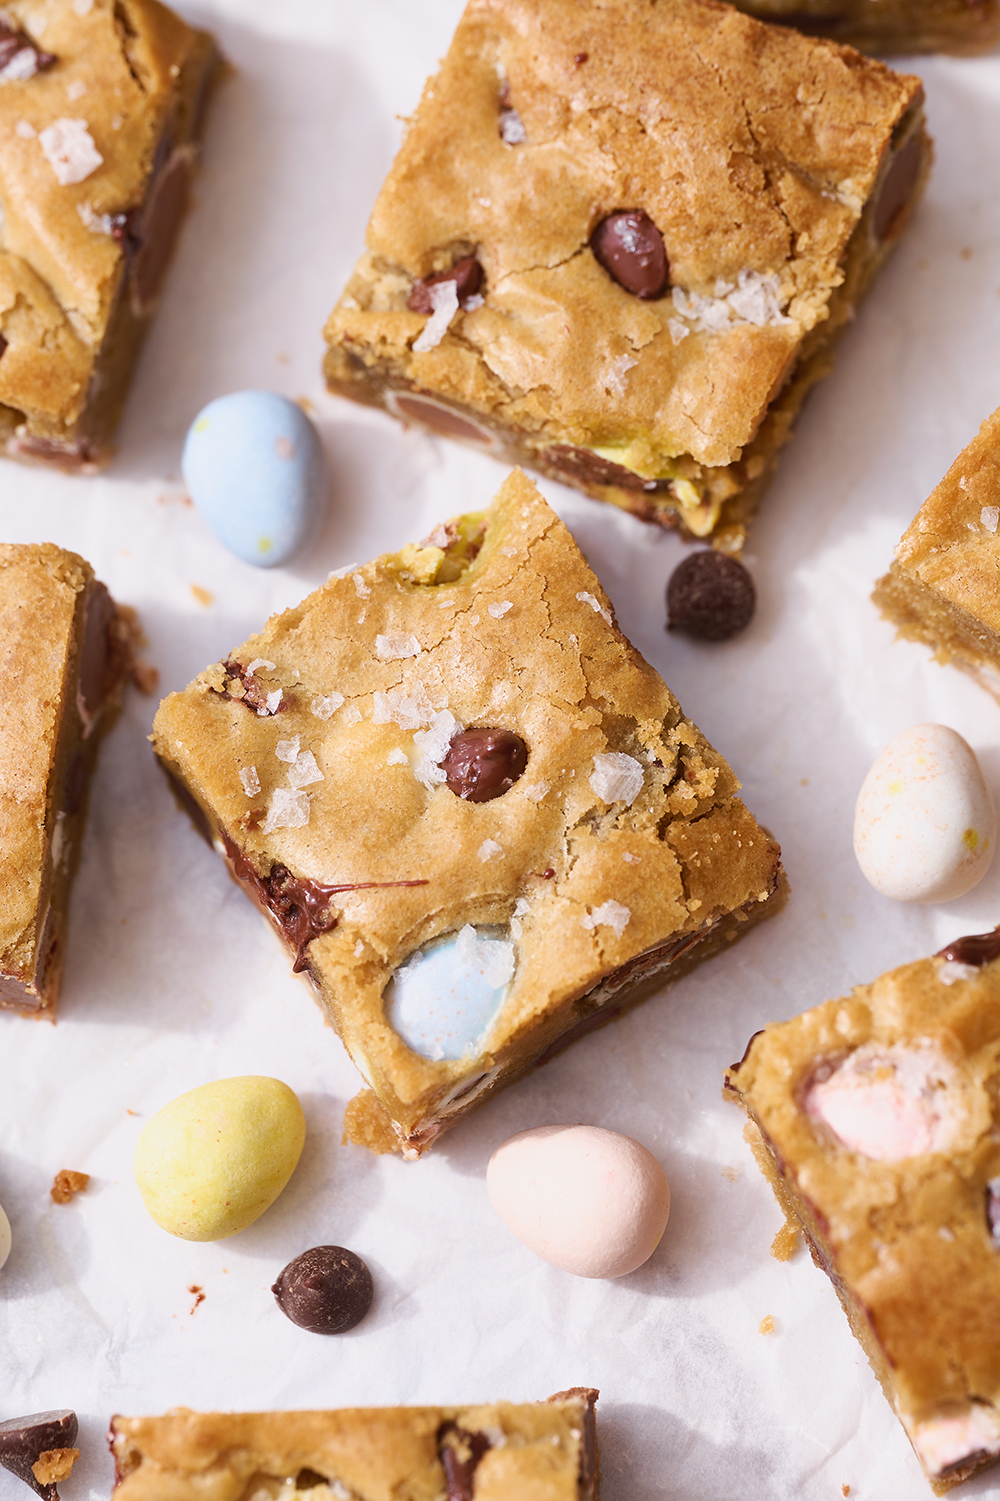
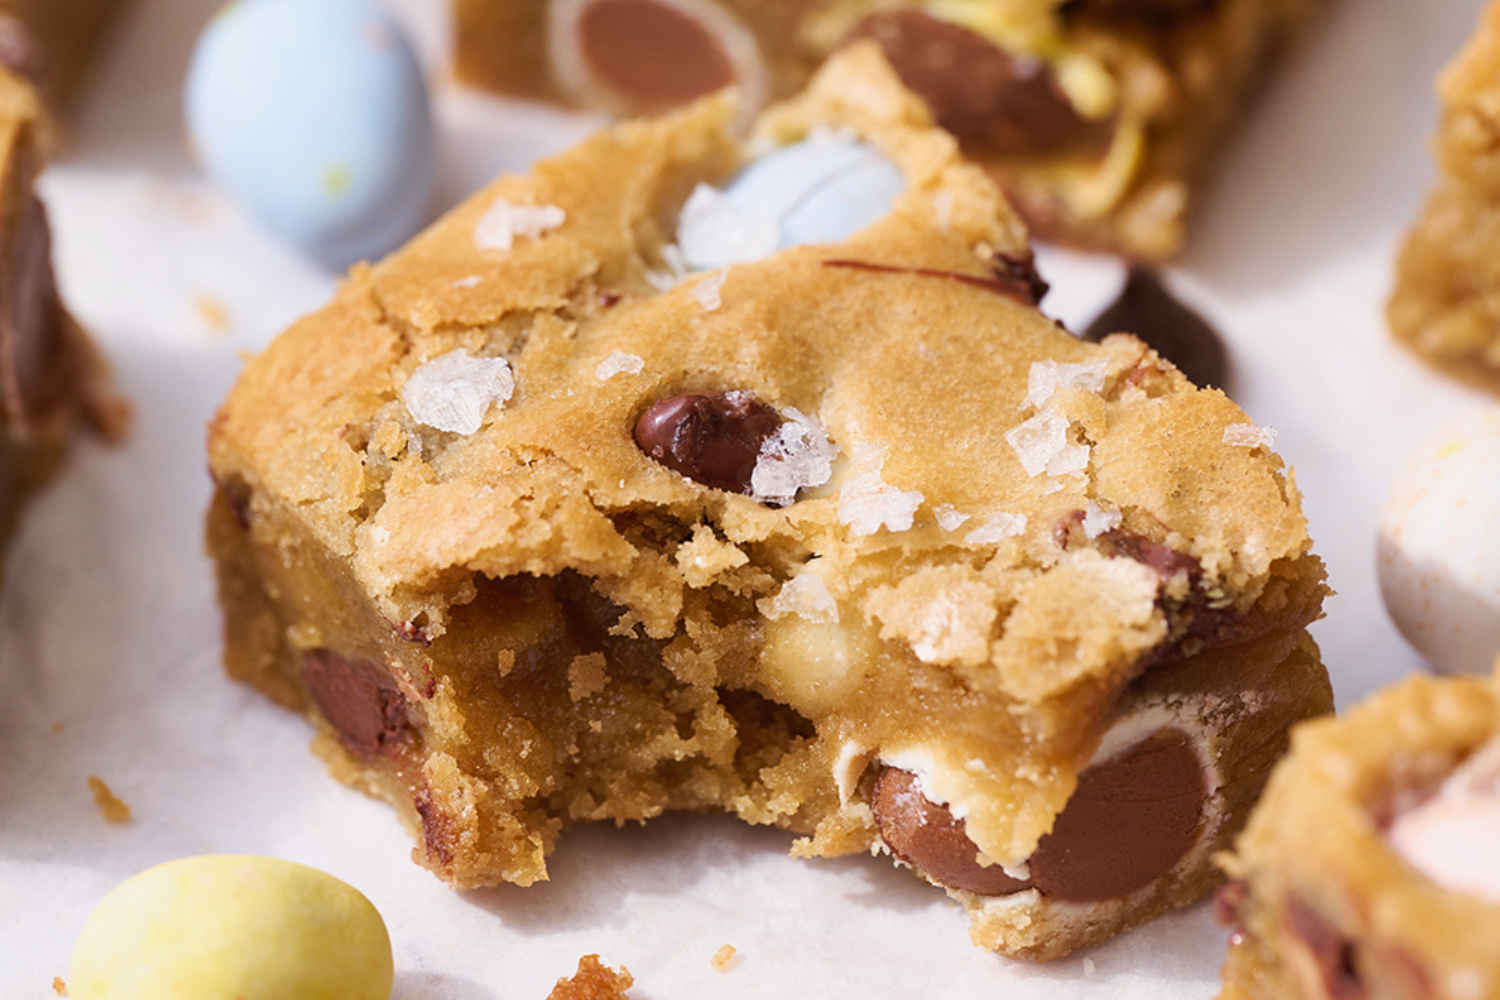
Taste: The dark chocolate chips perfectly balance out the sweetness of the Cadbury eggs. With some flaky sea salt sprinkled on top, these Easter blondies are sweet and salty perfection.
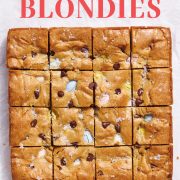
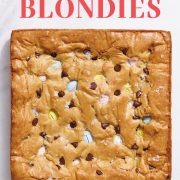
Texture: Chewy, gooey, and loaded with perfectly crunchy mix-ins.
Ease: One bowl, no mixer, less than 40 minutes from start to finish!
Why You’ll Love This Recipe: Adorable, quick, and easy recipe that’s a total crowd-pleaser.
This post may contain affiliate links. Read our disclosure policy.


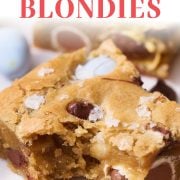


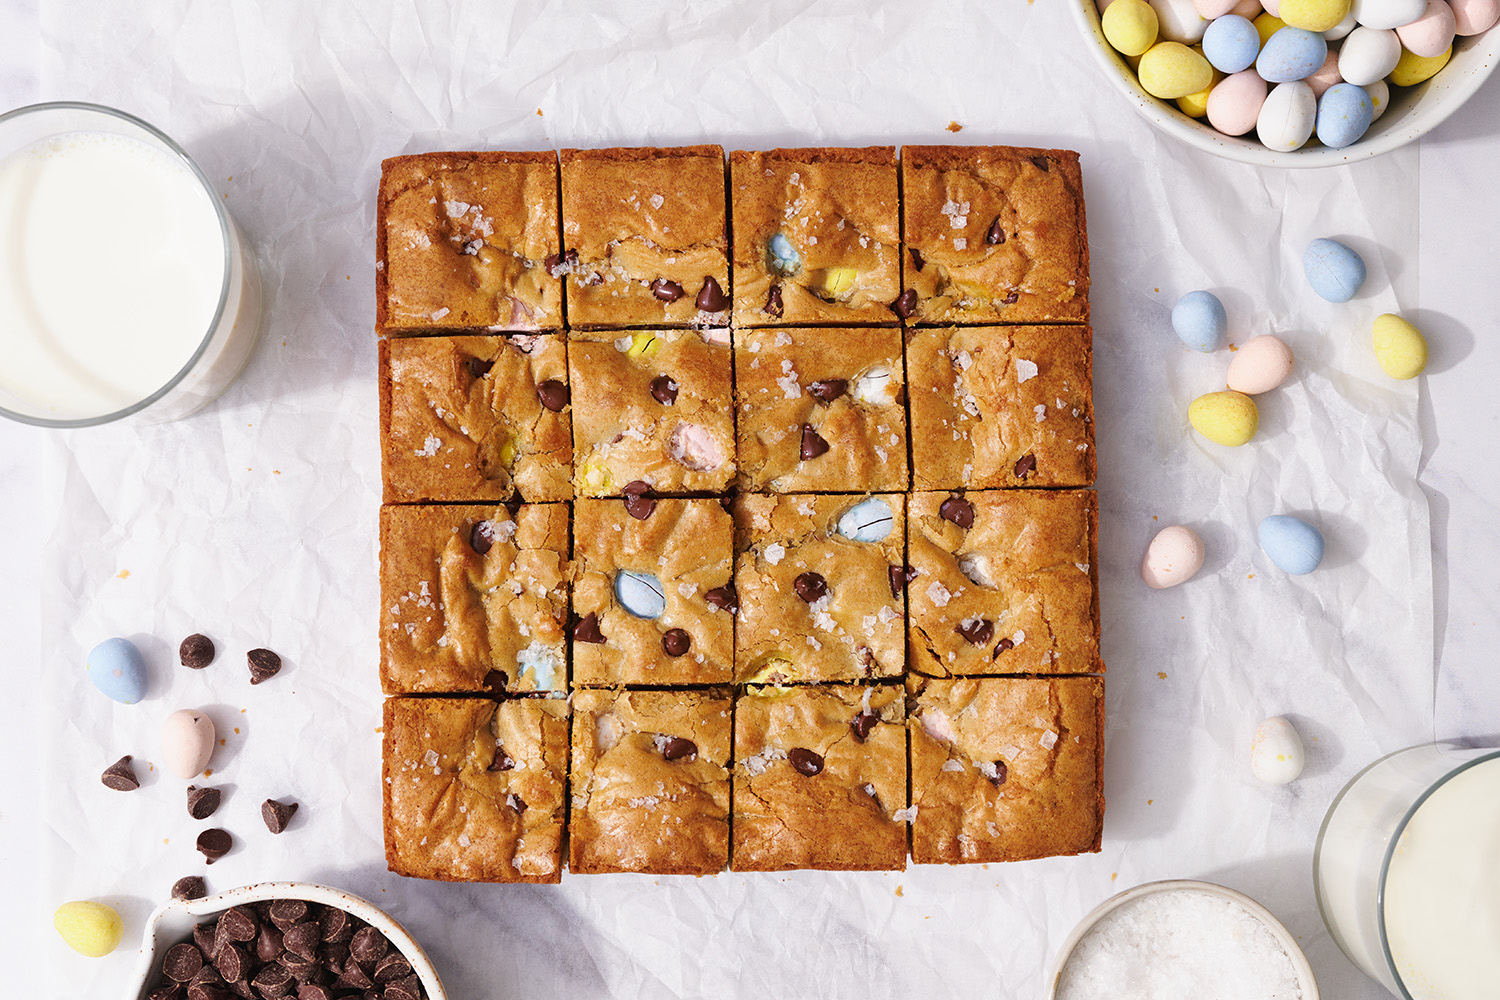
Are these Easter Blondies just the cutest dessert you’ve ever seen or what?
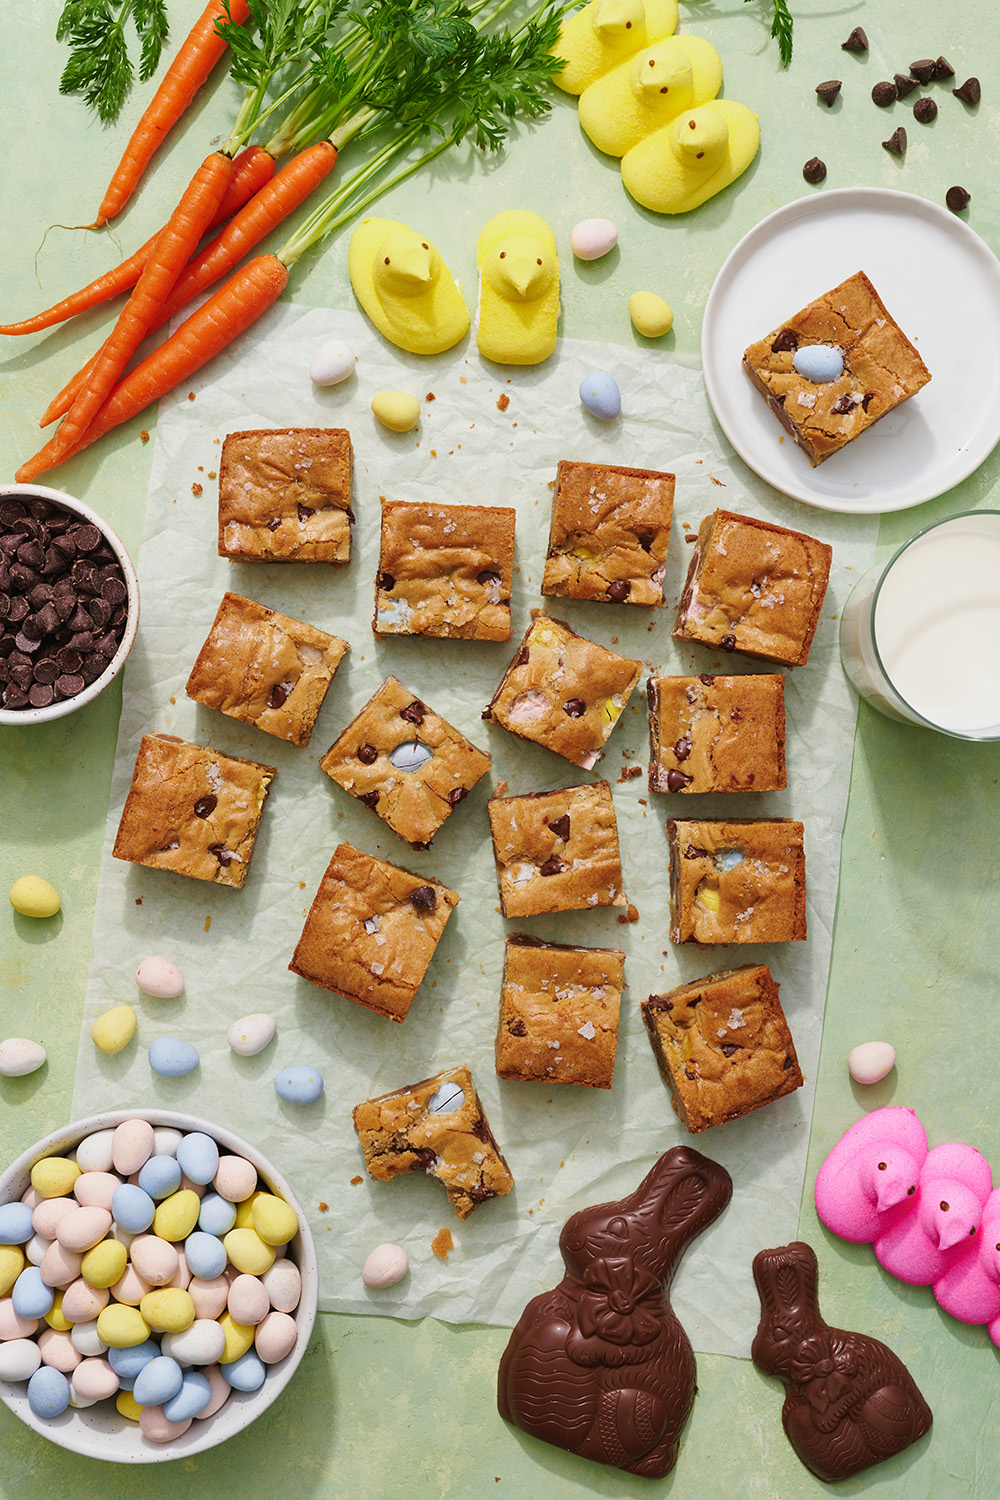
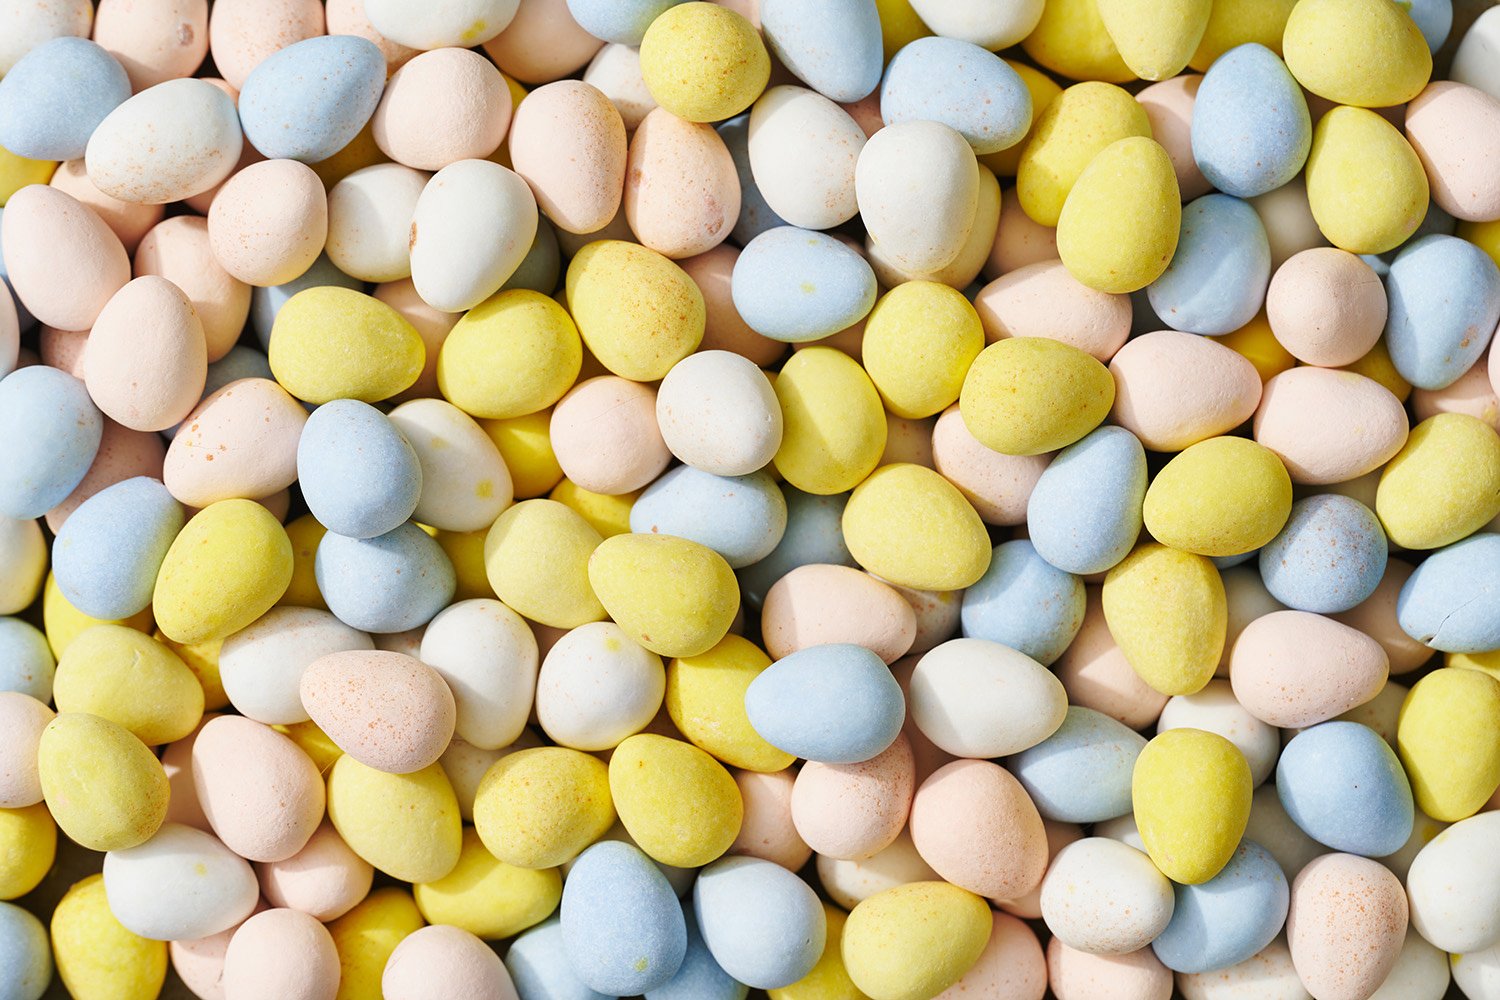
I don’t know about you, but I just love the darling pastel colors of Cadbury Easter eggs. They are so adorable and festive, especially in an easy Blondie Recipe like this one.
Last year, these Easter Blondies were the perfect dessert to go with my Easter Brunch of Classic Scones, my delicious Quiche Lorraine, and crispy Home Fries, all served with some fresh fruit. Not a crumb was left!
Both kids and adults will LOVE these easy Cadbury mini egg Blondies. Just don’t forget to dunk in a glass of milk while enjoying a slice!

Sprinkle of Science
How to Make Easter Blondies
What Is A Blondie? What is the Difference Between Blondies and Brownies?
Think of a Blondie as brownie’s butterscotch alter-ego! There is no cocoa or melted chocolate in a Blondie. Instead, Blondies are made with brown sugar for a rich butterscotch flavor and plenty of vanilla extract. A good Blondie is gooey, chewy, and a little fudgy.
They’re the perfect easy Easter dessert recipe or a fun way to use up leftover Easter candy. Bonus: these treats only take about 40 minutes from start to finish!
What if I Can’t Find Cadbury Eggs? Can I use M&Ms instead?
These Easter Blondies will work with any type of chocolate chip or similarly sized mix-in, though the Cadbury mini eggs are so quintessentially Easter-y (and cute!). If you can’t find them, I recommend using Easter M&M candies. Pretzel or peanut butter M&Ms will also work.
You can use exclusively Cadbury mini eggs if you like, but you run the risk of these bars becoming a little too sweet. I recommend balancing that Cadbury sweetness with dark chocolate chips (or semisweet, if you prefer).
I’m Out of Light Brown Sugar! Can I Still Make These Blondies?
There are two things you can do before you make an annoying extra supermarket trip:
- Substitute dark brown sugar for the same amount of light brown sugar, if that’s all you have. Your Easter Blondies will be a bit darker than pictured here, and a little softer and richer from the additional molasses in the dark brown sugar- but they will still taste delish!
- Make your own light brown sugar! For this recipe, you will need: 1 ½ cups (300 grams) white granulated sugar + 2 tablespoons molasses.
Whatever you do, don’t reduce the sugar! Sugar does so much more than sweetening these bars – learn more about sugar in baking here.
Top with Flaky Sea Salt!
I highly recommend sprinkling some flaky sea salt on the baked Blondies to balance the sweetness of the Cadbury eggs. Learn more about the differences between types of salt here.
The Key to Perfectly Baked Blondies: The Baking Pan
These Blondies are thick and rich, so it’s important to use a pan that conducts heat effectively, like my favorite USA Pan. We want to make sure the Blondies cook through completely but remain soft and gooey in the center.
Avoid Glass or Ceramic Pans for This Recipe!
Glass and ceramic take longer to heat up and longer to cook. This often leads to the edges starting to dry out and darken before the center is done. Check out our side-by-side comparison here, where we baked the exact same Blondie Recipe at the same temperature, for the same amount of time, in the same oven:
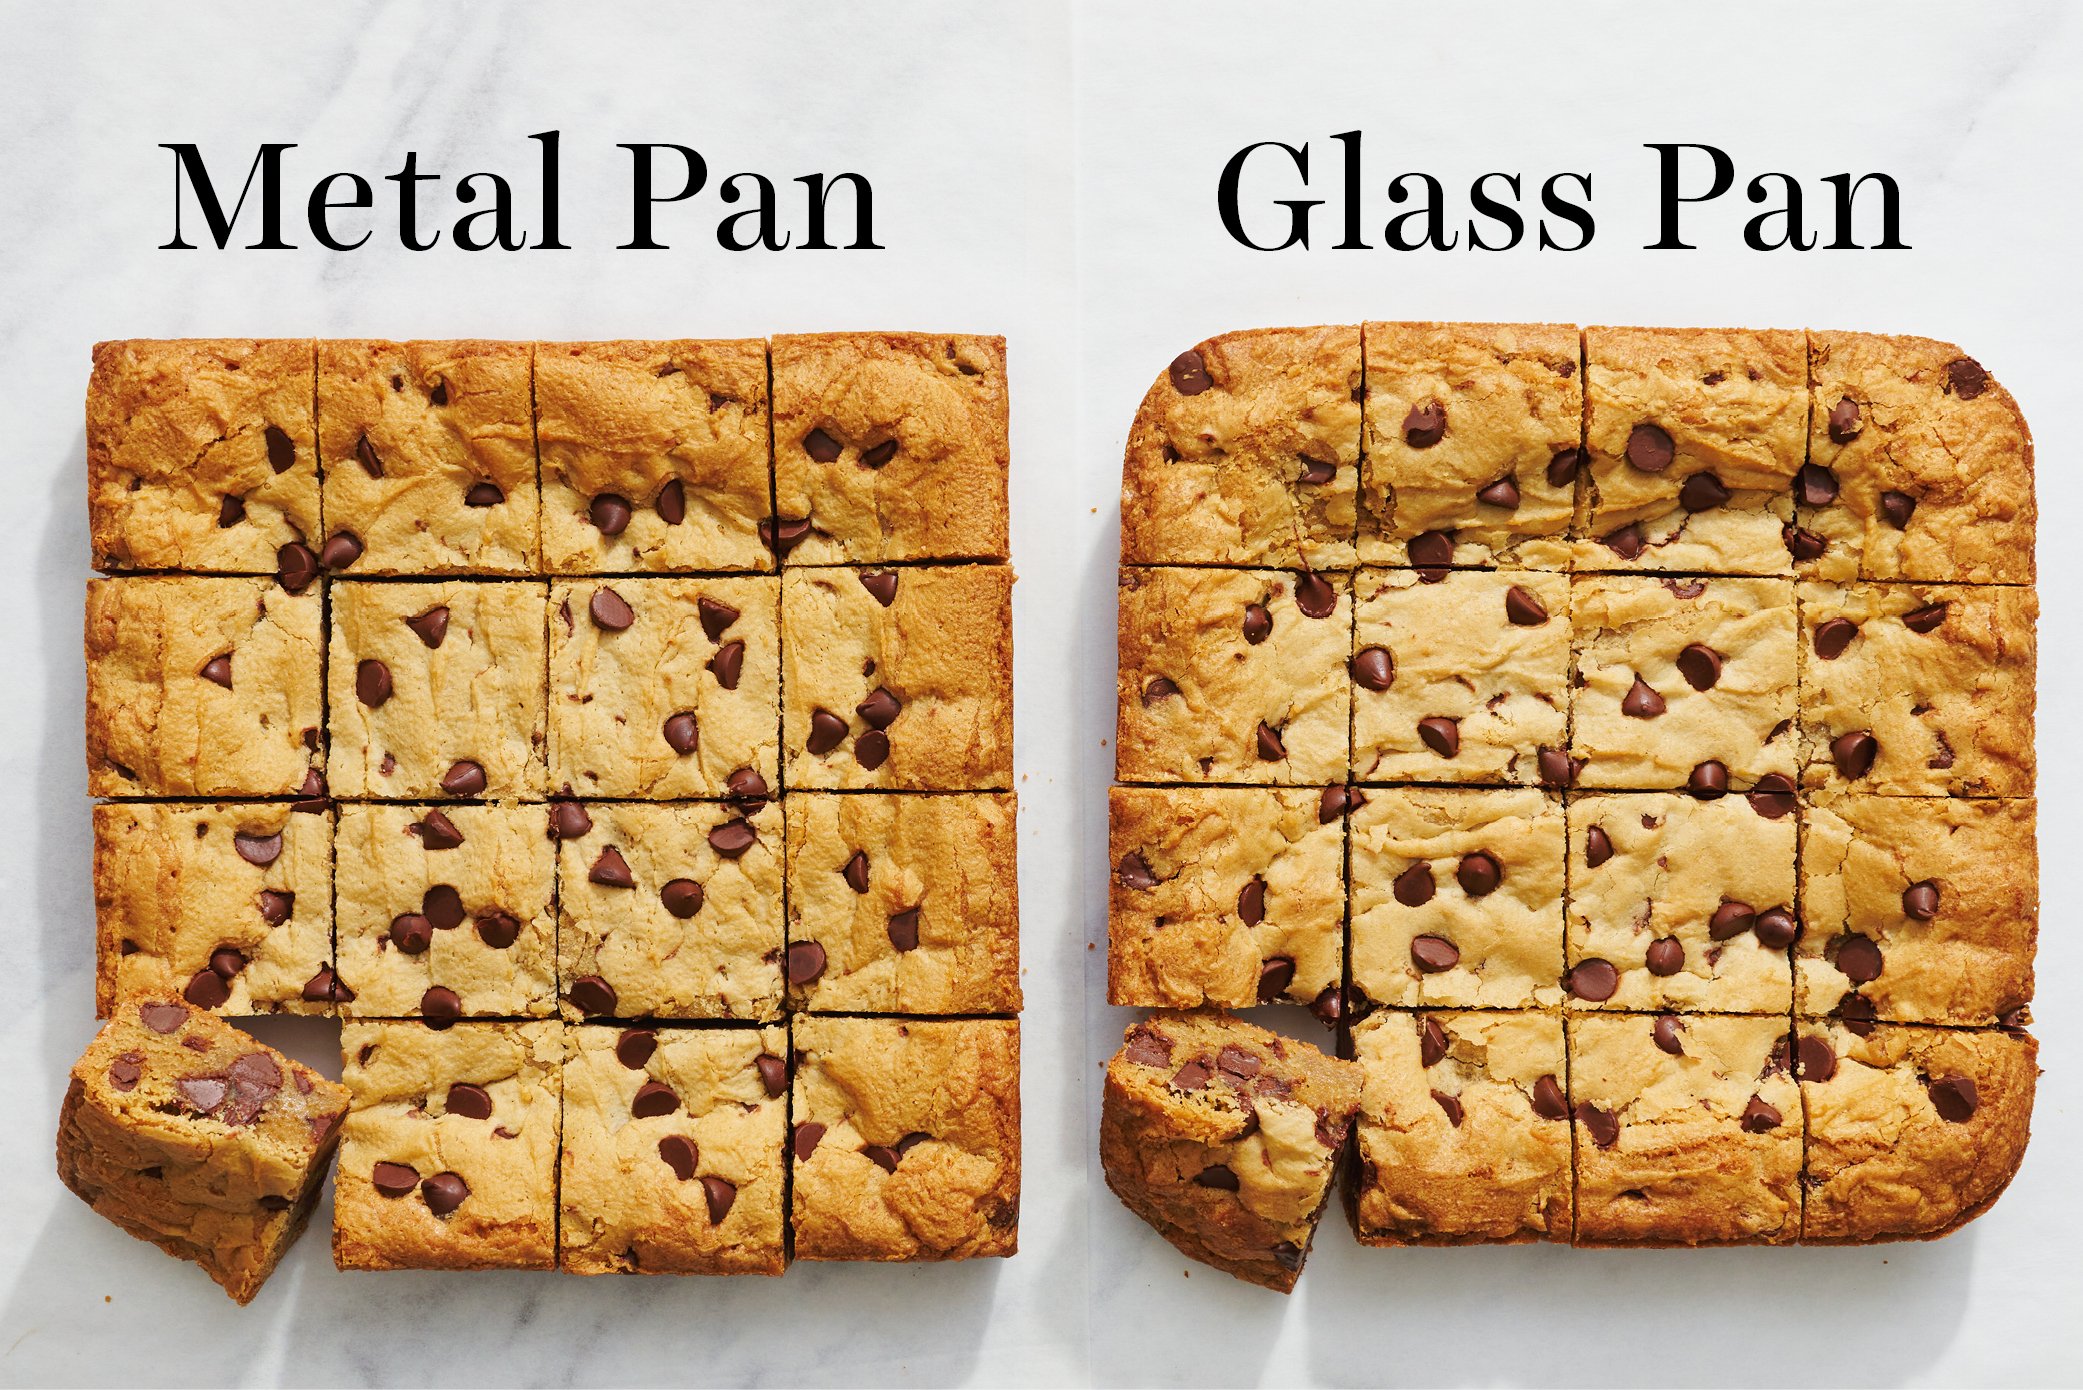
Though the differences weren’t quite as stark as with our brownie testing, the glass pan Blondies were definitely more gooey and less set. They also sunk in the center slightly. Sinking centers is a common issue with glass pans of all sorts. This can cause issues for Blondies & brownies as well as quick breads & loaves like banana bread.
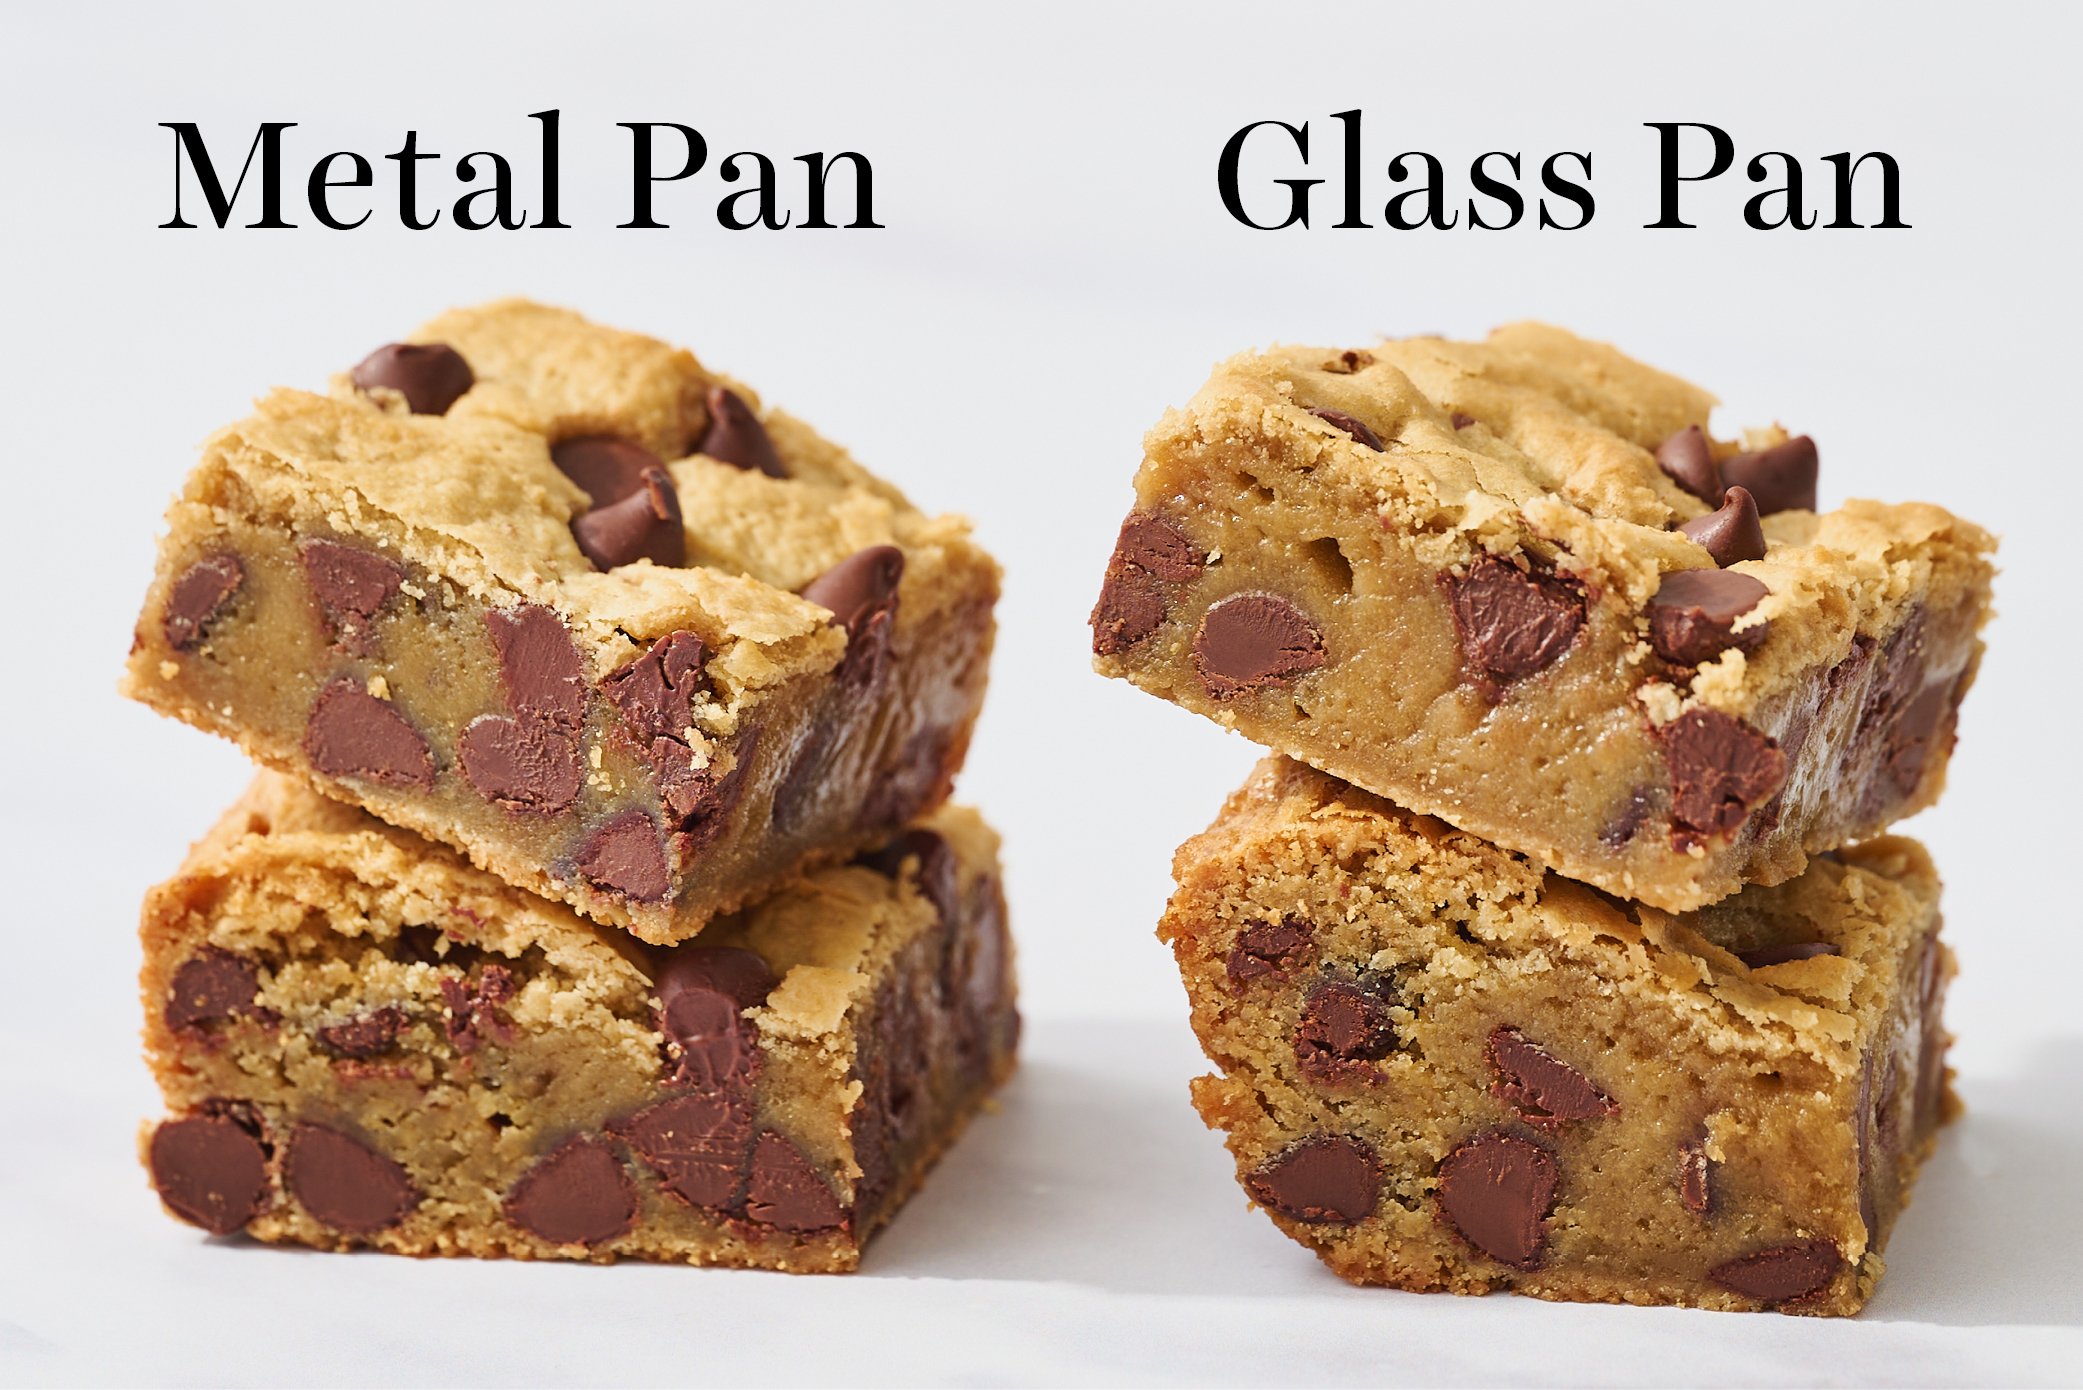
But I Only Have a Glass Pan – What do I do?!
If you must use glass or ceramic, drop the baking temperature by about 15°F and increase the baking time by 5-10 minutes.
Why Are My Blondies Hard? Why Are My Blondies Dry? Why Are My Blondies Cakey?
Besides using the right pan as detailed above, the answer to all of these questions is likely the same simple mistake: incorrect measuring of ingredients. If you are not measuring your ingredients with a digital kitchen scale, you could accidentally be adding too much flour, causing hard, dry, or cake-like Blondies. Learn more about how to measure for perfect results every time here!
The other reason your Blondies could be turning out too dry or hard is likely that they’re overbaked. Learn how to tell when your Blondies are done baking below.
Should Blondies be Gooey?
Yes! Overbaked Blondies are basically a dry, hard cookie bar. Who wants that? Learn how to tell when your Blondies are fully baked right below.
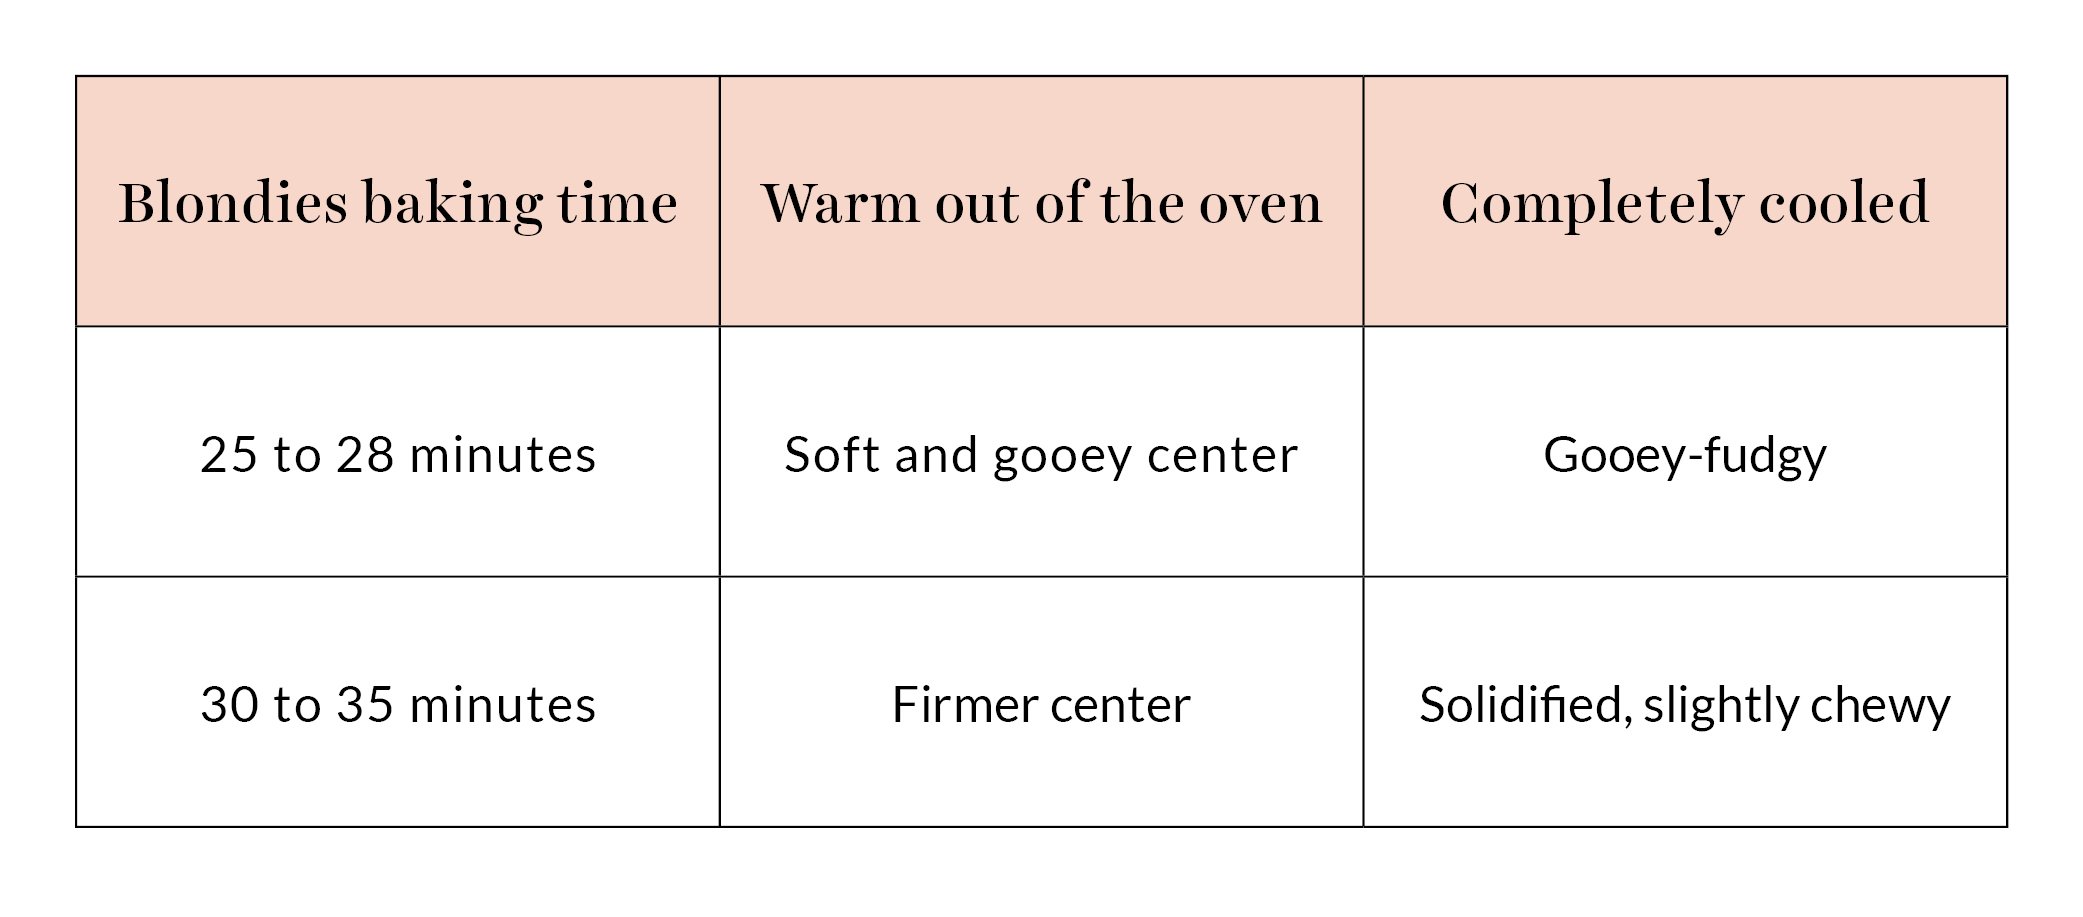
How Do I Know When Easter Blondies Are Done Baking? It varies!
We’ve tested this recipe in FOUR different ovens across the country. What we learned is that for this recipe in particular, the baking time will depend entirely on your oven AND your preferred level of doneness.
- We found that 25 – 28 minutes was perfect for a more soft and gooey center, while 30 to 35 minutes resulted in a more firm center.
- They’re done when the middle is still slightly jiggly and shiny on top, but the edges look solidified. You want to be careful not to overbake these or they will become dry and crumbly.
- Remember: residual heat will continue to cook the Blondies, so even if they seem just slightly underdone in the center, go ahead and remove them from the oven. They’ll solidify more as they cool. Please note that it is normal if the center of your Blondies sinks slightly after cooling, which is more likely to happen with a glass pan.
- If your Blondies are still a little gooey for your liking after they’ve cooled, let them sit on a cooling rack overnight, lightly covered with plastic wrap. This period of time will help them solidify even more.
- Also, be sure your oven is actually at the temperature it says it is. Learn more about that in my Oven 101 article, and if you don’t have an oven thermometer, now’s the time!
Can I Double This Blondies Recipe?
Yes! Just double all ingredients of this easy Easter dessert and bake it in a 9×13-inch light-colored metal baking pan, adding a few minutes to the baking time.
How to Store Easter Blondies
Store the Blondies in an airtight container for up to 3 days at room temperature or up to a week in the fridge. If storing for more than a day, wait to slice into bars until you’re ready to serve to prevent stale edges.
Can I Freeze Easter Blondies?
You can also freeze these Blondies (as a whole slab or sliced) wrapped in plastic wrap and inside an airtight container for up to 2 months. Thaw overnight at room temperature. You can then refresh in a 325°F oven for about 5 to 10 minutes, if desired.
More Easter Dessert Recipes:
- Easter Cupcakes (chocolate coconut cupcake deliciousness)
- French Silk Pie
- Brown Butter Carrot Cake
- Carrot Cake Cupcakes
- Check out ALL my Easter Recipes here!
Email This Recipe
Enter your email, and we’ll send it to your inbox.
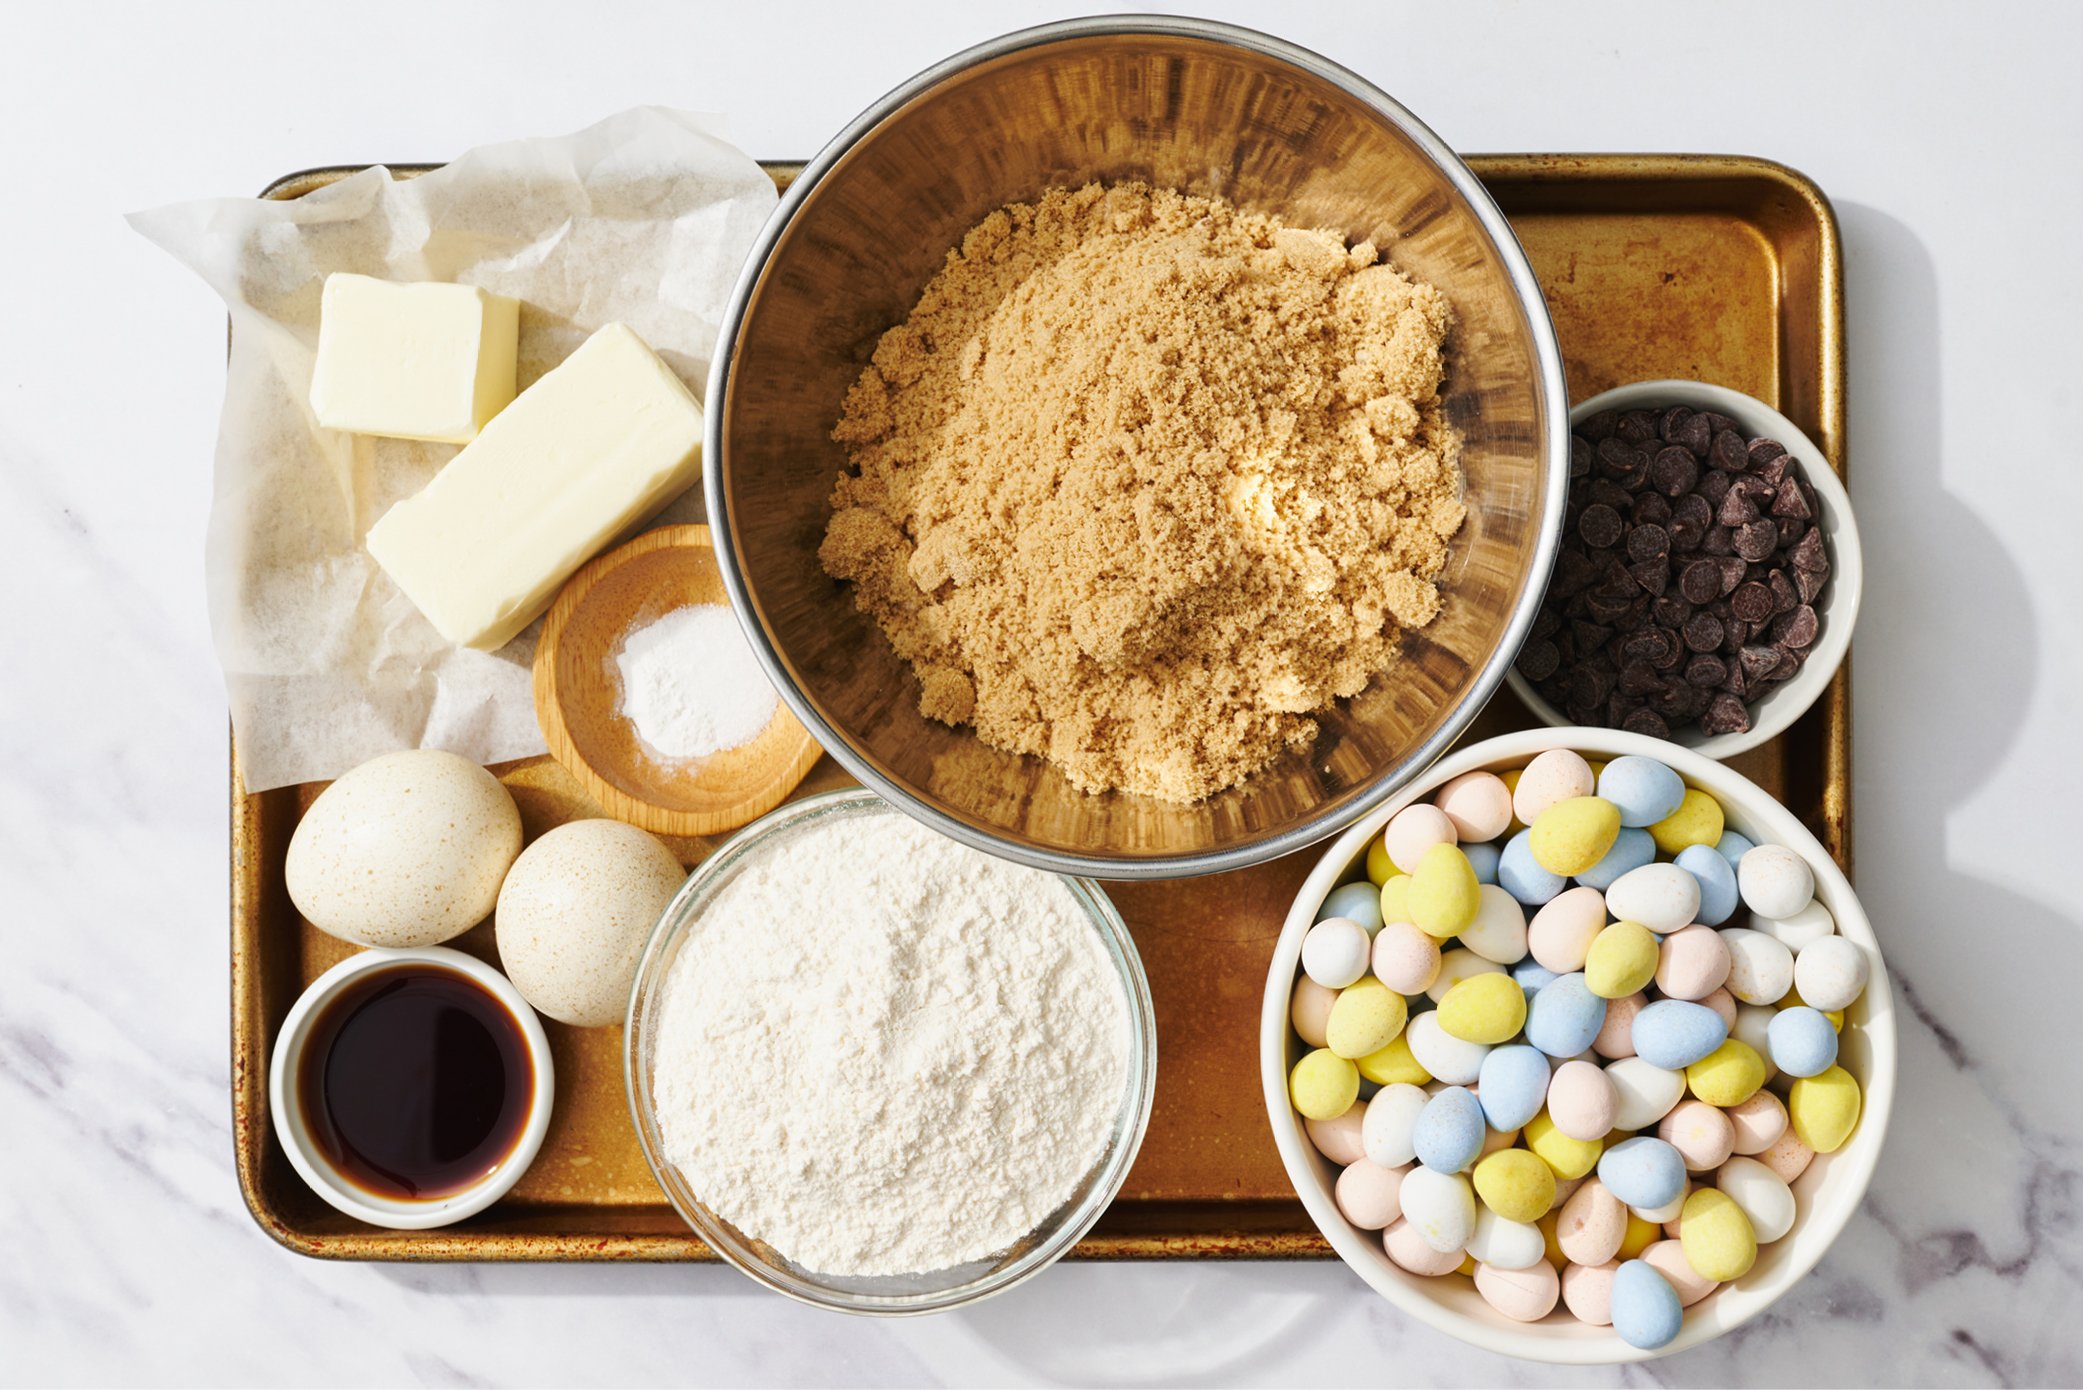
Ingredients
- 1 1/2 sticks (170 grams) unsalted butter
- 1 1/2 cups (300 grams) light brown sugar
- 1 large egg plus 1 egg yolk, at room temperature
- 2 teaspoons vanilla extract
- 1/2 teaspoon fine sea salt
- 1/4 teaspoon baking powder
- 1 1/2 cups (191 grams) all-purpose flour
measured correctly - 1 1/2 cups (255 grams) mix of Cadbury mini eggs and dark chocolate chips, divided
Flaky sea salt for sprinkling


Instructions
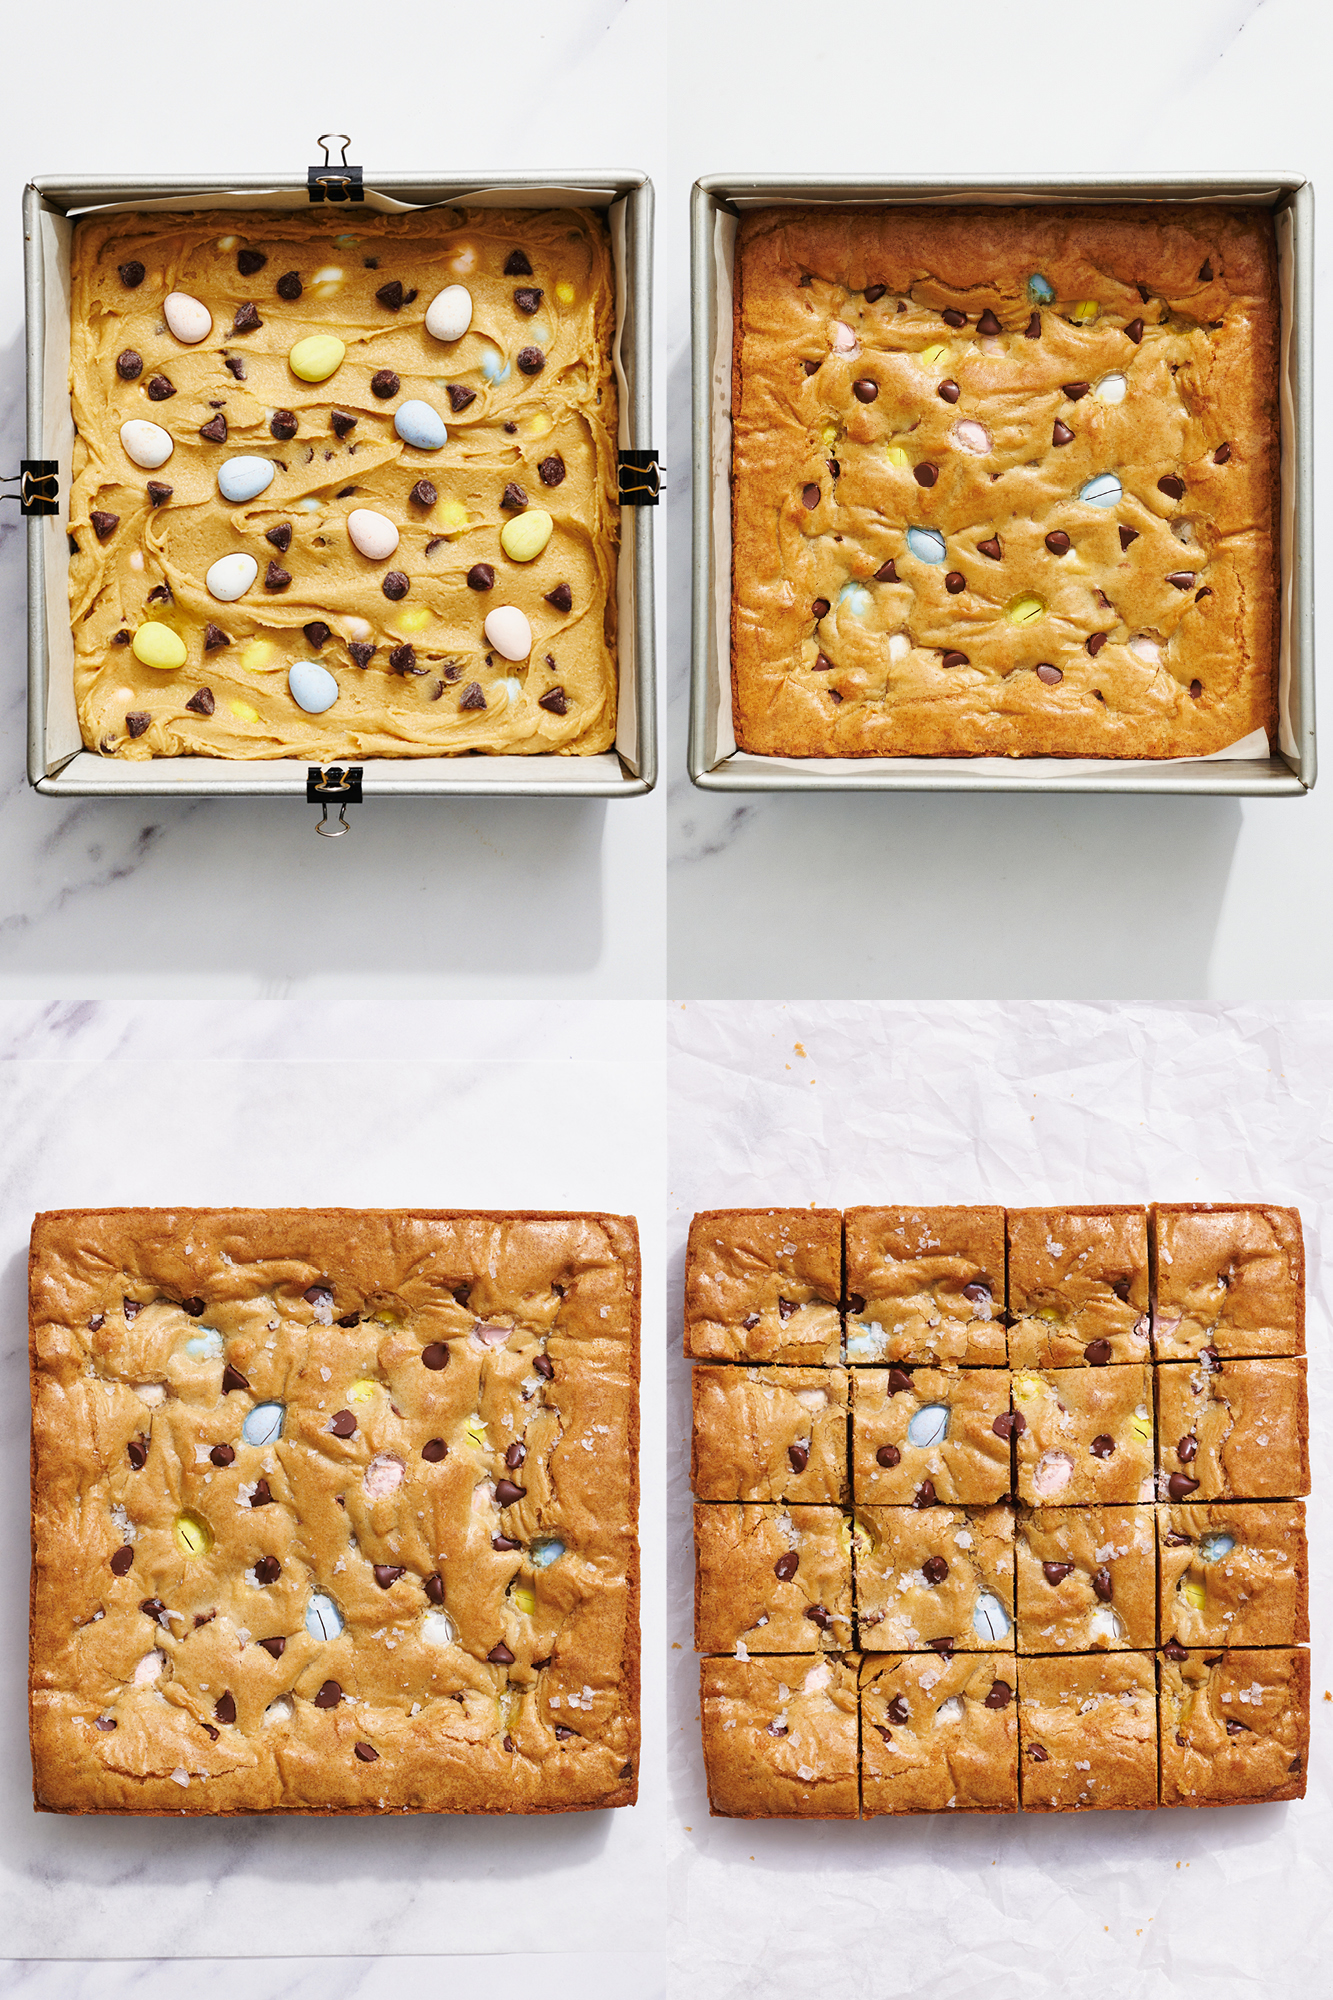
- Preheat the oven to 350°F. Line an 8 by 8-inch metal pan with foil or parchment paper. Spray with nonstick cooking spray.
- In a large microwave-safe bowl, heat the butter in 30-second increments until melted. Add the sugar to the hot butter and whisk to combine. Let cool until just warm.
- Add the egg, egg yolk, and vanilla and whisk vigorously until smooth. Stir in the salt, baking powder, and flour with a rubber spatula. Gently stir in 1 cup (170 grams) of the mix-ins.
- Pour the batter into the prepared pan. Top evenly with remaining 1/2 cup mix-ins.
- For a soft center, bake until the edges are lightly golden but the center still jiggles slightly, about 25 to 28 minutes. For a firmer center, bake until the edges are golden brown and the center is lightly golden and set, about 30 to 35 minutes. Set pan on wire rack and allow to cool before cutting*. Sprinkle with flaky sea salt before serving.
Notes
This post was originally published in 2023 and has been updated with additional baking tips. Photos by Joanie Simon.


Tessa, thank you so much for yet another delicious recipe! I didn’t have mini Cadbury eggs so I used pastel colored M&M’s and the dark chocolate chips and baked it for 33 minutes and they came out nice and soft and perfect!
Great substitution! So happy you loved them, Susana 🙂
I have made these so many times for parties but since I couldn’t find Cadbury eggs in the summer, I have been using peanut butter m&m’s and they are so good! Highly recommend making these, they are SO easy and delicious!
These blondies are delicious. Great blend of flavors and textures. Under baked for perfect softness. They went so quick didn’t get a picture. Wish I bought more Cadbury eggs for another batch. Thank you for this great recipe.
Hi. I cant wait to try this recipe this weekend. Could I add marshmallows to the batter?
Hi Tanika! We haven’t tried that, so I can’t say for sure – but it should work just fine! Let us know how it goes if you give it a try 🙂
Just wondering if I could use pecans instead of chocolate. When I was a kid, my mom and I made Blondies without chocolate. I can’t find the recipe.
Yes, you can absolutely use any other type of mix-in you like in place of the chocolate – just try to keep to around the same amount, for best results 🙂
I made these and they were so good for not a blondie fan but enjoyed these a lot was wondering could I substitute brown sugar with granulated sugar and also could I do half and half as well as in 150g brown sugar 150g white sugar
Hi Ash! So glad you enjoyed these blondies! We haven’t tested these blondies with anything but brown sugar, but feel free to experiment as you like! Brown sugar contains more molasses than granulated sugar, so it will make your blondies (or any bake) a little more butterscotchy and also moister because of that molasses content – so I’d recommend keeping at least some of the brown sugar, to enjoy both those benefits. Happy baking 🙂
Made these for the second time at the request of the granddaughter who loved them. I’m so glad I bought a bunch of Cadbury Eggs right after Easter, because I think we will be making these often. Although M&M’s work fine also.