


Tessa’s Recipe Rundown
Taste: These are sweet, but not over the top, with tons of cinnamon goodness.
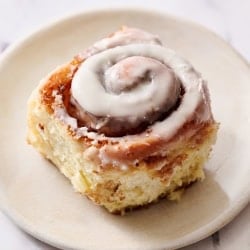
Texture: The rolls are ultra-soft and pillowy, with an indulgent, buttery filling. The flooded icing on top melts into every part of the bun, resulting in even more soft gooiness.
Ease: My cinnamon rolls take a few hours, but they can be prepped the night before.
Why You’ll Love This Recipe These cinnamon rolls have that irresistible, gooey center in every bite, and taste so much better than Cinnabon!
This post may contain affiliate links. Read our disclosure policy.


In my family, special breakfasts always meant cinnamon rolls. Since my parents weren’t bakers, they always came from those grocery store tubes, but we all loved them anyway.

I wanted to recreate that experience, but with real flavor, better ingredients, and a rich vanilla icing that melts into every swirl. These Gooey Cinnamon Rolls nail it. They’ve become my go-to breakfast for holidays, weekends, and anytime I want the house to smell like pure nostalgia.
Bonus: They can be made in advance!
Reader Love
My go to cinnamon roll!!!! Amazing and fool proof, I even freeze these after baking to pull out and reheat at a later date and they are still delicious!
–
Reader Love
I have been making this recipe for several years now. It is the only one I use, having tried many others. I am making them next week for Christmas. Absolutely the best in my opinion.
–

Recipe Ingredients
These Gooey Cinnamon Rolls have three main parts: the soft, rich dough, the buttery cinnamon roll filling, and the sweet vanilla icing that melts right in. Here’s what makes each ingredient special:

Cinnamon: This is the star of the show! Fresh, high-quality cinnamon makes all the difference in flavor. If your cinnamon doesn’t smell super aromatic, it’s time to replace it.
Milk: Whole milk keeps the dough tender and adds richness. It also helps activate the yeast. Avoid low-fat milk if possible, as the extra fat makes a noticeable difference in the softness.

Butter: Butter is a key part of every step. It adds flavor, richness, and that melt-in-your-mouth texture. Go with unsalted to control the salt level.
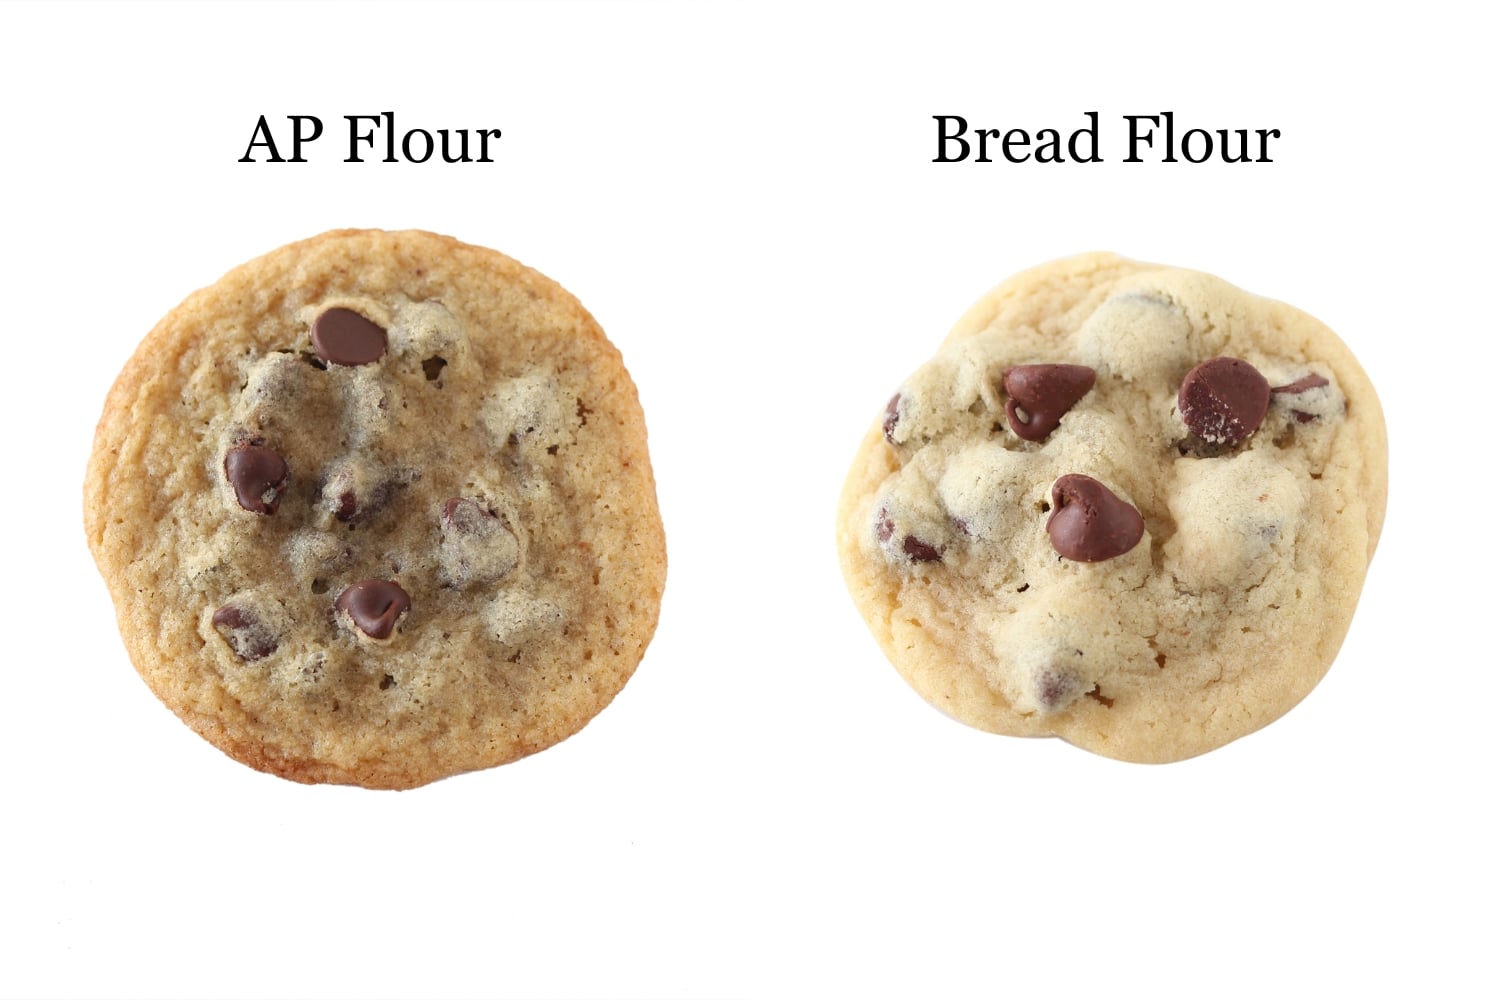
Flour: I prefer all-purpose flour over bread flour, which has a higher gluten content. You get the perfect balance between structure and softness.
Powdered sugar: You’ll need powdered sugar for the icing. It melts into the warm rolls for a soft, gooey finish.
Sour cream (or yogurt): This adds moisture and a slight tang, which helps create that fluffy, pillowy texture. Either sour cream or full-fat plain yogurt works beautifully.
Vanilla: Vanilla adds warmth and depth to both the dough and the icing. Don’t skip it!
Yeast: Instant yeast gives the quickest rise. You can swap in active dry at a 1:1 ratio. Just proof it in the warm milk mixture before adding to the dough. Learn more about the differences between Types of Yeast in my detailed guide.
How to Make Perfectly Gooey Cinnamon Rolls
I’ve tested these rolls enough times to know the secrets to a soft, pillowy dough that’s gooey in every bite, plus a filling and icing that take them over the top. Here’s my step-by-step guide to getting the best cinnamon rolls every time.
Make the Dough
For this simple dough recipe, start by warming the milk and butter just until the butter melts, then stir in the sour cream until it’s smooth and creamy. Let your milk and melted butter mixture cool until it reaches a lukewarm temperature (about 110°F) to prevent killing the yeast. It should feel warm to the touch, or you can use an instant-read thermometer.
Next, add the yeast, sugar, eggs, and vanilla, and give it a quick mix. Gradually add the flour and salt, then transfer the mixture to a stand mixer equipped with a dough hook. Add the remaining flour until a soft dough forms. A slightly sticky dough is exactly what gives the rolls that pillowy texture.
I knead on medium speed until my dough is smooth, elastic, and just slightly tacky. If it’s too sticky, I add flour a tablespoon at a time. You can knead by hand if you want. It just takes more patience and elbow grease! This is a very rich dough, so it will take longer to knead than some yeasted doughs. Make sure you only add as much flour as needed to handle the dough to avoid dense rolls.
First Rise
After kneading, place your dough in a lightly greased bowl and cover it. Because this is an enriched dough, full of butter, milk, sour cream, sugar, and eggs, it rises more slowly than a plain dough.

I usually set it somewhere warm in my kitchen. That can be near a sunny window, by a heater vent, or even in your oven if it has a proofing setting. I make sure it’s never warmer than about 80°F, as too much heat can stress the yeast.
Let the dough rise for the first time until it has doubled in size, which usually takes between 1 and 2 hours. Rising times will depend on the warmth and humidity of your kitchen. I like to use a glass bowl so I can see the dough puff up. It’s easier to watch, and so satisfying!
If you’re wondering how to tell if cinnamon rolls are done rising, do the “ripe test.” Press two fingers gently into the dough up to the second knuckle. If the indentations stay, I know it’s ready for shaping. If they spring back, I give it a little more time.

Shape and Fill
Roll the dough into a rectangle on a lightly floured surface, long side facing you, to keep the log tight and manageable. Spread the cinnamon mixture filling evenly, leaving a small border at the far edge and brushing it with water so the roll seals.

Rolling tightly is important for perfect spirals. I stretch the dough toward me as I roll up, keep it snug, and press the seam down so the filling stays inside. Push the ends slightly toward the center for an even log, then trim the edges.

I like to cut the log into 12 even pieces. Slice it in half, then each half in half again, and finally divide each piece into thirds. Use a sharp knife or unflavored dental floss, making sweeping motions to keep the rolls neat.

Second Rise
Cover the shaped rolls and let them rise again until they’ve doubled in size, about 1½ to 2 hours, depending on how warm your kitchen is. You’ll notice they look noticeably puffed, soft to the touch, and spring back slightly when gently pressed.

If I’m making these ahead, I let them rise just a little, then cover and refrigerate for up to 24 hours. When I’m ready to bake, I bring them to room temperature and let them finish rising. The extra time makes them even fluffier and gives an irresistible gooey center.
Bake and Ice
I bake my cinnamon rolls at 350°F until they’re lightly golden, usually about 22-25 minutes. Watch the centers closely. They should look set but still glossy, not dry.

While your rolls bake, whisk up a simple vanilla icing, aiming for a pourable consistency so it seeps into every swirl. Once the rolls are out of the oven and still hot, drizzle the icing, letting it melt into all those soft, buttery layers.

Tessa’s Pro Tips for Best Results
Choose the right pan. I usually bake in metal baking pans for even heat, but ceramic or glass pans heat more slowly, keeping the centers extra gooey. They look beautiful, too.
Temperature matters. Keep your milk and butter mixture at a lukewarm temperature of around 110°F. Too hot will kill the yeast. Too cool, and it won’t activate.
Flour cautiously. Add just enough flour to form a smooth, slightly tacky dough. Too much will make your rolls dense instead of soft and pillowy.
Create a good proofing environment. Warm, draft-free spots speed up rising. Try near a sunny window, a warm oven, or a heater vent. Keep it under 80°F to avoid overproofing.
Watch the dough, not the clock. Use visual cues like the “ripe test.” Press two fingers into the dough. If the indentations stay, it’s ready for shaping.
Roll and slice carefully. Roll the dough tightly for neat spirals, and slice with a sharp knife or unflavored dental floss to avoid squashing the rolls.
Don’t overbake. Aim for light golden brown. Overbaking dries out the centers, resulting in flaky cinnamon rolls.
Try make-ahead shortcuts. Shape the rolls, let them rise slightly, then refrigerate for up to 24 hours. When ready to bake, bring them to room temperature and let them finish rising.
Tasty Variations to Try
These are amazing as-is, but you can get creative with cinnamon roll flavors. Swap the cinnamon with cocoa powder to make my Gooey Chocolate Rolls. For a fall-forward twist, add a hint of pumpkin spice to the filling or substitute the vanilla icing for a maple glaze.
If you love experimenting with sweet rolls, check out my Pumpkin Bread Rolls or Texas Roadhouse Bread Rolls, both served with cinnamon butter.
Serving Suggestions
These cinnamon rolls are perfect for breakfast, brunch, or any special occasion when you want to treat yourself and everyone around you. I love them on Christmas morning or really anytime I want the house to smell like cozy comfort. Serve them warm, straight from the oven, for the tastiest experience.
Storage & Make ahead
Make Ahead: Refrigerate the shaped, unbaked rolls in the pan you plan to bake them in. I usually let them rise at room temperature for about 30 minutes first (especially in winter when the cold slows things down) to give them a jump-start.
Cover the rolls with plastic wrap and refrigerate for up to 24 hours. The dough on your overnight cinnamon rolls will continue rising slowly. When you’re ready to bake, remove the plastic, let them come to room temperature, and allow them to finish rising until they’ve doubled in size. Then bake as directed.
Freeze: You can also freeze the shaped but unbaked rolls in the pan, tightly wrapped in plastic wrap, for up to a month. Defrost them overnight in the fridge, then allow them to rise again at room temperature. Once doubled in size, proceed with the recipe as written. It’s best to eat these the day of baking, but you can store leftovers in an airtight container at room temperature for up to 24 hours. Warm slightly before serving the next morning for that fresh-from-the-oven, gooey goodness.

More Breakfast and Brunch Recipes
FAQs
A dirty cinnamon roll has extra gooey fillings, like chocolate and caramel, or sometimes is spiced with flavors like chai. It’s indulgent, messy, and over-the-top sweet! If you love chai flavors, try my Chai Sugar Cookies with a simple espresso glaze.
A Cinnabon is a branded cinnamon bun known for its ultra-sweet dough, heavy cinnamon-sugar filling, and thick cream cheese frosting. Regular or homemade cinnamon rolls vary widely in sweetness, texture, fillings, and glazes, but I think they’re always better than store-bought.
Heavy cream isn’t a part of this cinnamon roll recipe, but some bakers pour it over cinnamon rolls before starting the baking time to make them extra rich or to add moisture. It can also give cinnamon roll dough a slightly custardy texture.
Yes! Add the ingredients to the machine and select the dough cycle. It’ll mix and knead for you, saving time and effort. Once the cycle is complete, remove the dough for rising, shaping, and baking as usual. I have plenty of bread recipes for you to try once you’ve mastered these.
You can use active dry yeast in place of the instant yeast. Add active yeast to the warm (110°F) milk and butter mixture and allow it to proof for 5-10 minutes, or until foamy. From there, proceed as usual, knowing that the rise may take a little longer.
Yes, cut all ingredients by half. To halve the whole egg, crack it into a small bowl, beat it well, then measure out two tablespoons. Bake in a single 9-inch pie or cake pan or an 8×8-inch square pan.
I recommend making the dough twice to avoid overworking your stand mixer. Bake it in two 9×13-inch pans. This will allow for easier rising, ensuring the dough won’t overflow in your rising bowl. It’s also easier to roll out, resulting in 24 more evenly-sized rolls.
Email This Recipe
Enter your email, and we’ll send it to your inbox.
Ingredients
For the dough:
- 1 cup (227 grams) whole milk
- 1 stick (113 grams) unsalted butter
- 1/4 cup (57 grams) sour cream or plain yogurt, at room temperature
- 1 envelope (2 1/4 teaspoons) instant yeast*
- 1/4 cup (50 grams) granulated sugar
- 1 large egg, at room temperature
- 2 egg yolks, at room temperature
- 1/2 teaspoon vanilla extract
- 4 to 4 1/4 cups (508 to 540 grams) all-purpose flour, plus more for dusting
- 1 1/2 teaspoons fine sea salt

For the filling:
- 1 stick (113 grams) unsalted butter, completely softened to room temperature
- 3/4 cup (150 grams) packed light brown sugar
- 2 tablespoons ground cinnamon
- 1/8 teaspoon fine sea salt
For the icing:
- 2 cups (250 grams) powdered sugar
- 1/4 cup (57 grams) whole milk
- 2 tablespoons (28 grams) unsalted butter, melted
- 1 teaspoon vanilla extract
Instructions
Make the dough:
- In a small saucepan, heat the milk and butter until the butter is melted.
- Remove from heat and stir in the sour cream until smooth. Let cool until lukewarm** (about 100 – 110°F).
- In the bowl of an electric mixer, use a spatula to combine the milk mixture with the yeast, sugar, egg, egg yolks, and vanilla until well combined.
- Add in half of the flour and the salt and stir until combined.
- Place on a stand mixer fitted with a dough hook and gradually add the remaining flour until a dough begins to form. Only add as much flour as you need to form the dough.
- Knead at medium speed until the dough is very soft, smooth, pliable, elastic, and doesn’t stick to the sides of the bowl, about 8 to 10 minutes. If the dough is unbearably sticky, add more flour 1 tablespoon at a time.
- Lightly grease a large bowl. Shape the dough into a ball and place in the greased bowl. Cover with plastic wrap and let rise in a warm place until doubled in size, 1 1/2 to 2 hours.
Make the filling:
- Once the dough has risen, add filling ingredients to a medium mixing bowl.
- Beat with a hand-held electric mixer on medium-high until well combined and fluffy, about 3 minutes.
Shape the dough:
- Punch down the risen dough and turn out onto a lightly floured work surface.
- Use a rolling pin to shape the dough into a 16×12-inch rectangle, long side facing you.
- Spread the filling mixture all over the dough, leaving a 1/2-inch border at the far edge. Brush the border with water to help seal.
- Roll the dough up, pulling with your hands to keep it tightly rolled until it’s an even log shape. Press the border to seal. Trim the edges. Lightly flour the roll.
- Grease a 13×9-inch baking dish or two 9-inch pie pans.
- Cut the roll into 12 equal pieces using a sharp knife or unflavored dental floss.
- Place the rolls cut side up in the prepared baking dish. Cover with plastic wrap and let rise in a warm place until doubled, about 1 1/2 to 2 hours.
- Make-Ahead Option: After shaping, let the rolls rise until they’ve grown in size by about a quarter. Cover with plastic wrap and refrigerate for up to 24 hours. When ready to bake, let come completely to room temperature and continue rising until doubled in size, about 2 hours.
- Meanwhile, preheat the oven to 350°F. Bake the rolls until lightly golden brown, 22 to 25 minutes.
For the icing:
- While the rolls bake, combine the icing ingredients in a small mixing bowl until a smooth pourable icing forms.
- Spread over hot rolls immediately after they come out of the oven.
- Serve warm the day they’re baked.
Notes
- 8 ounces (227 grams) cream cheese, at room temperature
- 2 tablespoons corn syrup
- 2 tablespoons heavy cream
- 1 cup (125 grams) powdered sugar, sifted
- 1 teaspoon vanilla extract
- Pinch salt
This recipe was written in 2019 and has been updated with additional recipe tips. Photos by Joanie Simon.


Okay so it has always been my dream to make cinnamon rolls from scratch on Christmas morning. I followed a recipe before from some food blog and it was a disaster but I really wanted to try again. I’m not the most talented when it comes to doughs so I was really intimidated but gave it my all anyway because I saw Tess’s Instagram post about the rolls and the comments convinced me to try it.
I followed the instructions and was surprised at how EASY this recipe is and not intimidating at all! My partner and our friend said these are the best cinnamon rolls they’ve ever had and I have to agree. They are ABSURDLY soft and just perfect in every way. Like the whole roll is like the middle of a roll you’d get at Cinnabon. These cinnamon rolls are like black magic. Everyone is impressed with me after I made these rolls and now I’ll probably have to make them every year!
The only adjustments I made were not adding vanilla to the dough and then I melted all the frosting ingredients in a sauce pot together to take the edge off the powdered sugar flavor.
Thank you for this recipe!!!!
Yayy! So thrilled to hear these were such a hit for you, Lizzy!!
I’ve been making this for the past 2 Christmas holidays. Amazing and my go to recipe from now on! 10/10!
These are absolutely delicious!
In case anyone is like me, I used 2% milk because I didn’t have whole milk and it turned out just fine!
So glad you enjoyed these cinnamon rolls, Liz!!
Best cinnamon roll recipe I’ve found. They come out perfectly golden yet fluffy and gooey every single time. The first time I made these for my family there were only 5 of us but we got through all 12 rolls as people couldn’t stop going back for more!
OMG! I read the review that said you get the middle part (the best part) of the roll in every bite- and I thought how can that be? We’ll, I’m still not sure how Tessa did it, but it’s true! There is cinnamon goodness in every bite! This was my very first attempt at home made cinnamon rolls, and I will not be looking for any others. The dough is very forgiving. I forgot to put in the vanilla extract, so after the first rise, I added some and lightly folded it into the dough with just a little flour, and it was perfectly fine. Thanks for another great recipe!
Yay!! So happy to hear this, Anne!! So glad you enjoyed these cinnamon rolls so much 🙂
Love this recipe! Have made it many times and always comes out great.
Question- can I cut them into 24 mini rolls? If so- what would be the baking time.
Thank you
Hi Renee! I’m sorry, but as we have not tried that, I cannot tell you exactly how long the bake time would be – but I don’t see why it wouldn’t work! You might need to roll the dough out a little longer, so you can more easily cut into smaller rolls. Watch the rise time carefully, as that might be shorter with the smaller size (but not necessarily; it all depends on your kitchen environment at the time!). Start the rolls at 15 minutes in the oven and just monitor carefully, and bake as the recipe states (until lightly golden brown). Let us know how they turn out!!
Hi! I’m looking to also cut into mini rolls, did you have any success?
Literally…. The best cinnamon roll I’ve ever had. It was SO SOFT!!! So soft. You know how in canned cinnamon rolls the only REALLY good part is the center? Okay… well… with this recipe, the ENTIRE CINNAMON ROLL WAS THE CENTER!!!!!!!! Outrageously good. I wish it was a really easy simple thing to make because I’d make these every day. Lol. Did take a while but SOOOOO WORTH IT. and it was so much fun 🙂
Wow, what a review, Miranda!! We are so thrilled you loved these cinnamon rolls so much!! Thanks so much for letting us know 🙂
Hey guys n gals! I made your recipe on Friday and baked it on Saturday morning. I followed everything to a T but traded AP flour for KA bread flour and did a little more stretch and folding. I was NOT disappointed! It was still amazingly pillowy soft, but a little bit of pull in the bread part and did the cream cheese frosting from your other recipes for this one, made it totally divine. This was only my first time but beat Cinnabon , Costco or anywhere I have bought cinnamon rolls 😀
1 Question: What do u use to spread cream cheese frosting? I totally had the wrong tool (plastic butter knife) and was not too ideal.
2 Question: The sides were brown, and the bottom, but the top was pale but it was thoroughly cooked. How can I get the tops browner? Thankfully , it was only aeshetic and were among the top 5 things I’ve ever made lol. I’ll be posting this on Instagram too 🙂
10/10 for this recipe!
https://imgur.com/a/pl79uw5
PICS of the rolls I made!
Hi Danny! Our HTH Team saw your photo on Instagram – your cinnamon rolls looked fantastic! We find using something like this offset spatula to be the ideal tool for spreading the frosting, or icing any smaller cake/cupcake/etc – I use mine allllllll the time! As for your other question, what type of pan did you bake the rolls in? Perhaps your pan is a little dark, so the sides and bottom caught before the tops were done browning? A light-colored metal pan is ideal (this pan is Tessa’s favourite – I have the same one, and I LOVE mine too!), so the sides and bottom can bake evenly, along with the top! As long as the centers were baked and not undercooked, I honestly wouldn’t worry too much. They looked great, and it sounds like they tasted fantastic, and the frosting covers the tops anyway!! If you do wish to troubleshoot this more, though, please feel free to reach back out and we can try to troubleshoot further!! Happy baking 🙂
Ah, yes! Other’s were also telling me that is normal for the tops to not really brown, and other stores might be glazing theirs as some optional step.
Oh and I did mean to type “pretty brown” not “very brown.” They were brown enough but not overly so! Yea I’m using a light aluminum non stick WILTON pan, which seems to be working great.
I will take your suggestion in case I need a 2nd pan, that one looks great! And yes, I will definitely buy that spatula. I will have a cleaner looking roll next time. I am glad they were so delicious, absolutely the best!
Sounds like a plan, Danny! So happy you enjoyed them so much 🙂 Happy baking!!
If I wanna freeze, I’m suppose to rise first for 2 hours and then roll with filling and after you freeze. Or you freeze the raw dough. Not understanding exactly the process when I wanna freeze. Can you please explain exact steps what I do? Thanks
Hi Chaya! Tessa talks about this in the pink box, right above the recipe 🙂 Finish the first rise, fill the dough, shape them into rolls, and place the shaped (but unbaked) cinnamon rolls in the pans you plan to bake them in. Cover the rolls tightly with plastic wrap and freeze for up to 1 month. Defrost overnight in the fridge.
When getting ready to bake, loosen the plastic wrap and let the rolls rise at room temperature until doubled in size. The length of time this will take will depend entirely on how much they rose before freezing, and how warm / humid your kitchen is. It may take just 20 to 30 minutes, or it may take over an hour. Proceed with baking as the recipe is written.
I hope this answers your questions! Happy baking! 🙂
I have made these numerous times as my husband keeps requesting them! They are better than store bought ones and pretty easy to make. Thank you for this recipe!
So excited that you and your husband love this recipe, Maha! Happy baking 🙂
The first time I ate a cinnamon roll, was when I was on holiday at a Swedish patisserie. Since tasting Kanellbullar (right spelling?), as the Swedes call it, I have hankered after these. The frozen ones from Iceland are cold comfort. They also have an ingredients list consisting of alarmingly long and unfamiliar ingredients. Ever since I found out that the carmine in my sausages was made of beetles (and had a minor fainting fit in the process) I have become increasingly careful about the back of my shop-bought items. I made this recipe using honey instead of sugar ( I am trying, for the most part, unsuccessfully to be a little bit healthier by decreasing my refined sugar intake is one of my new year resolutions). I took these out of the oven and added creme fraiche frosting. (I know from experience icing MUST contain icing sugar). They looked perfect. I took a bite and… ugh! The thing was harder and more rubbery than the first short-crust pastry I baked at 8! I am soooo disappointed! What went wrong? Could the honey have caused any problems? The filling and frosting, licked off the bowls, were scrumptious but the pastry certainly was not.
Hi Beatrice, sorry to hear your rolls turned out hard and rubbery! Substituting the sugar could very well have been the issue. Sugar isn’t in recipes just to add sweetness, substituting it can actually affect the outcome as it helps to create a tender and moist texture, it assists in leavening your baked good (lift and rise for a taller shape and lighter texture), provides food for yeast fermentation in bread baking, along with so much more. Tessa actually goes into detail of the importance of sugar and other common ingredients in our Magic of Baking course, which you might find helpful. I completely understand your attempts to make healthier recipes, but to guarantee a better outcome, I’d suggest searching for a cinnamon roll recipe that contains the healthier ingredients you’re looking for. And come to us for full-fat, indulgent and very satisfying dessert recipes (with no substitutions) 🙂 Please let me know if you give this recipe another try!
Thank you for sharing this wonderful recipe! It produced amazing Gooey Cinnamon Rolls! Followed your recipe notes for using rapid rise yeast instead of instant yeast. Kneaded by hand. (Therapeutic, no stand mixer.) Topped with cream cheese frosting. Amazing! Looking forward to enjoying these again!
**Hoping to be a little more familiar with this recipe, and have the timing down better the second time around. Never having made these before, I found myself rereading the recipe again and again. But the results were so worth the effort!
Kneading by hand is so good for the soul! I’m glad your rolls turned out perfectly, thanks for letting us know! 🙂