


Tessa’s Recipe Rundown
Taste: These are sweet, but not over the top, with tons of cinnamon goodness.
Texture: The rolls are ultra-soft and pillowy, with an indulgent, buttery filling. The flooded icing on top melts into every part of the bun, resulting in even more soft gooiness.
Ease: My cinnamon rolls take a few hours, but they can be prepped the night before.
Why You’ll Love This Recipe These cinnamon rolls have that irresistible, gooey center in every bite, and taste so much better than Cinnabon!
This post may contain affiliate links. Read our disclosure policy.


In my family, special breakfasts always meant cinnamon rolls. Since my parents weren’t bakers, they always came from those grocery store tubes, but we all loved them anyway.

I wanted to recreate that experience, but with real flavor, better ingredients, and a rich vanilla icing that melts into every swirl. These Gooey Cinnamon Rolls nail it. They’ve become my go-to breakfast for holidays, weekends, and anytime I want the house to smell like pure nostalgia.
Bonus: They can be made in advance!
Reader Love
My go to cinnamon roll!!!! Amazing and fool proof, I even freeze these after baking to pull out and reheat at a later date and they are still delicious!
–
Reader Love
I have been making this recipe for several years now. It is the only one I use, having tried many others. I am making them next week for Christmas. Absolutely the best in my opinion.
–

Recipe Ingredients
These Gooey Cinnamon Rolls have three main parts: the soft, rich dough, the buttery cinnamon roll filling, and the sweet vanilla icing that melts right in. Here’s what makes each ingredient special:

Cinnamon: This is the star of the show! Fresh, high-quality cinnamon makes all the difference in flavor. If your cinnamon doesn’t smell super aromatic, it’s time to replace it.
Milk: Whole milk keeps the dough tender and adds richness. It also helps activate the yeast. Avoid low-fat milk if possible, as the extra fat makes a noticeable difference in the softness.

Butter: Butter is a key part of every step. It adds flavor, richness, and that melt-in-your-mouth texture. Go with unsalted to control the salt level.
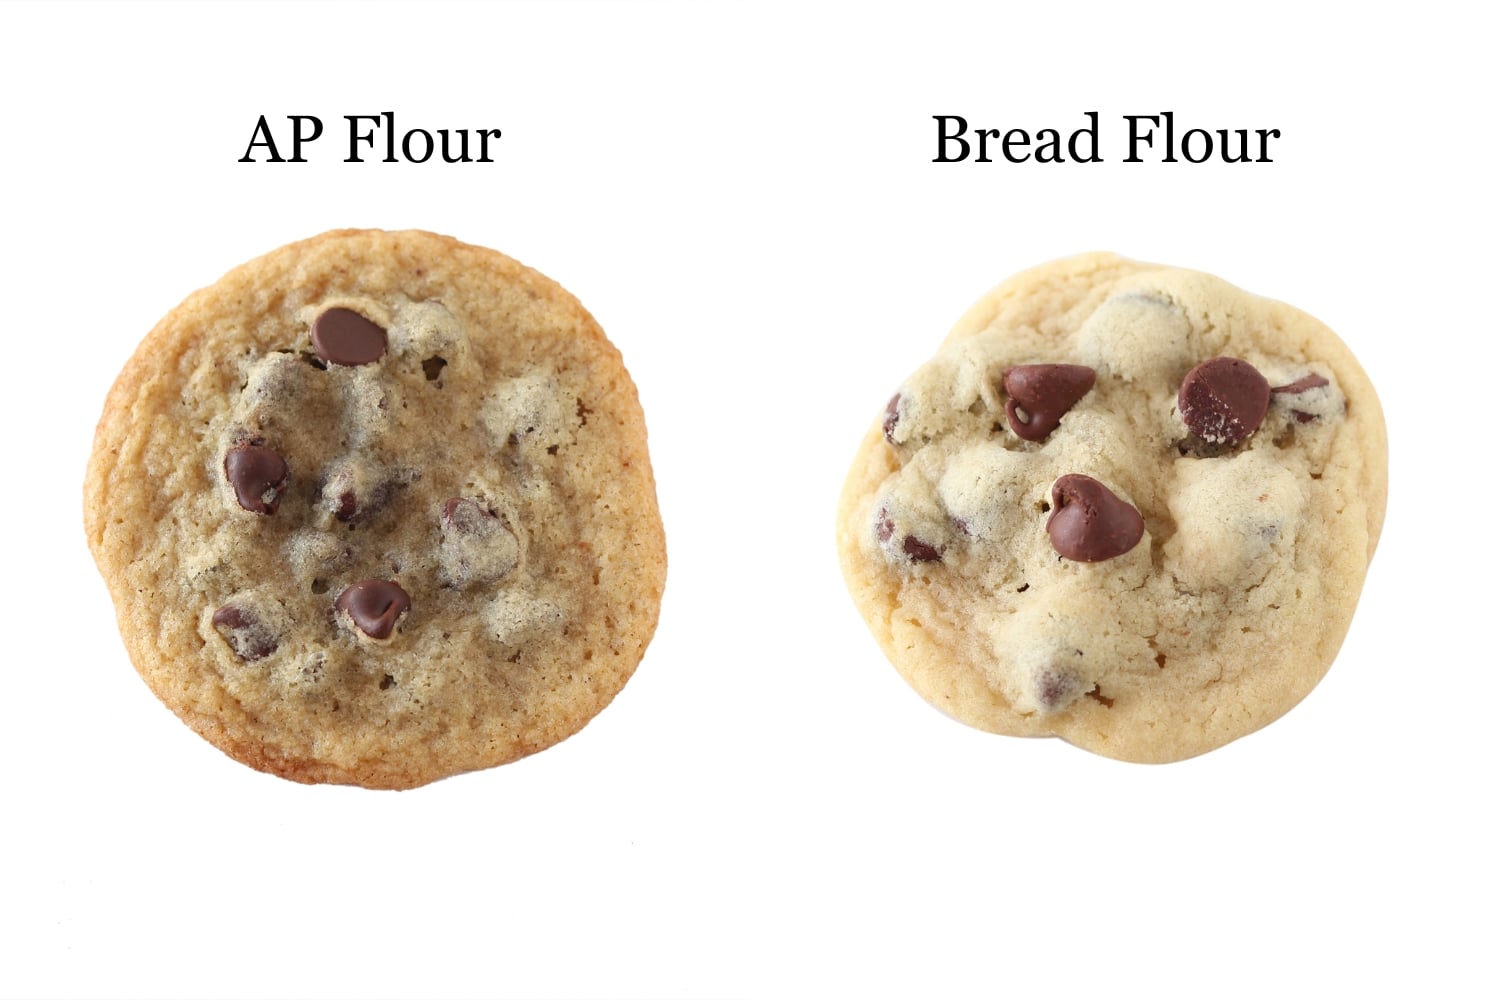
Flour: I prefer all-purpose flour over bread flour, which has a higher gluten content. You get the perfect balance between structure and softness.
Powdered sugar: You’ll need powdered sugar for the icing. It melts into the warm rolls for a soft, gooey finish.
Sour cream (or yogurt): This adds moisture and a slight tang, which helps create that fluffy, pillowy texture. Either sour cream or full-fat plain yogurt works beautifully.
Vanilla: Vanilla adds warmth and depth to both the dough and the icing. Don’t skip it!
Yeast: Instant yeast gives the quickest rise. You can swap in active dry at a 1:1 ratio. Just proof it in the warm milk mixture before adding to the dough. Learn more about the differences between Types of Yeast in my detailed guide.
How to Make Perfectly Gooey Cinnamon Rolls
I’ve tested these rolls enough times to know the secrets to a soft, pillowy dough that’s gooey in every bite, plus a filling and icing that take them over the top. Here’s my step-by-step guide to getting the best cinnamon rolls every time.
Make the Dough
For this simple dough recipe, start by warming the milk and butter just until the butter melts, then stir in the sour cream until it’s smooth and creamy. Let your milk and melted butter mixture cool until it reaches a lukewarm temperature (about 110°F) to prevent killing the yeast. It should feel warm to the touch, or you can use an instant-read thermometer.
Next, add the yeast, sugar, eggs, and vanilla, and give it a quick mix. Gradually add the flour and salt, then transfer the mixture to a stand mixer equipped with a dough hook. Add the remaining flour until a soft dough forms. A slightly sticky dough is exactly what gives the rolls that pillowy texture.
I knead on medium speed until my dough is smooth, elastic, and just slightly tacky. If it’s too sticky, I add flour a tablespoon at a time. You can knead by hand if you want. It just takes more patience and elbow grease! This is a very rich dough, so it will take longer to knead than some yeasted doughs. Make sure you only add as much flour as needed to handle the dough to avoid dense rolls.
First Rise
After kneading, place your dough in a lightly greased bowl and cover it. Because this is an enriched dough, full of butter, milk, sour cream, sugar, and eggs, it rises more slowly than a plain dough.

I usually set it somewhere warm in my kitchen. That can be near a sunny window, by a heater vent, or even in your oven if it has a proofing setting. I make sure it’s never warmer than about 80°F, as too much heat can stress the yeast.
Let the dough rise for the first time until it has doubled in size, which usually takes between 1 and 2 hours. Rising times will depend on the warmth and humidity of your kitchen. I like to use a glass bowl so I can see the dough puff up. It’s easier to watch, and so satisfying!
If you’re wondering how to tell if cinnamon rolls are done rising, do the “ripe test.” Press two fingers gently into the dough up to the second knuckle. If the indentations stay, I know it’s ready for shaping. If they spring back, I give it a little more time.

Shape and Fill
Roll the dough into a rectangle on a lightly floured surface, long side facing you, to keep the log tight and manageable. Spread the cinnamon mixture filling evenly, leaving a small border at the far edge and brushing it with water so the roll seals.

Rolling tightly is important for perfect spirals. I stretch the dough toward me as I roll up, keep it snug, and press the seam down so the filling stays inside. Push the ends slightly toward the center for an even log, then trim the edges.

I like to cut the log into 12 even pieces. Slice it in half, then each half in half again, and finally divide each piece into thirds. Use a sharp knife or unflavored dental floss, making sweeping motions to keep the rolls neat.

Second Rise
Cover the shaped rolls and let them rise again until they’ve doubled in size, about 1½ to 2 hours, depending on how warm your kitchen is. You’ll notice they look noticeably puffed, soft to the touch, and spring back slightly when gently pressed.

If I’m making these ahead, I let them rise just a little, then cover and refrigerate for up to 24 hours. When I’m ready to bake, I bring them to room temperature and let them finish rising. The extra time makes them even fluffier and gives an irresistible gooey center.
Bake and Ice
I bake my cinnamon rolls at 350°F until they’re lightly golden, usually about 22-25 minutes. Watch the centers closely. They should look set but still glossy, not dry.

While your rolls bake, whisk up a simple vanilla icing, aiming for a pourable consistency so it seeps into every swirl. Once the rolls are out of the oven and still hot, drizzle the icing, letting it melt into all those soft, buttery layers.

Tessa’s Pro Tips for Best Results
Choose the right pan. I usually bake in metal baking pans for even heat, but ceramic or glass pans heat more slowly, keeping the centers extra gooey. They look beautiful, too.
Temperature matters. Keep your milk and butter mixture at a lukewarm temperature of around 110°F. Too hot will kill the yeast. Too cool, and it won’t activate.
Flour cautiously. Add just enough flour to form a smooth, slightly tacky dough. Too much will make your rolls dense instead of soft and pillowy.
Create a good proofing environment. Warm, draft-free spots speed up rising. Try near a sunny window, a warm oven, or a heater vent. Keep it under 80°F to avoid overproofing.
Watch the dough, not the clock. Use visual cues like the “ripe test.” Press two fingers into the dough. If the indentations stay, it’s ready for shaping.
Roll and slice carefully. Roll the dough tightly for neat spirals, and slice with a sharp knife or unflavored dental floss to avoid squashing the rolls.
Don’t overbake. Aim for light golden brown. Overbaking dries out the centers, resulting in flaky cinnamon rolls.
Try make-ahead shortcuts. Shape the rolls, let them rise slightly, then refrigerate for up to 24 hours. When ready to bake, bring them to room temperature and let them finish rising.
Tasty Variations to Try
These are amazing as-is, but you can get creative with cinnamon roll flavors. Swap the cinnamon with cocoa powder to make my Gooey Chocolate Rolls. For a fall-forward twist, add a hint of pumpkin spice to the filling or substitute the vanilla icing for a maple glaze.
If you love experimenting with sweet rolls, check out my Pumpkin Bread Rolls or Texas Roadhouse Bread Rolls, both served with cinnamon butter.
Serving Suggestions
These cinnamon rolls are perfect for breakfast, brunch, or any special occasion when you want to treat yourself and everyone around you. I love them on Christmas morning or really anytime I want the house to smell like cozy comfort. Serve them warm, straight from the oven, for the tastiest experience.
Storage & Make ahead
Make Ahead: Refrigerate the shaped, unbaked rolls in the pan you plan to bake them in. I usually let them rise at room temperature for about 30 minutes first (especially in winter when the cold slows things down) to give them a jump-start.
Cover the rolls with plastic wrap and refrigerate for up to 24 hours. The dough on your overnight cinnamon rolls will continue rising slowly. When you’re ready to bake, remove the plastic, let them come to room temperature, and allow them to finish rising until they’ve doubled in size. Then bake as directed.
Freeze: You can also freeze the shaped but unbaked rolls in the pan, tightly wrapped in plastic wrap, for up to a month. Defrost them overnight in the fridge, then allow them to rise again at room temperature. Once doubled in size, proceed with the recipe as written. It’s best to eat these the day of baking, but you can store leftovers in an airtight container at room temperature for up to 24 hours. Warm slightly before serving the next morning for that fresh-from-the-oven, gooey goodness.

More Breakfast and Brunch Recipes
FAQs
A dirty cinnamon roll has extra gooey fillings, like chocolate and caramel, or sometimes is spiced with flavors like chai. It’s indulgent, messy, and over-the-top sweet! If you love chai flavors, try my Chai Sugar Cookies with a simple espresso glaze.
A Cinnabon is a branded cinnamon bun known for its ultra-sweet dough, heavy cinnamon-sugar filling, and thick cream cheese frosting. Regular or homemade cinnamon rolls vary widely in sweetness, texture, fillings, and glazes, but I think they’re always better than store-bought.
Heavy cream isn’t a part of this cinnamon roll recipe, but some bakers pour it over cinnamon rolls before starting the baking time to make them extra rich or to add moisture. It can also give cinnamon roll dough a slightly custardy texture.
Yes! Add the ingredients to the machine and select the dough cycle. It’ll mix and knead for you, saving time and effort. Once the cycle is complete, remove the dough for rising, shaping, and baking as usual. I have plenty of bread recipes for you to try once you’ve mastered these.
You can use active dry yeast in place of the instant yeast. Add active yeast to the warm (110°F) milk and butter mixture and allow it to proof for 5-10 minutes, or until foamy. From there, proceed as usual, knowing that the rise may take a little longer.
Yes, cut all ingredients by half. To halve the whole egg, crack it into a small bowl, beat it well, then measure out two tablespoons. Bake in a single 9-inch pie or cake pan or an 8×8-inch square pan.
I recommend making the dough twice to avoid overworking your stand mixer. Bake it in two 9×13-inch pans. This will allow for easier rising, ensuring the dough won’t overflow in your rising bowl. It’s also easier to roll out, resulting in 24 more evenly-sized rolls.
Email This Recipe
Enter your email, and we’ll send it to your inbox.
Ingredients
For the dough:
- 1 cup (227 grams) whole milk
- 1 stick (113 grams) unsalted butter
- 1/4 cup (57 grams) sour cream or plain yogurt, at room temperature
- 1 envelope (2 1/4 teaspoons) instant yeast*
- 1/4 cup (50 grams) granulated sugar
- 1 large egg, at room temperature
- 2 egg yolks, at room temperature
- 1/2 teaspoon vanilla extract
- 4 to 4 1/4 cups (508 to 540 grams) all-purpose flour, plus more for dusting
- 1 1/2 teaspoons fine sea salt

For the filling:
- 1 stick (113 grams) unsalted butter, completely softened to room temperature
- 3/4 cup (150 grams) packed light brown sugar
- 2 tablespoons ground cinnamon
- 1/8 teaspoon fine sea salt
For the icing:
- 2 cups (250 grams) powdered sugar
- 1/4 cup (57 grams) whole milk
- 2 tablespoons (28 grams) unsalted butter, melted
- 1 teaspoon vanilla extract
Instructions
Make the dough:
- In a small saucepan, heat the milk and butter until the butter is melted.
- Remove from heat and stir in the sour cream until smooth. Let cool until lukewarm** (about 100 – 110°F).
- In the bowl of an electric mixer, use a spatula to combine the milk mixture with the yeast, sugar, egg, egg yolks, and vanilla until well combined.
- Add in half of the flour and the salt and stir until combined.
- Place on a stand mixer fitted with a dough hook and gradually add the remaining flour until a dough begins to form. Only add as much flour as you need to form the dough.
- Knead at medium speed until the dough is very soft, smooth, pliable, elastic, and doesn’t stick to the sides of the bowl, about 8 to 10 minutes. If the dough is unbearably sticky, add more flour 1 tablespoon at a time.
- Lightly grease a large bowl. Shape the dough into a ball and place in the greased bowl. Cover with plastic wrap and let rise in a warm place until doubled in size, 1 1/2 to 2 hours.
Make the filling:
- Once the dough has risen, add filling ingredients to a medium mixing bowl.
- Beat with a hand-held electric mixer on medium-high until well combined and fluffy, about 3 minutes.
Shape the dough:
- Punch down the risen dough and turn out onto a lightly floured work surface.
- Use a rolling pin to shape the dough into a 16×12-inch rectangle, long side facing you.
- Spread the filling mixture all over the dough, leaving a 1/2-inch border at the far edge. Brush the border with water to help seal.
- Roll the dough up, pulling with your hands to keep it tightly rolled until it’s an even log shape. Press the border to seal. Trim the edges. Lightly flour the roll.
- Grease a 13×9-inch baking dish or two 9-inch pie pans.
- Cut the roll into 12 equal pieces using a sharp knife or unflavored dental floss.
- Place the rolls cut side up in the prepared baking dish. Cover with plastic wrap and let rise in a warm place until doubled, about 1 1/2 to 2 hours.
- Make-Ahead Option: After shaping, let the rolls rise until they’ve grown in size by about a quarter. Cover with plastic wrap and refrigerate for up to 24 hours. When ready to bake, let come completely to room temperature and continue rising until doubled in size, about 2 hours.
- Meanwhile, preheat the oven to 350°F. Bake the rolls until lightly golden brown, 22 to 25 minutes.
For the icing:
- While the rolls bake, combine the icing ingredients in a small mixing bowl until a smooth pourable icing forms.
- Spread over hot rolls immediately after they come out of the oven.
- Serve warm the day they’re baked.
Notes
- 8 ounces (227 grams) cream cheese, at room temperature
- 2 tablespoons corn syrup
- 2 tablespoons heavy cream
- 1 cup (125 grams) powdered sugar, sifted
- 1 teaspoon vanilla extract
- Pinch salt
This recipe was written in 2019 and has been updated with additional recipe tips. Photos by Joanie Simon.


I would love to try these but 12 is a big amount just for me. May I cut the recipe in half? Or do you have a smaller batch recipe?
Thank you
Yes, I’ve halved this recipe with success! To halve the whole egg in the recipe, crack it into a small bowl, beat it well, then measure out two tablespoons for the recipe. Everything else can easily be halved. I baked mine in a single 9-inch pie pan, but you could also use an 8×8-inch pan. Enjoy! 🙂
Not only are these the best cinnamon rolls I’ve ever baked, they’re also the best I’ve ever eaten.
After a failed attempt at another blogger’s recipe for cinnamon rolls, I was hesitant to try again – but I was craving them, plus I don’t like the taste of defeat.
So I tried again, and my goodness…
They’re so so so soft and gooey.
And the best part for me? They freeze beautifully!!
I made one batch of your suggested cream cheese frosting, slathered it on while they were still warm, and then froze them individually, wrapped in cling film.
I simply take one out of the freezer a couple hours before I want to eat it, let it thaw, and eat it at room temperature.
Absolutely magnificent, and I actually prefer it to eating one straight out of the oven!
It’s so convenient for whenever I feel like indulging or treating myself, so I’m very happy with how well these freeze.
I’m so ecstatic about how these came out that I’m already thinking about other fillings and frostings to experiment with!
I used brown butter for the dough and the filling (because I have an obsession with brown butter), but I couldn’t really taste it in the end, which is fine! I suppose the cinnamon just overpowers it.
Thank you for this gorgeous recipe – the two rises are VERY MUCH worth it.
Hello…i’m curious why you used AP flour instead of bread flour?
Hi Kyla! Tessa decided to use the all purpose flour to make the cinnamon rolls lighter and softer. Bread flour would lead to a chewier roll. Hope this helps! Happy baking!
I tried this recipe and the AP flour indeed made it super soft! my butter knife just cut through it effortlessly when i was slicing my cinnamon rolls. It was a success even though i did a few things differently; i used a metal baking pan instead of a glass one because that’s the only big pan i have, and i rose my dough in my unplugged microwave with a bowl of hot water because the weather was cold today so i felt like it was going to take a long time to rise in room temp.
The only thing i would improve for my next time is the icing. I think the brand of icing sugar i used is way sweeter than yours, so when i used your icing recipe, it ended up being far too sweet.
But other than that, everything was perfect!
These cinnamon rolls are amazing! The first time I made them my friends begged me to make more, so I’ve used this recipe several times now. They tell me they’re soft, moist, and the whole roll feels and tastes like the center. I agree! They even store well and are still soft a day or two later!
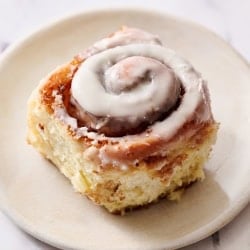
Just look at that gooey goodness 😍
Hello! Will this icing set?
Also, how can I make a cream cheese icing/glaze?
Thanks!
Hi Chiara! No, this icing won’t fully set as it’s supposed to be gooey 🙂 We usually use Tessa’s Cream Cheese Frosting when we want a cream cheese frosting here, but again, that won’t really set.
This was my first attempt at making cinnamon rolls or any enriched dough, and who knew for such a seemingly daunting task that it would turn out to be my new favorite thing to make! I can’t get over how soft and delicious these are, and how incredibly fun the process is. After making these I saw leftover store bought cinnamon rolls sitting out at a friend’s house, and they looked overly sweet, small, and dense in comparison. If there’s any recipe you give a shot, it should be this one!
So excited to hear this, Kate! Your cinnamon rolls look perfect – amazing job!
my new go to for cinnamon rolls. These turned out soft, right about of sweet and perfect! I was very cautious to not overbake since we like the softer bread. Loved the brownsugar that camelized on the bottom of the pan
Tessa, I am curious- what kind of cinnamon do you use? Regular, Korintje or Saigon? Other? Or a mixture of any kinds? I am interested in the different kinds of cinnamon and how they affect the taste of the rolls because I’ve heard that can be one of the biggest factors in setting cinnamon rolls apart.
I am getting a new oven soon and may be trying your cinnamon rolls as the first thing I bake. 🙂
Hi Ashley! Tessa and the rest of our team all use a variety of cinnamon types – sometimes regular, sometimes Vietnamese, and sometimes combinations, too – and they’re all delicious in this recipe. We really find the age of the cinnamon to be a bigger factor, as older spices carry less flavor. I made these for myself using a new container of McCormick’s regular cinnamon a few weeks ago, and they were the most delicious breakfast treat I’ve ever made 😉 We can’t wait to hear what you think of these cinnamon rolls in your new oven! Happy baking 🙂
Okay, good to know. Thank you!
Made these for my family and they were a big hit. Will certainly be making them again!
Wow wow wow. These rolls are SO soft! I’ve tried many cinnamon roll recipes and this is the best one hands down. I find that I always need the full amount of flour called for in the recipe even in the summer (when I first tested this recipe) and that I need to knead this for longer in my mixer than stated in the directions. Make sure your dough passes the windowpane test so that it rolls up easy with no sticking!
Thanks for the recipe. This one will be written down and kept in my recipe tin.
These cinnamon rolls are incredible! I highly recommend trying these! Love everything about them! 10/10
These were absolutely amazing! Probably the best cinnamon rolls I have EVER had. I used a cream cheese icing and they were just incredible. I did freeze these rolls per the instructions, I gifted them to a friend for Christmas. The only thing I will say is that after defrosting in the fridge overnight, they did take significantly longer to proof at room temperature than the instructions said. It ended up delaying our Christmas morning schedule by at least an hour and a half, so I would say definitely take them out of the fridge much earlier than you think you need! Mine took an hour and a half (and that was with moving them to our boiler room for extra heat). However, the end result was sooooo worth it and I will absolutely make these again!