


Tessa’s Recipe Rundown
Taste: Savory perfection!
Texture: Perfectly chewy and wonderful.
Ease: Not the quickest recipe ever, but with the step-by-step video you can totally make your own perfect bagels!
Pros: No need to fly to NYC for a delightful bagel. Plus you can easily customize the flavors.
Cons: Time-consuming and a little messy. Definitely a project for a free afternoon.
Would I make this again? Absolutely! I make a batch of these homemade bagels every few months.
This post may contain affiliate links. Read our disclosure policy.


This homemade bagel recipe is about a million times better than any store-bought bagels. It’s the closest I’ve come to New York-style bagels at home.
I won’t say they’re exactly like New York bagels because those seem to have some sort of magic power. I will say these are about 1,000 times better than all grocery store bagels. And honestly… most bagels found here in Phoenix.
Making bagels from scratch at home is such a fun baking project. They’re a little messy and time-consuming, but totally doable. Especially if you follow along with my video below which shows you exactly how to make bagels.
I’ve even included a bunch of baking tips and topping customization ideas so you can really get creative (right above the recipe!)

Sprinkle of Science
How to Make Bagels
Ingredients for Homemade Bagels:
- Bread flour – The higher protein level in bread flour helps to create that chewy texture. It’s worth the trip to the grocery store to pick some up. You can use all-purpose flour if you absolutely must, but the texture will suffer.
- Instant yeast – You can also use active dry yeast, just note your dough may take longer to rise. Learn more about active dry vs. instant yeast here.
- Fine sea salt – You can also use table salt. Learn more about the differences in salt types here.
- Barley malt syrup – Order online or find at some health food stores or beer brewing supply stores. You can also use light or dark brown sugar instead if you must, but the flavor of your bagels won’t be as delicious.
- Lukewarm water – Make sure it’s not scorching hot or it may kill your yeast. 100-110°F is perfect.

What Makes a Bagel New York-Style?
Bagels were brought to North America from Eastern European immigrants in the early 20th century. The debate about what’s most traditional or which style is best is fierce.
- New York-style bagels are generally larger, uniformly round with a smaller hole and a chewy, slightly fluffy texture. They’re boiled then baked and generally have a fairly high salt content.
- Some New York bagel shops bake their bagels on burlap wood planks.
- On the other hand, Montreal-style bagels are boiled in honey water and baked in a wood-fired oven, caramelizing the exterior more than their New York-style counterparts.
- Forget what you may have heard about needing NY tap water to make good bagels, that myth has been debunked.
What Makes a Bagel Chewy?
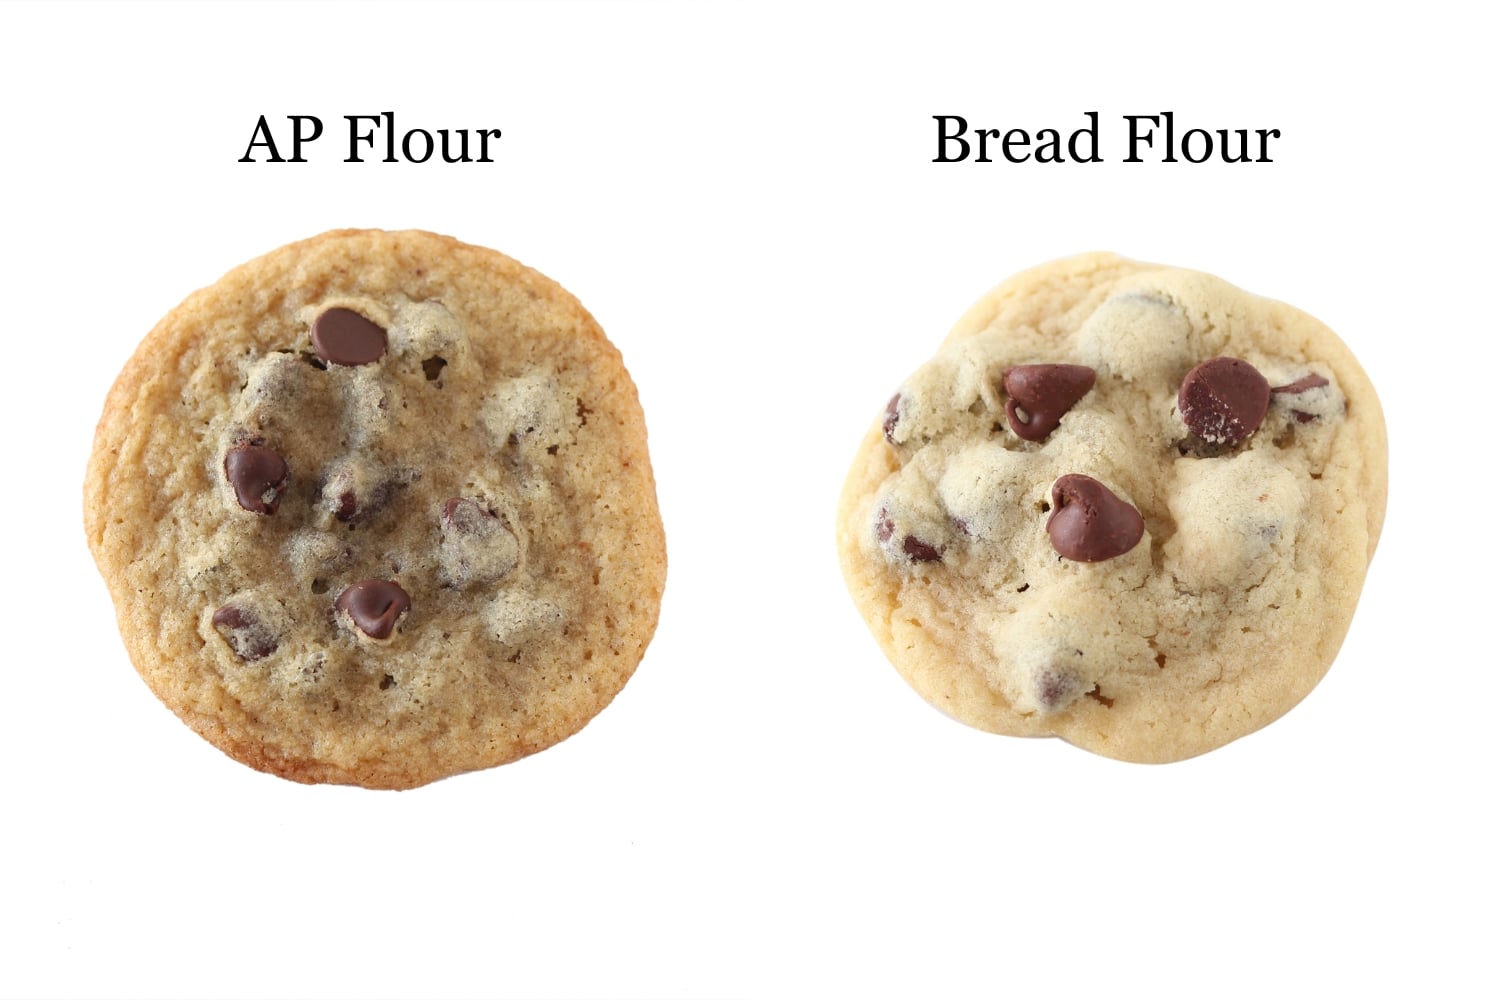
Bread flour is the essential ingredient to creating that distinct chewy bite we all crave in a bagel. Its high protein content creates a stiff dough that holds its shape while baking and develops more gluten for more chew. Boiling the bagels in barley malt prior to baking also contributes to creating this chewy texture.
Do I Have to Use Bread Flour?
- I don’t recommend substituting the bread flour with all-purpose flour in this recipe as the texture will suffer.
- The high protein content in bread flour is what allows the gluten to develop, to create a stiff dough that turns into chewy, well-shaped bagels.
- If you’re going to the trouble of making bagels from scratch, you may as well use one of the primary ingredients required for the best texture!
- Bread flour is the only flour that this recipe has been successfully tested with.
- If you can’t find bread flour in supermarkets locally, you can buy it here on Amazon.
How to Knead Bagel Dough
- For best results, use a larger 6-quart stand mixer fitted with the dough hook attachment, or knead by hand.
- This is a very stiff dough, and old or small stand mixers may not be up to the task of kneading and may ‘jump’ on the counter or burn out your motor.
- Kneading by hand will take about 10 to 15 minutes, depending on your upper body strength.
- Learn how to knead dough by hand here.
How to Shape Bagels
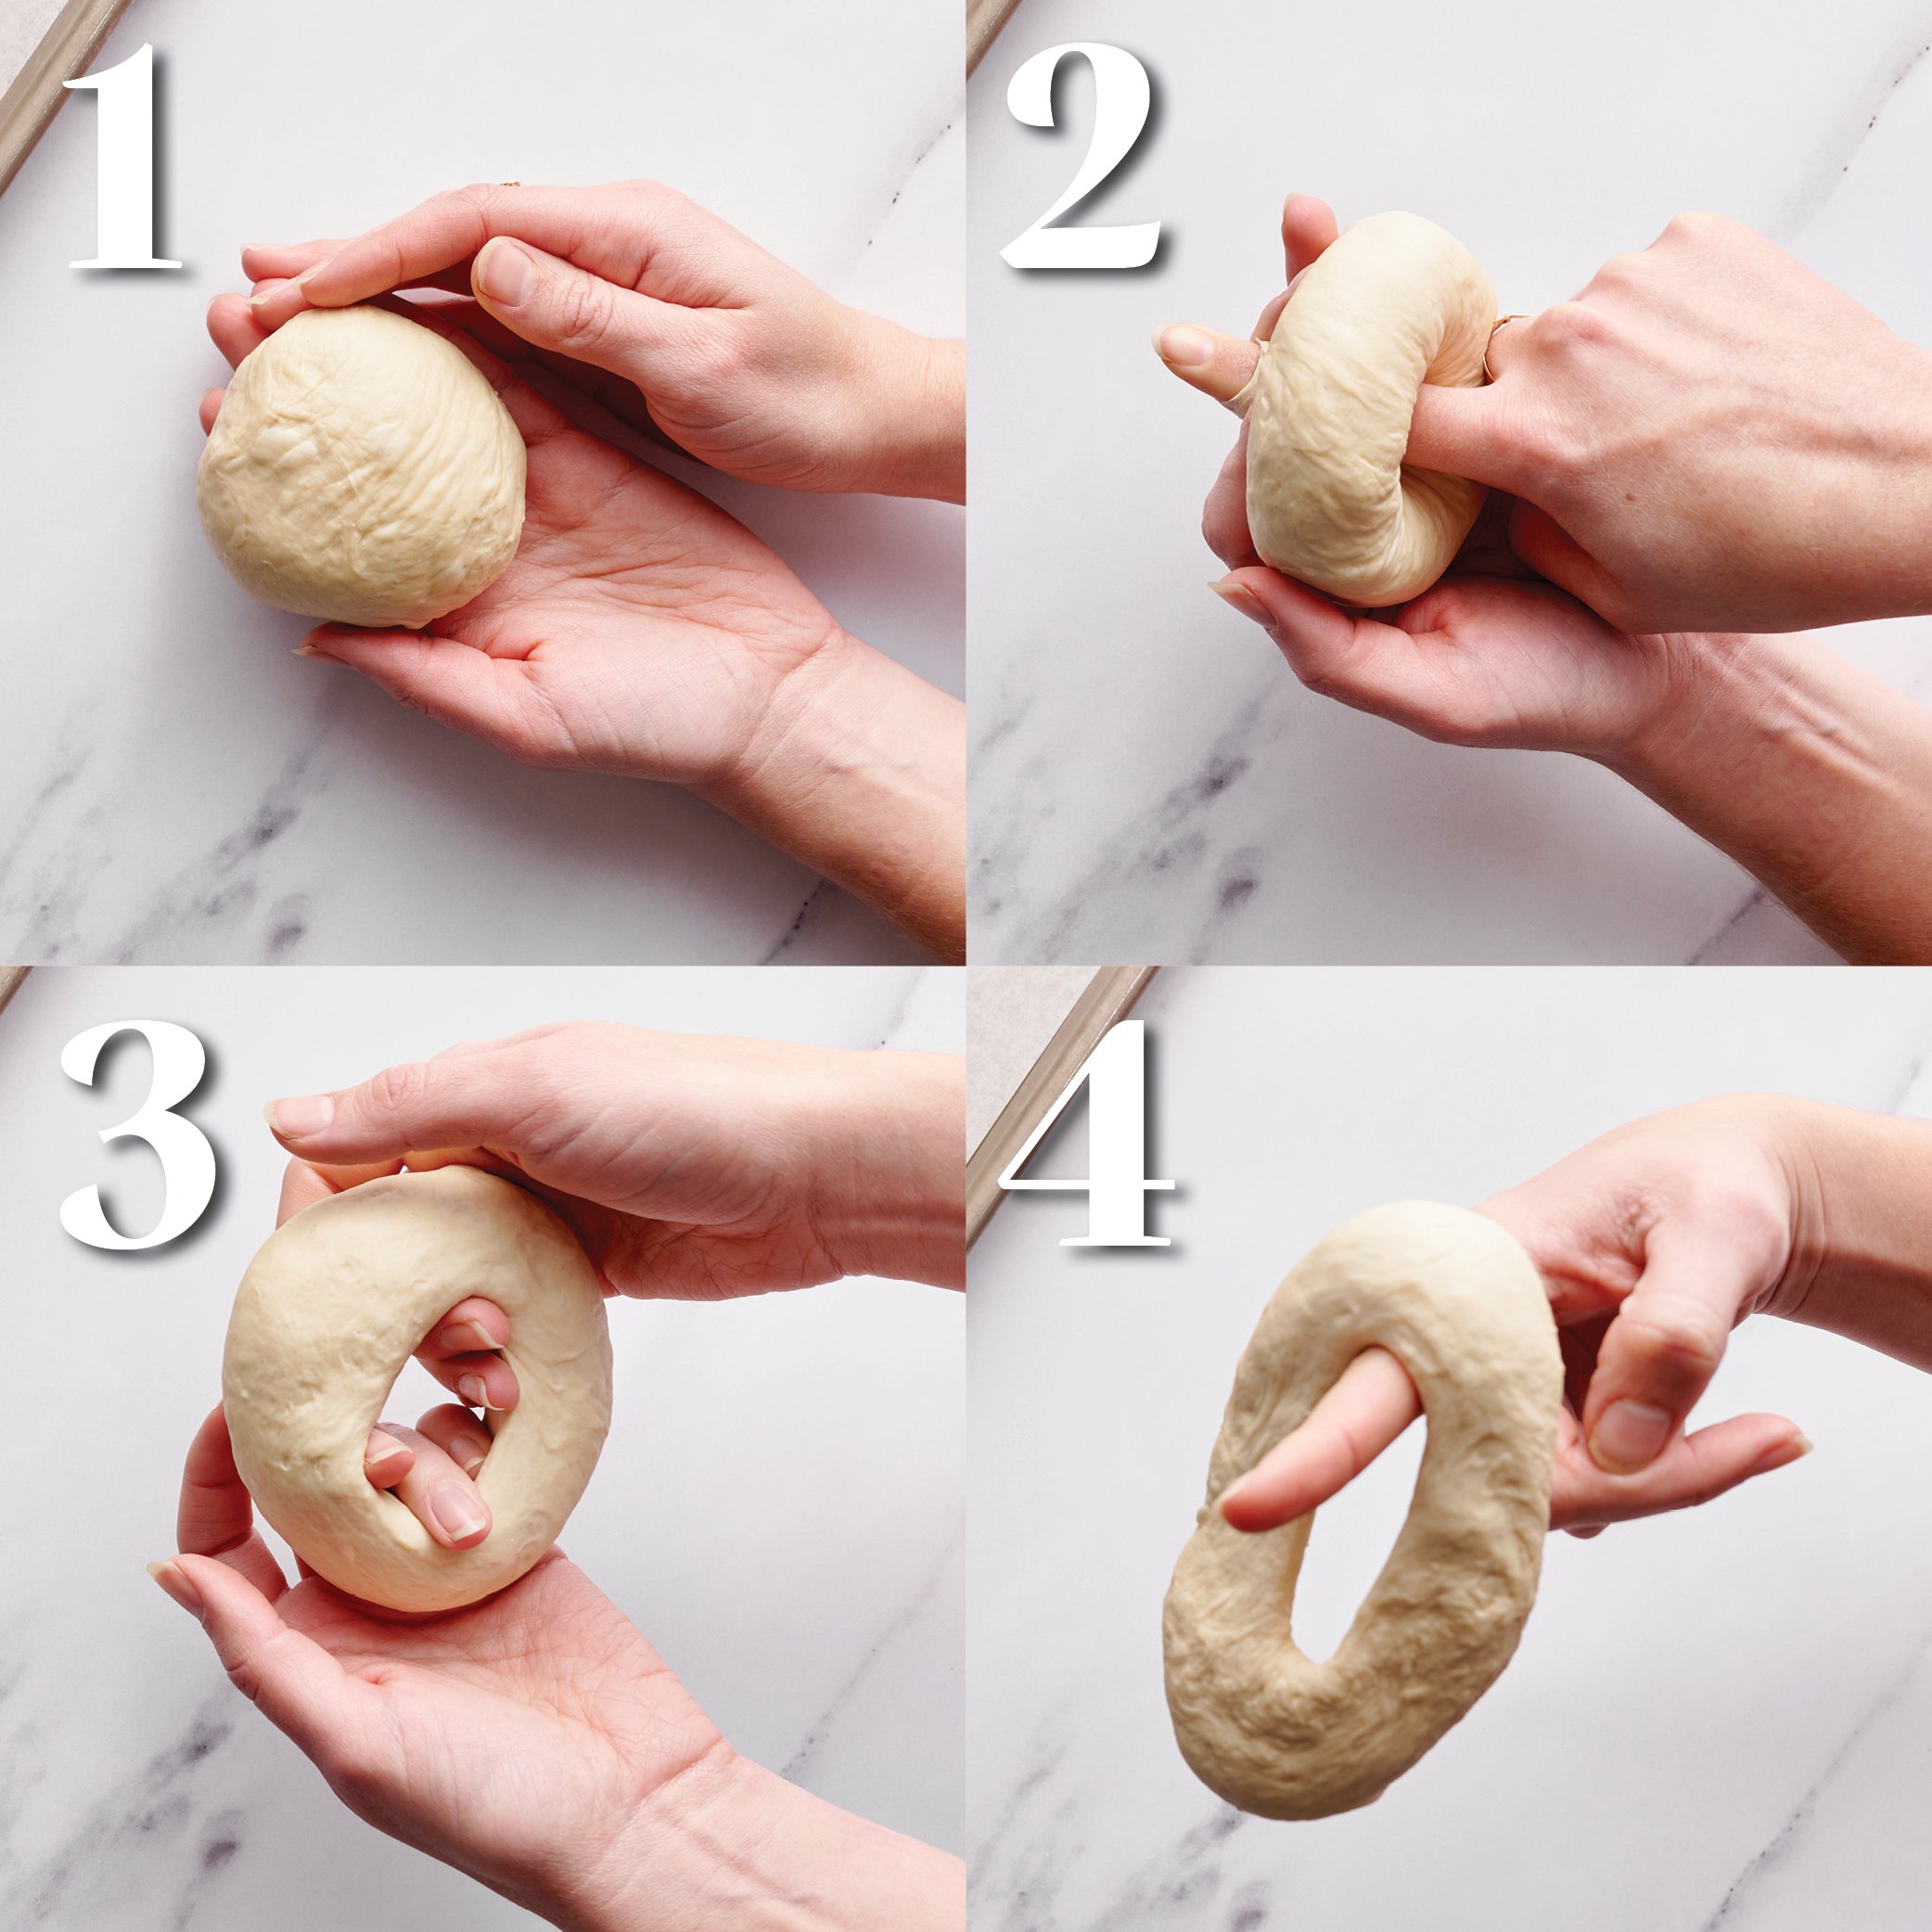
Bagels are made with a basic stiff yeast dough. Allow the dough to rise, shape it into 8 balls, then let those balls rise again. Then, in order to get the bagel shape, you simply use your index finger to poke a hole through the center and twirl it around your finger to stretch that hole out, as seen in the image below.
How to Make Bagels More Flavorful AND Make Them Ahead of Time
Besides choosing flavorful toppings or mix-ins, an easy way to develop better flavor in your bagel dough and make them ahead of time, to finish off the morning you want to serve them, is to allow them to ferment in the fridge for up to 48 hours.
UPDATE: Some readers who have allowed their shaped bagels to ferment in the fridge for up to 48 hours have had their final bagels turn out flat. This is likely due to overproofing. For this reason, I would recommend reducing the amount of yeast to 2 teaspoons if you’d like to refrigerate the dough for an extended period.
Make Ahead Directions:
- Cover your shaped bagels on their baking sheets with plastic wrap.
- Allow to proof in the fridge for 24 to 48 hours to develop more flavor and chewiness.
- Allow to come to room temperature before boiling, topping, and baking.
- This is also a great idea if you’re hosting breakfast or brunch!
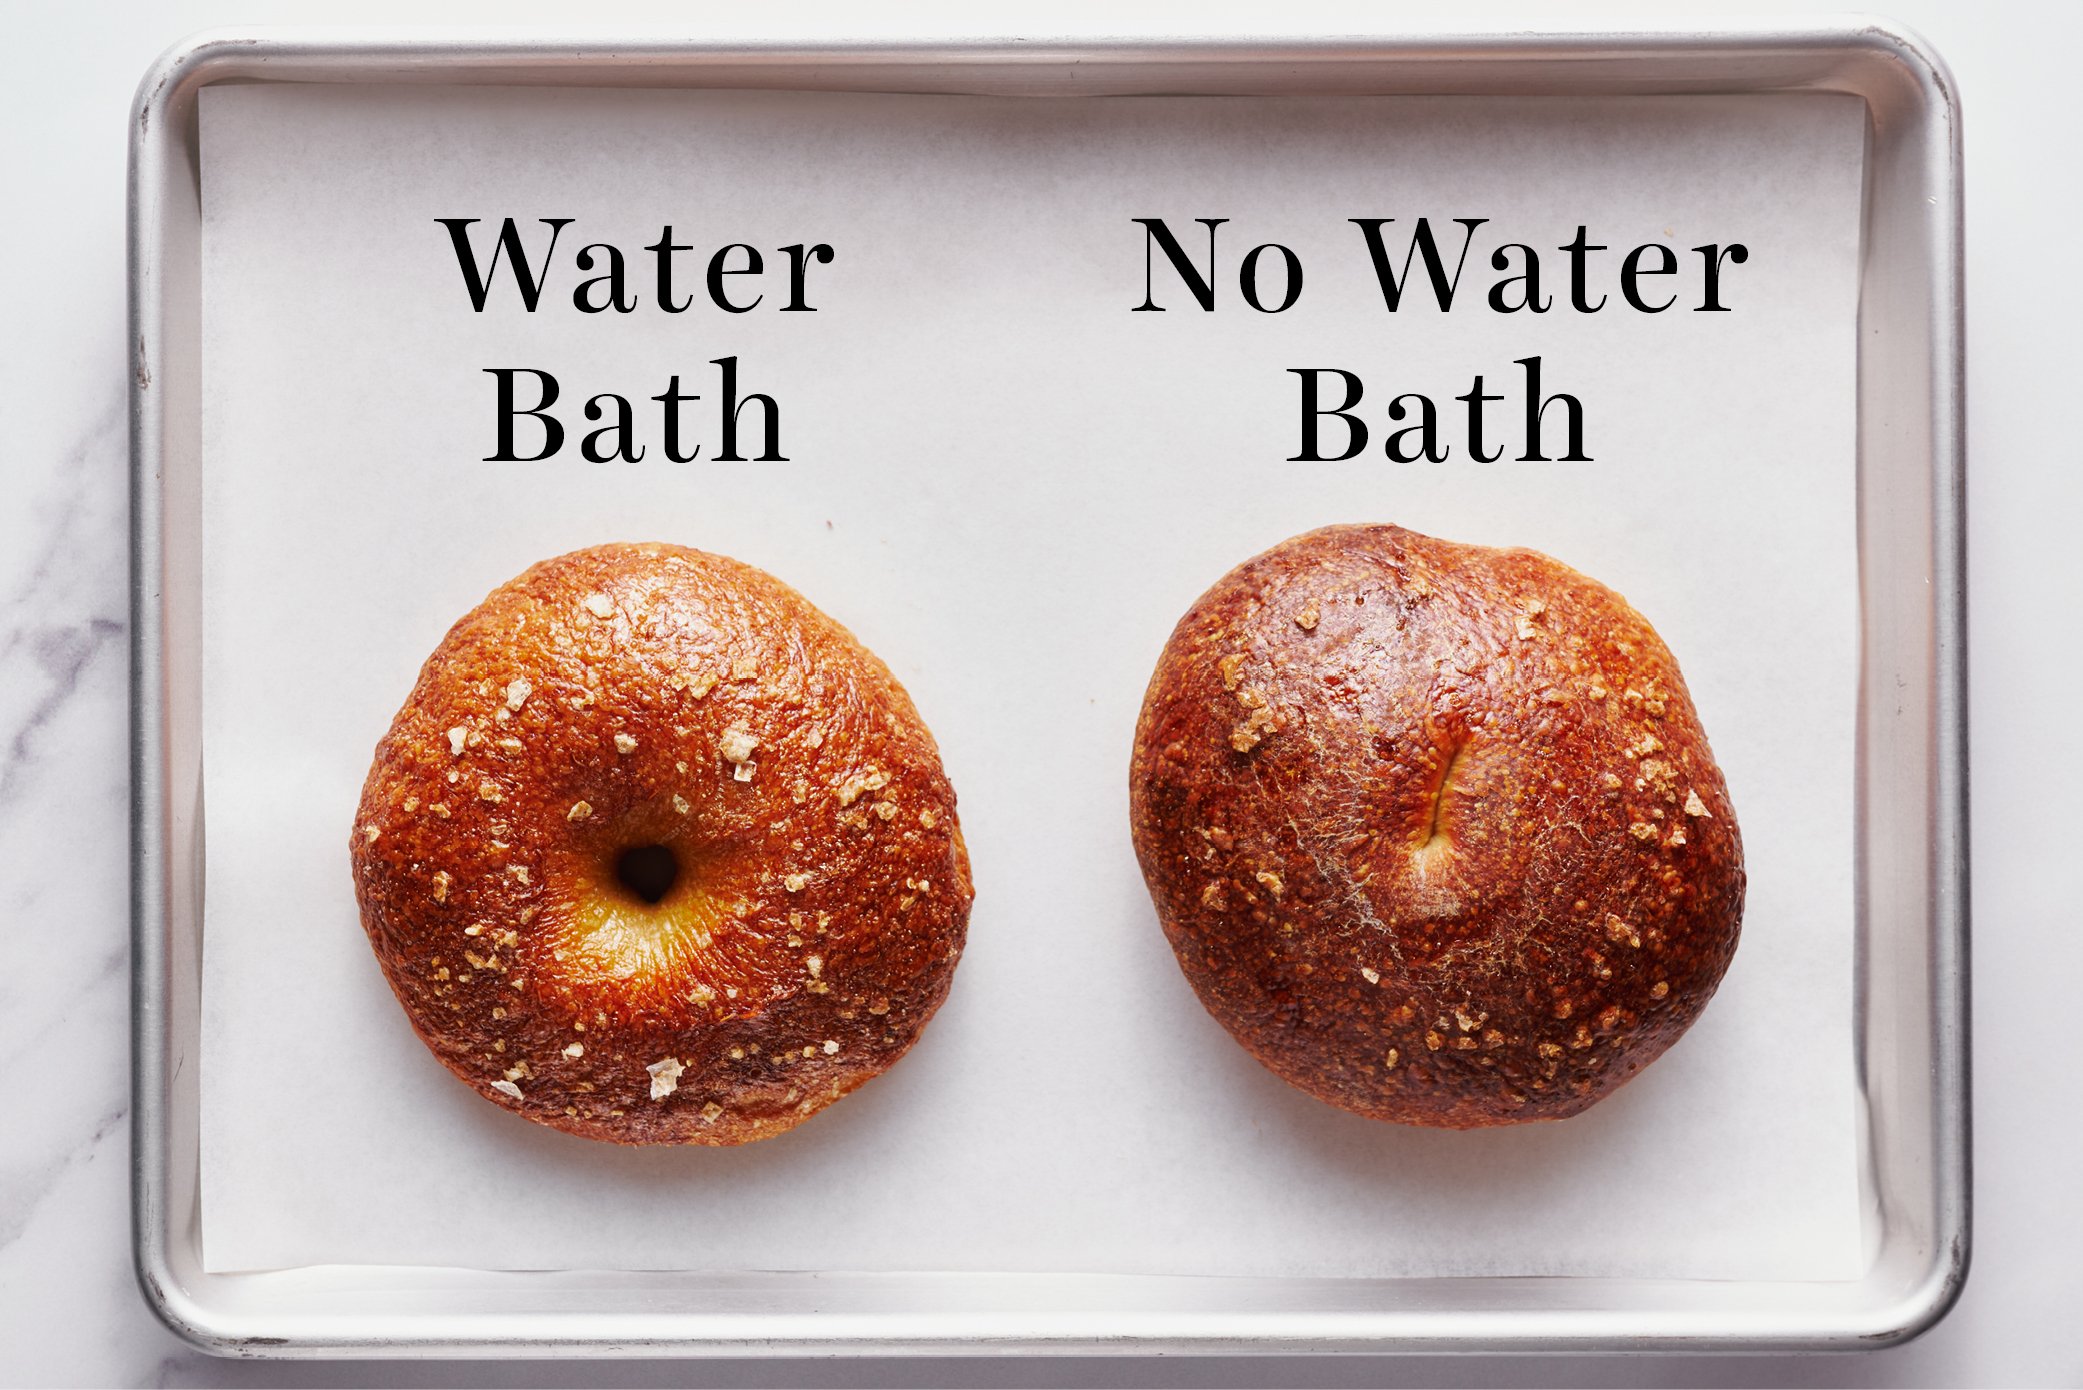
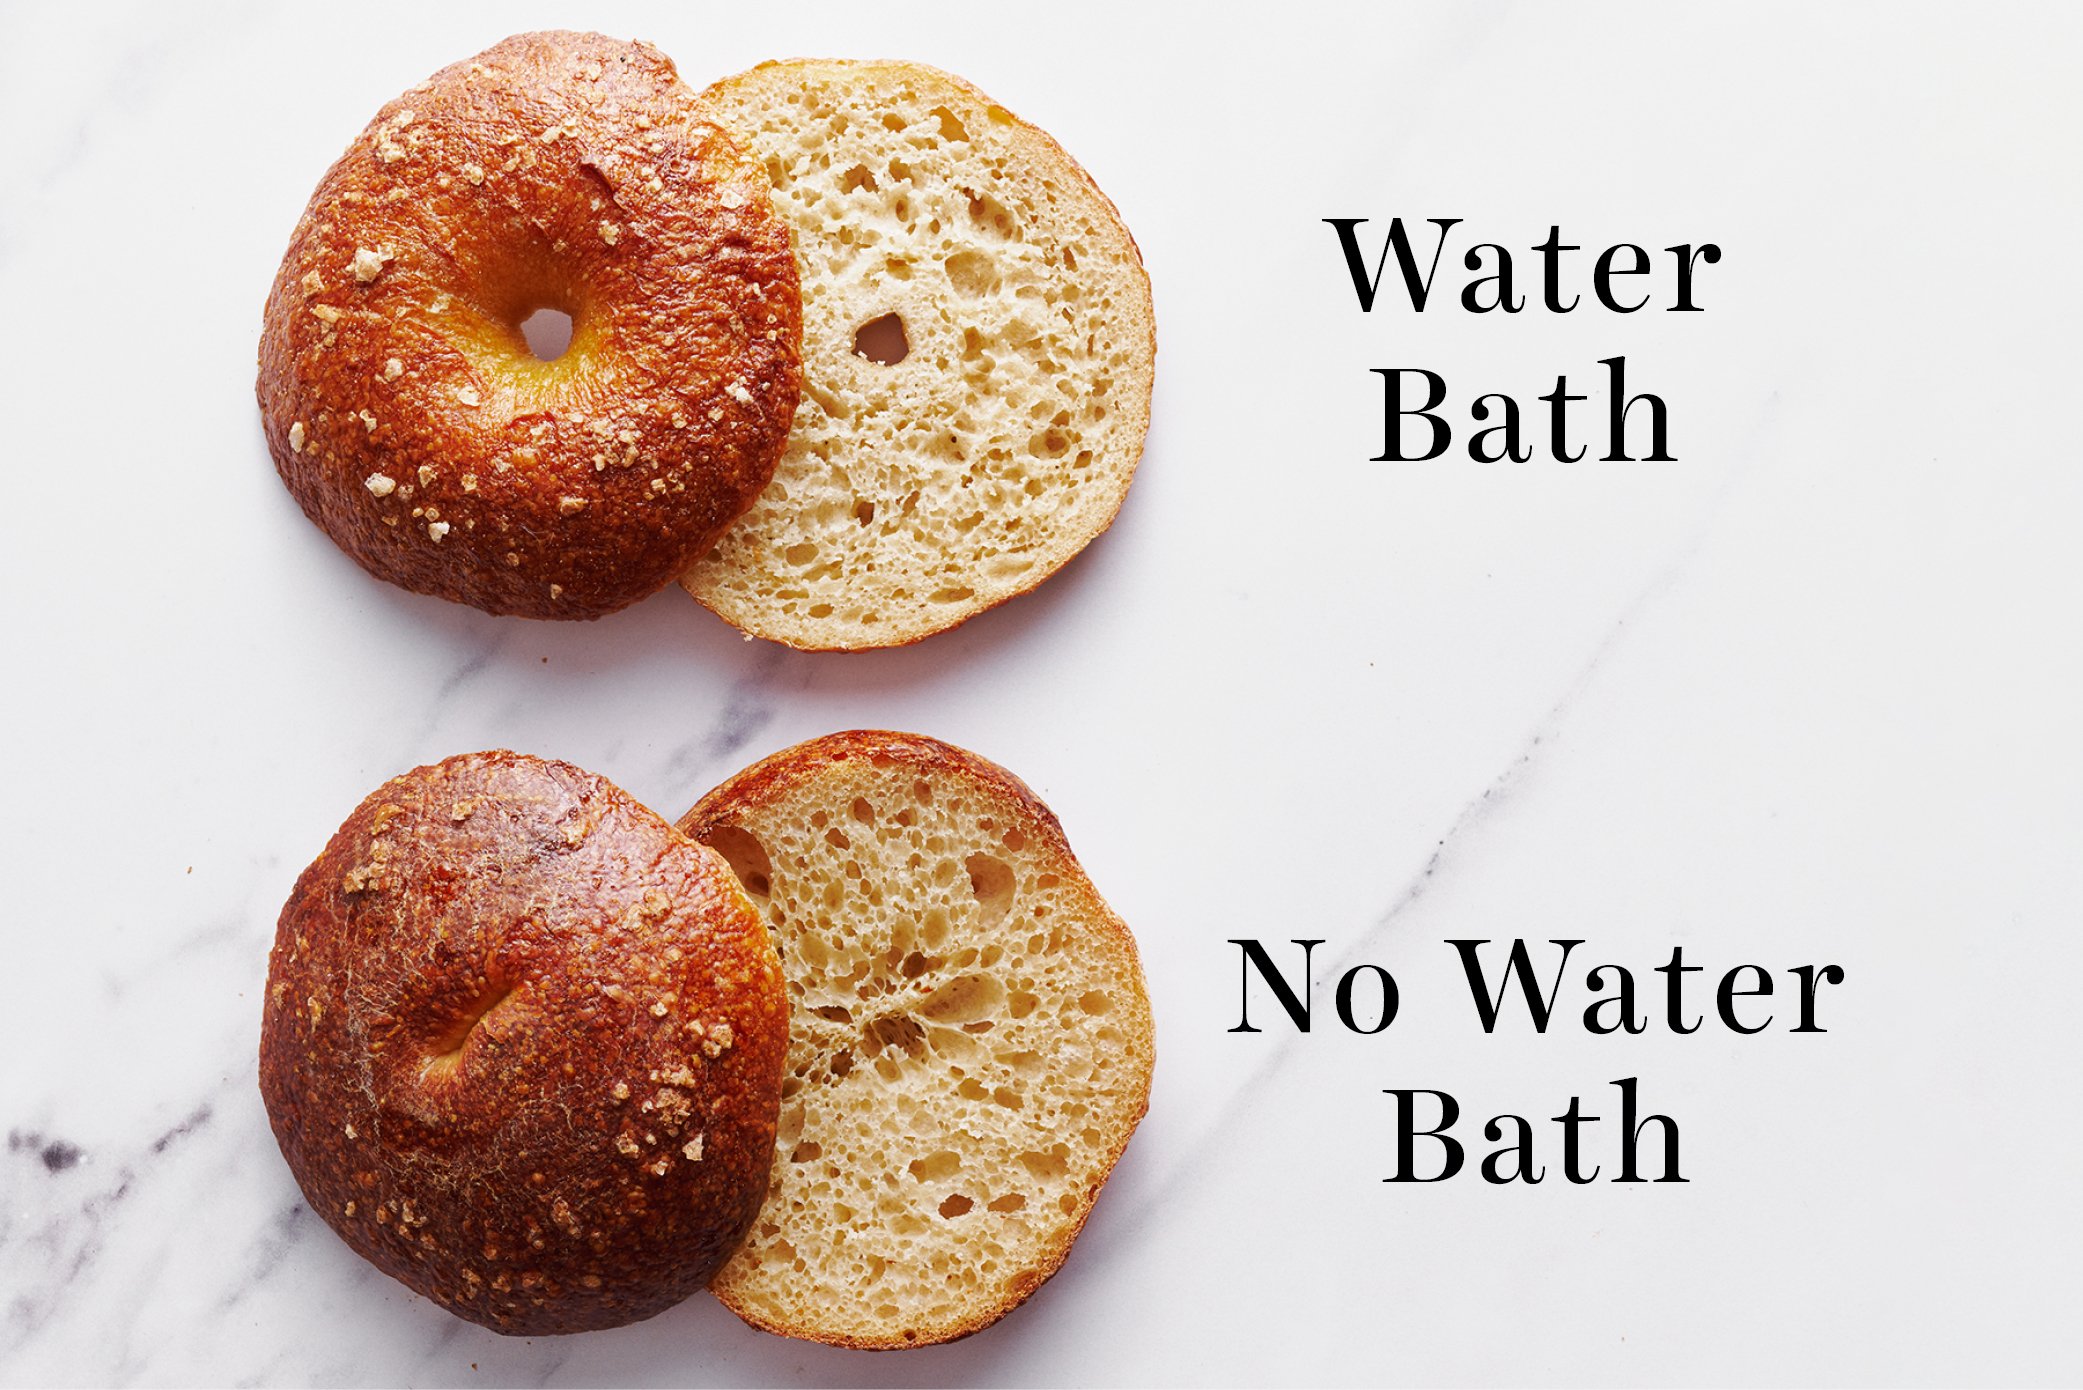
Why do You Boil Bagels Before Baking?
In order for the bagels to develop that well-browned exterior and slightly dense chewy texture, they must be boiled briefly before baking. This works because the boiling water sets the exterior crust before it hits the oven, preventing the bagels from rising very much, while further developing that browned exterior.
The reason we add barley malt to the boiling water is to further develop that browned crust and to give it that distinct flavor we all know and love. I also add a little bit of baking soda to elevate the pH of the water solution, to encourage more browning on the crust.

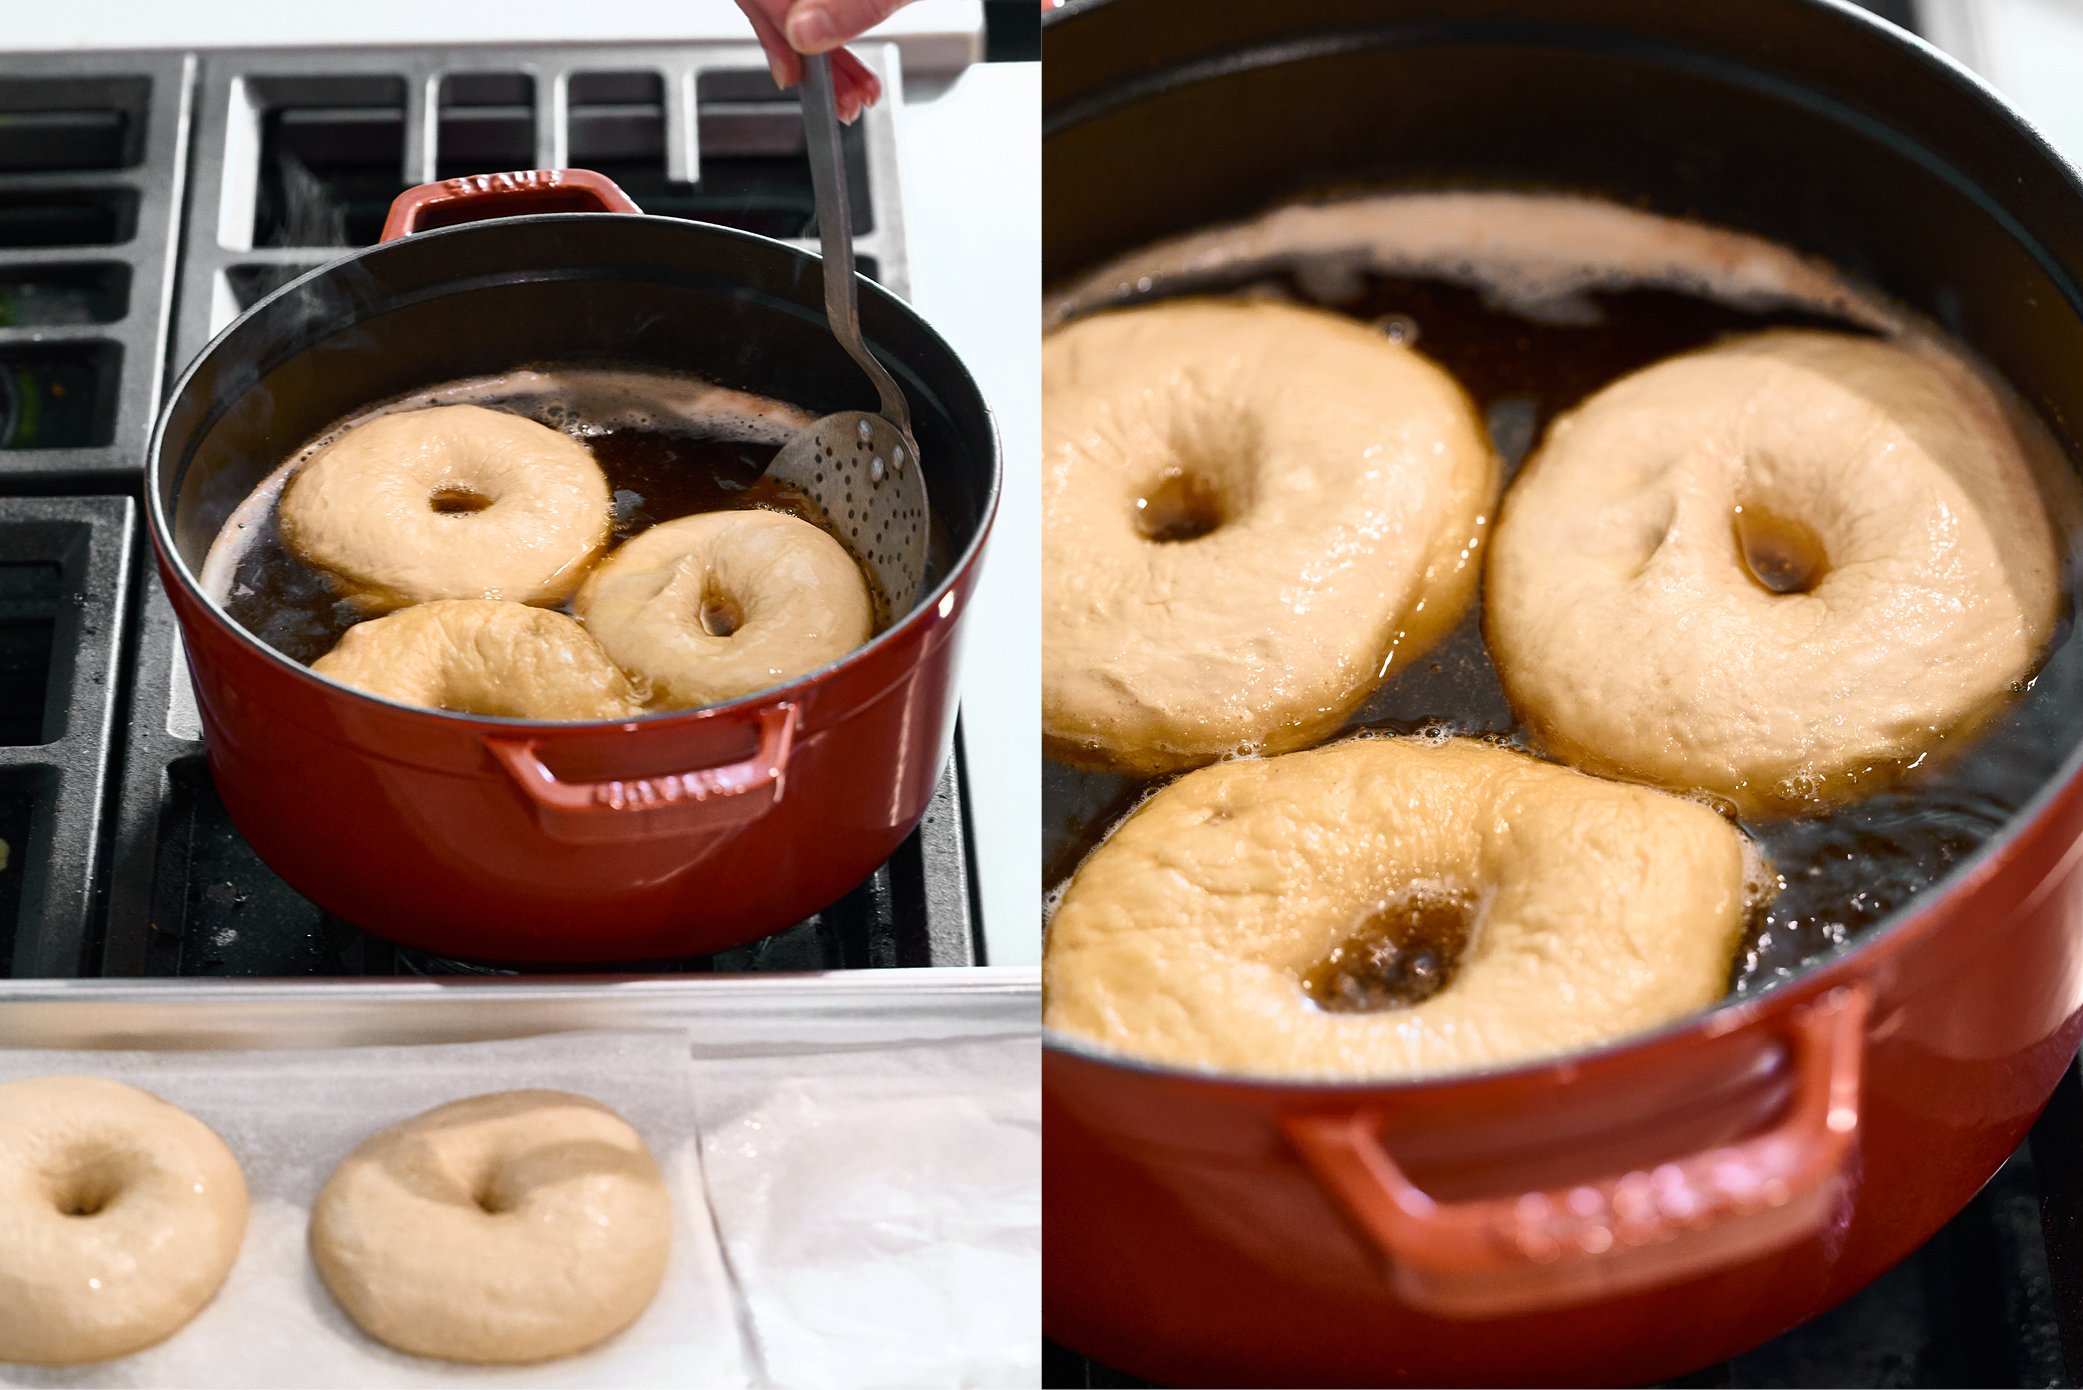
Tips for Preparing a Water Bath for Bagels
Use a wide heavy-bottomed pot and add the baking soda and barley malt first before turning the heat up, to avoid spillovers. A small mesh or wire skimmer or spider makes quick and easy work of dipping and removing the bagels from the water.
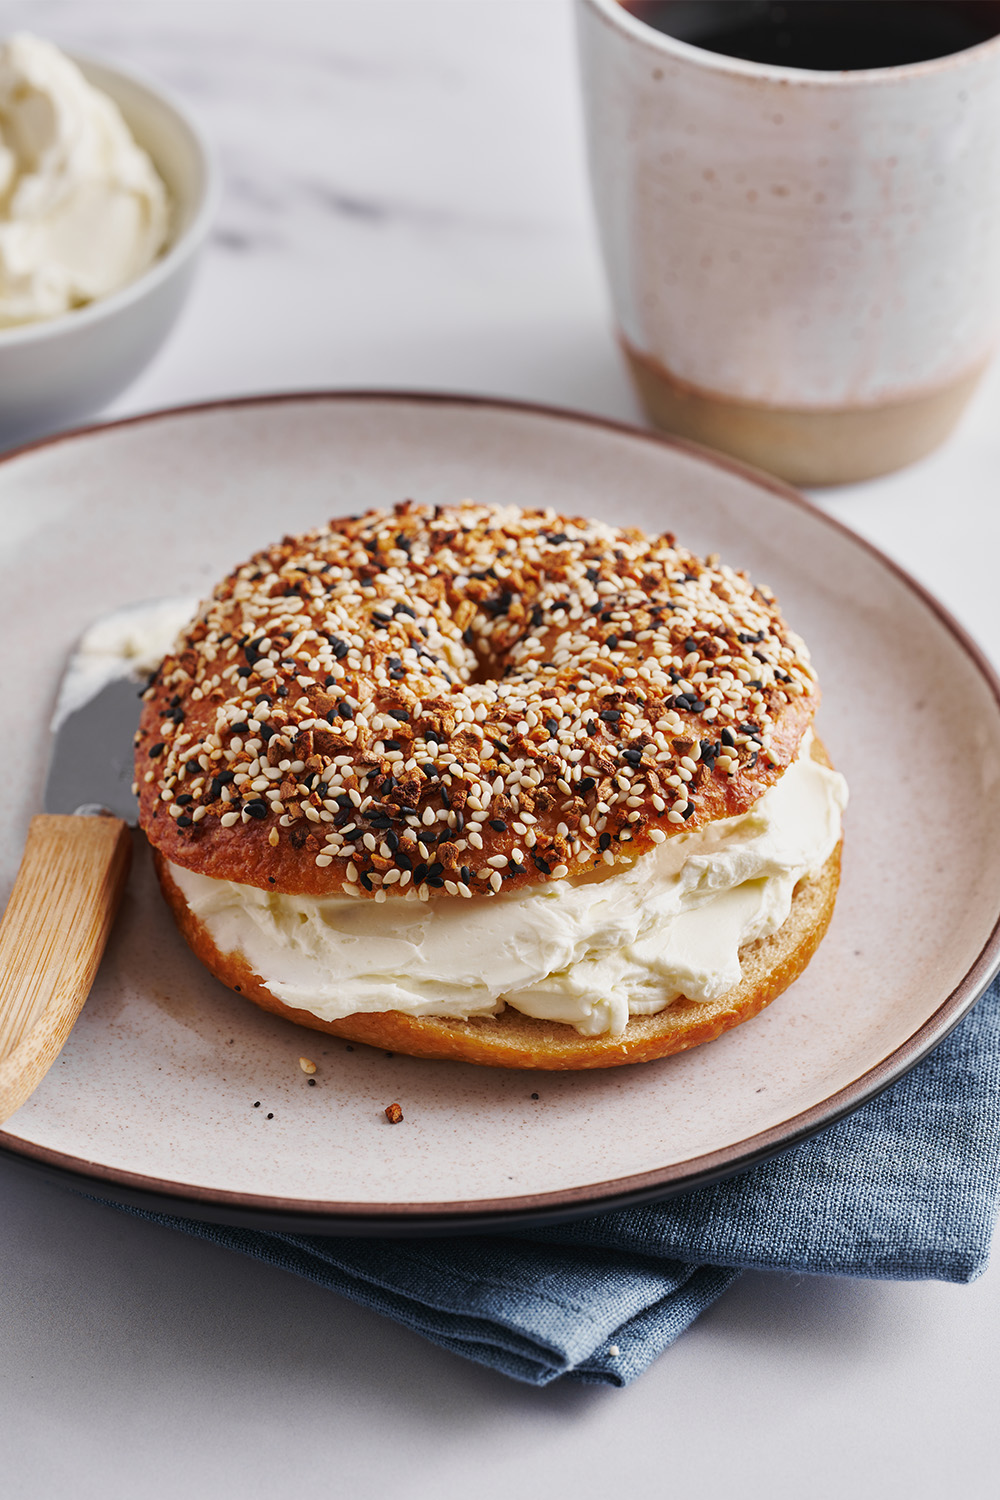
What to Put on a Bagel
- Cream cheese! Stick with plain, or try any flavor you’d like. Fresh herbs in cream cheese are delicious!
- Lox or gravlax with sliced red onion, tomato, and capers.
- Egg, cheese, and bacon/sausage for a perfect breakfast sandwich.
- Butter (I love using European butter here, for a simple yet delicious breakfast!)
How Long do Bagels Last?
Fresh bagels are the most delicious, but uncut bagels can be stored for up to 48 hours in a paper bag (or loosely wrapped in parchment). Slice and briefly toast before serving. See just below for freezing instructions.
Can you Freeze Bagels?
Yes! To freeze bagels whole, wrap each in plastic then place in an airtight container. To freeze bagels sliced, slice them and place on a baking tray in the freezer until solid. Wrap in plastic wrap and store in an airtight container or ziptop bag. Freeze for up to 3 months. Toast directly from frozen.
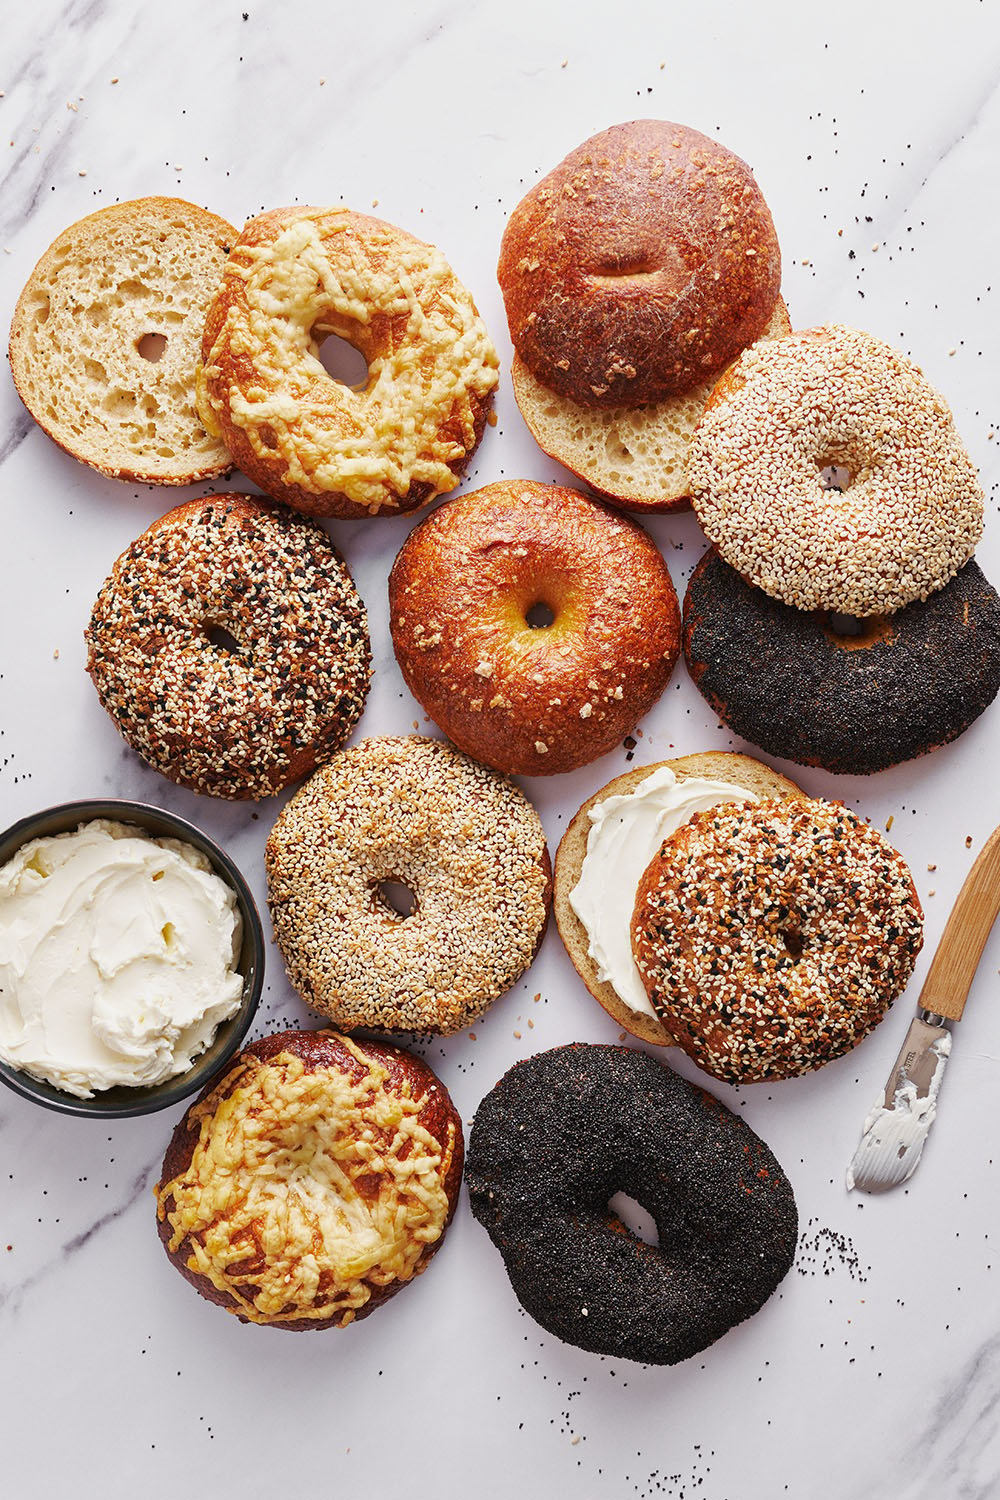
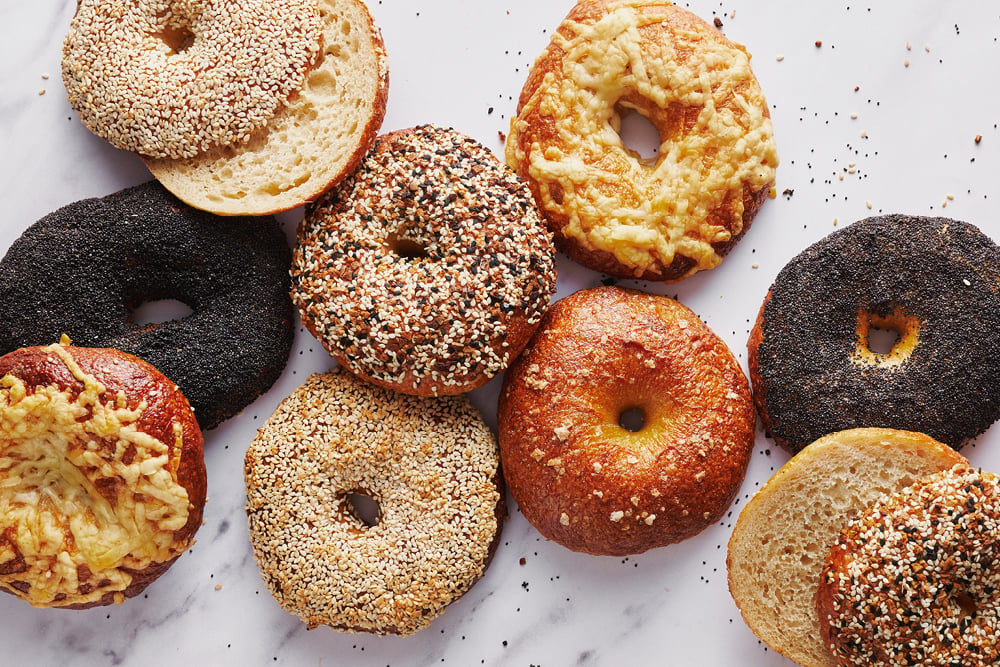
Homemade Bagel Topping Ideas & Directions
It’s one thing to know how to make bagels, but it’s another to make any flavor you want! Customize your bagels by using my topping ideas below, or get creative and experiment with different dough add-ins and toppings! The full printable recipe is below.
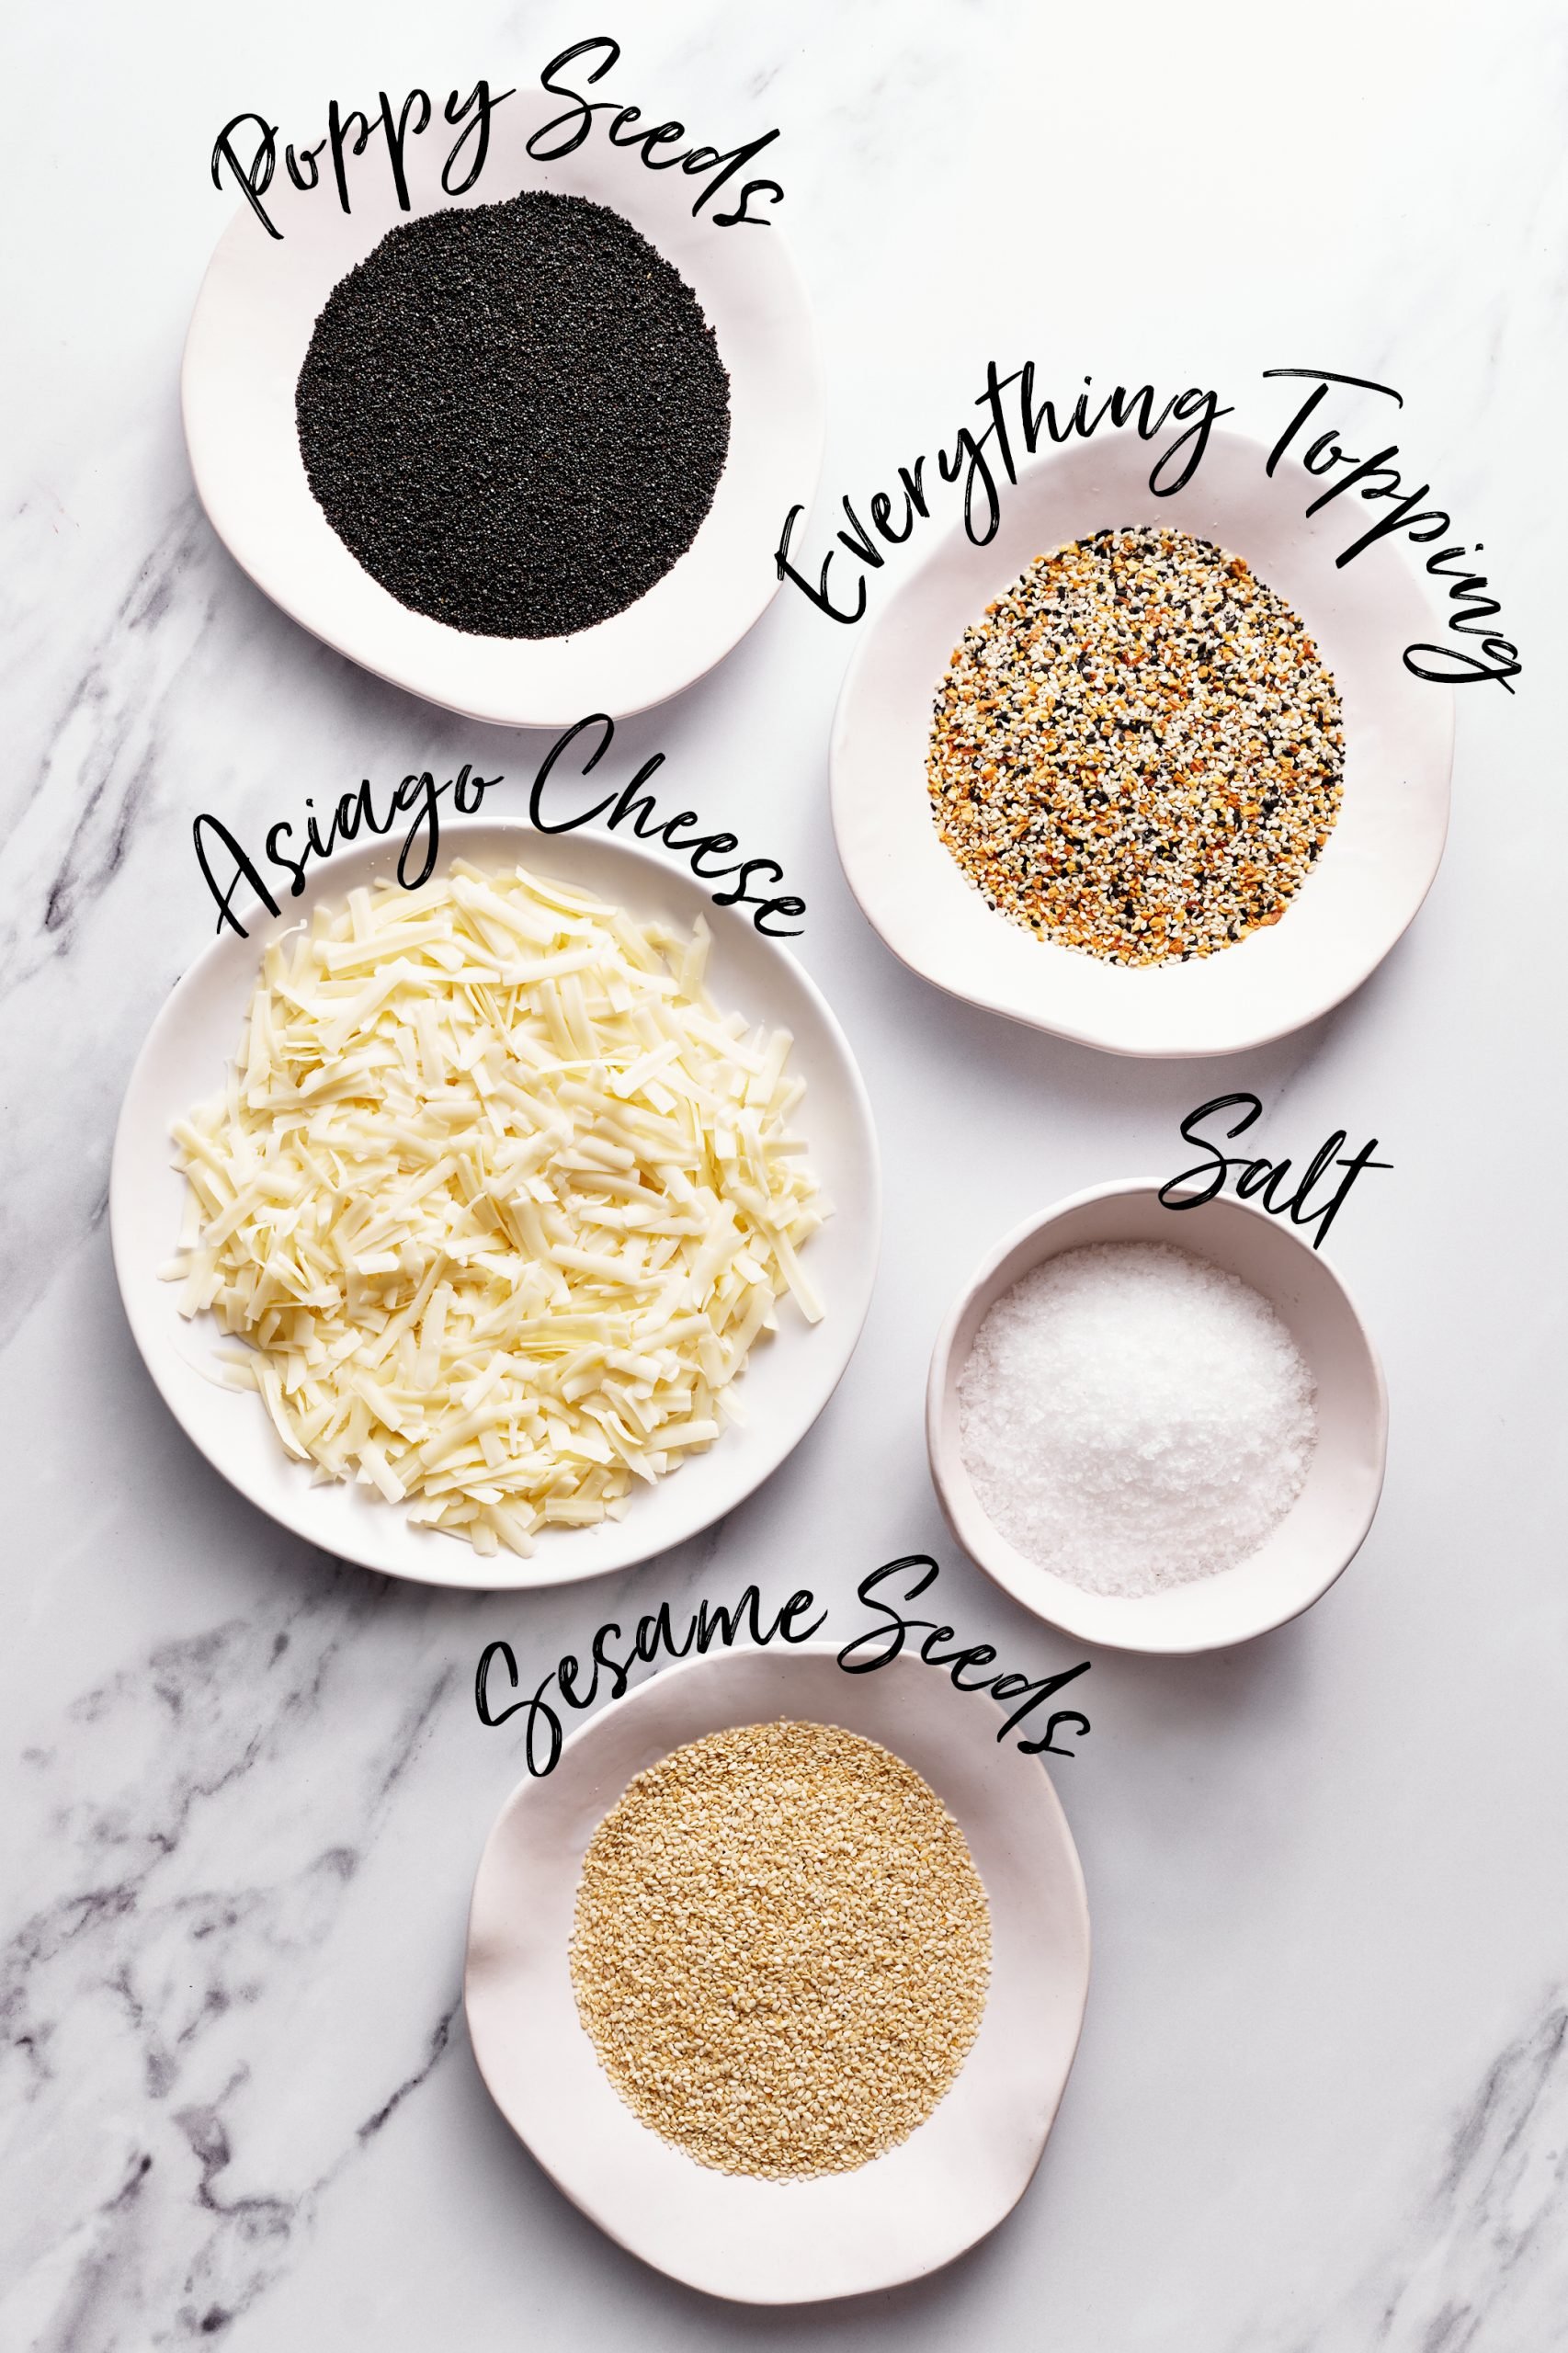
Basic Toppings
- Sesame seeds
- Poppy seeds
- Minced onion
- Coarse salt
Everything Bagel Topping
- 1 egg white, beaten
- 2 teaspoons poppy seeds
- 2 teaspoons sesame seeds
- 2 teaspoons onion flakes
- 2 teaspoons garlic flakes or 1 teaspoon garlic powder
- 2 teaspoons kosher salt or coarse sea salt
- 1 teaspoon caraway seeds
- Combine all ingredients and sprinkle over egg-washed bagels before baking.
- Find the full recipe + more tips on homemade everything bagel seasoning HERE.
Asiago Cheese Bagel Topping
- 10 ounces freshly grated Asiago cheese
- Make the recipe as instructed all the way until the water bath.
- Place the cheese in a shallow bowl.
- As the bagels come out of the water bath, immediately place them, one at a time, in the cheese.
- Turn to coat and press to adhere. Transfer back to the prepared baking sheet.
More Homemade Bread & Breakfast Recipes:
- Quiche Lorraine
- How to Make Crepes
- Homemade Cinnamon Rolls
- How to Make Buttermilk Biscuits
- The BEST Pancake Recipe
- Homemade Pizza Dough
- Classic Soft Pretzels
Email This Recipe
Enter your email, and we’ll send it to your inbox.
Ingredients
For the Dough:
- 6 cups (762 grams) bread flour
- 1 tablespoon (9 grams)
instant yeast* - 1 tablespoon (18 grams) fine sea salt
- 1 1/2 tablespoons (32 grams)
barley malt syrup or brown sugar - 2 cups (473 grams) lukewarm water

For the Water Bath:
- 2 quarts (64 ounces) water
- 2 tablespoons
barley malt syrup , or molasses or brown sugar - 2 teaspoons baking soda
For Topping:
- 1 egg white
- Desired toppings
Instructions
Prepare the dough:
- Combine all the dough ingredients in the bowl of a stand mixer fitted with a dough hook. Knead on medium-low speed for about 7 to 10 minutes (or knead vigorously by hand for 10 to 15 minutes). The dough will be stiff yet tacky and hold its shape without spreading. Place the dough in a lightly greased bowl, cover, and let rise until puffy but not necessarily doubled in size, about 1 to 1 1/2 hours.
Shape the dough:
- Punch down the dough and transfer to a clean work surface and divide into ten equal pieces. Roll each piece into a tight ball. Cover and let rest for 15 minutes.
- Starting with the first ball you formed, pierce one or two fingers through the center to form a hole. Twirl the dough around your fingers to stretch out the hole to about 1 1/2 inches in diameter. Repeat with the remaining dough balls. Place all shaped bagels on two greased parchment paper-lined half-sheet pans (5 bagels on each pan).
- Cover and let them rest for 45 minutes to 1 hour, or until visibly puffed but not doubled.
- Preheat the oven to 450°F.
Prepare the water bath:
- In a large wide pot, combine the water, malt syrup, and baking soda. Bring to a boil, then reduce heat to a gentle boil.
- Gently transfer bagels, two to four at a time (don't overcrowd the pot), to the boiling water. Cook the bagels for 1 to 2 minutes (2 minutes for a stronger crust and chew), gently flip them over, and continue cooking for 1 minute. Use a skimmer to remove the bagels back to the baking sheet and repeat with the remaining bagels. Beat the egg white with 1 tablespoon of water and brush egg wash on the smooth side of each bagel. Place your desired topping(s) in a shallow dish, and place each bagel, egg white-side down, onto the toppings to coat.
- Bake the two pans of bagels for 17-25 minutes, or until they reach your desired brown color and exterior crunch, rotating the pans and switching shelves halfway through. Remove the bagels from the oven and cool on a wire rack for at least 20 minutes.
- Uncut bagels can be stored up to 48 hours in a paper bag (or loosely wrapped in parchment), then sliced and briefly toasted to serve.
- To freeze bagels whole, wrap each in plastic then place in an airtight container. To freeze bagels sliced, slice them and place on a baking tray in the freezer until solid. Remove to an airtight container. Toast directly from frozen.
Notes
This post was originally published in 2016 and recently updated with recipe improvements and new photos. Photos by Joanie Simon.


I did watch the video! I used a slotted spoon. But I just think my dough was way too sticky the first time. This time was so much better!
Ok, so I used a little more flour when I was shaping the bagels and used the rope method to shape them and it made SUCH a difference! They look a lot more like bagels now, haha 🙂
Hi Tessa!
So how do you shape the bagels so beautifully? I found that because the dough was somewhat sticky, when I picked them up to shape them or put them into the water bath it stuck to my fingers and messed up their smooth shape. Please let me know, thanks!
Hi! Did you watch the video? Around minute 2:30 you can see how I got the raw bagels into the water 🙂
Hi I wsd wondering if there is a substitute for the barley malt? My son was recently diagnosed with severe allergies so im reluctant to use new ingredients and have started making my own breads as opposed to store bought. These bagels look amazing and Inwould love to make then for him!
Have not tried this but I believe you can substitute molasses for barely malt I think you just need less of it? But double check
Hi ! I am happy to find you and your recipe. I shall prepare the dough today to have fresh bagels tomorrow for breakfast. Since I carry food made at home for office lunch, it shall serve two purposes, if any left after breakfast 🙂 Thank you !
Lol – makes a lot of sense! (And I still use parchment – greased – on the baking sheet I bake the bagels on). I mainly do this because I’m lazy and don’t like clean up!
Responding to your reply on my comment about the parchment- I haven’t had sticking issues. I use one baking sheet lined with parchment for the final rest after I form the bagel, then put the bagels back on the same sheet after boiling. I then transfer to a fresh oil coated sheet for baking. Haven’t had any stick issues!
Sandy, I think you’re misunderstanding. I’m saying that if you place wet bagel dough on parchment and then bake it off on that same parchment, it’ll stick. You just said you transfer to a greased baking sheet for baking, so we’re not talking about the same thing 😉 Since this becomes quite confusing to describe, I just recommend people don’t use parchment so they don’t accidentally bake on it and have their bagels stick. Make sense?
Do you ever make your own bread flour using vital wheat gluten? I have a bag of wheat gluten in the freezer because I do not make enough bread to warrant having a bag of bread flour in my cupboard. I have not found a definitive ratio of gluten to AP flour to use. Have you made your own bread flour? Can you help me out?
I haven’t ever tried that 🙁
Thank you for sharing this recipe and Technics to make a GREAT BAGEL!
Hi Tessa – I can’t have malted barley in any form (I assume this is the same stuff you find in a lot of flours?). I’ve made bagels myself and they come out ok, just not that extra flavor from the malted barley! The recipe I use – rise, then punch down for 10 min and form into the balls. Immediately make bagel shape out of the balls (finger through middle). But I use parchment lined cookie sheet, with some oil spread onto the parchment, to rest them on for 10 min before boiling. Then I do same on another cookie sheet for baking. Why do you use silpat for the rest period vs parchment? Thanks so much!
I don’t use parchment at all when making bagels, because I don’t want to the dough to stick especially once the bagels have come out of the boiling water and they’re wet. If you place the wet boiled bagels on a parchment sheet then bake in the oven, the paper will bake onto the bagels and stick horribly.
I love the technique you applied in creating these bagels! But I’m wondering how to do them in the oven. Par boiled then baked off? Also; I’ve seen bagels with some toasted garlic on to that looks a lot like sesame seeds. Would you know where I might find those to use as opposed to garlic powder or salt?
I’m not sure what you mean by doing them in the oven? Did you watch the video and read the recipe? As for the garlic, it sounds like you’re talking about granulated garlic, which is available at many grocery stores, Costco, spice stores like Penzey’s, or online.
Do you know if the dough could be made in the evening and then put in the refrigerator over night? Or could the bagels be made as far as going through the water bath the night before? It would be lovely to have fresh-baked bagels in the morning.
Hi Bonnie, the dough can definitely be made and refrigerated overnight. It’ll rise slowly in the fridge. I haven’t tried to make the bagels ahead through the water bath step but I’m thinking that would work fine! Let us know how it goes if you try that 🙂