


Tessa Arias, Chef and Cookbook Author
This post may contain affiliate links. Read our disclosure policy.


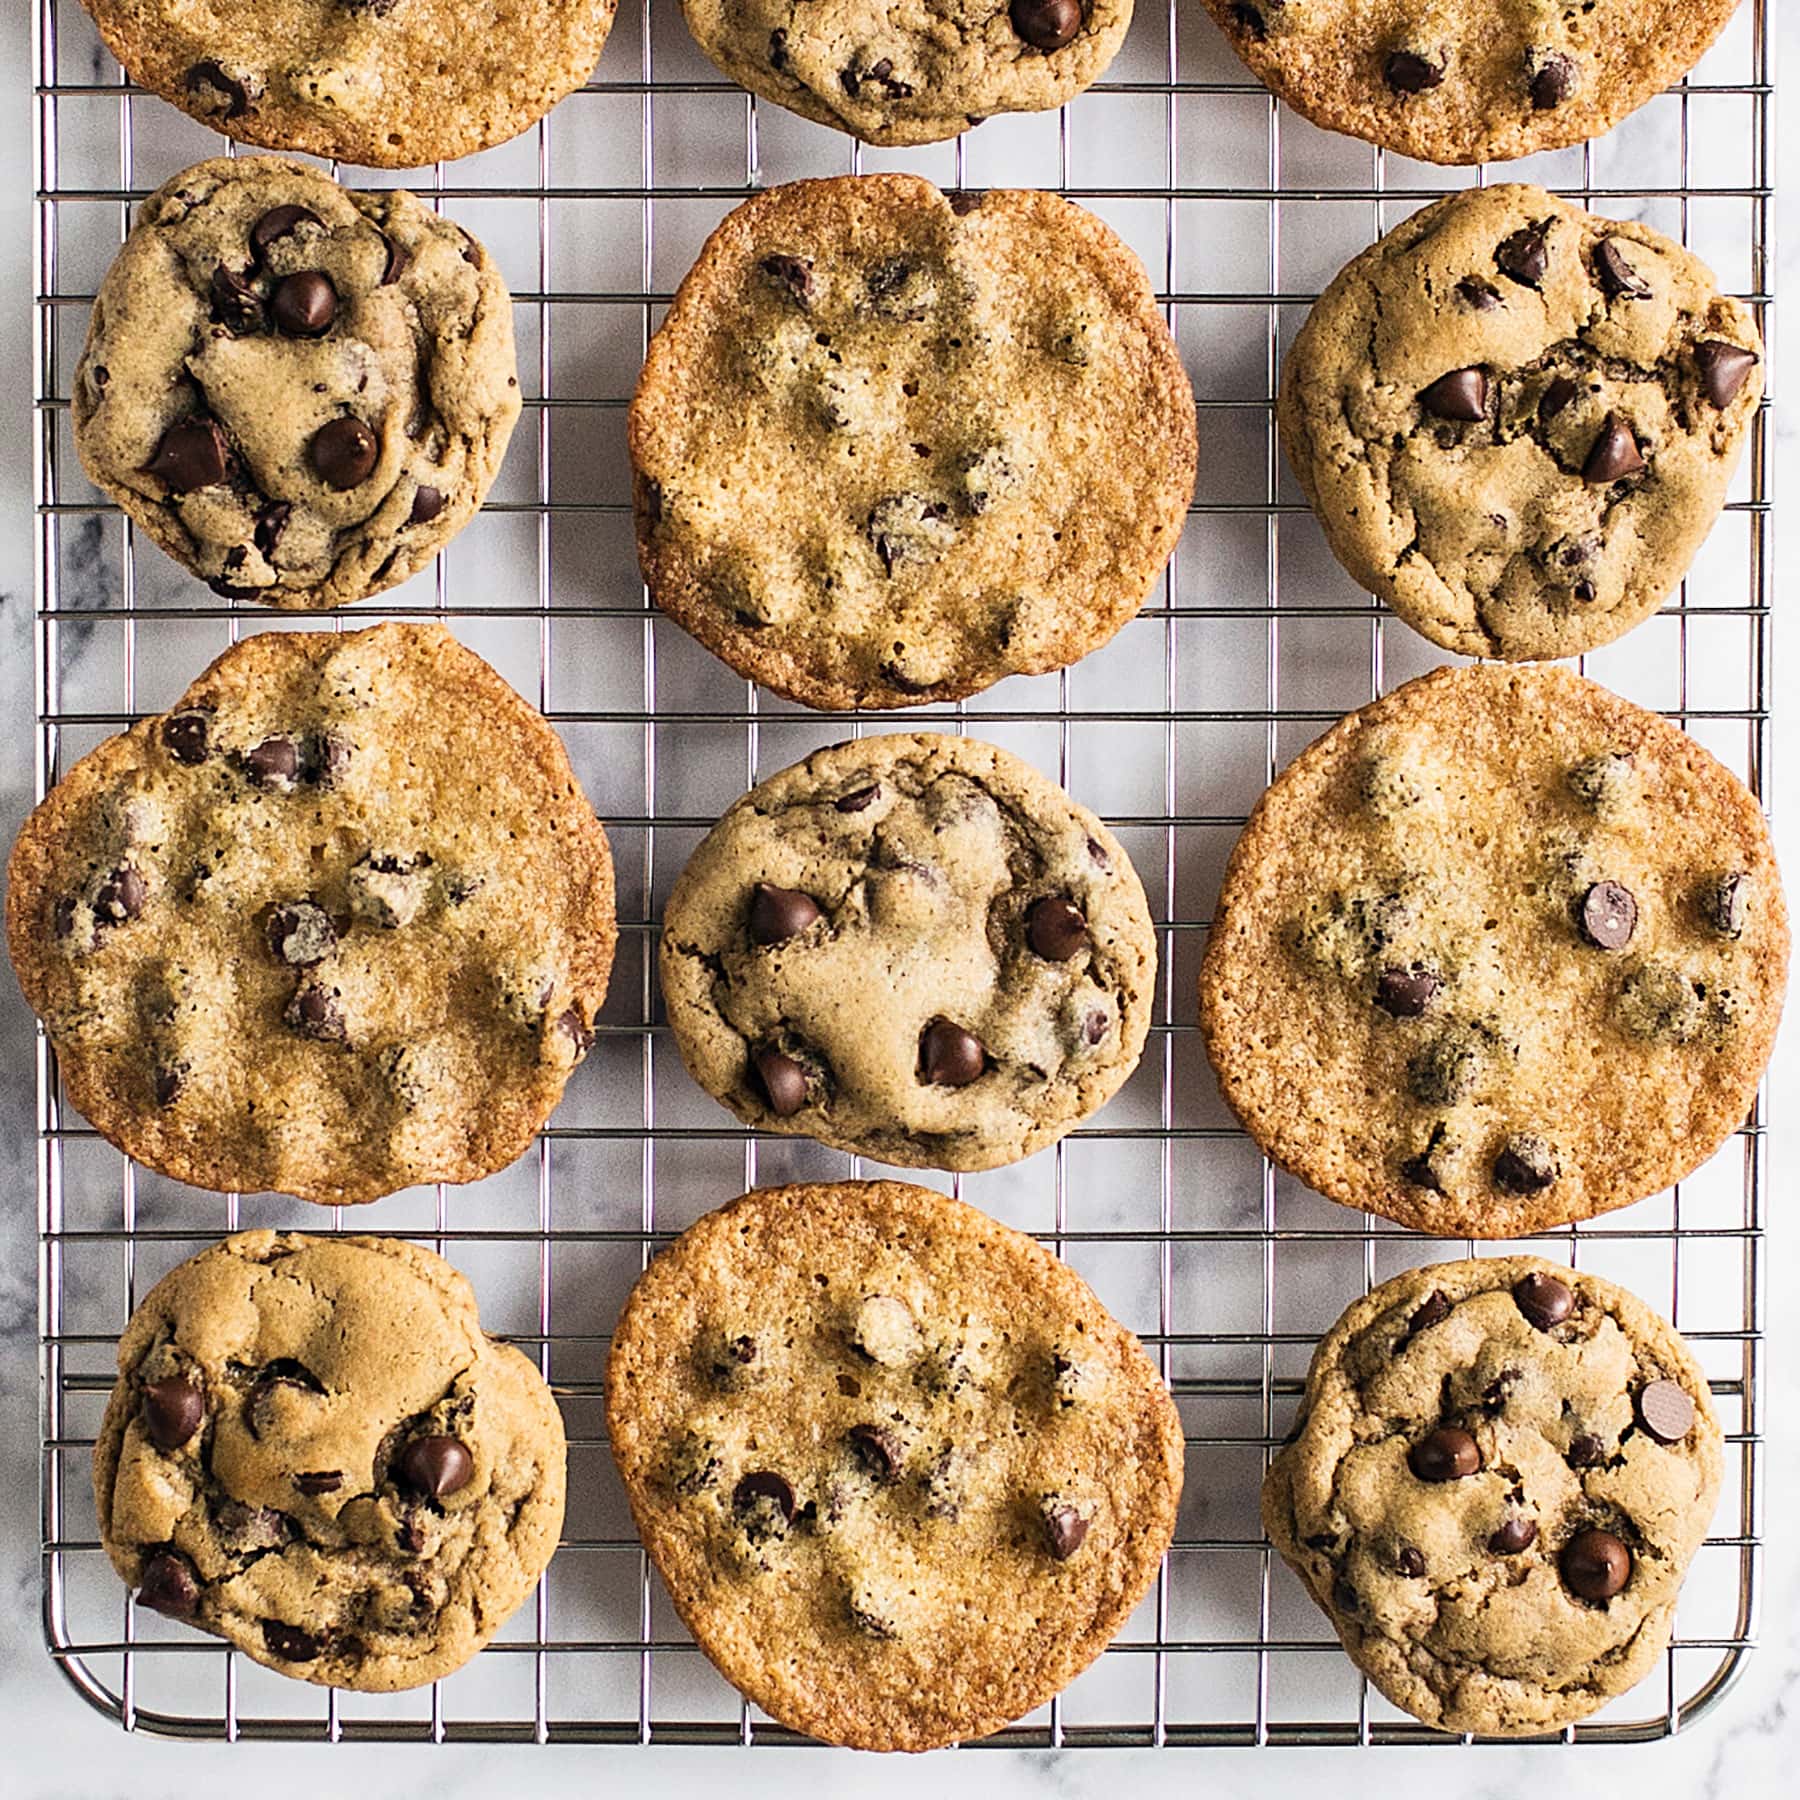
What makes cookies thick, fat, fluffy, and delicious? And why do some cookies come out flat, thin, and sad? Especially if you followed the recipe ‘to a T’ or if you’ve made them before with no problems!
If you’ve followed me for a while, you know my passion is diving into the Science of Baking in a fun and visual way.
It’s absolutely shocking how such simple variances in the baking process can result in such massive differences in the final product. Today I want to dive into how to bake THICK cookies that stay nice and fat, even after cooling.
Read through all my tips below to understand why your cookies come out unintentionally flat. I hope you find these tips helpful!

Sprinkle of Science
How to Bake THICK Cookies
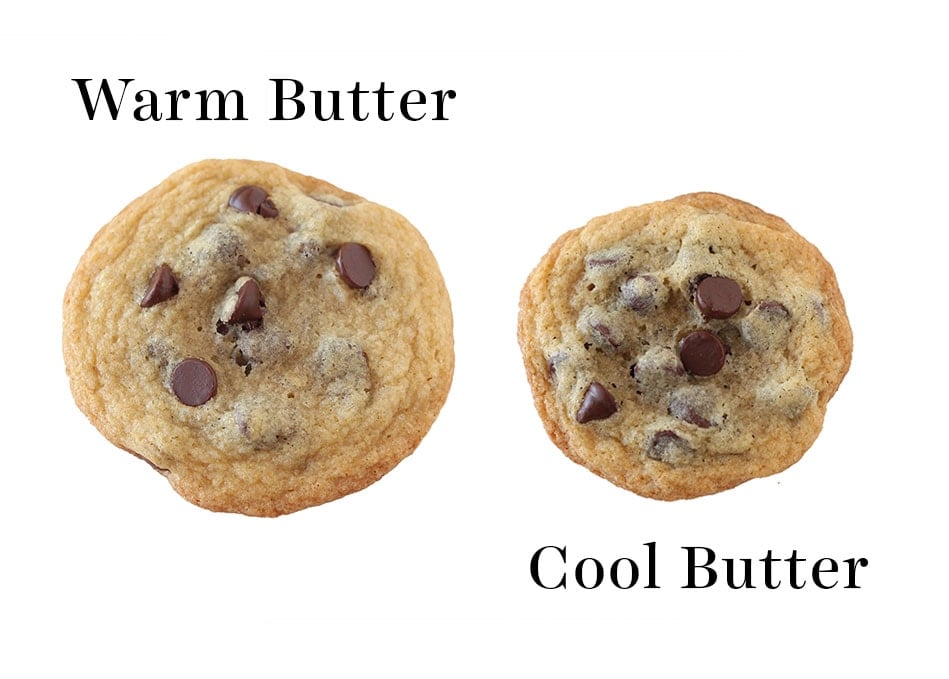
Use Butter at a COOL Room Temperature for THICK Cookies!
A common misconception is that your butter should be completely at room temperature when making cookies. Perfect room-temperature butter for cookie baking should:
- Give slightly when pressed with your finger, but still hold its shape
- Be flexible without breaking or cracking
- Be at a cool room temperature of about 67°F (or even a couple degrees colder is fine, especially if it’s hot in your kitchen)
Check out this picture below, where we baked the exact same cookie recipe, using the exact same ingredients, baking time, and temperature – the only difference was the temperature of the butter at the time of creaming. The cookie on the left used butter that was completely at room temperature, and the cookie on the right used cool room temperature butter at 67°F.
How to Bring Your Butter to Cool Room Temperature Quickly
- I recommend cutting your butter up into small cubes and spacing the cubes out slightly on a flat surface like a cutting board. This allows the butter to warm up evenly and more quickly, without overheating or melting.
- I don’t recommend using the microwave to soften butter for baking cookies, but if you must, use 50% power to ensure you don’t overheat it. Even slightly melted butter can result in overspread cookie puddles.
Chill Your Cookie Dough for THICK, Flavorful Cookies
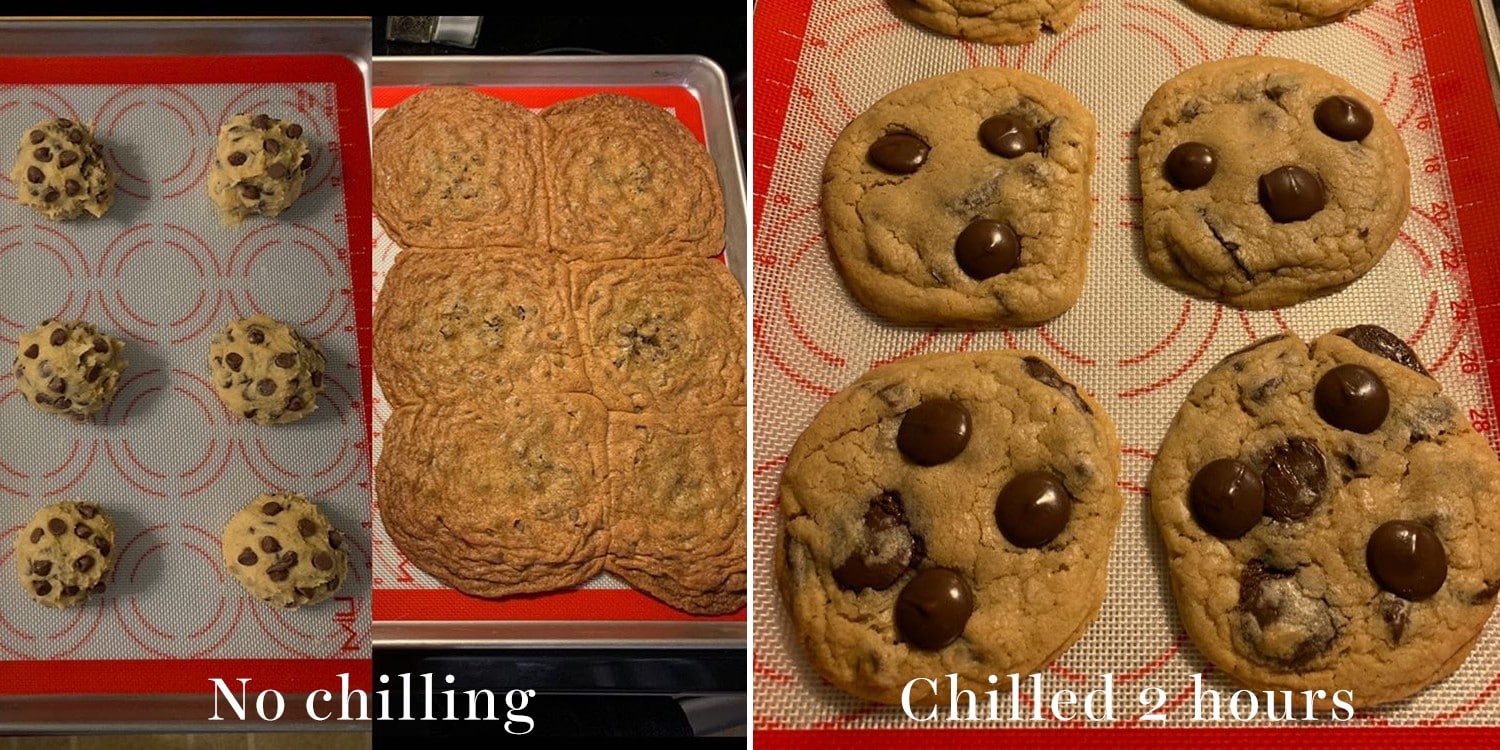
Chilling your cookie dough for at least 24 hours or up to 72 hours does magical things to your cookies, and is one of the best tricks for baking thick cookies. Think of this like a “marinating” period. Not only will the flavors intensify, but the texture will also improve, so your cookies will bake up beautifully thick and chewy. This is due in part to flour having a longer period to absorb the moisture within the dough. Learn more about chilling your cookie dough here!
@MeganBush9 on Instagram had flat puddle cookies that were fixed simply by chilling the dough for 2 hours. Look at the results:
Briefly Freeze Your Cookie Dough Balls
While freezing won’t give you the same magical benefits as chilling your cookie dough, it’s beneficial if it’s a hot day, or if you’re baking multiple trays of cookies one at a time. Take your sheet of cookie dough balls and pop it in the freezer while your oven preheats, about 20 minutes. This will help prevent excess cookie spreading. As the first batch bakes, if you leave the remaining dough sitting on the counter, it will continue to get warmer and warmer, resulting in more spreading and thinner cookies.
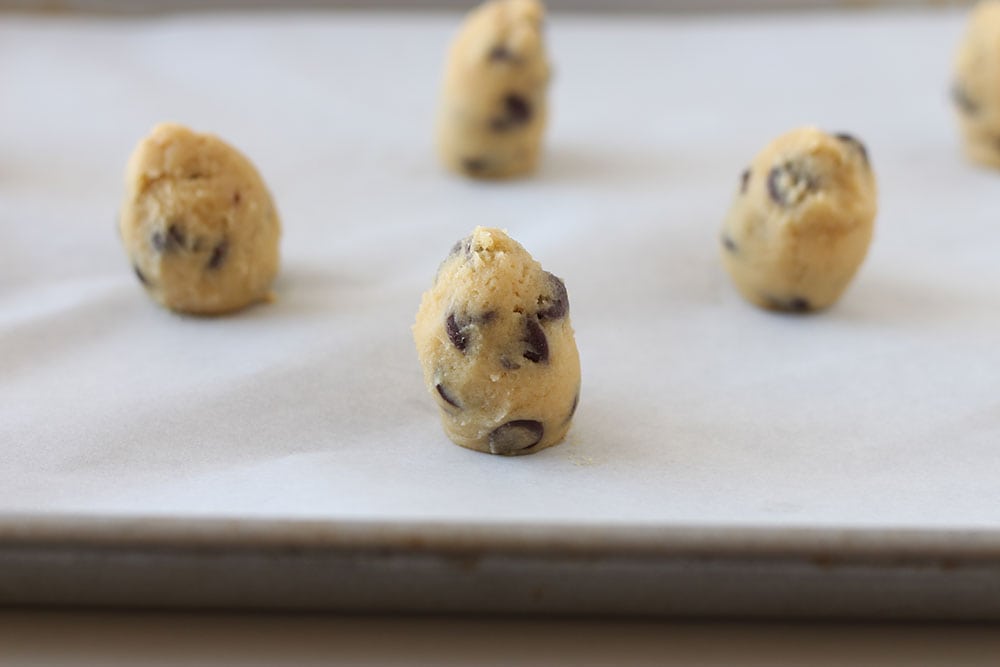
Thick Cookie Shaping Trick: Scoop Tall Mounds of Cookie Dough
Shaping tall mounds of dough (as shown in the picture below) instead of balls or discs before baking can prevent too much spreading and result in thicker cookies.
Decrease Moisture for Thick Cookies
If you live in a humid environment, you may have problems with cookies spreading and flattening too much – especially in the summer months. Even if it’s not a particularly humid day, the moisture can actually seep into ingredients like flour and remain there for a while.
Flat cookies can also happen at high altitudes. King Arthur Baking has a great guide on tips for baking at high altitudes.
I live in Phoenix, which is a very dry climate at sea level. A cookie dough recipe that turns out perfectly for me here may end up a little too “moist” and flat for those of you in humidity or at a high altitude.
Here’s what to do:
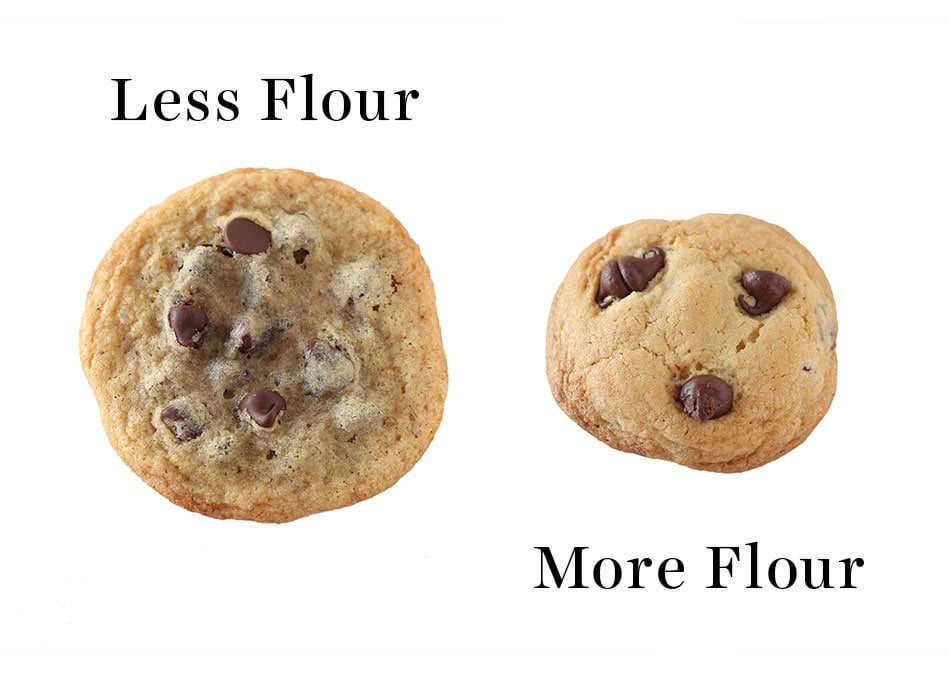
Add More Flour to Decrease Moisture
Start with 2 tablespoons extra flour and go from there. When I’m unsure about how a tweak will affect my cookies, I’ll just bake off a few cookies initially, let them cool, and then see if the dough needs even more flour. Play around until you get it right! Then you’ll have an idea of what works in your kitchen specifically.
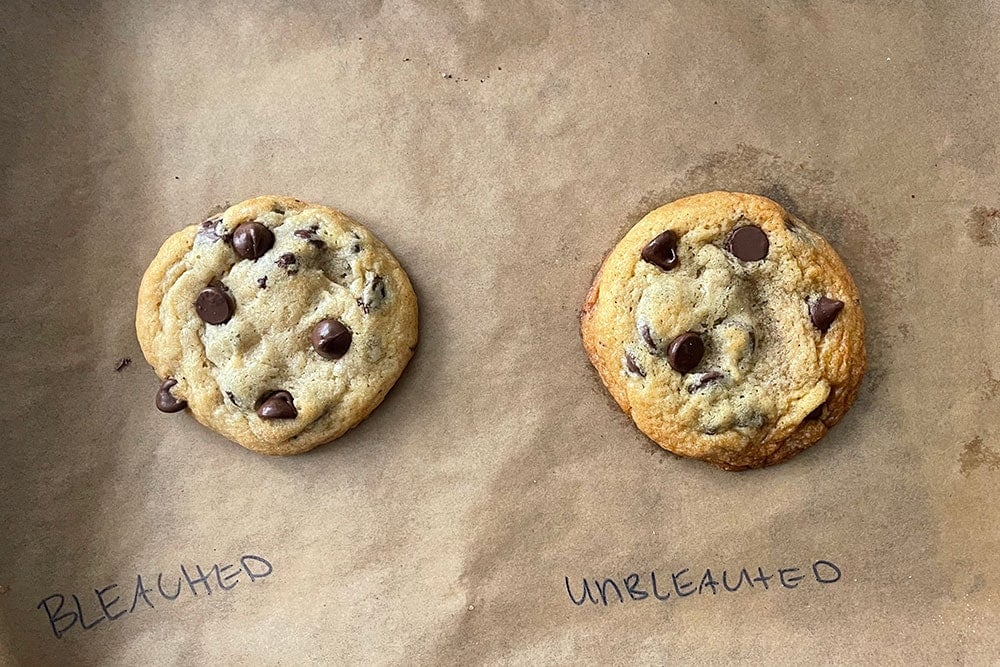
Try Bleached Flour (Instead of Unbleached)
Bleached flour absorbs more moisture than unbleached flour, making for THICK Cookies. If you struggle with your cookies spreading out more than you want, try using bleached flour.
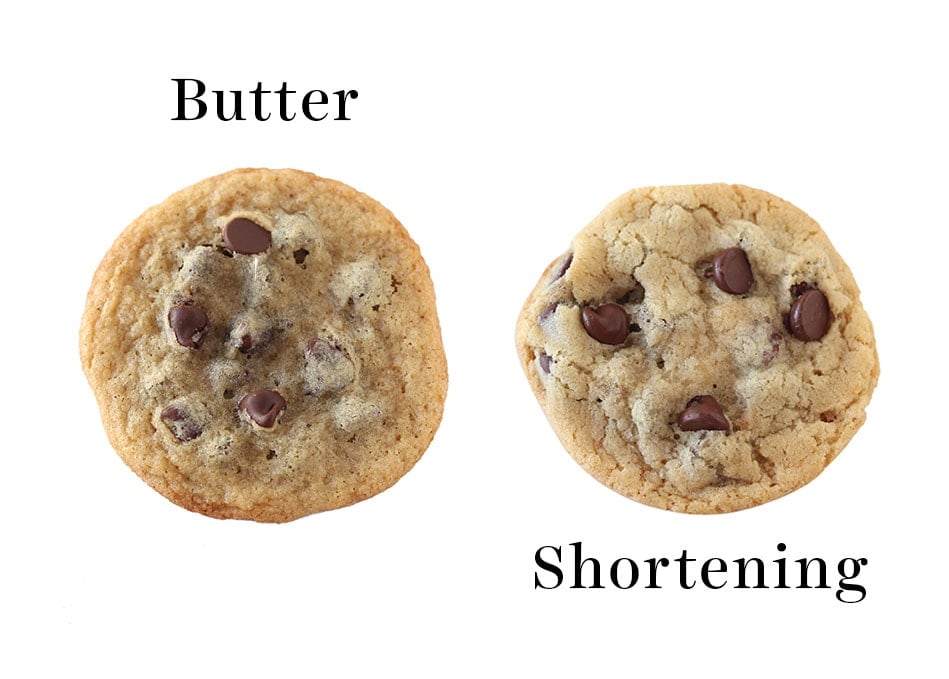
Try Using Shortening Instead of Butter
Shortening is not my favorite ingredient – but where butter contains about 15 to 20 percent water, shortening is pure fat. This will reduce spreading. If you’d like to get the best of both worlds (the delicious taste of butter and the texture of shortening), use half shortening and half butter in a recipe.
Use Less Granulated Sugar and More Brown Sugar
This might seem contrary to the above section since brown sugar has more moisture than granulated sugar, but cookies made with all granulated sugar will actually spread more than cookies made with all brown sugar. So, feel free to tweak the ratio of brown to white sugar in the recipe you’re using to help reduce spread and increase thickness.
Pay Attention to Your Baking Pans!
Take a look at the picture below. Each cookie came from the same exact batch of dough, baked for the same amount of time, at the same temperature. The only difference was the baking sheet each cookie was baked on. Crazy right?!
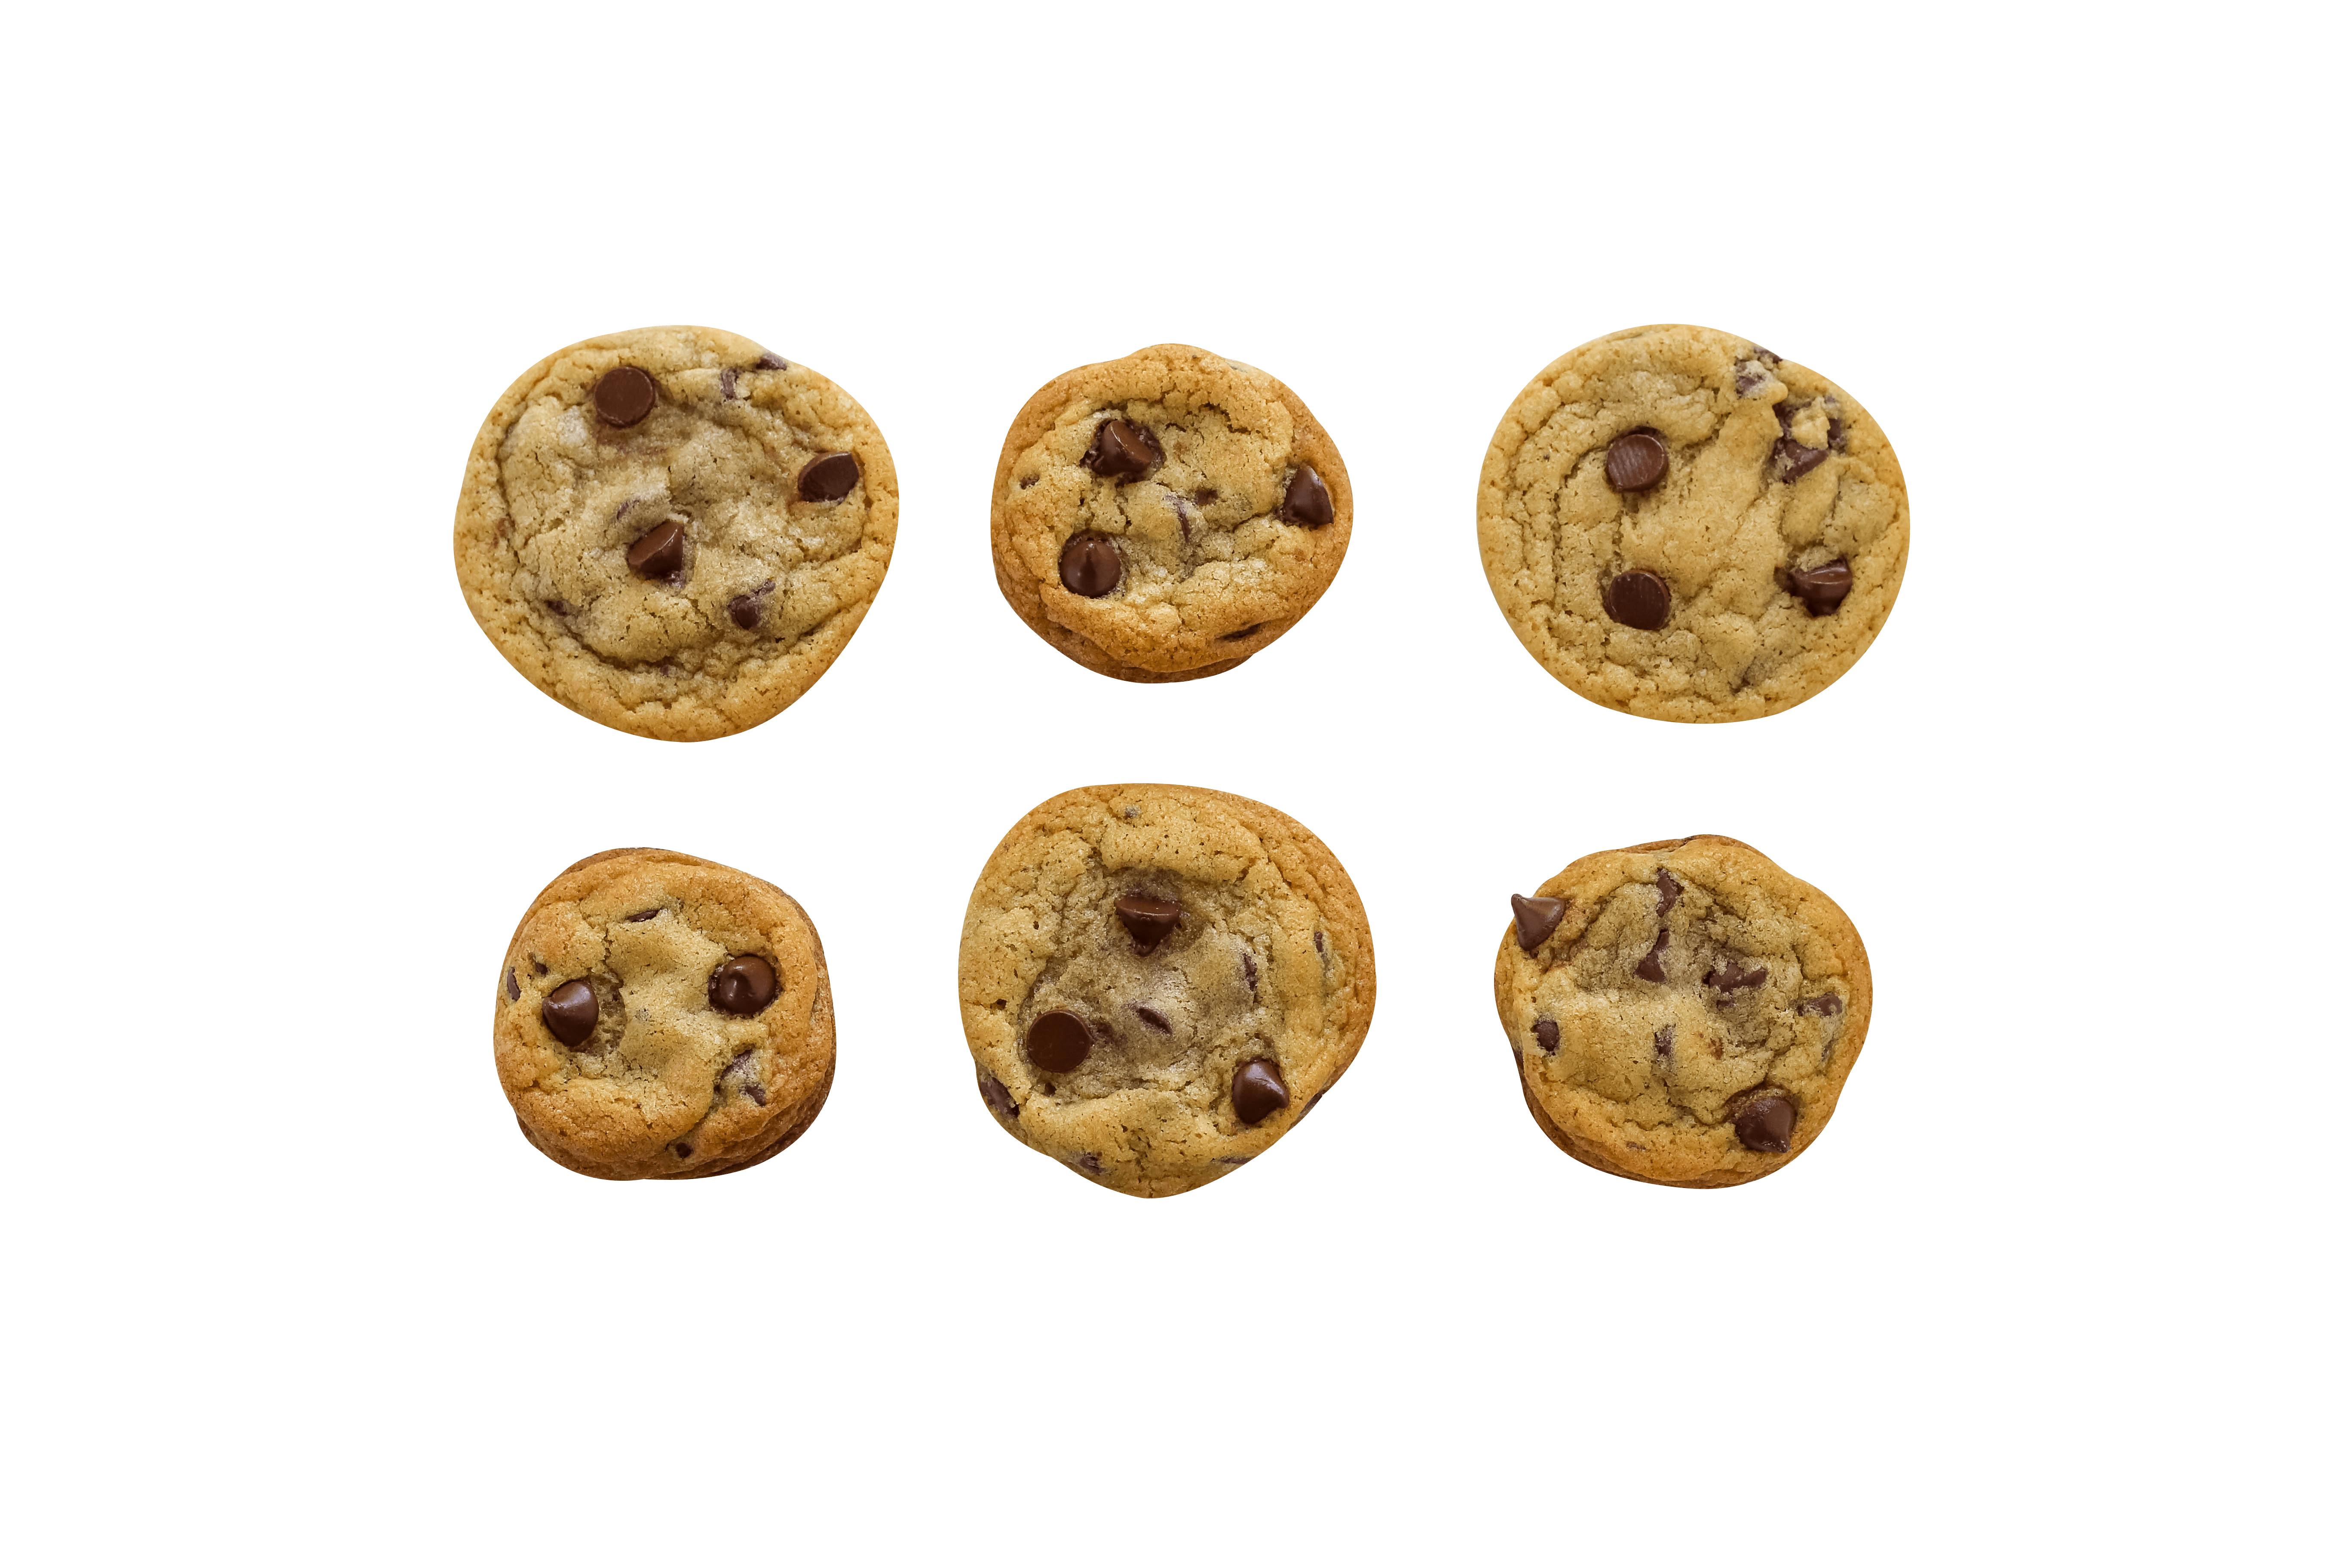
If you want to check out my full Best Baking Pans article (and see the bottoms of these cookies, which are all SO different!), click here. But when it comes to baking thick cookies, here are my baking pan tips:
Use Quality Baking Pans
Thin, flimsy, or cheap baking pans won’t conduct heat efficiently. This can negatively impact the texture of your cookies. These are my favorite half-sheet pans to bake with. If you’re still having issues with uneven cookie baking, try baking just one pan at a time on the center rack of the oven.
Allow Your Pans to Cool Completely
Never place cookie dough on a pan that’s still hot from the oven. This will cause the butter to start melting before it has even hit the oven! Always allow your baking sheets to cool completely between batches. You can speed this up by running your pan under cool water (wearing oven mitts!). Or, just invest in multiple high-quality baking pans so you can whip up batches quickly.
Never Grease Your Baking Pan
I always use parchment paper to bake cookies. I personally prefer it over silicone baking mats, but either will do. Just never use nonstick spray when baking cookies. And if you’re making multiple batches on the same pan, clean off any grease from the previous batch that might remain on the pan. Excess grease will result in excess spreading.
Check Your Oven
Did you know that most ovens are lying to you about the temperature they’re actually at?! Many home ovens are off by 15 degrees or more. This might not seem like a big difference, but it has a huge impact on your baking. Here’s why oven temp matters so much:
- If your oven is running too cool: Your cookies are baking at a lower temperature than they should be, causing the butter to melt slowly and potentially over-spread your cookies. It can also mean your cookies stay pale and don’t achieve any crispness around the edges.
- If your oven is running too hot: Your cookies are baking at a higher temperature than they should be, which can cause the cookies to dry out, over-brown, over-crisp, or even burn on the bottom.
- An oven thermometer can be your best friend in the kitchen, to make sure your oven is heating correctly.
- Learn more of my oven tips in my Oven 101 article here.
Cookie Collapsing Troubleshooting
Don’t Over-Beat the Butter and Sugar!
Over-beating your butter and sugar can incorporate too much air into the dough, so the dough can’t hold onto all that air. The structure will weaken, and the cookies will collapse as they bake or cool. Overbeating can also warm up the butter, which further increases spread.
If you’ve ever had cookies bake up perfectly in the oven, then deflate as they cool, try beating your butter and sugar for only 2 minutes. Cookies don’t need as much creaming time as cake. Learn more about creaming butter and sugar here!
Check Your Leaveners
Did you add too much, or use expired baking powder and/or baking soda? Too much chemical leavener can cause the cookies to deflate, and expired leavener won’t work at all to raise the cookies. Also, baking soda specifically aids in spreading and browning. Learn more about the differences between baking soda and baking powder, and how to test for freshness, here.


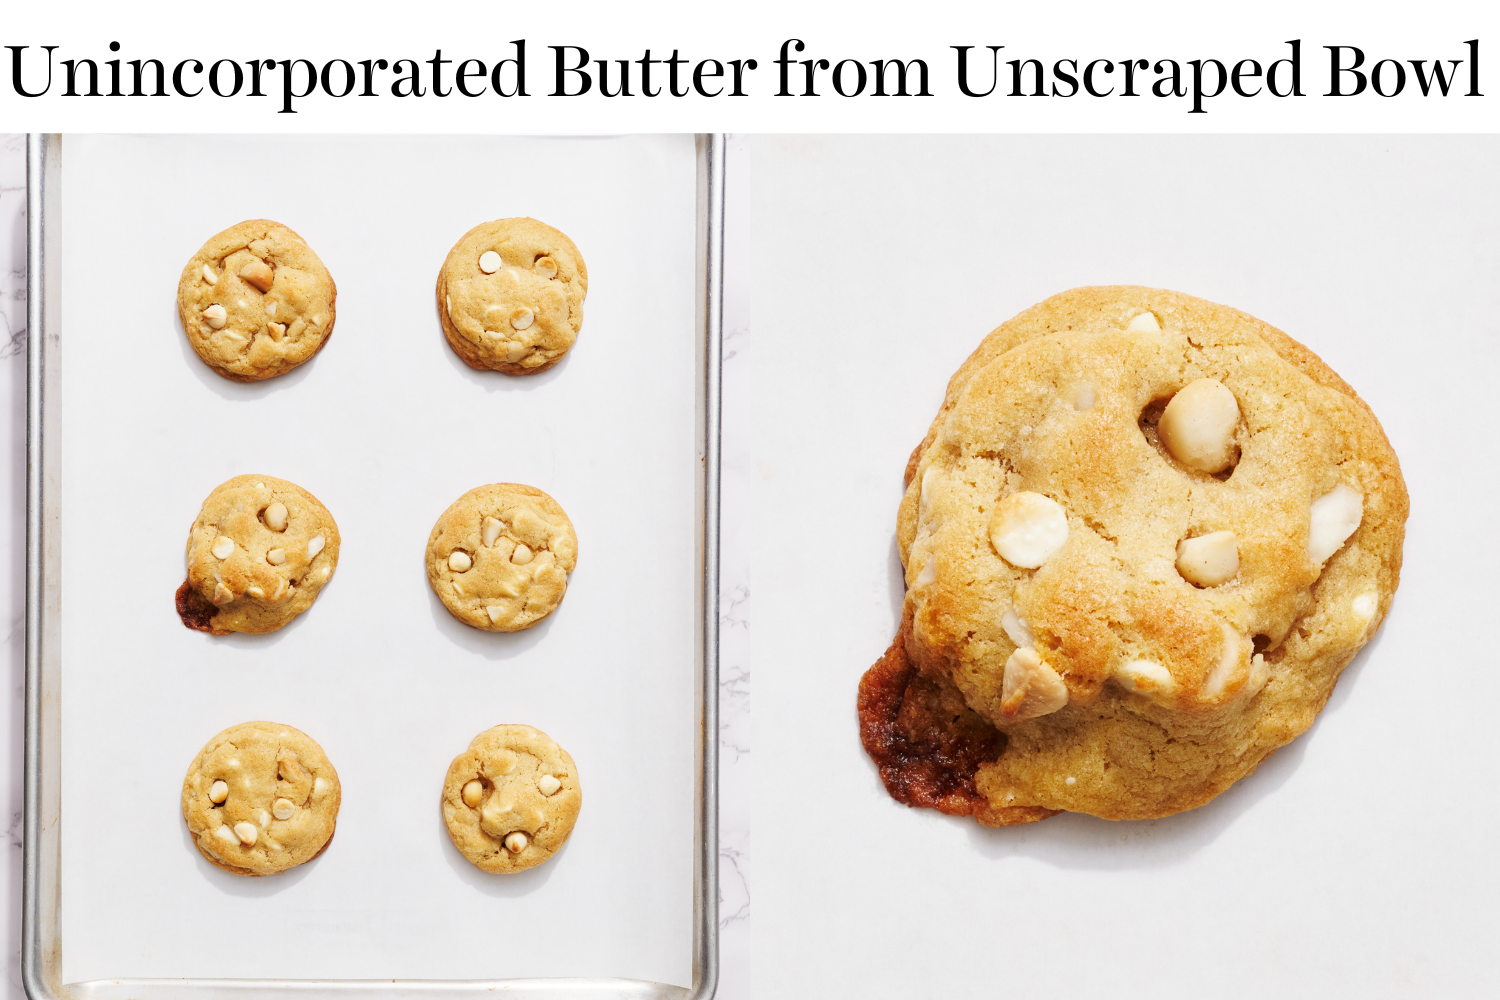
Bonus Tip for Perfect Cookies
Make sure all of your butter is incorporated and there are no pockets hidden at the base of your mixing bowl! If I’m not careful about scraping down the sides and bottom of my mixing bowl, even if I’m using one of those paddle attachments that scrapes as it goes, I usually end up with a few cookies from the bottom of the bowl that look like they exploded out one side in the oven. This is due to pockets of unincorporated butter!
How to Rescue Flat Cookies
If your cookies turned into absolutely flat puddles of nothing while baking, try chopping them up and mixing them into ice cream.
If your cookies turned out just a little flatter than you’d like, grab a round cookie or biscuit cutter that’s just slightly bigger than the cookie’s diameter. Run the cutter around the cookie to re-shape them into perfectly round, thicker cookies. Do this as soon as they come out of the oven, while they’re still hot and moldable. Watch this trick in action over on my Instagram page here!
My Favorite Thick Cookie Recipes:
- Bakery Style Chocolate Chip Cookies
- Soft & Chewy Sugar Cookies
- Peanut Butter Chocolate Chip Cookies
- Browned Butter Toffee Chocolate Chip Cookies
- Glazed Lemon Cookies


I have been baking for many years and this has been a very helpful article. I can’t wait to make those cherry white chocolate chip cookies I made that turned out so flat you could see through using your tips. Love this blog.
Hi Marsha! Thank you so much for the feedback – I’m so happy you found Tessa’s tips so helpful! Happy baking 🙂
I wonder about filled in cookies, I’ve seen them in bakeries here in Barcelona and online but never found a recipe to try and make them
https://www.instagram.com/sugarpastrycompany/p/CQ84eLih5iB/?utm_medium=copy_link
Like this shop that is about to open…
Thanks in advance
Hi Ana! That link doesn’t take me anywhere, do you mean how to bake cookies with a filling inside, like our Fudge Filled Cookies?
Similar but their are sooo big, that one of the things that comes to my mind when I see this kind of cookie is that it has to be undone in the core of it. I’m curious because only tried once as it is still difficult to find many bakeries of this kind in Barcelona and more in those turbulent times.
Anyway I’ll keep digging and investigating while enjoying your blog and recipes ☺️❤️
Thanks!!
Gotcha! You might be interested in checking out Cupcake Jemma on YouTube. She’s one of my absolute favorites and actually has a few videos regarding some amazing stuffed cookies. I think it’s just what you’re looking for. Here’s a link!
I can’t see here your last answer bit I did on my email, thanks for the reply and… Yes!! Cupcake Jemma and NY style cookies are the perfect answer.
Love these tips ! Especially to refrigerate the dough at least 2-24 hours or add more flour and brown sugar versus granulated
Can’t wait to
Try on my molasses cookies
Can I use shortening instead of butter?
What if you don’t have room in your freezer to put in a sheet? I don’t even have room for a half-sheet. I scoop balls first because I have such a difficult time getting the dough to room temperature enough to scoop it, chill them in the ‘fridge for about 24 hours, and leave them in the fridge between batches. I know you recommend chilling the dough for at least 24 hours before scooping it and putting it into balls, but this works best for me.
Have you experimented with oat flour in addition to or instead of wheat flour in a chocolate chip cookie? I was wondering if this would make a chewier and thicker cookie. Also the oat flavor might be nice.
Love your advice. I, too, prefer parchment. I crinkle (or wrinkle)it to make it lay flat. M R
i have singed up for several of guides etc… EX: Download my FREE Cookie Customization Guide here. I have NEVER gotten any of them sent to me.
Great article! I know some info but not all. Very helpful 🙂
Thanks for sharing this recipe as I badly wanted this one. As the weekend is near will ask my mother to try it at home.
Wow, I’m making so many mistakes…not cooling the batter, using warm butter, putting the dough on warm cookie sheets. Thanks for the tips, I’ll definitely try these come winter cookie season!
What brand of parchment paper do you use? Some parchment paper tends to be too oily after baking.