


Tessa’s Recipe Rundown
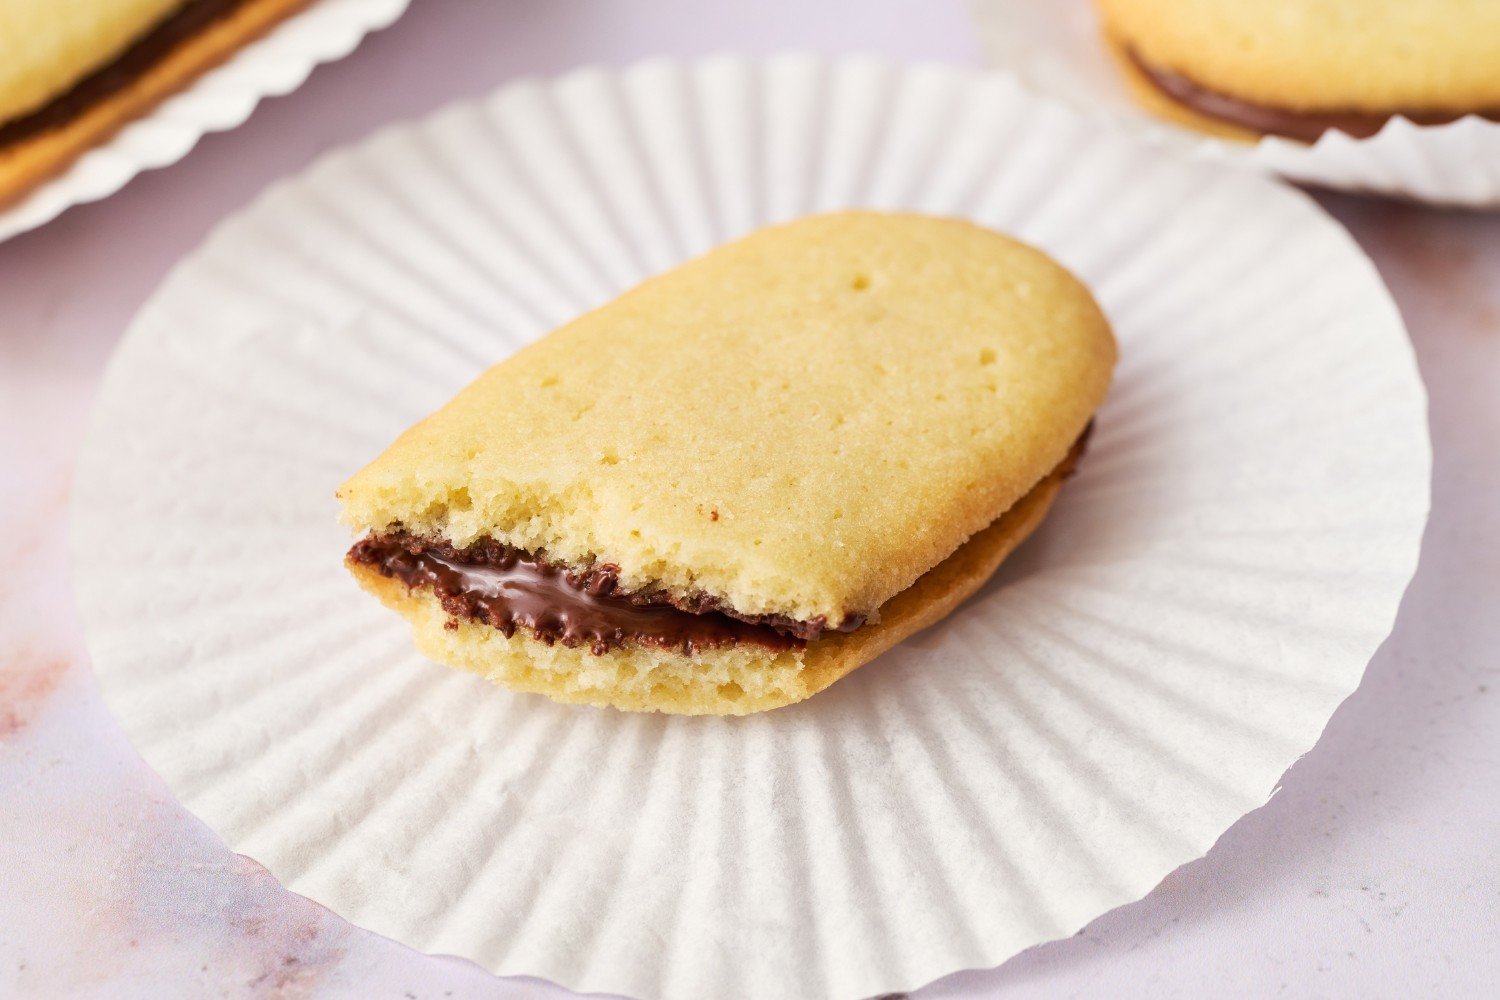
Taste: The cookies are buttery and perfectly sweet without being cloying, pairing beautifully with the rich semisweet chocolate filling.
Texture: The cookies are slightly crumbly and almost shortbread-like in texture, while the chocolate is super smooth.
Ease: So quick and easy. This would be a fun recipe to make with kids!
Pros: Impressive and scrumptious.
Cons: A little messy to assemble, but an offset spatula makes it much easier.
Would I make this again? I have made these countless times!
This post may contain affiliate links. Read our disclosure policy.


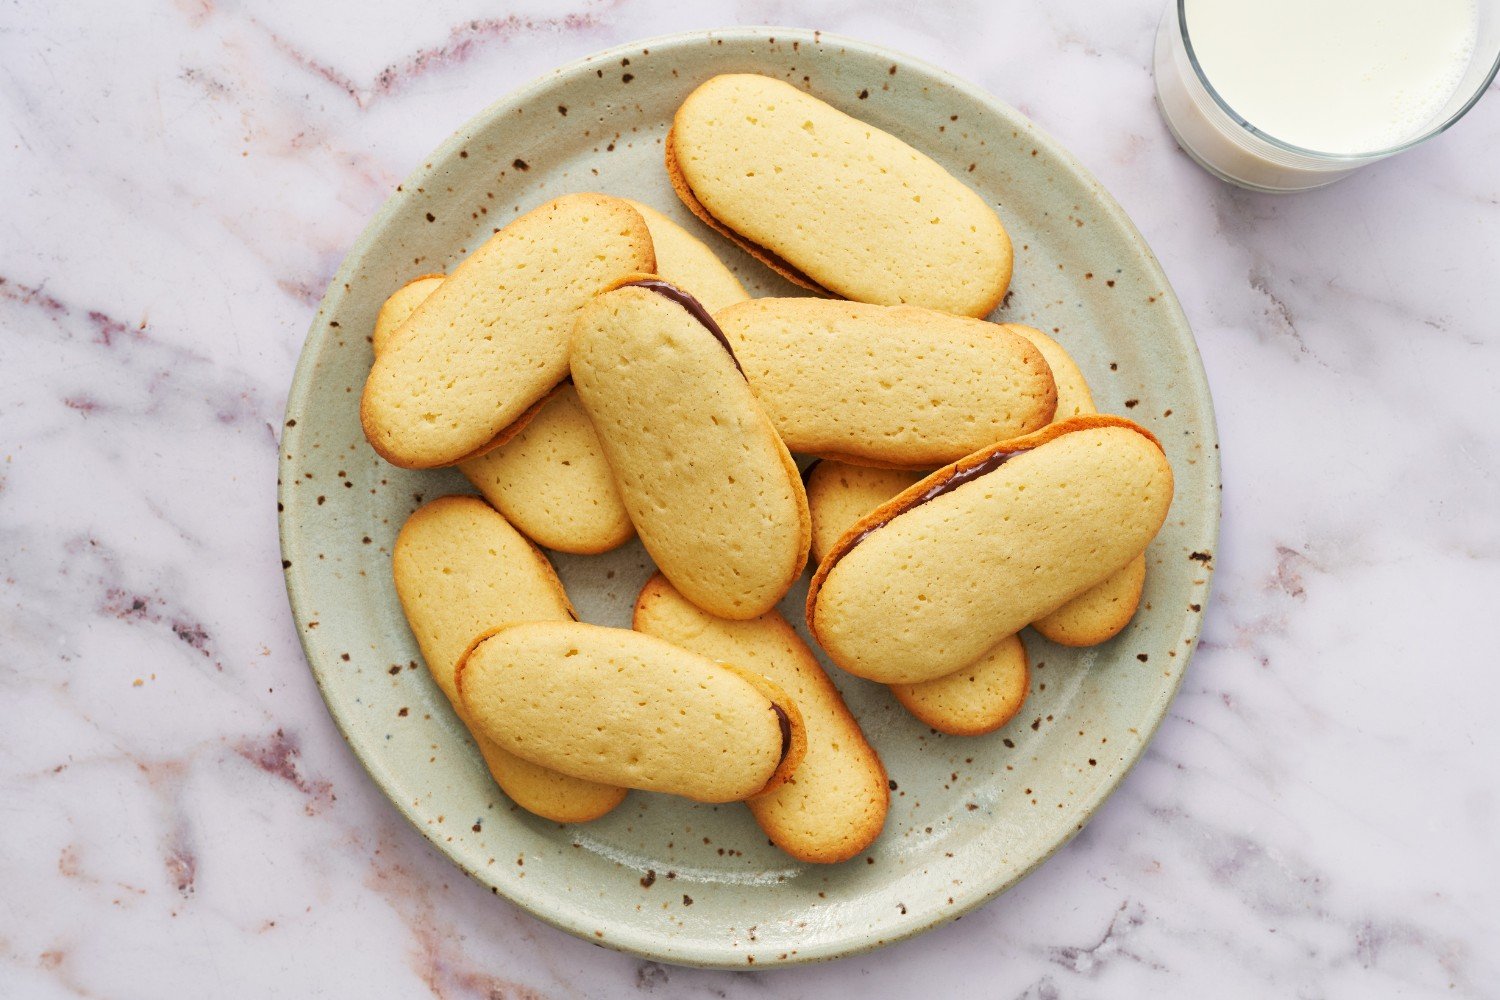
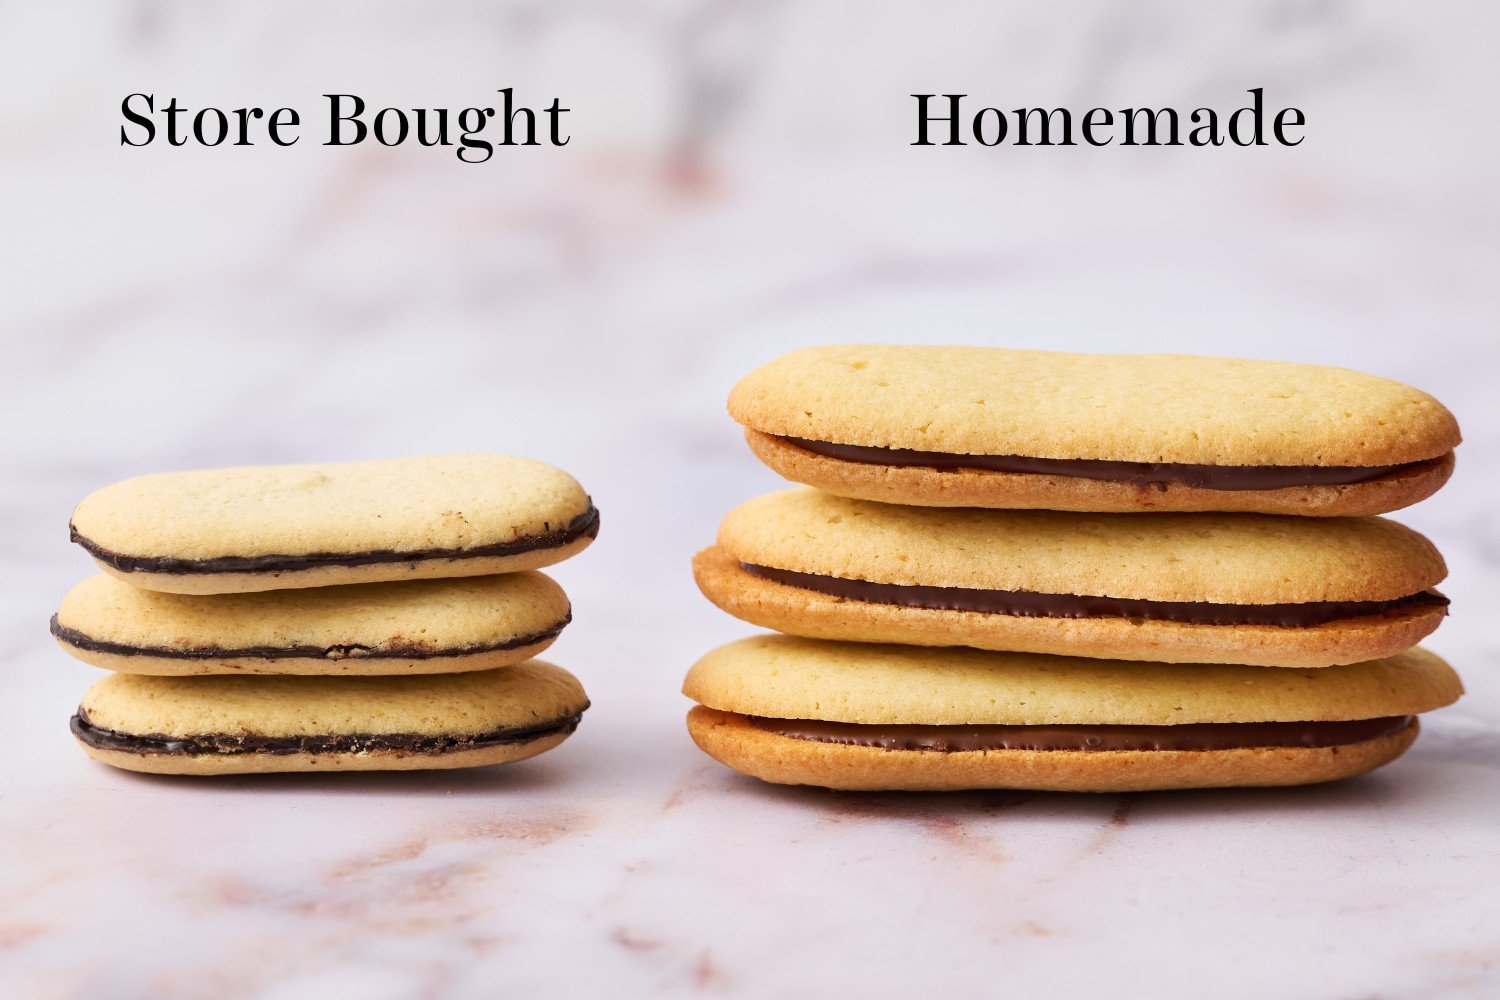
Say goodbye to store-bought Milano Cookies and hello to an easy homemade version that’s not only twice the size but infinitely more delicious!
I’ve loved Milano cookies since I was a kid, especially the peppermint variety. It was always such a treat!
I began creating copycat versions of my favorite childhood snacks years ago. There’s something special about taking a store-bought item and creating a homemade version. It’s a fun challenge every time to recreate and improve on the originals.
I have several fantastic copycat recipes already – like my Homemade Oreos, my Cosmic Brownies, and even Copycat Olive Garden Breadsticks.
These Copycat Milano Cookies are like little bites of nostalgia. And the best part? They’re so easy to make!
Since the Mint Milanos are my favorite, I was most excited to recreate those – but you can customize them to your own favorite flavor. You’ll be the hit of the party with these babies!

Sprinkle of Science
How to Make Homemade Milano Cookies
What are Milano Cookies?
Sold commonly in grocery stores across the U.S., Milano Cookies are deliciously buttery oval-shaped cookies that are sandwiched together with a layer of chocolate. Based on Italian-style cookies, the cookie itself is a little crisp, slightly crumbly, and somewhat shortbread-like in texture. They are available in a wide variety of flavors, such as Peppermint Chocolate, Orange Chocolate, Raspberry Chocolate, and Milk Chocolate. The same cookies are known as Monaco Cookies in Canada.

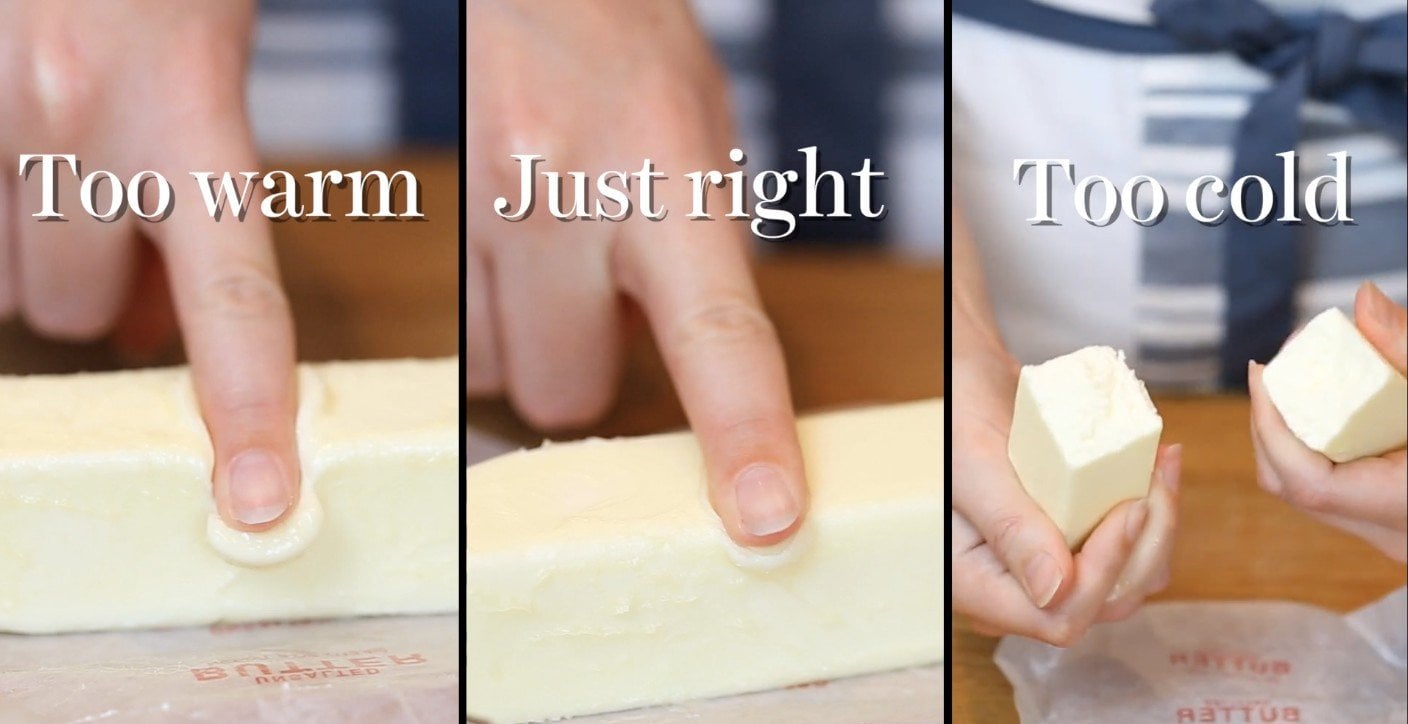
Butter Temperature is KEY
It’s important to avoid getting your butter too warm to prevent your cookies from overspreading. About 67°F is perfect. Use an instant-read thermometer for accuracy, but if you don’t have one, see the image below to learn how to tell when your butter is the perfect temperature for creaming.
Measure Your Flour Correctly: Important for PERFECT Milano Cookies
Measuring your flour correctly is essential to ensuring these Milano Cookies have the perfect texture, spread evenly while baking, and taste amazing. I highly recommend using a digital kitchen scale to weigh your flour, but if you don’t have one, use the spoon-and-level method to measure your flour. This ensures that you don’t accidentally compact too much flour and end up with cookies that are dry, hard, or otherwise lackluster.
No Leavening Agent?
Much like shortbread and other similar cookies, these Milano Cookies don’t contain baking powder or baking soda. Their only leavening comes from creaming the butter and sugar together. Learn more about creaming butter and sugar here.


Don’t Reduce the Sugar!
It might seem simple to reduce the sugar to cut down on sweetness, but reducing sugar actually has a big impact on the texture of your cookies. Learn more about sugar’s role in baking here.
Milano Cookie Flavor Variations
- I opted to make Peppermint Milanos using peppermint extract (not mint extract, which can taste like toothpaste), but feel free to experiment with other extracts to make other Milano flavor variations.
- I haven’t tested anything but peppermint, but orange or raspberry would be delicious – just keep in mind that extracts may vary in strength, so start with less and add a little more as needed, to taste.
- Simply omit the mint layer if you prefer the plain chocolate variety.
- You can also use dark chocolate, milk chocolate, or white chocolate if you prefer.
Can I Double This Recipe?
Yes – simply double all ingredients to yield 24 sandwich cookies. No other modifications needed.
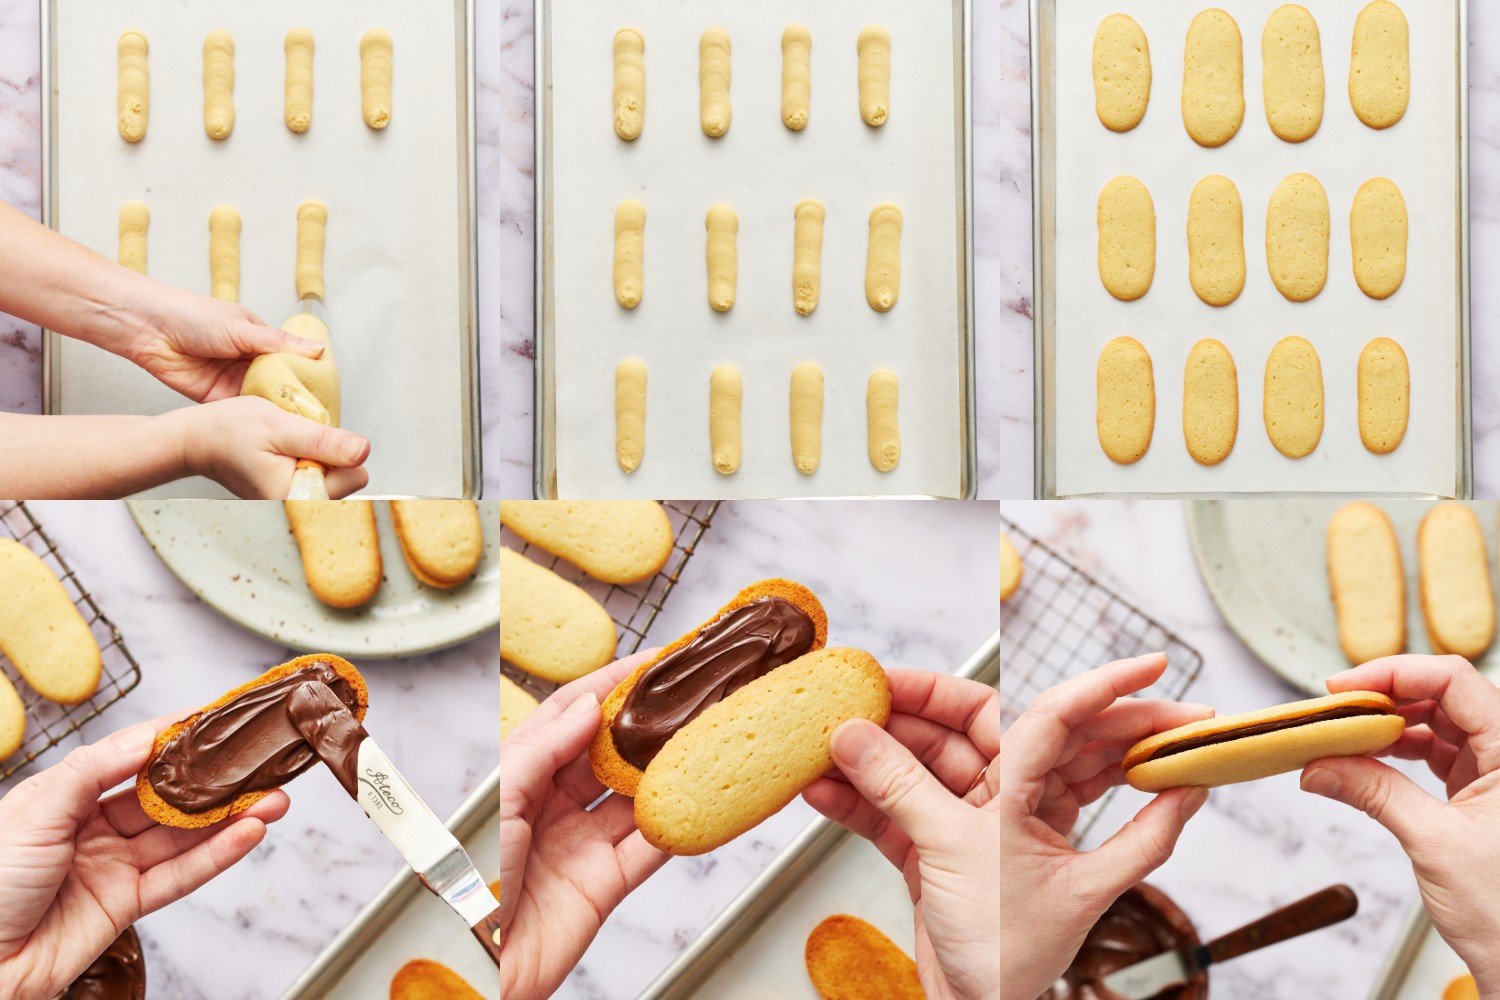
How to Pipe Milano Cookies
- As you pipe, press into the dough slightly so it doesn’t mound too much.
- Stop squeezing the dough before you pull away to avoid creating a pointed tip.
- Don’t worry about any lumps or bumps, as they’ll smooth out when baking.
- If you want to ensure uniformity in the cookies, you can draw a guide on your parchment paper using a ruler and a pencil. Draw 3-inch lines spaced an inch or two apart, flipping the parchment over so the pencil lines don’t get on the cookies. Eyeballing it works just fine, too!
Milano Cookie Recipe Tools
For these Homemade Milano Cookies, there are a few small and inexpensive tools that make them much easier:
- Ateco plain tip (#808) and a disposable piping bag to pipe out uniform logs of cookie dough.
- You can also use a quart-size bag and simply snip a 3/4-inch hole in the bottom corner to pipe the dough.
- Use a small offset spatula to spread the filling over the cookies.
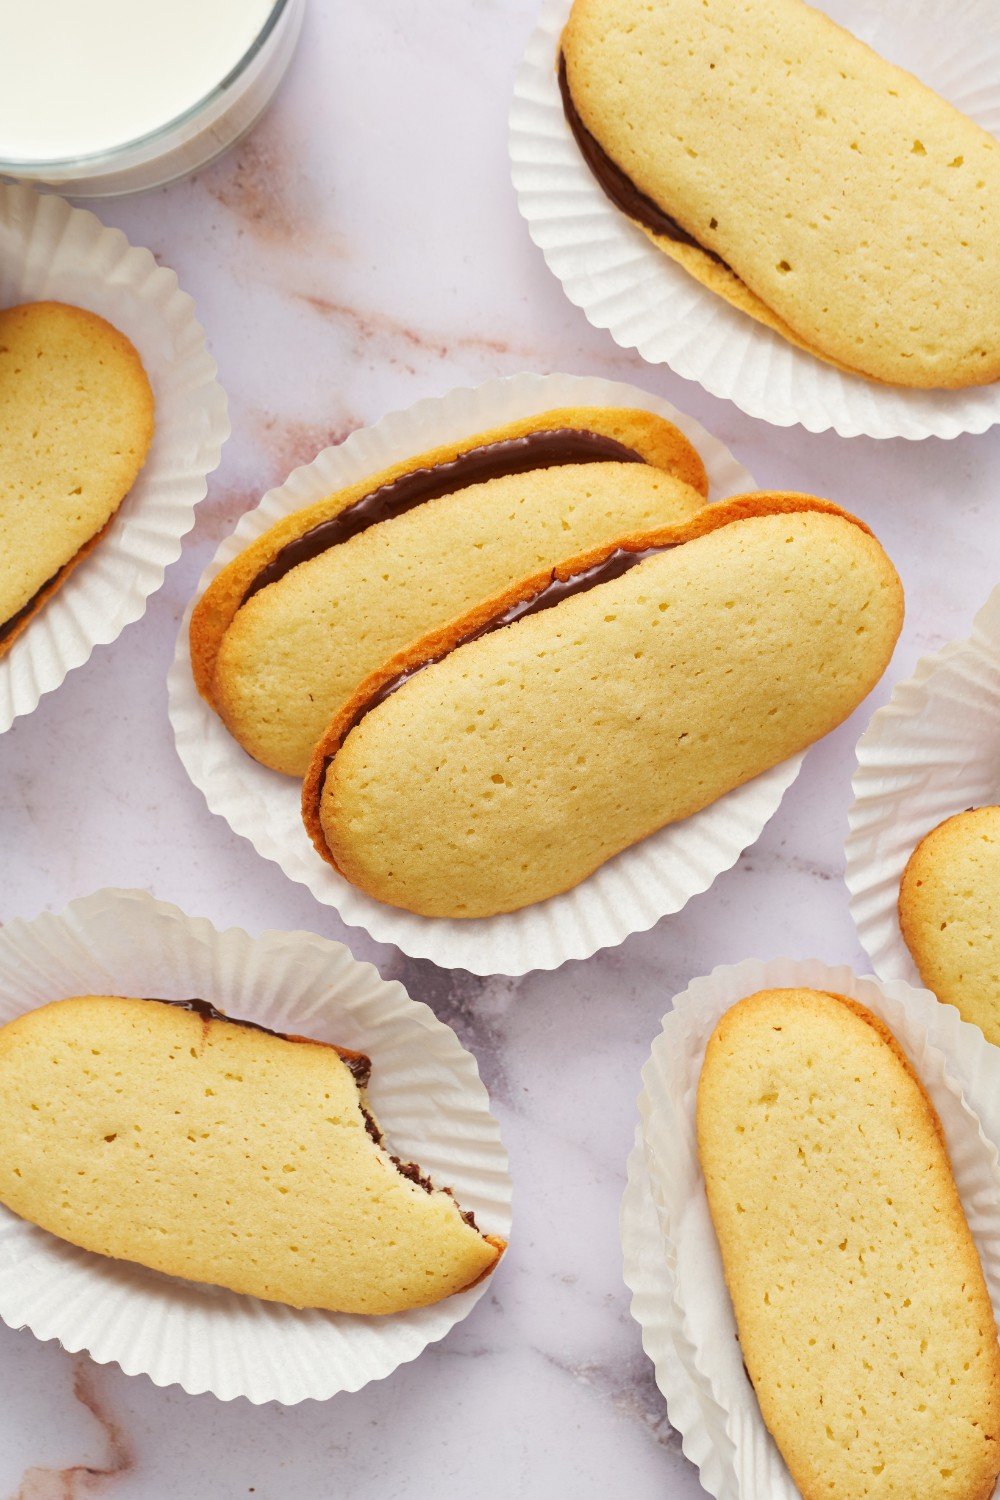
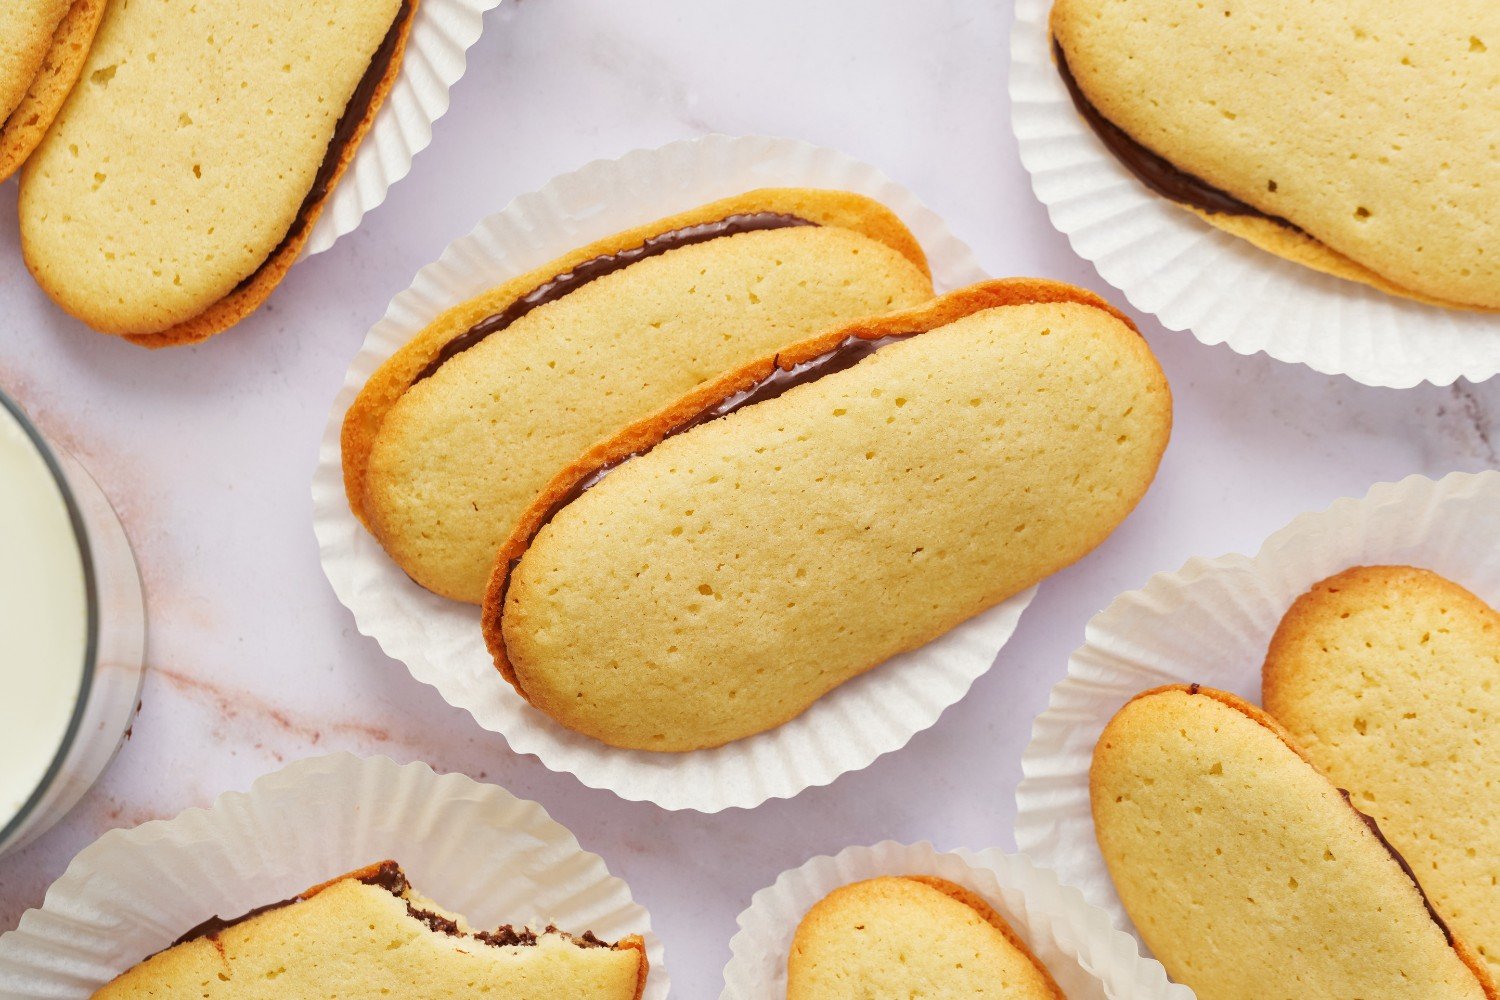
- Place cookies in jumbo paper cupcake/muffin liners before serving so they look just like packaged Milanos!
- I also recommend using a high-quality rimmed baking sheet to bake your cookies. Learn more about the best (and worst!) baking pans here.
How to Store Milano Cookies
Store Milano Cookies in an airtight container at room temperature for up to 5 days.
Can You Freeze Milano Cookies?
Yes, but for the best flavor and texture, I recommend freezing the baked, cooled cookies before adding the fillings. Place in an airtight container or a freezer bag for up to a month. Thaw for a few hours and allow to come to room temperature before adding the fillings and assembling.
More Copycat Recipes You’ll Love:

Email This Recipe
Enter your email, and we’ll send it to your inbox.
Ingredients
- 1 stick (113 grams) unsalted butter, at cool room temperature
- 2/3 cup (133 grams) granulated sugar
- 1 teaspoon vanilla
- 1 large egg, at cool room temperature
- 1 1/4 cups (159 grams) all-purpose flour
- 1/2 teaspoon fine sea salt
- 4 ounces (113 grams) semisweet chocolate chips

Mint Layer (optional)*
- 3/4 cup (94 grams) powdered sugar
- 1/4 teaspoon pure peppermint extract
- 3-4 teaspoons water
Instructions
- In the bowl of an electric mixture, use the paddle attachment to beat the butter and granulated sugar on medium-high speed until light and fluffy, about 3 minutes. Scrape down the bowl. Add the vanilla and egg and beat to combine. With the mixer on low, gradually add the flour and salt and beat until just combined.
- Transfer dough to a quart-size zip-top bag. With scissors, snip a 3/4-inch hole in one corner (or use a pastry bag with a plain tip). Pipe about 24 logs about 3 inches long, spacing 1/2 inch apart, onto two parchment-lined baking sheets. For best results, chill until firm, about 30 minutes.
- Preheat the oven to 325°F. Bake until cookies are light golden at the edges, about 15 minutes, rotating sheets halfway through. Transfer to wire racks and let cool.
- Melt the chocolate chips in a small heat-proof bowl in the microwave for about 1 1/2 minutes, stirring every 15 seconds, until smooth.
- If desired, in a separate bowl, whisk together powdered sugar, peppermint extract, and 3 to 4 teaspoons of water.
- With a small offset spatula, spread the melted chocolate on the flat side of half the cookies and mint glaze on the other half (if using). Sandwich cookie halves together.
- Cookies can be stored in an airtight container up to 5 days.
Notes
This post was originally published in 2016 and has been updated in 2024 with new photos, weight measurements, additional recipe tips, and a step-by-step video. Photos by Joanie Simon.


omg best thing I’ve ever made! These Milanos are foolproof, they were (in my opinion) fun to make. The only frustrating thing was putting the batter/dough into a piping bag… things got messy, but that’s part of the fun 🙂
To get through the pandemic, my family and I are mailing each other homemade cookies and book! We love milanos so I’d love to surprise them with these! The only problem is that I don’t have a piping tube or bag. And of course no shopping allowed! Is there a DIY substitute? I do have ziploc bags. Also, do you know if I can make the mint part from candy canes? Got some of those, too. Thanks a lot!
So impressed with myself LOL. Follow Tessa’s recipe exactly as written and you will have homemade Milano cookies! Yum. The most difficult part was squeezing cookie dough out of pastry bag as it is a bit thick. Consider it a gym day! 🙂
I was convinced I’d screw up the texture somehow, as I was mixing entirely by hand and this recipe contains no obvious source of puffiness, but I didn’t! The texture is perfect. The taste is lovely. It is noticeably different from the store-bought version but in a pleasant way.
I don’t know what happened but my cookies never spread! They just remained like little logs/fingers. Tasted great but unusable as a Milano dupe.
Hi,
I am trying to watch the video for making Homemade Milano Cookies, but there doesn’t seem to be anything to tap on to play it. Is it still available for viewing and if so, how can I get to it? Thank you.
I made the Milano Cookies today. They taste really good. I made some with just chocolate and some with the mint. I made the mint filling and it was way too strong for me, so I made another batch with 1/4 cup sugar and a smidgen of extract. It was better. Next time I am going to use Hershey’s Mint Chocolate Chips or add the extract to the chocolate instead of using the confectioner’s sugar. Overall, a very good cookie.
Love Milano cookies, unfortunately for me, they are a bit sweet. Know with this recipe I can adjust the sugar or add a different type of sweetener. Thank you so much for this and all the other recipes.
Hi Tessa, I watched your video & love the milano cookie recipe and am anxious to try it. You make it look so easy & you take the time to show all the steps for making the recipe and the finished product.
Thank you so much & I’m looking forward to checking out more of your recipes.
Norma
Yay so excited to try these! I recently gave up Milano cookies because they contain Palm Oil 🙁 These look like the perfect replacement!
Hi Tessa! I was wondering if you could use brown sugar instead of granulated to make the cookies. Thanks!
Hi Jo, no unfortunately they won’t quite be like Milano Cookies if you make that change.
Hello Tessa,
Thank you for all the yummy recipes and beautiful pictures you’ve posted.
I was looking over some of your recipes and I have a question about the ratios posted.
I always use a scale and weigh when baking and not use the American cups measuring system. And I’ve noticed some inconsistencies in the weights/cups you’ve provided in your recipes.
For example, the ones above:
1 stick of butter is normally 113-115 grams, but above has stated 133g.
2/3 cup of granulated sugar is 135g, which you have 132g above, which is very close.
1-1/4 cups of AP flour is 175g, but you have 159g.
I assume a couple of the weight differentials are probably typos, but I just wanted to double check with you if you normally make your recipes with the US cups to bake or do you usually use a scale to weigh everything? I needed to know to make sure which ingredients weight I should be following.
I’ve checked in multiple websites, sources and tested myself on the ingredients conversions, I’m fairly sure what I have is correct. If i’m not, please feel free to correct me. Thank you very much!