


Tessa's Recipe Rundown
Taste: Mild chocolate flavor to let those mix-ins really shine.
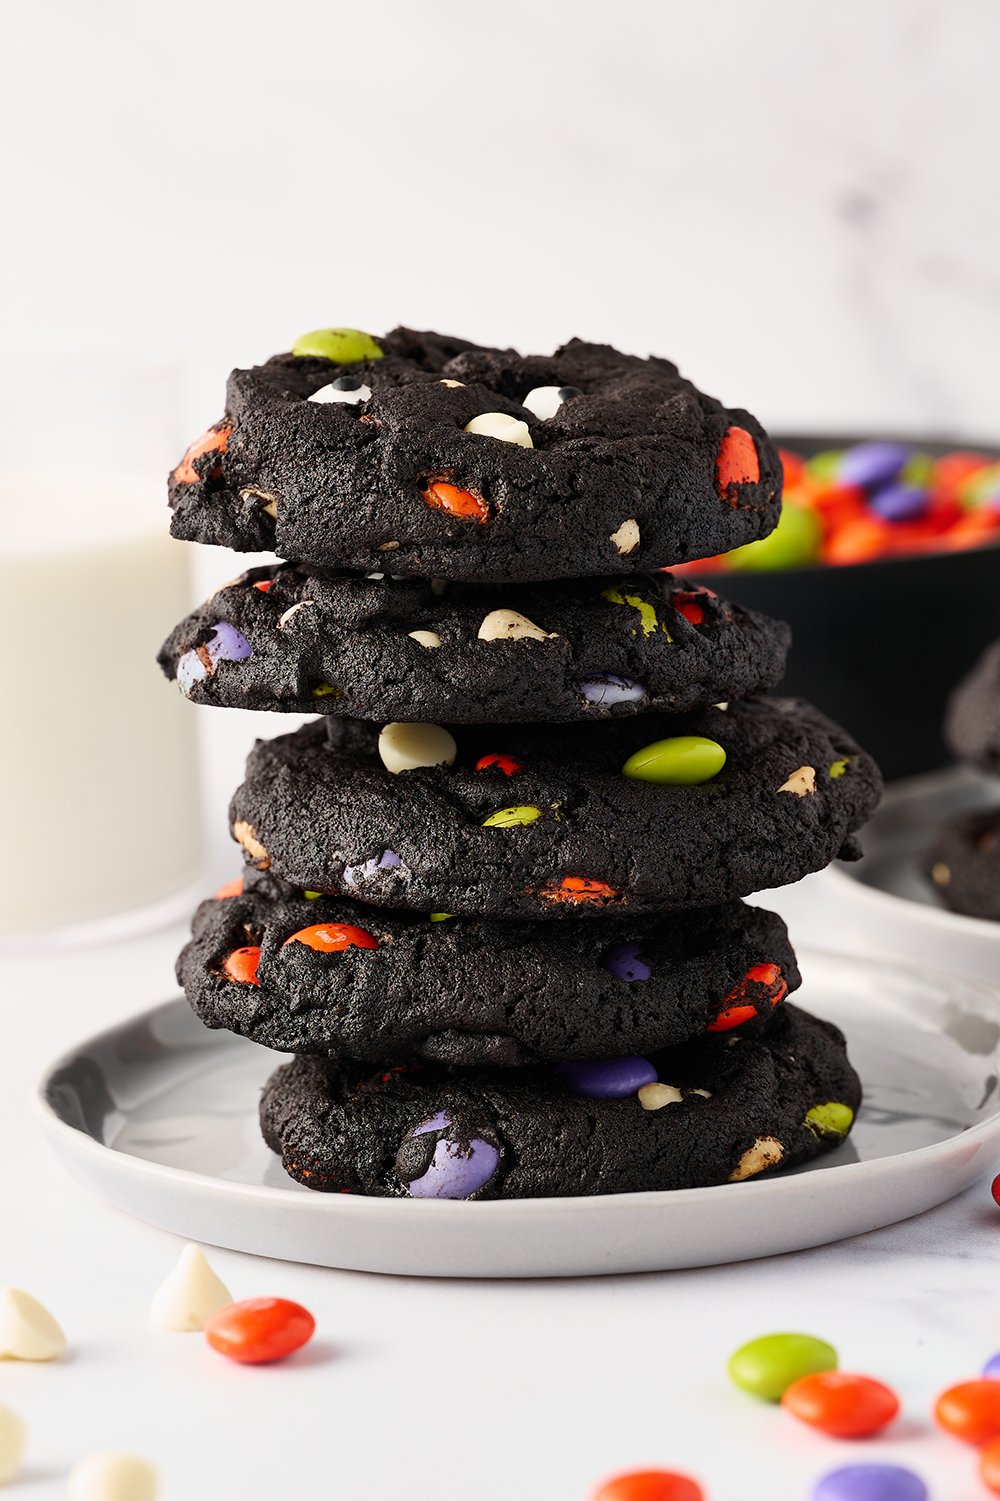
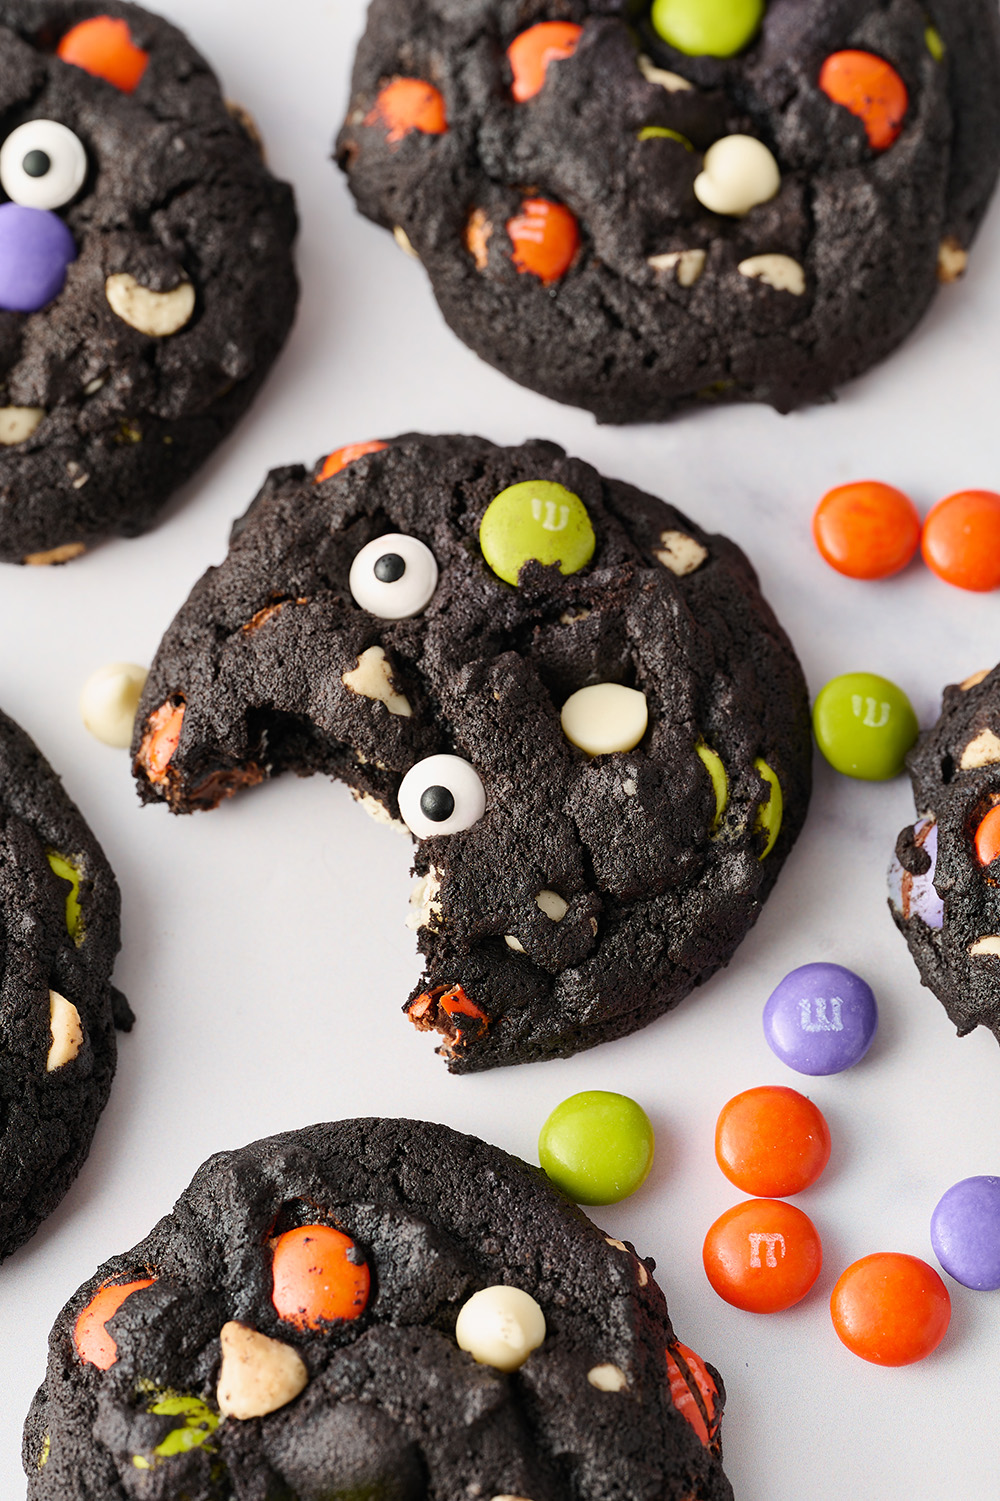
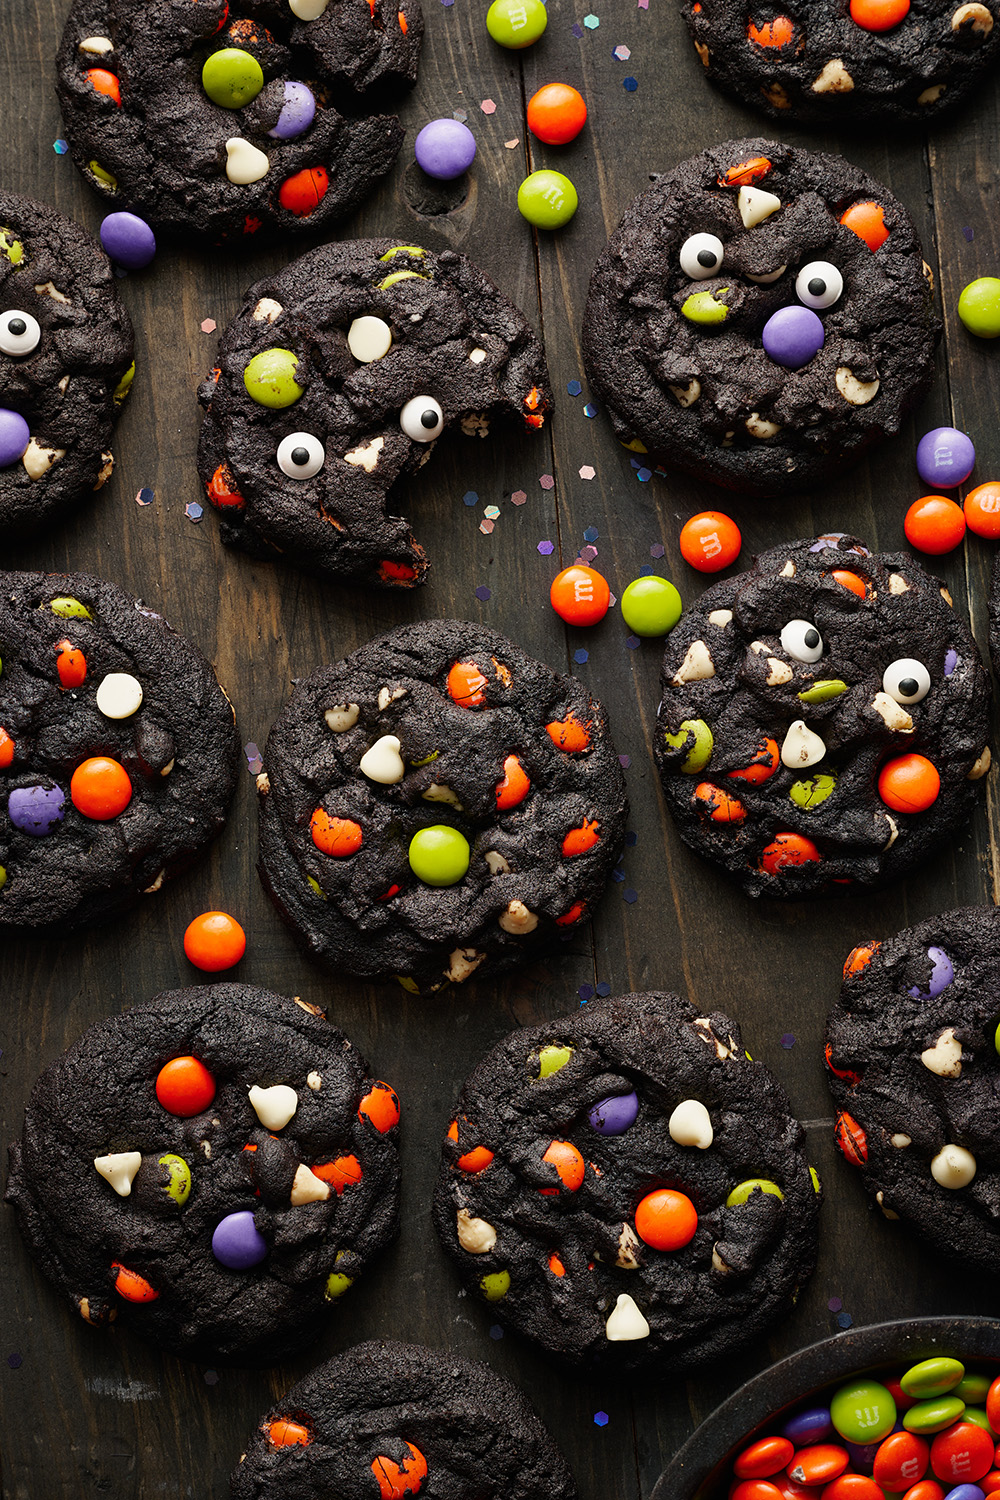
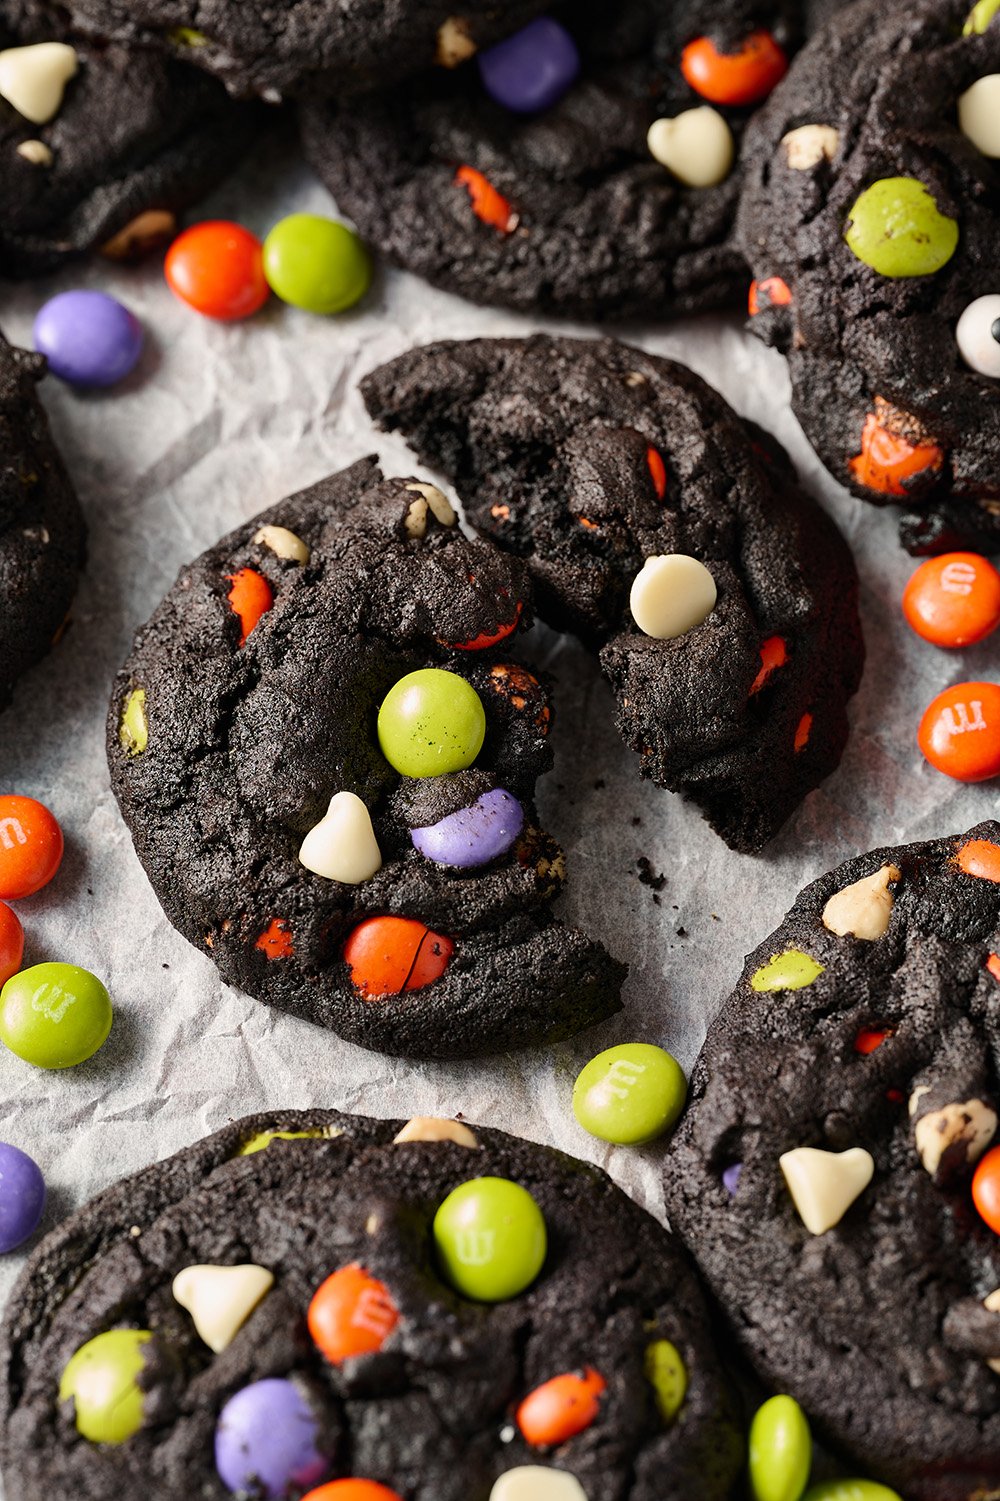
Texture: The cookie is ultra soft and chewy with blissful crunches from the Halloween M&Ms and googly candy eyes.
Ease: SO easy to make.
Pros: The cutest (yet easiest!) Halloween cookie recipe.
Cons: None.
Would I make this again? Yes, these are the perfect Halloween dessert.
This post may contain affiliate links. Read our disclosure policy.


Festive and easy, these Halloween Cookies are an absolute must-make for your friends and family for a spooky movie night at home or for the Halloween block party!
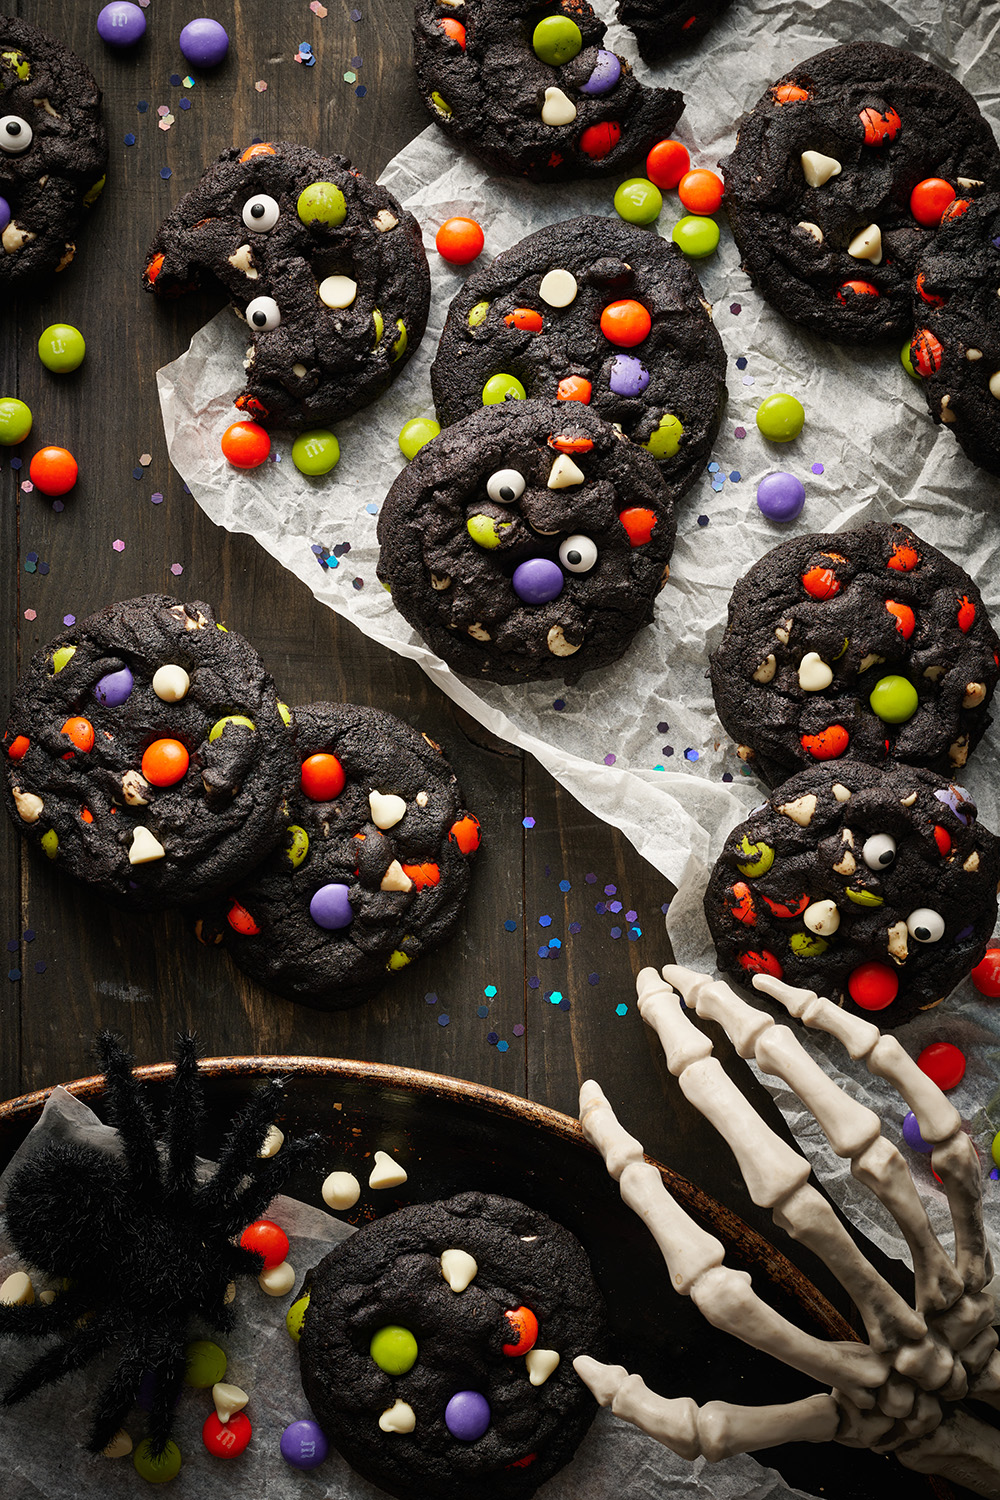
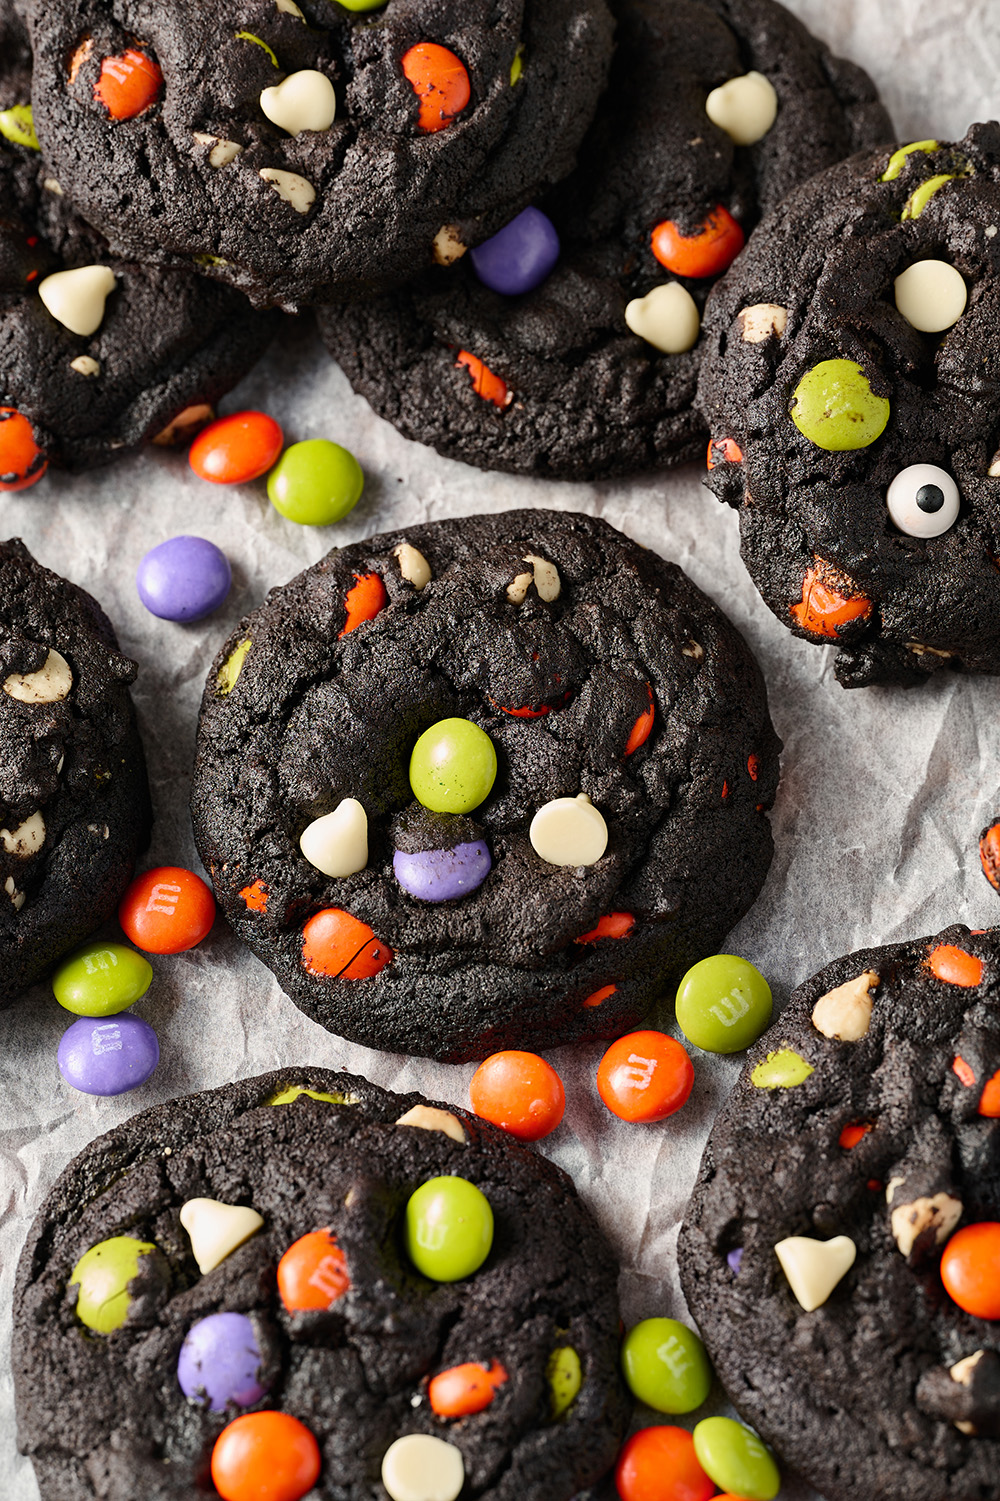
No tricks here, just a delicious treat! These cookies are filled with orange, purple, white, and green M&Ms (the seasonal “Ghoul Mix” M&M bags) for the most adorable Halloween cookies. We even added edible googly eyes to some of the cookies to create perfect monster cookies! How cute are they?!
They’re so easy to make, too. No crazy decorating with royal icing required! Plus, these are so fun to get the kids involved with baking up a spooky treat together.
If you make these for your Halloween party, you might want to make a double batch. They go fast! 😉
These are one of my favorite Halloween treats to make each year, and I hope you love this recipe as much as I do (and the guests who have enjoyed them off my dessert table too!).

Sprinkle of Science
How to Make Halloween Cookies
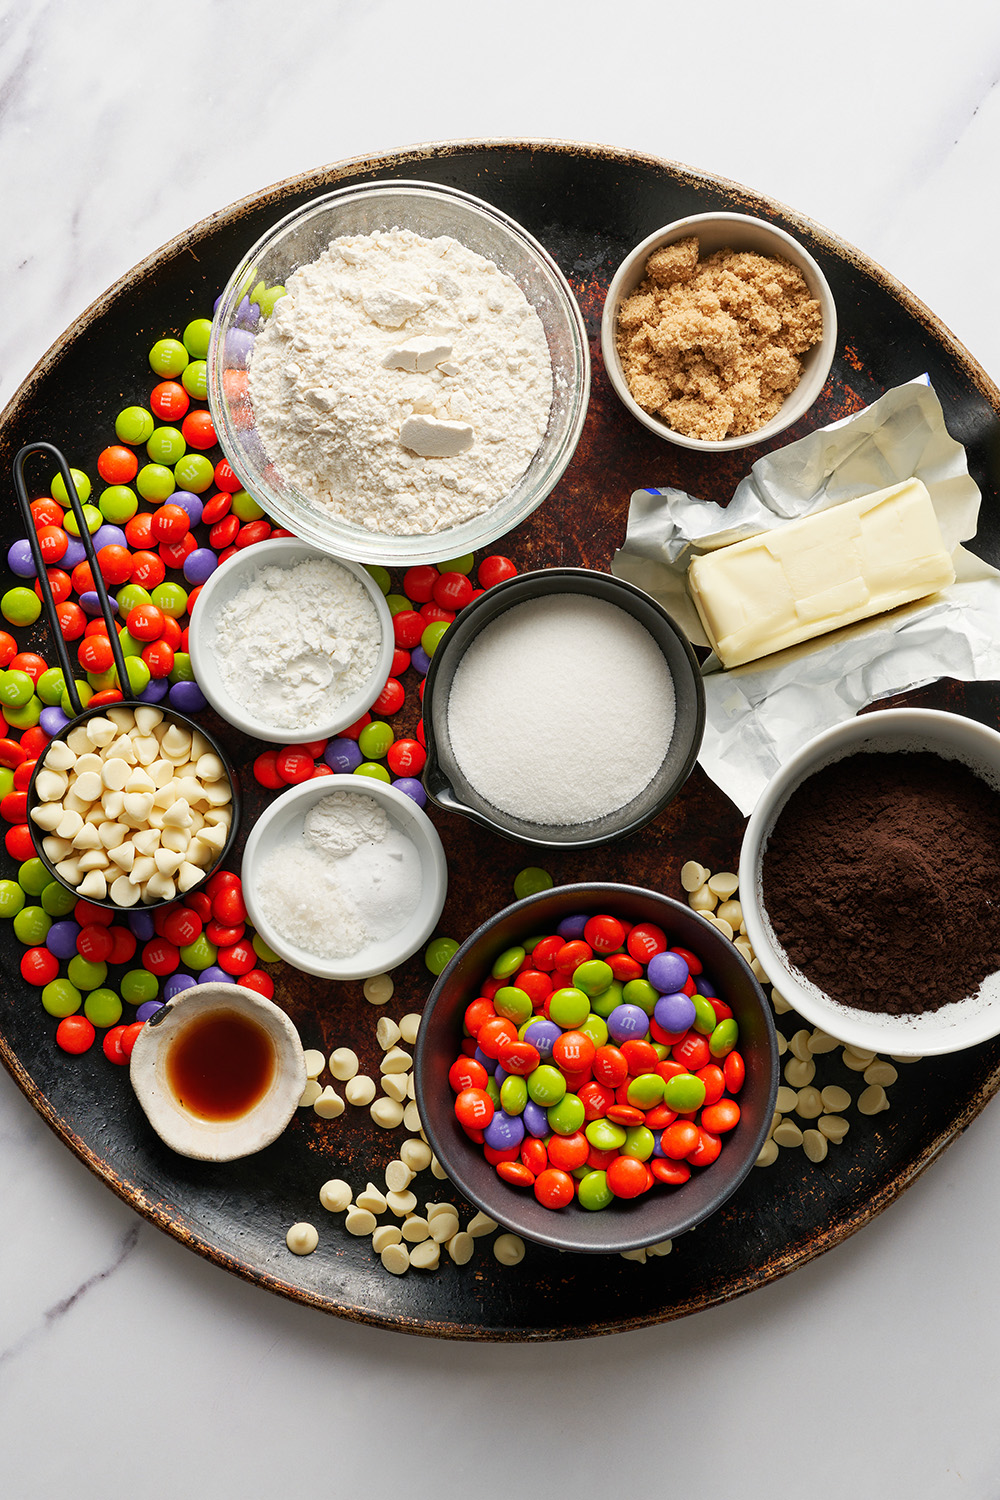
Ingredients for Easy Halloween Cookies:
- All-purpose flour – Be sure to measure your flour correctly! If you add too much flour, you may end up with tough cookies that don’t spread, are cakey, dry, or taste bland.
- Black Cocoa powder or Dutch-process cocoa powder – Black cocoa can be ordered online and will provide that festive deep dark color. It also makes the cookies taste like Oreos! If you can’t find Black cocoa, feel free to use Dutch-process cocoa powder instead. Learn more about Dutch-process cocoa here. Be sure to also measure your cocoa correctly, as cocoa powder is a drying ingredient and too much will dry out your cookies.
- Baking soda & baking powder – Check out my Baking Soda vs. Baking Powder article to learn about the surprising differences between these two leaveners!
- Cornstarch – To keep the consistency of these cookies soft and tender.
- Salt – Enhances the flavor.
- Granulated sugar and light brown sugar – For sweetness, moisture, and flavor. Do not reduce the sugar – learn why here.
- Butter – Always use unsalted butter in baking, at a cool room temperature (around 67°F is perfect). Learn why butter temperature is important in baking here.
- 1 egg – At room temperature.
- Vanilla extract – For flavor.
- White chocolate chips & Halloween-themed M&Ms – For flavor, and to bring a super fun Halloween-y flair to our cookies!
- Candy googly eyes – For so much additional fun!!

What Type of Cocoa Powder to use for Double Chocolate Halloween Cookies?
I recommend using Black Cocoa for the best visual effect and for a tasty flavor (think Oreos – not super rich in chocolaty flavor, but a distinct flavor nonetheless). It can be difficult to source in stores but can be purchased easily online here. Alternatively, you can also use Dutch-process cocoa – just note that this will make your cookies lighter and more brown in color. My favorite brands of Dutch-process cocoa powder are E. Guittard, Penzeys, Bensdorp, or Valrhona. Regardless of cocoa type, be sure to sift it to avoid clumps of cocoa in your cookies!
How to Make Double Chocolate Halloween Cookies:
- Cream the butter and sugars. In the bowl of a stand mixer fitted with the paddle attachment, beat the butter and sugars together on medium speed until light and fluffy, about 3 minutes.
- Add the vanilla and egg. Scrape the bowl down before adding in the vanilla extract and the room temperature egg, beating well to combine.
- Combine the dry ingredients. Sift together the flour, cocoa, cornstarch, salt, baking soda, and baking powder. Gradually add in the dry ingredients to the wet ingredients and beat until a slightly sticky dough forms.
- Add the chocolate. Fold in the white chocolate chips and M&Ms with a rubber spatula.
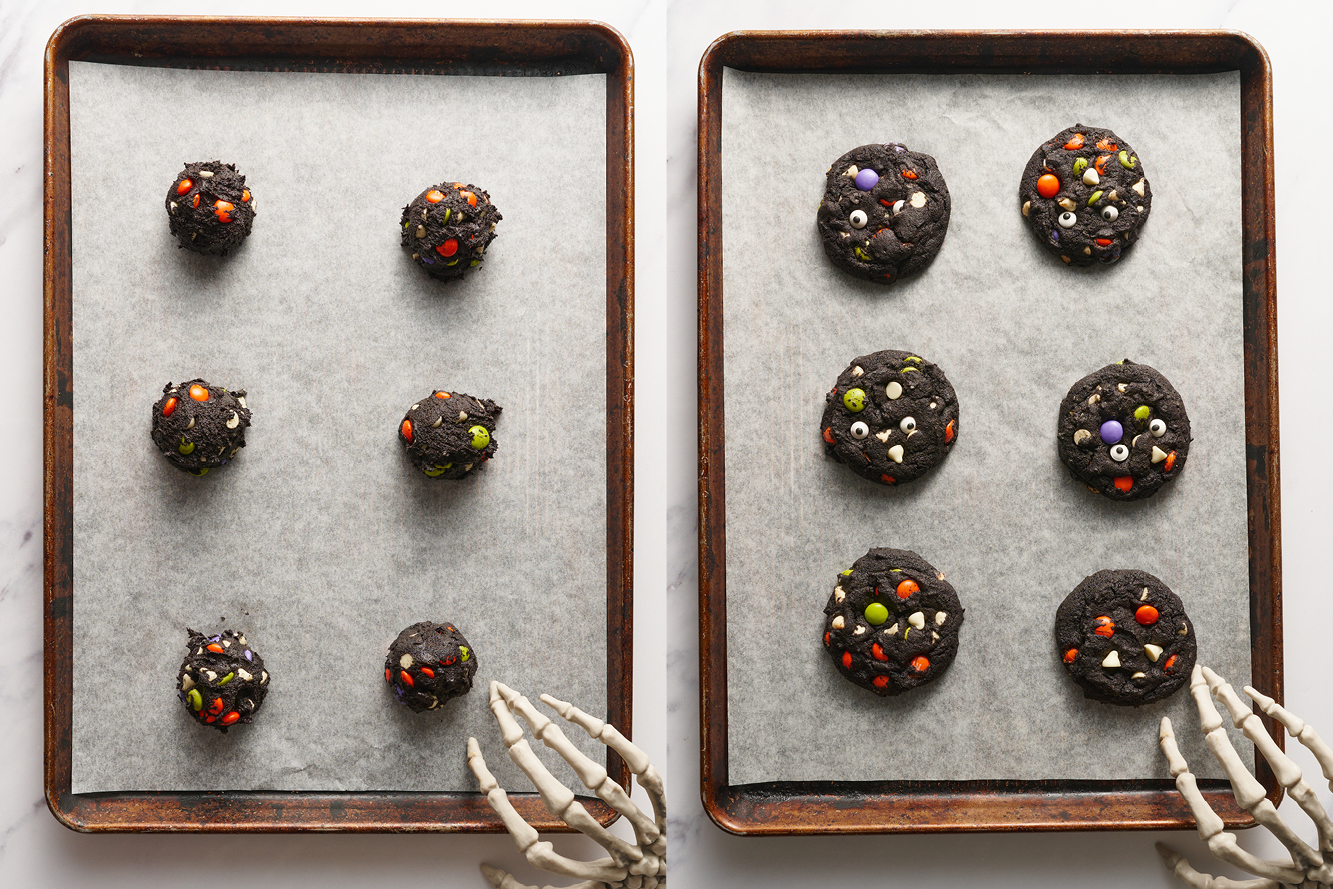
- Portion out the cookies and decorate. Using a large spring-loaded scoop, drop 3-tablespoon sized balls of dough onto the prepared baking sheets, spacing them at least 2 inches apart. Dot the balls of cookie dough with extra chips, M&Ms, and candy eyeballs.
- Bake. At 350°F for about 12 minutes, until puffy but still soft, being careful not to overbake.
Allow to cool slightly on the baking tray. Allow to cool on the baking sheet for 5 minutes, before removing to a wire rack to cool completely.

Can I Change up the Mix-Ins?
Yes! You can absolutely switch out the white chocolate chips and Halloween-themed M&Ms for just about whatever you like! Just be sure to keep the total weight (or volume) the same as written in the recipe as well as using similarly sized mix-ins so the cookie dough balls stay together. Here are some Halloween cookie mix-in ideas:
- Dark chocolate chips
- Semi-sweet chocolate chips
- Reese’s Pieces
- Well-chopped candy bars
Can I Make These into Halloween Cookie Bars?
Yes! These work beautifully as cookie bars. Here’s how:
Preheat oven to 350°F. Line a light-colored metal 8×8-inch baking pan with parchment paper or aluminum foil and use metal binder clips to secure in place. Make the recipe as instructed, then place the cookie dough in the prepared pan. Decorate the top with additional M&Ms, white chocolate chips, and candy eyeballs as desired. Bake for 25-30 minutes, or until the edges appear set but the center still jiggles slightly. Allow to cool before removing from the pan and slicing into 16 bars.
How to Store Double Chocolate Halloween Cookies
These are best enjoyed when fresh, but they will keep in an airtight container at room temperature for up to 5 days. Be sure they are completely cooled before storing. See right below for my top cookie storage tips!
How to Keep Cookies Soft
To keep your baked Halloween Cookies soft, you can add an apple wedge, piece of bread, or a tortilla on the top and bottom of the cookies to the container a day or two after baking them, or whenever you find the texture beginning to harden. The moisture from this will migrate to your cookies, making them soft and chewy again. A tortilla is a favorite of mine because it takes up much less room than a slice of bread and doesn’t transfer any flavors or aromas like an apple wedge can.
Alternatively, you can freeze the cookie dough so you can just bake off what you need, then store the rest in the freezer until you next crave fresh chocolaty cookies! More on this below.
Can you Freeze Double Chocolate Halloween Cookies?
I love the taste of cookies straight from the oven best (who doesn’t!?). I always keep pre-scooped balls of various types of cookie dough in a resealable bag in my freezer, so I can bake cookies off and have them warm from the oven in a matter of minutes whenever I want! Find all my tips for freezing cookie dough, and baking from frozen here.

Email This Recipe
Enter your email, and we’ll send it to your inbox.
Ingredients
- 1/2 cup (113 grams) unsalted butter, at cool room temperature
- 1/2 cup (100 grams) granulated sugar
- 1/4 cup (50 grams) brown sugar
- 1 teaspoon vanilla extract
- 1 egg, at room temperature
- 1 cup (127 grams) all-purpose flour
- 1/2 cup (43 grams)
black cocoa powder (or Dutch-process), sifted - 1 tablespoon cornstarch
- 1 teaspoon fine sea salt
- 1/2 teaspoon baking soda
- 1/4 teaspoon baking powder
- 1/2 cup (85 grams) white chocolate chips, plus more for garnish
- 1 cup (218 grams) Halloween M&MS, plus more for garnish
Edible candy eyeballs , for garnish

Instructions
- Preheat oven to 350 degrees F. Line baking sheets with parchment paper.
- In the bowl of a stand mixer fitted with the paddle attachment, beat the butter and sugars together on medium speed until light and fluffy, about 3 minutes. Scrape the bowl down before adding in the vanilla extract and egg, beating well to combine.
- In a separate bowl, whisk together the flour, cocoa, cornstarch, salt, baking soda, and baking powder. Gradually add in the dry ingredients to the wet ingredients and beat until a slightly sticky dough forms. Fold in the white chocolate chips and M&Ms with a rubber spatula.
- Using a large spring-loaded cookie scoop, drop 3-tablespoon sized balls of dough onto the prepared baking sheets, spacing them at least 2 inches apart. Dot the balls of cookie dough with extra chips, M&Ms, and candy eyeballs. Bake for about 12 minutes, until puffy but still soft, being careful not to overbake. Allow to cool on baking sheet for 5 minutes before removing to a wire rack to cool completely.
Notes
Preheat oven to 350°F. Line a light-colored metal 8×8-inch baking pan with parchment paper or aluminum foil and use metal binder clips to secure in place. Make the recipe as instructed, then place the cookie dough in the prepared pan. Decorate the top with additional M&Ms, white chocolate chips, and candy eyeballs as desired. Bake for 25-30 minutes, or until the edges appear set but the center still jiggles slightly. Allow to cool before removing from the pan and slicing into 16 bars.
Photos by Joanie Simon.


These are so delicious and fun to make! I made these with my 3-year-old in preparation for spooky season and she had a blast! We swapped out the regular m&ms for peanut butter m&ms and they were so yummy! We will definitely be making these again soon.
Love the addition of peanut butter M&M’s, yum! Glad you had a fun baking day together! 🙂
So so delicious! I am a huge fan of black cocoa
These cookies are so perfect for Halloween
There are so tasty and fudgy. Easy to Make and they will go fast. Fun to substitute any favorite candy…
hi! What brand(s) of black cocoa powder do you reccomend?
Hi Katrina! Our team’s favorites include The Cocoa Trader, King Arthur Baking, and Modern Mountain, and Anthony’s. Hope that helps, can’t wait for you to enjoy these cookies 🙂
Thank you for the recipe, they look delicious! I am planning to bake these cookies for Halloween this year. Whenever I baked cookies from scratch, I notice they tend to turn hard instead of chewy after taking it out of the stove. For these cookies, would you recommend that I adjust the stove temperature to a lower temperature and still bake it to 12 minutes?
Hi Christine! There are a few things that can make your cookies hard. You can definitely err on the side of caution and take these cookies out a couple minutes early, but here are some additional things to consider:
– Your oven might be running a little hot. Do you have an oven thermometer to check that? Check out Tessa’s article here about ovens, full of tips!! If you don’t have an oven thermometer to ensure your oven is at the temperature it says it is, invest in one now! They are inexpensive and really help your baking so much! This oven thermometer is one of Tessa’s favorites.
– How do you measure your ingredients? By volume (using cups), or by weight (using a digital kitchen scale)? When measuring by volume, it’s so easy to mis-measure ingredients (particularly flour) and throw off the entire chemistry of a recipe – and end up with hard, dry, or crumbly cookies, rather than nice chewy cookies. Check out Tessa’s article here, where she talks about how to best measure ingredients to ensure accuracy every time.
– What type of pan are you baking on? Different materials of pans conduct heat differently, so some will cook too aggressively, and change the texture of the baked cookie. Tessa discusses and shows the differences between a variety of baking pans in this article here!
– This isn’t entirely necessary for this specific recipe, but have you ever tried chilling your dough? Most cookie doughs benefit greatly from a refrigerated rest period of 24 – 72 hours to maximize the flavors and textures. Learn more about that here! Think of it like marinating meats, but for cookies! All that depth of flavor + additional chewiness happens while the dough rests.
– Finally, double check that your leavening agents are fresh and are not expired. If your baking soda/powder are not fresh, they won’t do their jobs and your baked goods can not rise properly, fall after baking, and much more. They can also lose their effectiveness long before the expiration date on the packaging! Tessa talks about the science behind leavening agents, and how to test for leavener freshness, in this article here!
I hope this helps, and I hope you enjoy these cookies!! Happy baking 🙂
I made these for a Halloween party and one guest asked who made the cookies. When I told him I did, he said they were the best chocolate cookie he’s ever had! Normally, he’s disappointed by chocolate cookies because they are dry and don’t taste much like chocolate, but he was very impressed with these! They have been a hit with my husband and everyone who ate them at the party. Super easy to make and super tasty! Thank you!
So amazing to hear this, Tiffany! So glad these were such a hit with everyone at your party! 🙂
Yes, i made this for halloween, I also make a variation of this recipe that’s always a hit. I do change it a bit as I add a teaspoon of Cayenne pepper which raises it to whole other level!! Yum!!
Ooo, what a fun tweak, Lori!!
Made them 2 days ago. Sending to my kid in college. Kept some for us here. I thought The sea salt was too salty, but tasted another cookie 2 days later and it was so good. Not too salty at all. I will make these again.
So rich and delicious!
I made this patch for my Halloween party and I can’t wait for my guests to try them too! I couldn’t find the Halloween M&Ms from the recipe so I substituted them with Reeses Pieces, and they worked wonderfully. If you want to make a simple but amazing dessert for the spooky season, THIS is it! Thank you for sharing it with us!
So thrilled to hear this!
These are perfectly delicious.
Such a simple, fun, festive and tasty recipe!
I doubled the recipe and used regular Dutch process cocoa. The cookies were fabulous! Tasty and super cute looking!!
I had to go to 3 stores to find Halloween M&M’s but Target came through!!
They’ve been hard to find this year! So glad you enjoyed this recipe, Sabrina 🙂